
Did you know that learners in membership communities see upwards of a 60% improvement in course completion and knowledge retention? Yet, despite these benefits, many educators struggle to set up and manage effective membership platforms.
Enter Tutor LMS—one of the most popular, innovative LMS that’s rapidly becoming a favorite among course creators. Its robust, user-friendly membership feature simplifies building and managing membership sites, making it easier than ever to deliver continuous, high-quality training. With Tutor LMS, you can effortlessly create exclusive, tiered content that engages your audience while driving recurring revenue. In this step-by-step guide, we’ll show you how to harness the power of Tutor LMS to build your own membership site.
Understanding Tutor LMS Membership
Membership sites are more than just a trend—they’re a proven way to build a loyal community and generate recurring revenue. For course creators, memberships offer a steady income stream while providing learners with structured, ongoing access to valuable content. Tutor LMS Membership simplifies this process, allowing you to create subscription-based access to your courses without the hassle of third-party plugins.
With Tutor LMS, you can design flexible membership plans tailored to your audience’s needs. Whether you’re offering a single tier or multiple levels, the platform supports both full-site memberships (access to all courses) and category-based memberships (restricted access to specific topics).
Key Benefits for You and Your Learners:
- For Creators: Recurring payments mean predictable revenue, while built-in tools reduce setup time.
- For Learners: Tiered plans provide affordable entry points, with options to upgrade as their skills grow.
Prerequisites: Installing Tutor LMS & Tutor LMS Pro
Before diving into your membership site setup, let’s ensure your WordPress foundation is ready. Here’s how to install the essential prerequisites:
- Tutor LMS: The core plugin provides the foundational learning management system functionality
- Tutor LMS Pro: This premium extension unlocks the membership capabilities
The Pro version is essential as it contains the payment integration frameworks, subscription management tools, and membership-specific features that power the entire system.
For a visual walkthrough of the installation process, check out this helpful video: How to Install & Activate License in Tutor LMS.
Creating Your Membership Plan: Defining Access and Value
Now that you understand the value of membership offerings, let’s dive into creating your first membership plan in Tutor LMS. The platform makes it straightforward to sell online courses with a subscription model that keeps students engaged and revenue flowing consistently. Let’s break it down step by step:
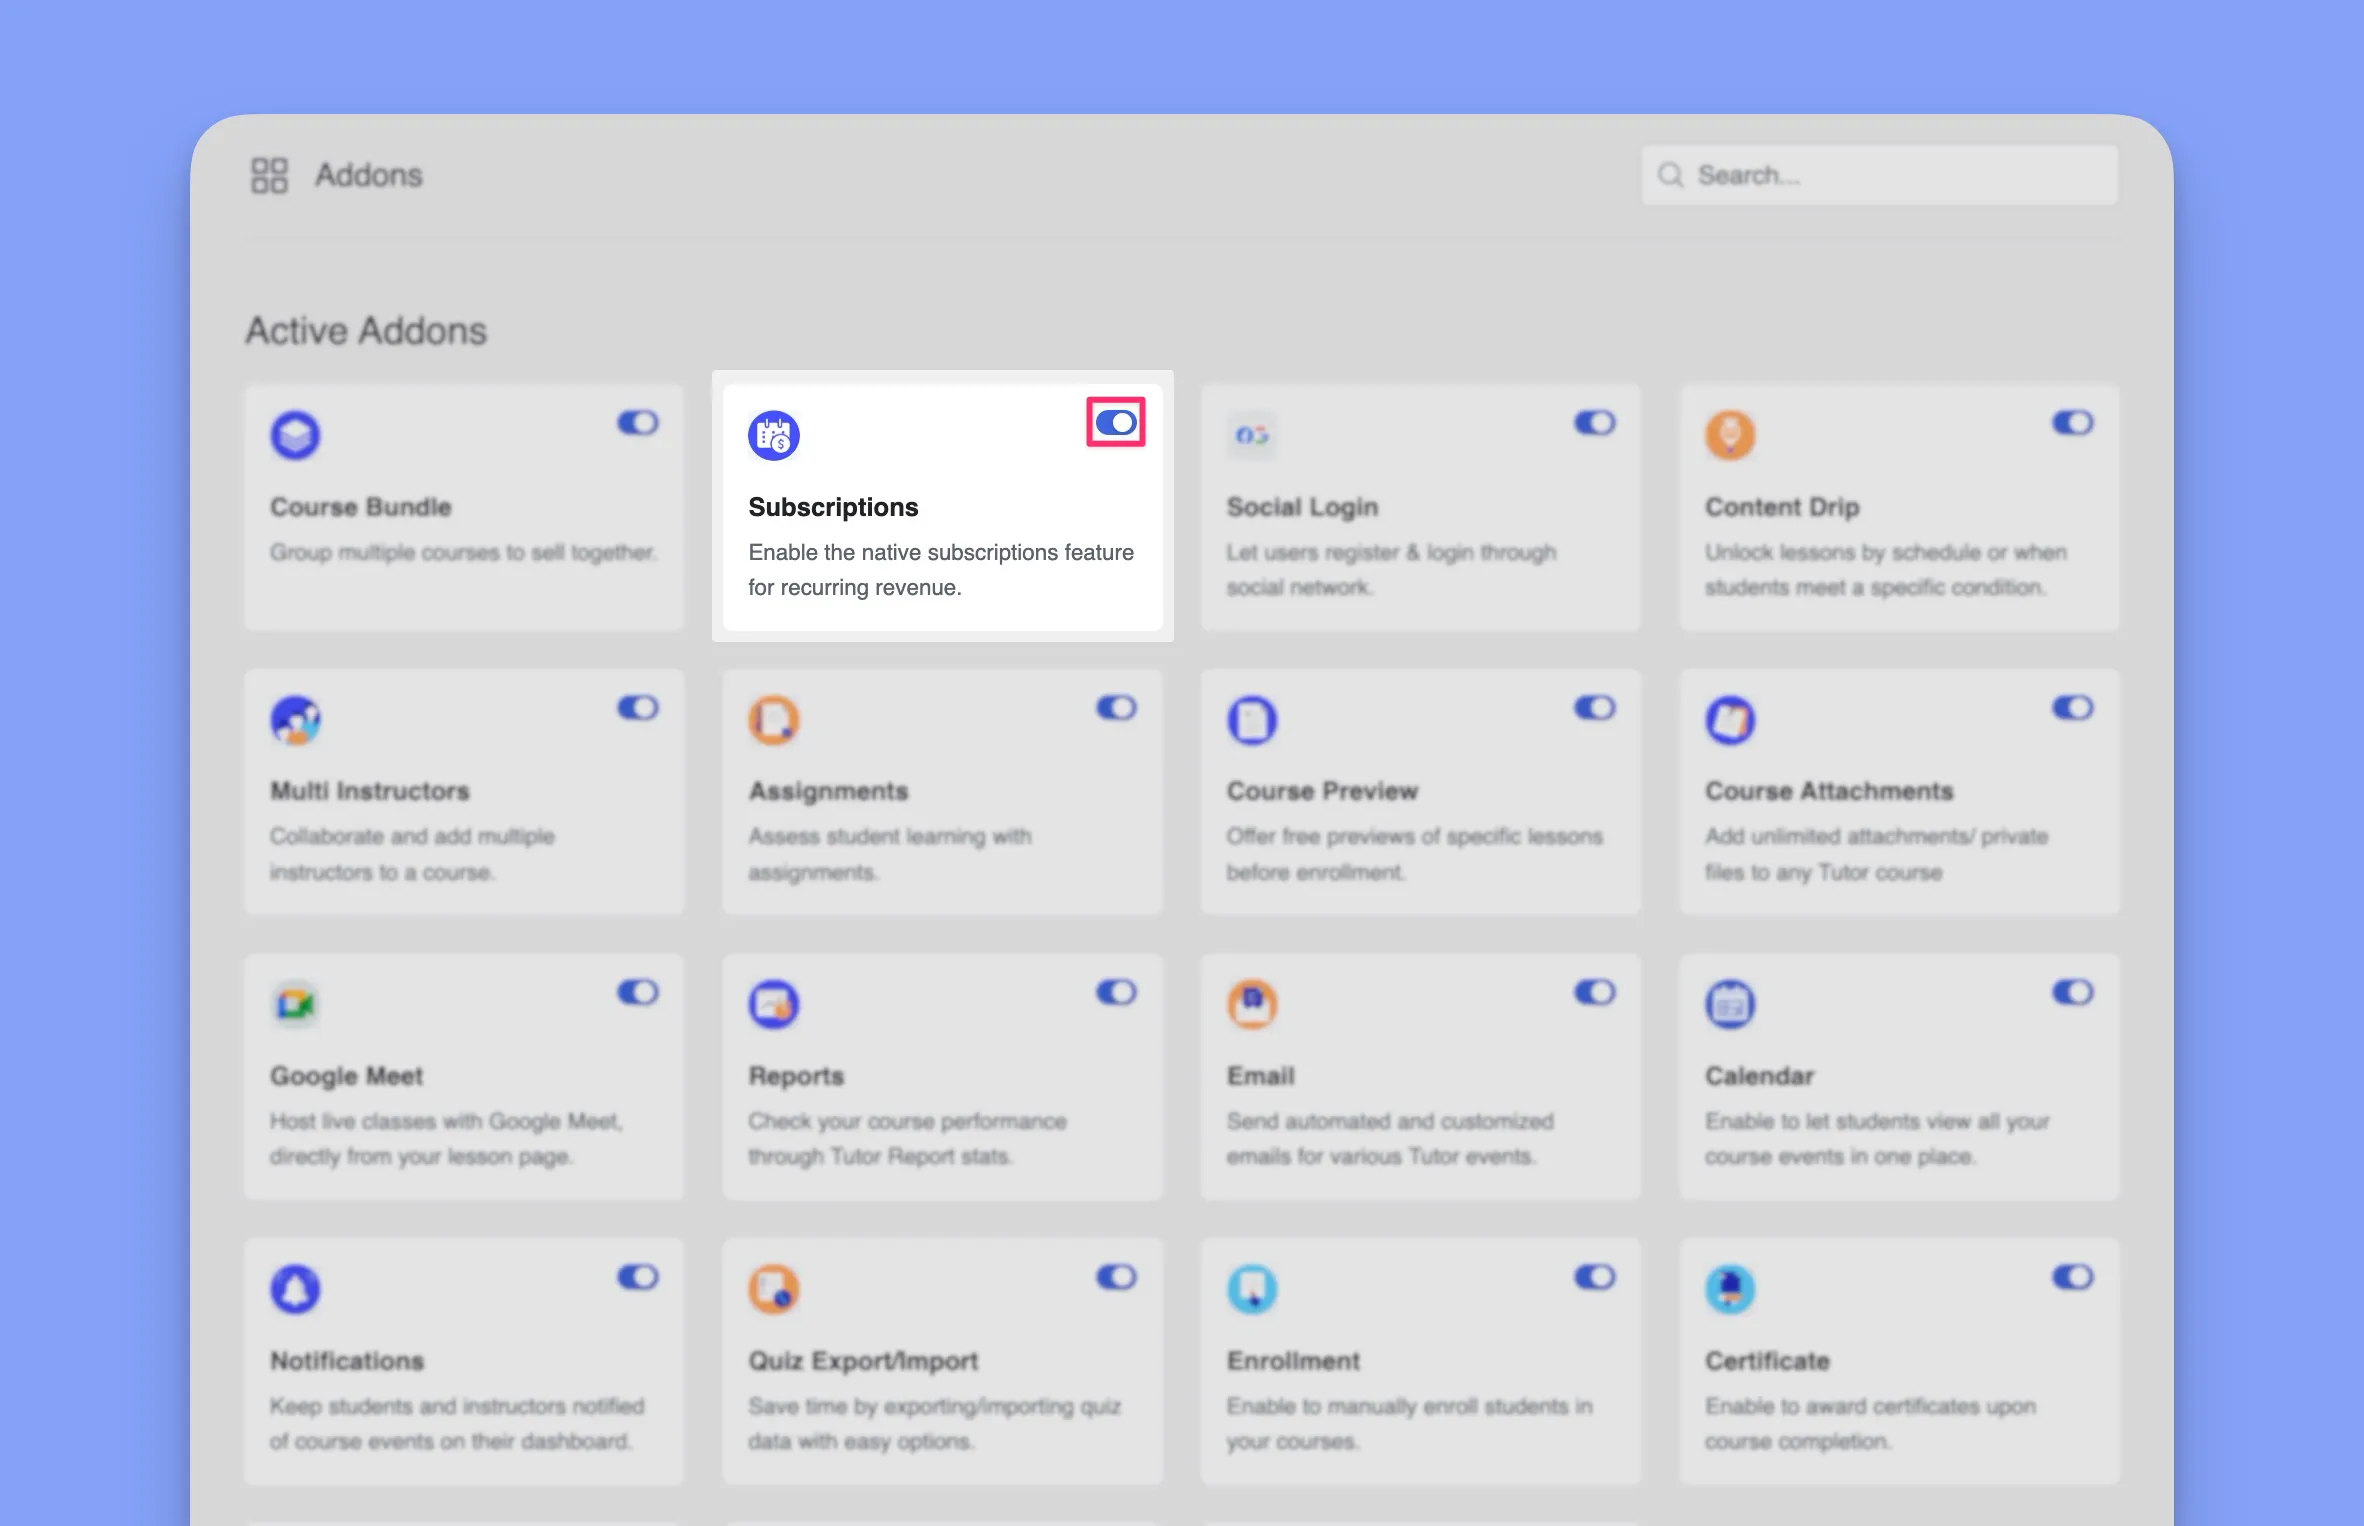
Step 1: Enable the Subscriptions Addon:
Before creating any membership plans, navigate to WordPress Dashboard > Tutor LMS Pro > Addons and activate the “Subscriptions” addon. This unlocks all the subscription-related features you’ll need to build your membership site.
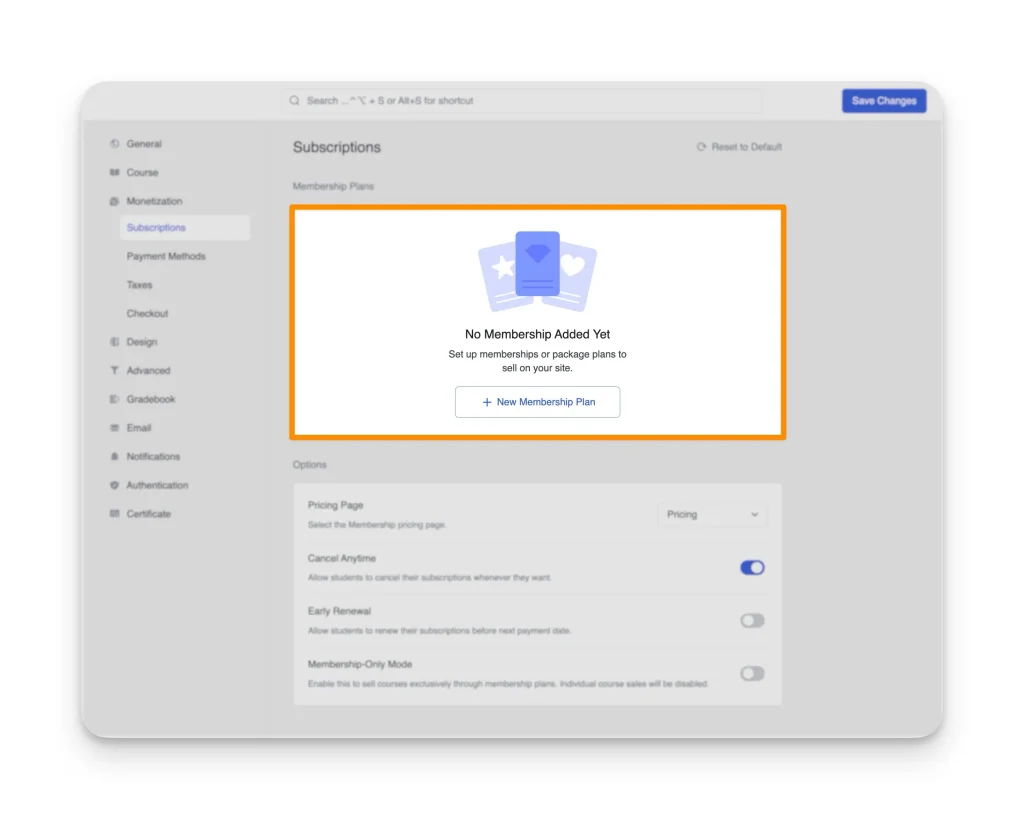
Step 2: Create a New Membership Plan:
Navigate to Tutor LMS Pro > Settings > Subscriptions. This is where you manage your plans. Click “+ New Membership Plan” to get started.
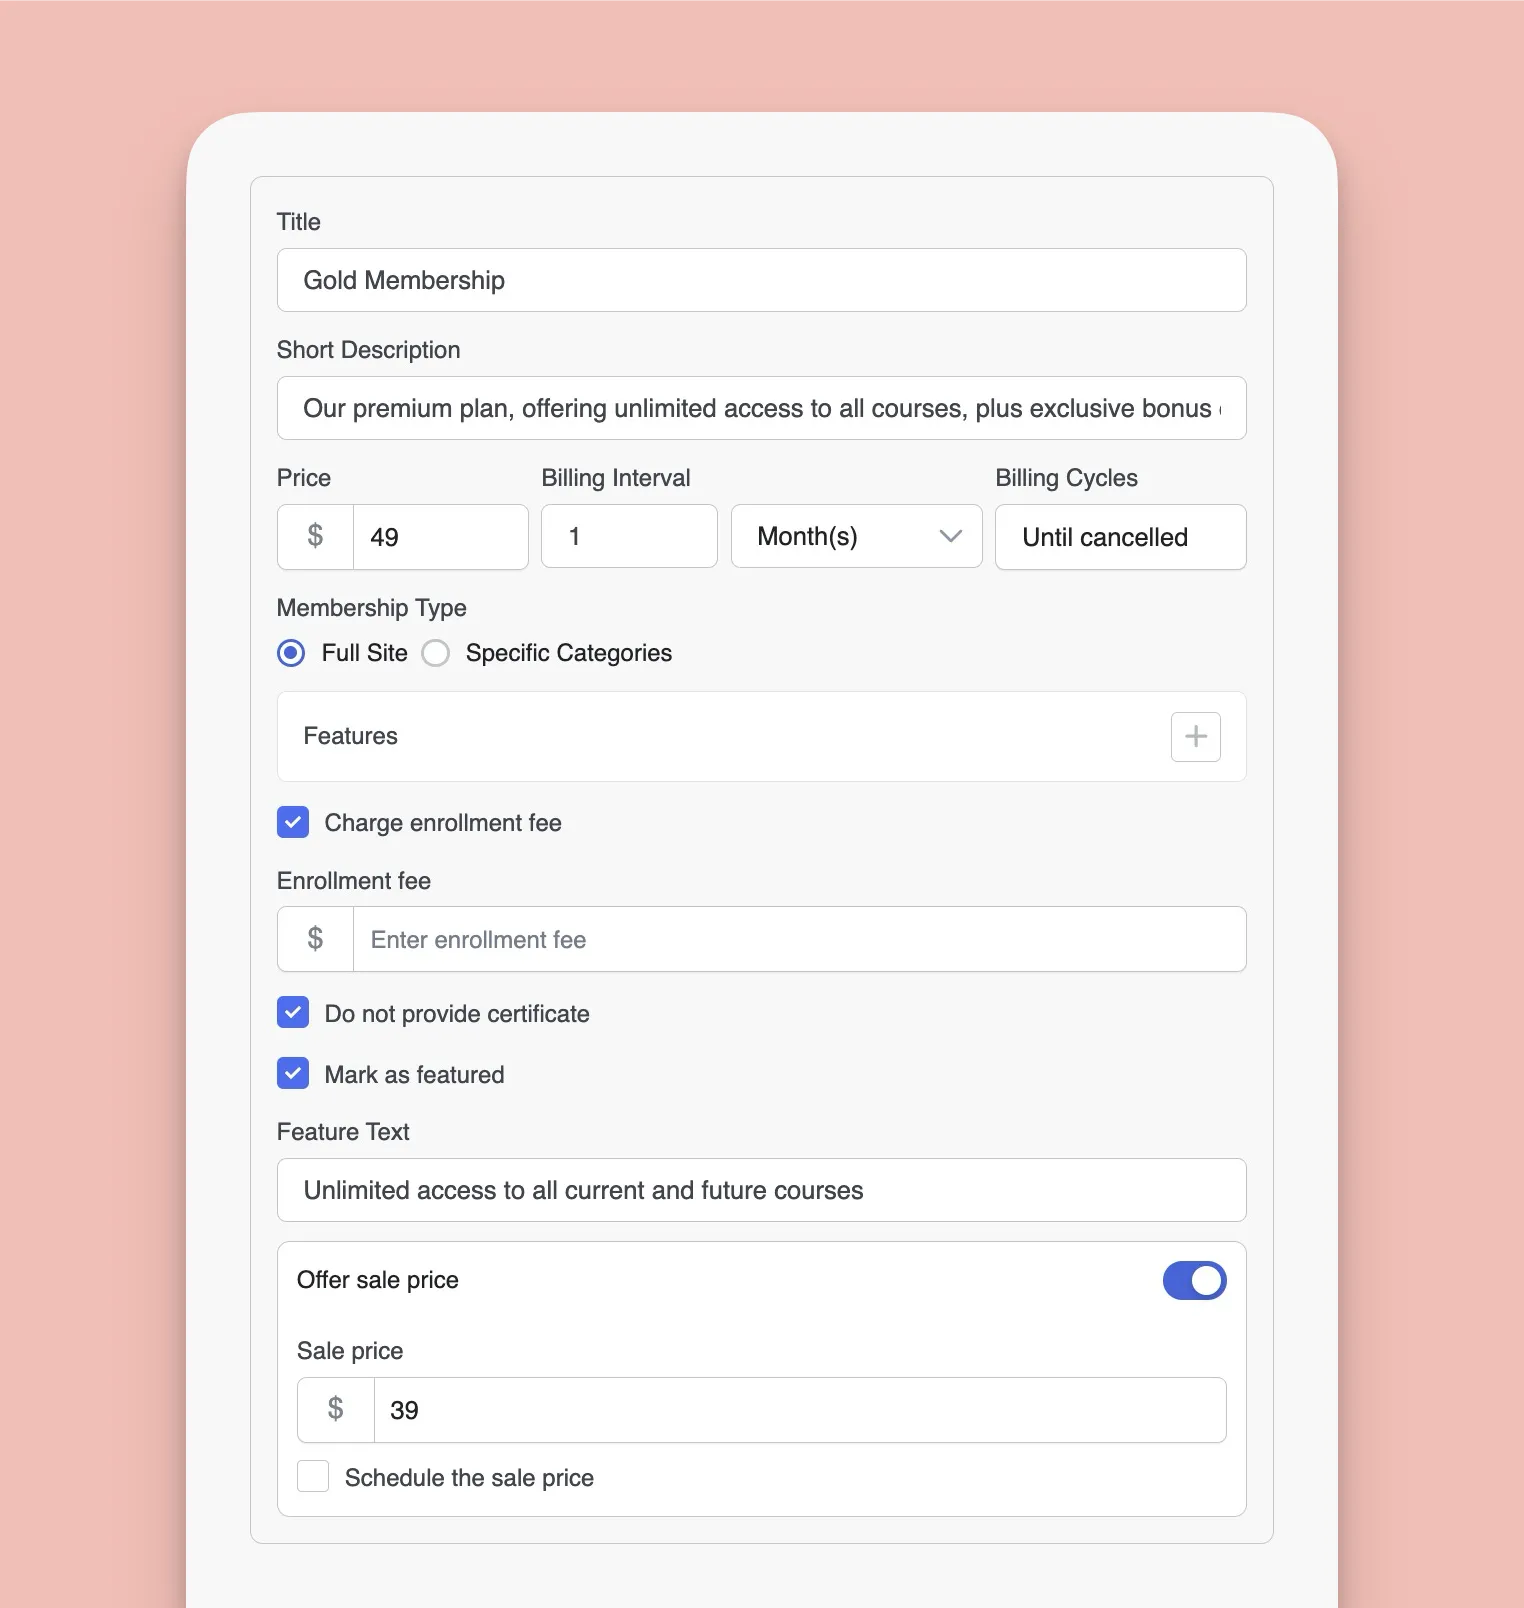
Step 3: Crafting the Offer:
A new window will appear (see the image below). This is where you’ll specify all the details for this particular membership level. Let’s break down each key setting:
- Title & Description: Create a compelling name and detailed explanation of what students receive
- Price & Billing Details: Set your price point, billing interval (monthly, quarterly, yearly), and number of billing cycles (or unlimited)
- Membership Type: Choose between different access models (more on this below)
- Features: List the key benefits included to showcase value
- Enrollment Fee: Add a one-time signup fee if desired
- Certificate: Toggle whether completion certificates are included
- Featured Status: Highlight premium plans to increase conversions
- Featured Text: (Optional) Add customized text like “Best Seller” or “Most Popular”.
- Sale Price: Offer limited-time discounts to drive enrollment
Step 4: Save and Repeat: After setting up all, click the “Save Changes“. and you’re done with your first plan, after that you can create more plans, each with different pricing and access levels, repeating steps 2-4.
Now that you know how to create individual plans, let’s consider the overall structure of your membership site.
Choosing Your Membership Model: Full Site Access or Targeted Content Groups?
You’ve defined the what of your membership plans (pricing, features, etc.). Now, let’s focus on the how – how will members access your courses? Tutor LMS offers two powerful models: Full Site Membership and Category-wise Membership. The right choice depends on your content strategy and how you want to structure your student experience.
1. Full Site Membership: The All-Access Pass
Think of this as the “Netflix” model for your courses. A Full Site Membership grants members unrestricted access to every single course currently available on your Tutor LMS site.
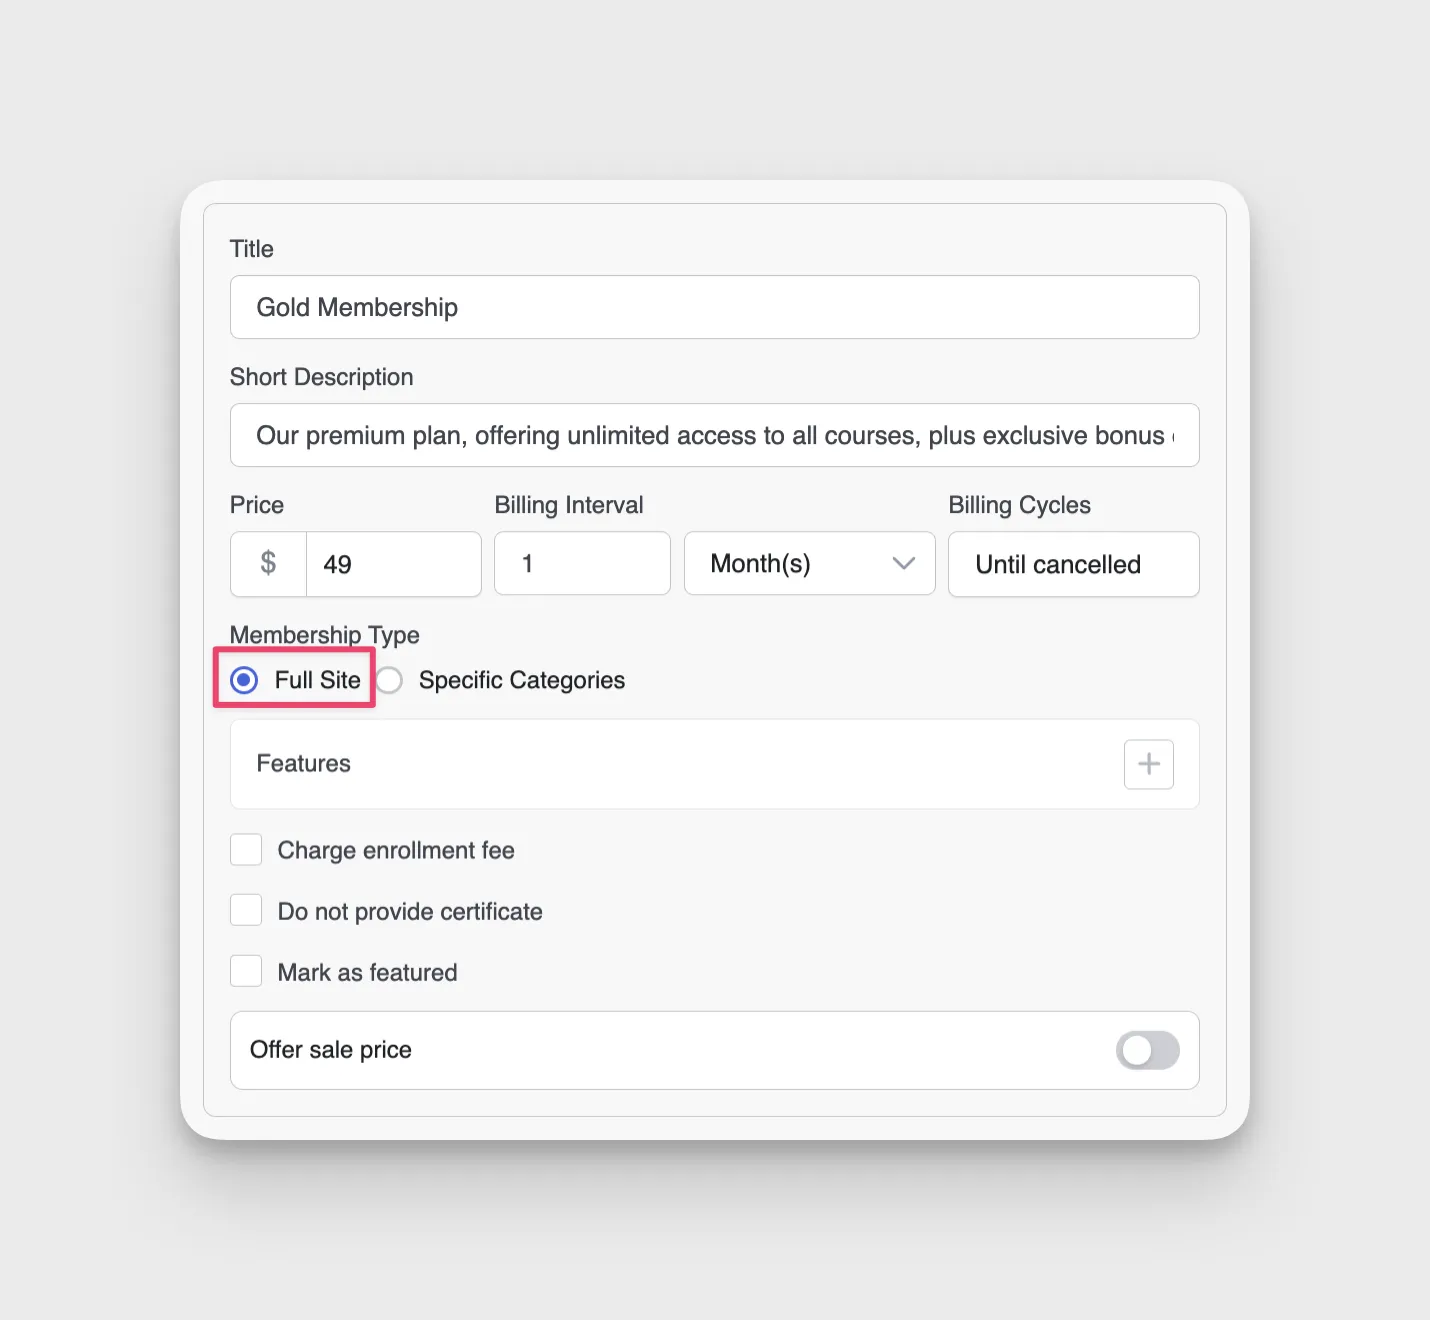
Setting Up Full Site Access:
When creating your membership plan (as we just covered), simply select the “Full Site” radio button under the “Membership Type” setting. That’s it! No further configuration is needed.
Tip: This approach works exceptionally well when your courses complement each other or build upon shared foundations.
2. Category-wise Membership: Targeted Access and Tiered Learning
Category-based Membership allows you to create specialized subscription options focused on specific subject areas or expertise levels. You can group your courses into categories (e.g., “Beginner,” “Intermediate,” “Advanced”; or “Photography,” “Videography,” “Editing”) and then create membership plans that grant access only to specific categories.
Setting Up For Specific Categories:
- Ensure Your Courses are Categorized: Before creating the plan, make sure your existing courses are assigned to relevant categories within Tutor LMS (Tutor LMS Pro > Categories).

- Create the Membership Plan: Follow the steps we outlined previously.
- Select “Specific Categories”: Under “Membership Type,” choose the “Specific Categories” radio button.
- Add Categories: A new “Add Categories” button will appear. Click it, and a list of your existing course categories will be displayed. Select all the categories you want to include in this specific membership plan. The number of courses within each selected category will be shown, giving you a clear overview. You can add as many categories as you want to a given plan.
- Save all your changes and check the pricing page to make sure everything is as it is.
TIP: If you add new courses to a category that’s already part of a membership plan, those new courses will automatically become accessible to members of that plan. This is a powerful feature, but it’s important to keep in mind for content planning.
Creating an Exclusive Learning Experience: The Membership-Only Option
Tutor LMS gives you incredible flexibility in how you sell your courses. You can offer one-time purchases, set up recurring subscriptions (learn more about unlocking that recurring revenue stream in our Subscriptions Guide), or… go exclusively membership. This last option transforms your entire site into a curated learning community, accessible only to paying members.
Why Choose Membership-Only?
Instead of individual course sales, a membership-only site focuses on ongoing access and a deeper relationship with your students. It fosters community, provides predictable income, and positions your content as a premium offering.
Enabling Membership-Only Mode (It’s Easy!)
- Head to Tutor LMS Pro > Settings > Subscriptions.
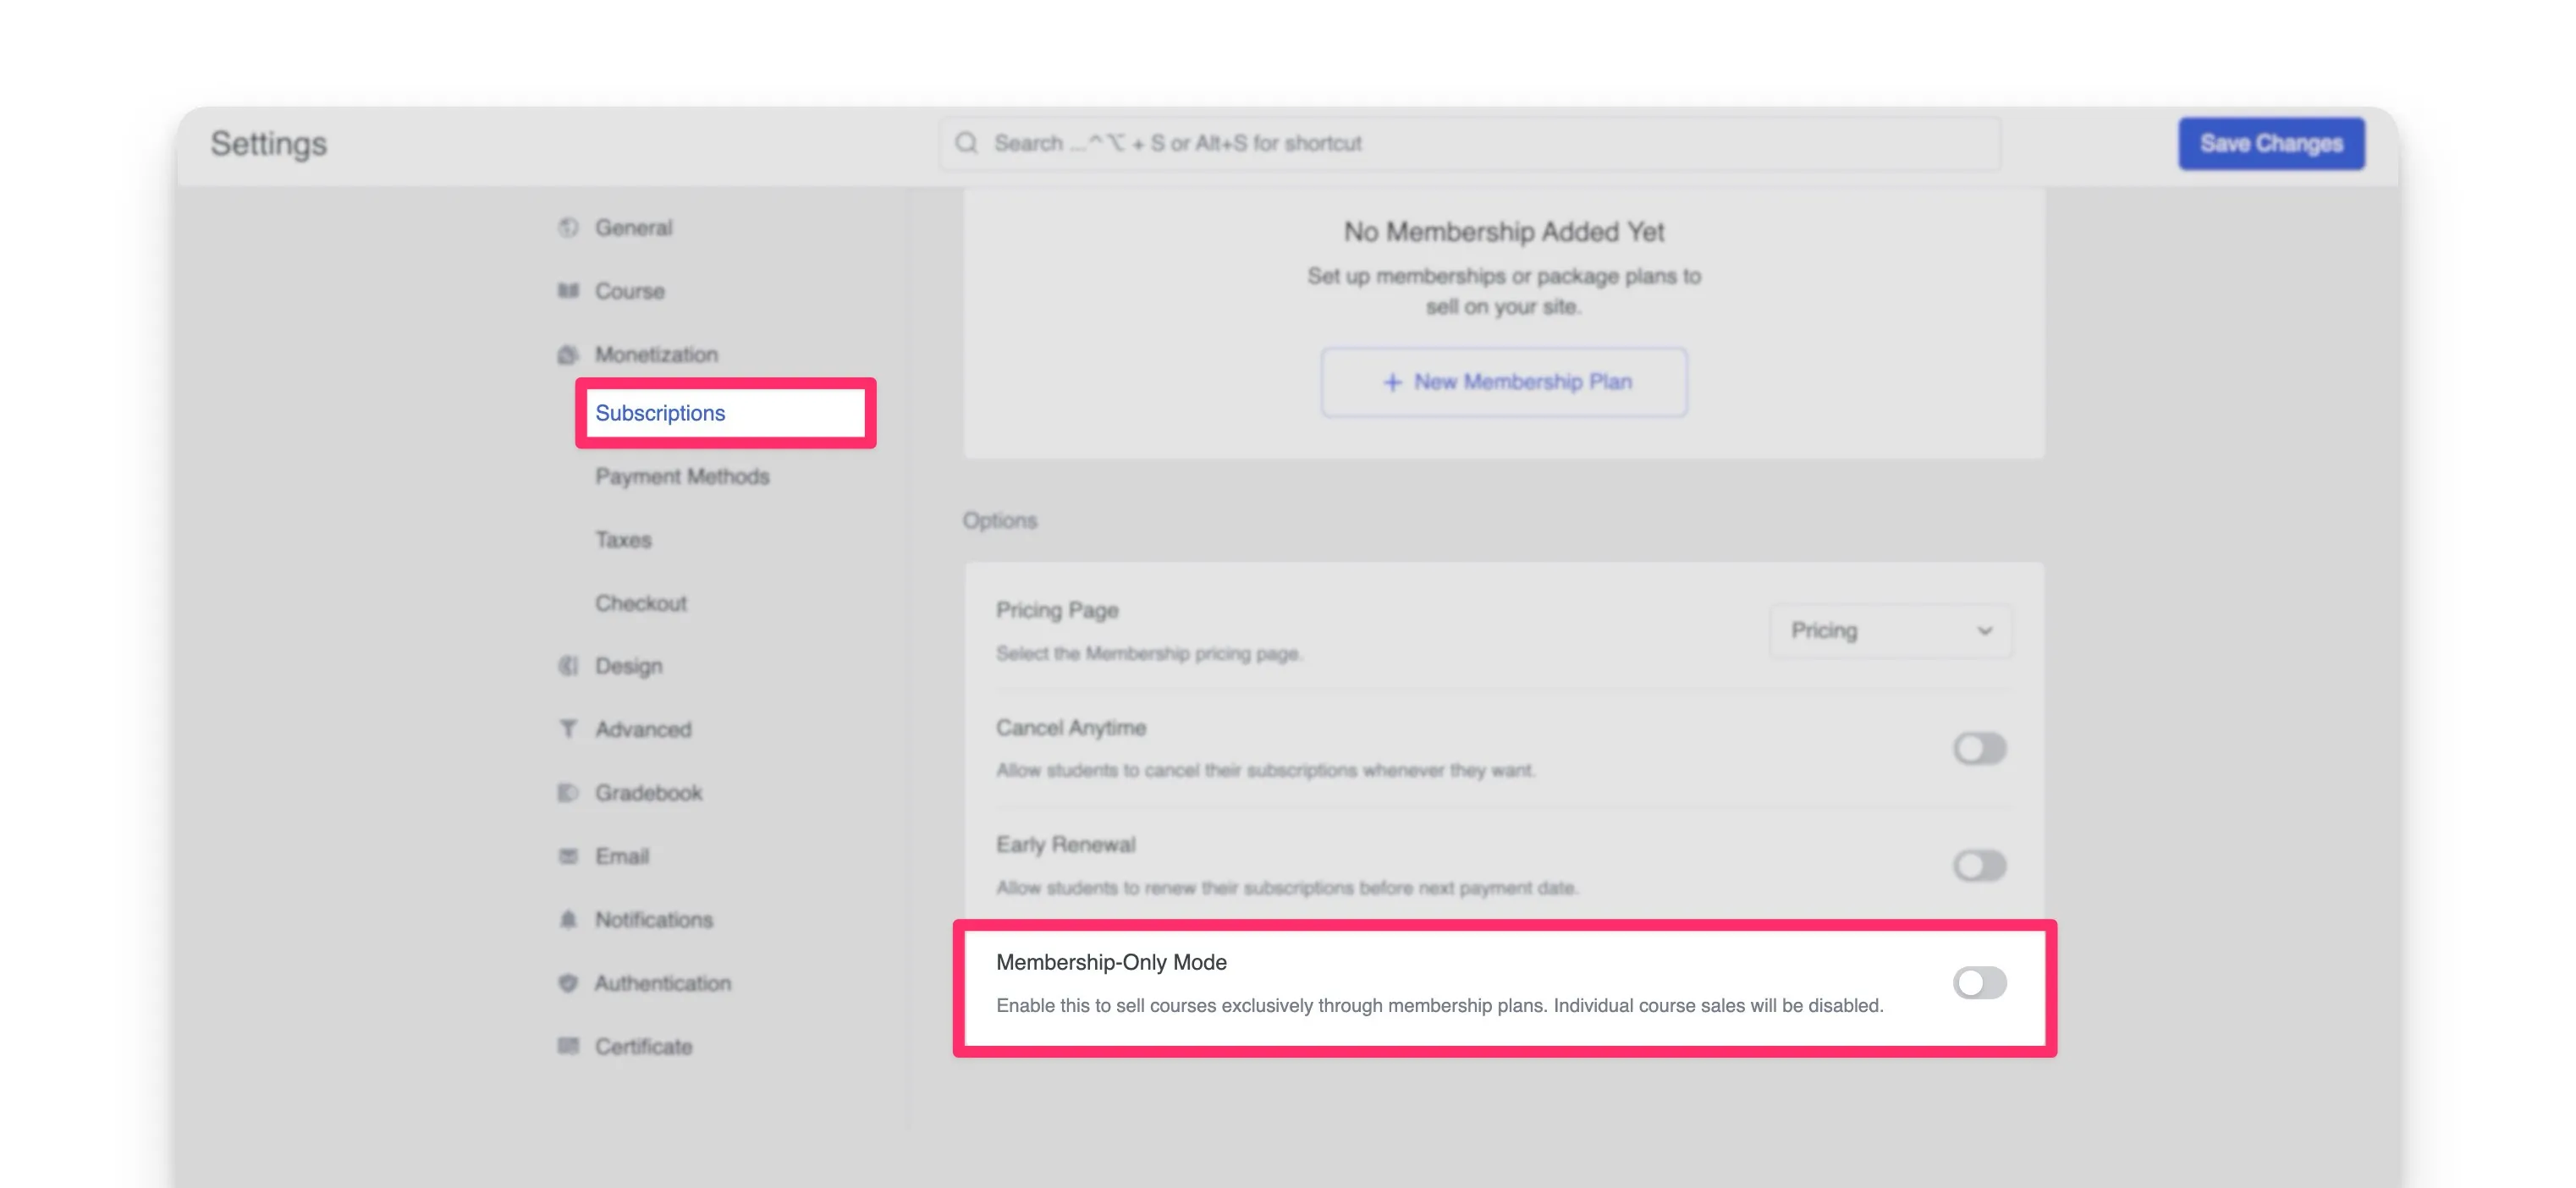
- Find “Membership-Only Mode” and toggle it on.
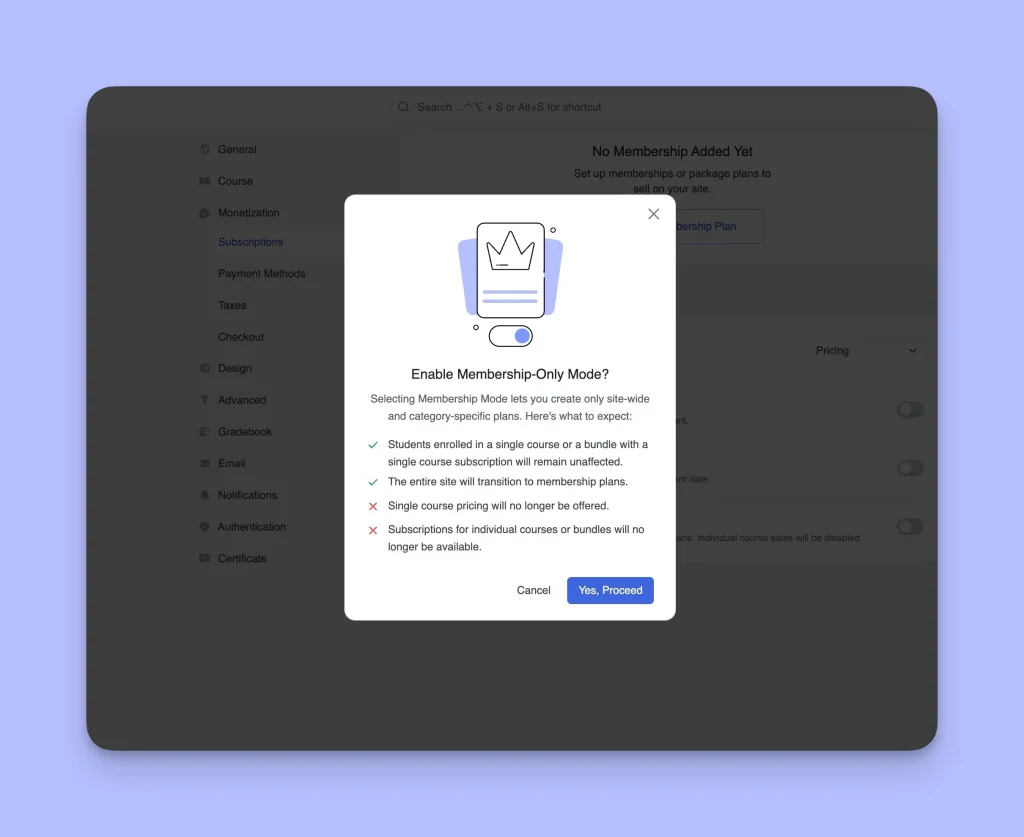
- A confirmation pop-up will appear. Review the details, and when you’re ready, click “Yes, Proceed.“
- Click “Save Changes.”
And that’s it! Your site now prioritizes your membership plans. Individual course purchases are disabled, streamlining the user experience and highlighting the value of becoming a member.
Launch Your Learning Community Today!
You’ve now unlocked the secrets to building a powerful “membership site with Tutor LMS”! We’ve journeyed from initial setup to crafting compelling membership plans, and even explored the exclusive membership-only mode. You’re equipped to transform your “online courses” into a thriving, subscription-based “eLearning platform.”
Don’t let technical hurdles hold you back. Start exploring Tutor LMS today, and unlock the potential to build the thriving online learning business you’ve always dreamed of. You’ve got this – and we’re here to help every step of the way!

Start Using Tutor LMS Today
Ready to take your online courses to new heights? Download Tutor LMS now and enjoy a journey of eLearning excellence.