The early bird gets the worm – this old adage is especially true for students when it comes to enrolling in an online course. The earlier a student gets access to their online courses, the earlier they can start learning.
That’s why students are always eager to enroll in their intended courses as early as possible. But, the students don’t need to wait for the enrollment process if you use Tutor LMS to build your eLearning platform.
This feature-packed LMS has a built-in feature to enroll a student manually by the web admins. Today, we are going to show you the step-by-step process of enrolling students manually in your Tutor LMS courses.
How Can a Student be Enrolled in Tutor LMS Courses?
Tutor LMS supports two methods of enrolling in your online course. Here are the methods of enrolling a student:
- Enrolling by Student’s Self-enrollment
This is by far the most common course enrollment strategy for online learning platforms. In this strategy, students can enroll on the eLearning platform and enroll in whichever course they want. However, they have to pay the course fees to enroll in the premium courses.
- Manual Enrollment by the Administrator
Besides the student’s self-enrollment, the admin can also add students to their courses. It not only makes the enrollment process faster but also ensures the student’s enrollment for the courses with limited seats. By the way, we’ll explain this manual enrollment process later.
So, these are the methods by which a student can be enrolled in your Tutor LMS courses.
Note: The learner must complete his registration on the website to be enrolled manually in a Tutor LMS course.
Why Would You Need to Enroll Students Manually in Your Courses?
In some cases, enrolling a student manually is beneficial for both the learner and instructor. In this section, we’ll shed some light on the benefits of manual enrollment.
- Enrollment becomes easier and more instant: Tutor LMS supports bulk student enrollment. Thus the admin can instantly enroll multiple students in their intended courses.
- Saves time: Every student has to enroll individually on the traditional LMS system. But, our advanced LMS platform supports bulk students enrollment facility. Thus the admin can save time by utilizing the bulk enrollment feature rather than enrolling the students one by one.
- Ensures enrollment for the courses with limited seats: Enrolling in competitive courses with limited seats is pretty arduous for the students. In that case, the admin might enroll some students manually to ensure their access to those courses.
- Adding students manually after class starts: It might happen that students may need to enroll in a live course after the registration period has ended. So, the student has no chance to enroll in that class unless the trainer enrolls that student manually.
How to Add a Student Manually to Your Tutor LMS Courses?
Tutor LMS supports granting access to a student to the learning materials without registering for the course. Now, we are going to explain the step-by-step process of adding a student manually to a Tutor LMS course.
Step #1: Enable the Enrolment Add-on
In order to enroll students manually, you’ll need the Enrollment add-on. By default, all of the Tutor LMS add-ons are disabled. You have to enable whichever you want manually. To enable the manual student enrollment process, we have to enable the Enrolment add-on. To access the Tutor LMS add-ons, navigate to WP Dashboard > Tutor LMS Pro > Add-ons. Then look for the Enrollment add-on and enable it using the toggle button.
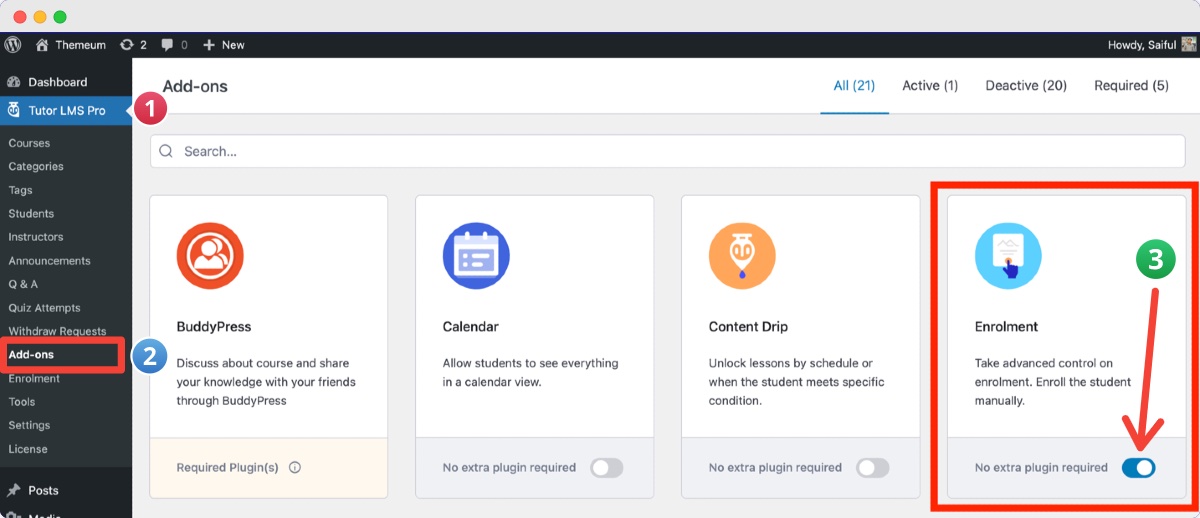
The Enrolment option will be added to the WP dashboard sidebar menu just after enabling it. You’ll notice this option after reloading the page.
You’ll need the Tutor LMS Pro version to enable the Enrolment add-on.
Step #2: Browse the Enrolment tab
To enroll a student manually, navigate to WP Dashboard > Tutor LMS Pro > Enrolment. This page will contain the list of previously enrolled students in different courses. If you are setting up for the first time, you’ll get a blank page.
Note: Only the admin can enroll students manually on a course.
Step #3: Enroll a Student in Your Course
Now it’s time to enroll a student for the first time. Look for the Enroll a student button on the Enrolment page. This button is located at the top bar of this page. Click on that button, and a new window will appear in front of you.
On this Manual Enrollment window, choose your intended course and the student name whom you want to enroll in that course. By the way, having too many courses on your website won’t be a problem here. Simply search by your course name, and the course name will appear instantly.
In the student section, write the student’s name, and the student’s profile will be displayed under the search box. You can know the student’s name, email, and profile picture just by searching for the name. Thus, even if you have multiple students with similar names, you can identify the intended one by email address and profile picture.
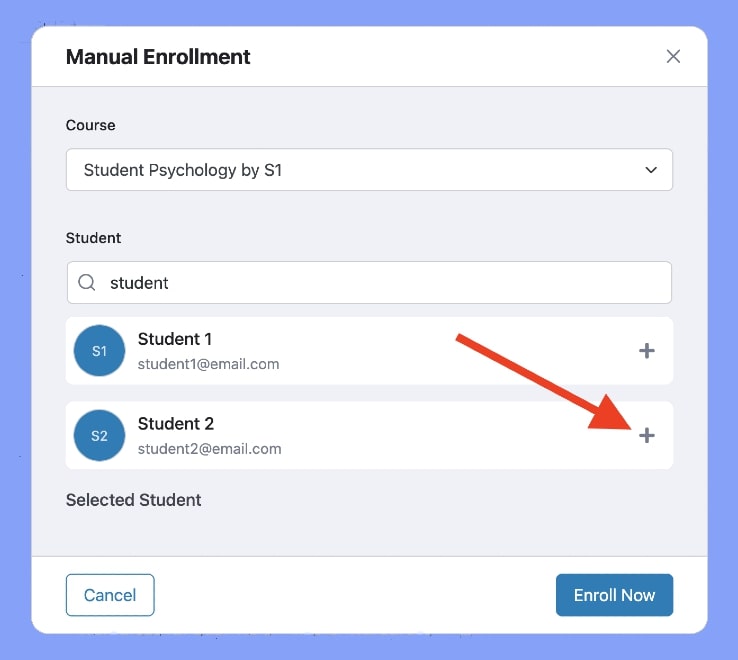
From the student’s list, click on the ➕ sign, and the student will be selected. When the selection process is complete, click on the Enroll Now button, and the student will be added to that course.
Step #4: Process of Enrolling Students in Bulk
Enrolling multiple students one by one is a tedious and time-consuming task. To get rid of that hassle, Tutor LMS supports bulk student enrollment via this feature. Simply search your students’ names or email addresses and click on the ➕ sign beside their name card. Thus the student’s name will be added to the selected student’s list.
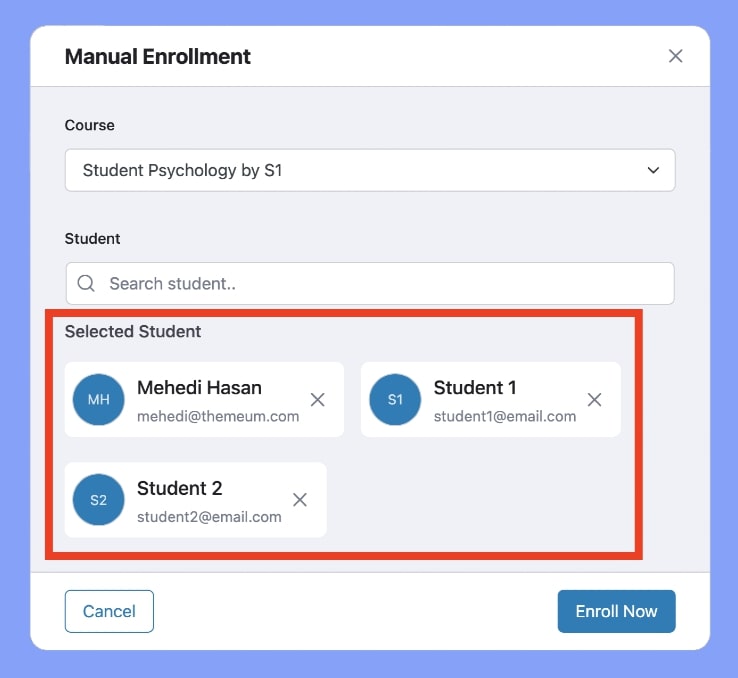
After you are done with the selection process, click on the Enroll Now button in the bottom right corner. That’s it! You just enrolled students manually on your Tutor LMS course.
Automatic Invoice Generation for the Paid Courses After Enrolling Students Manually
If you are enrolling students in a paid course, Tutor LMS will automatically generate an invoice for that course. Hence, you will get a message like this:
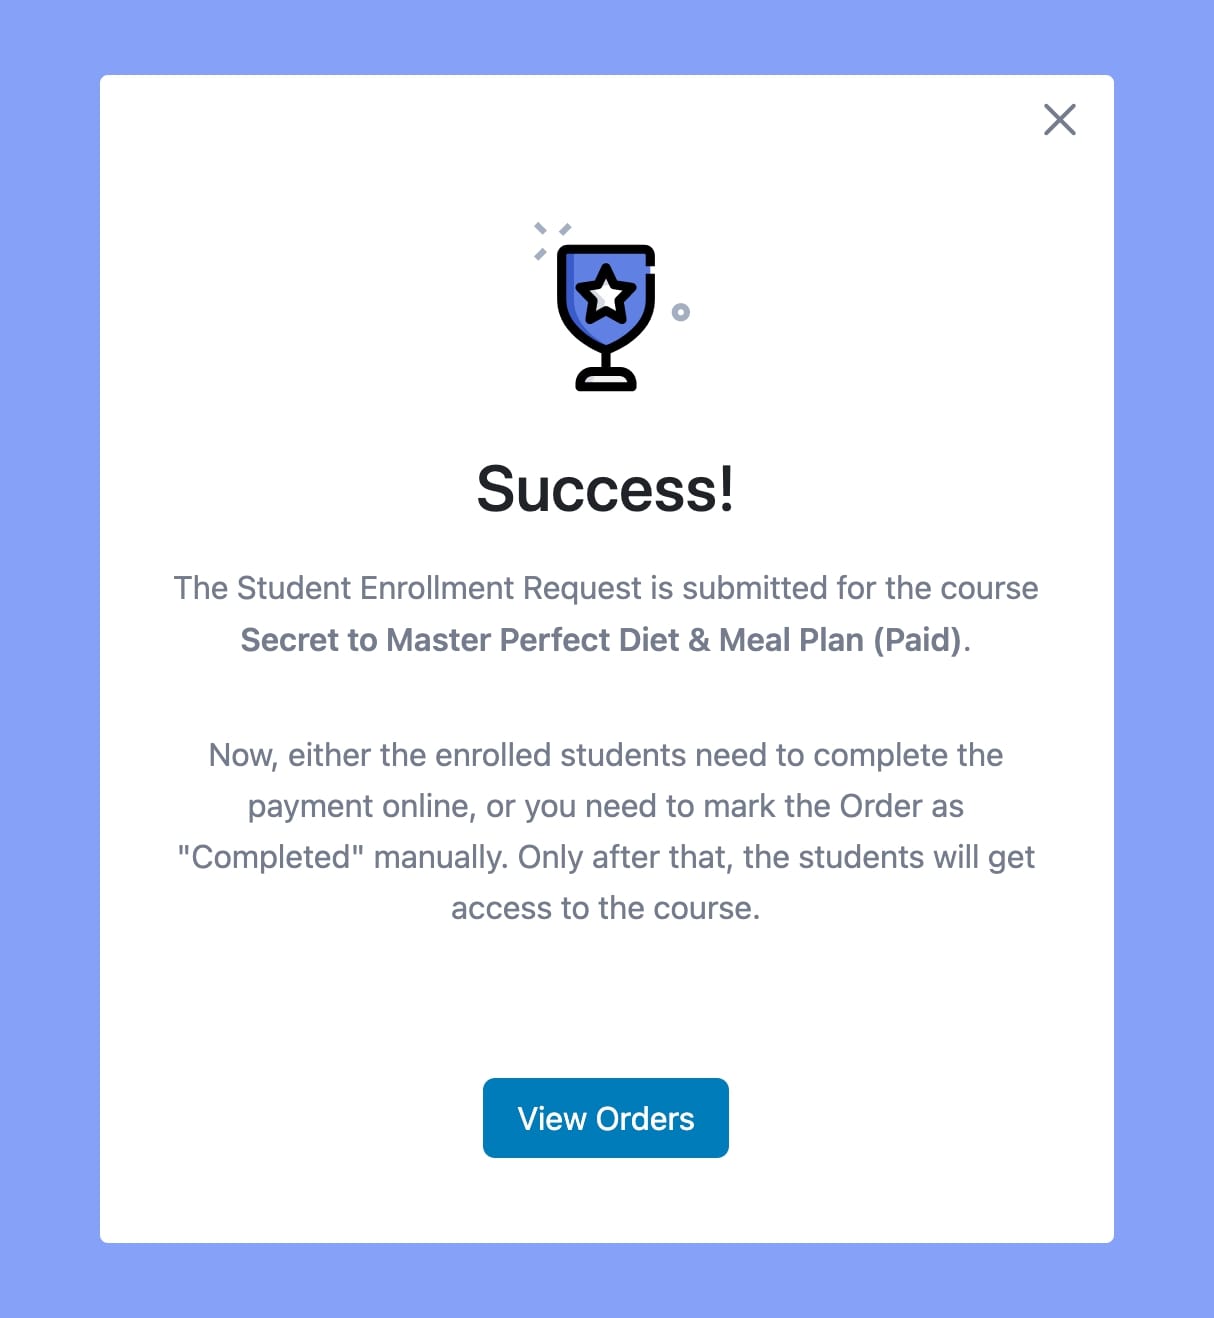
As the image states, now it’s time to pay for that course. The manually enrolled students must complete the payment to complete the enrollment process. To do that, students have to navigate to Student Dashboard > Order History. Here, he will get the automatically generated invoice for that particular course.
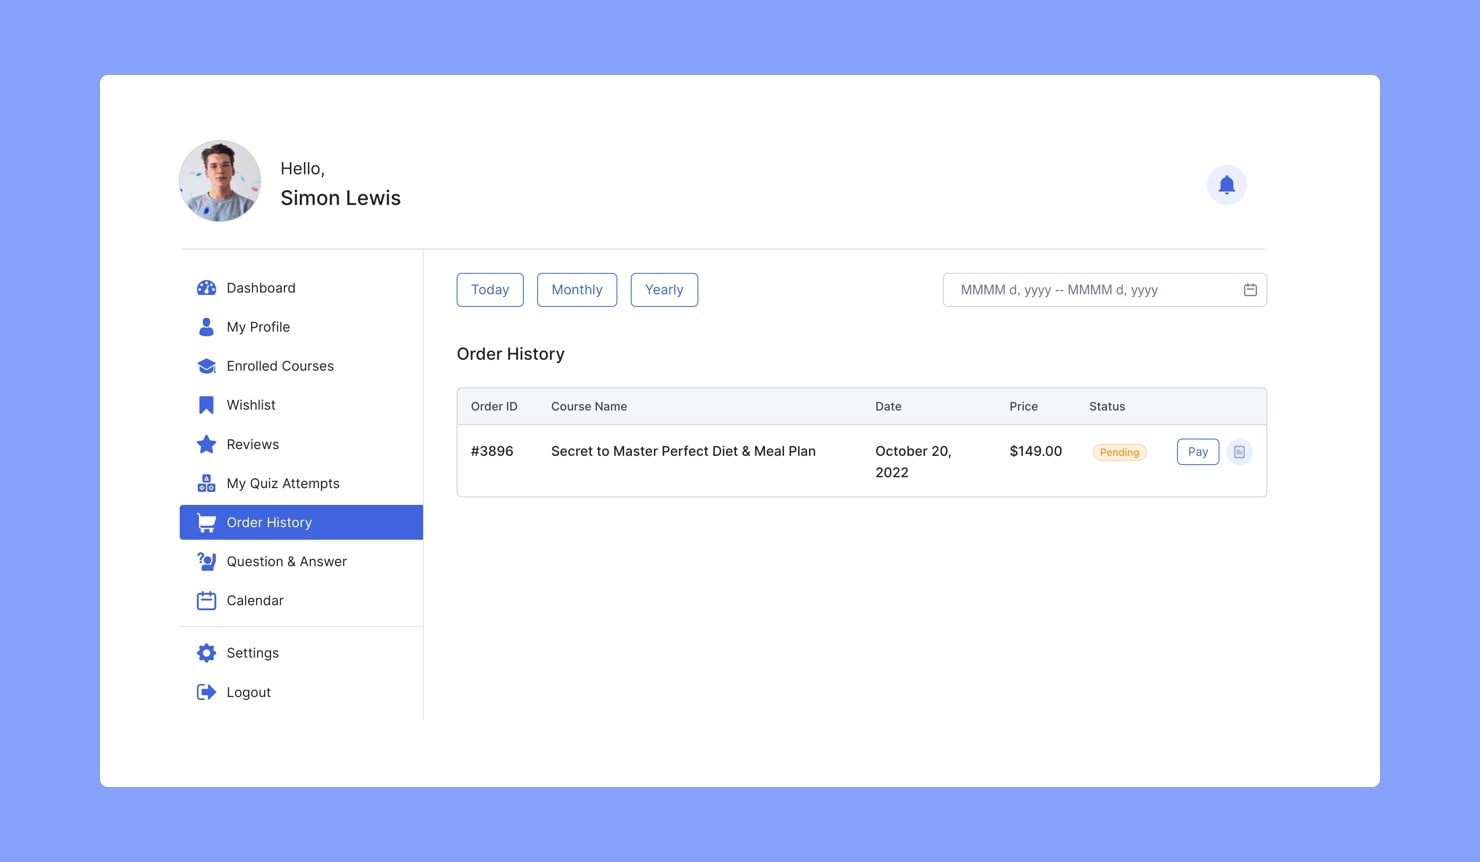
Now, click on the Pay button and follow the on-screen instructions to complete the payment procedure. The order status will be changed to ‘Completed’ upon completing the payment.
However, the admin can also manually mark the order as complete if anything goes sideways. The manual order completion method solely depends on the monetization method you are using on Tutor LMS. But, if you use WooCommerce to monetize your Tutor LMS courses, follow the steps below to complete the order manually.
On the Success message popup, there will be a button titled View Orders in the bottom section. Click on that button, and you’ll be redirected to the WooCommerce order page. You can also access that order later by navigating to WooCommerce > Orders page. There you’ll get the list of all orders including the previously completed orders. Now, click on your intended order name to view the Edit order page.
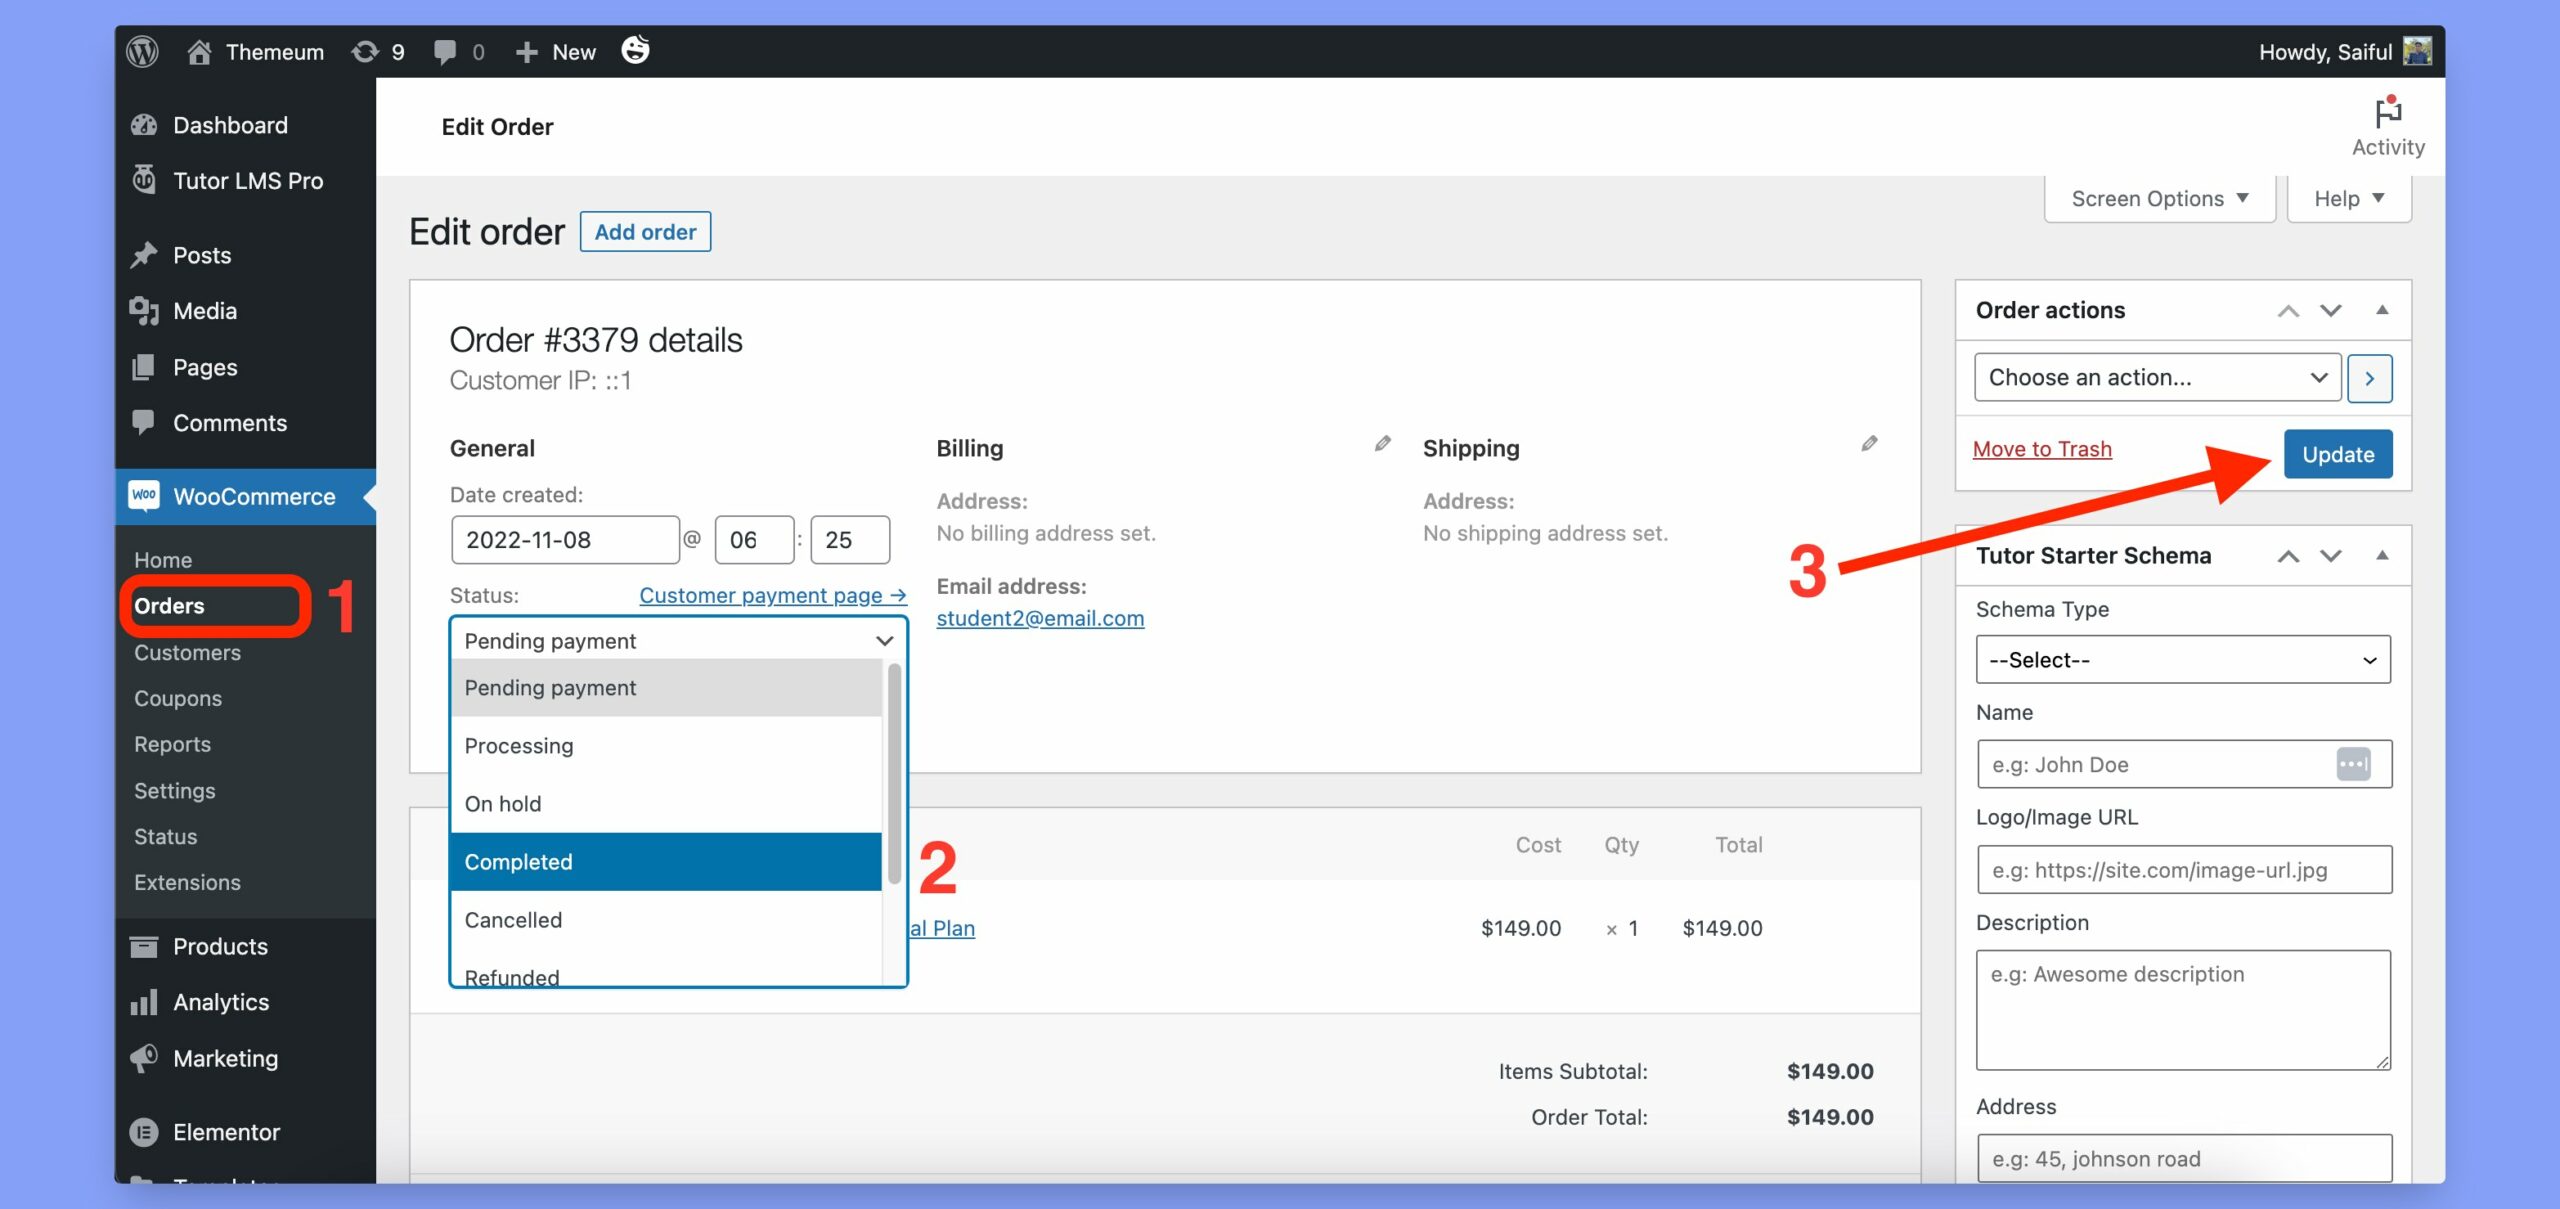
From the order page, click on the Status dropdown menu and choose Completed from here. After that, update the order status, and your task is done for now. As the payment status is marked as complete, both the course status will be changed from Pending to Completed to both the student and the trainer dashboard.
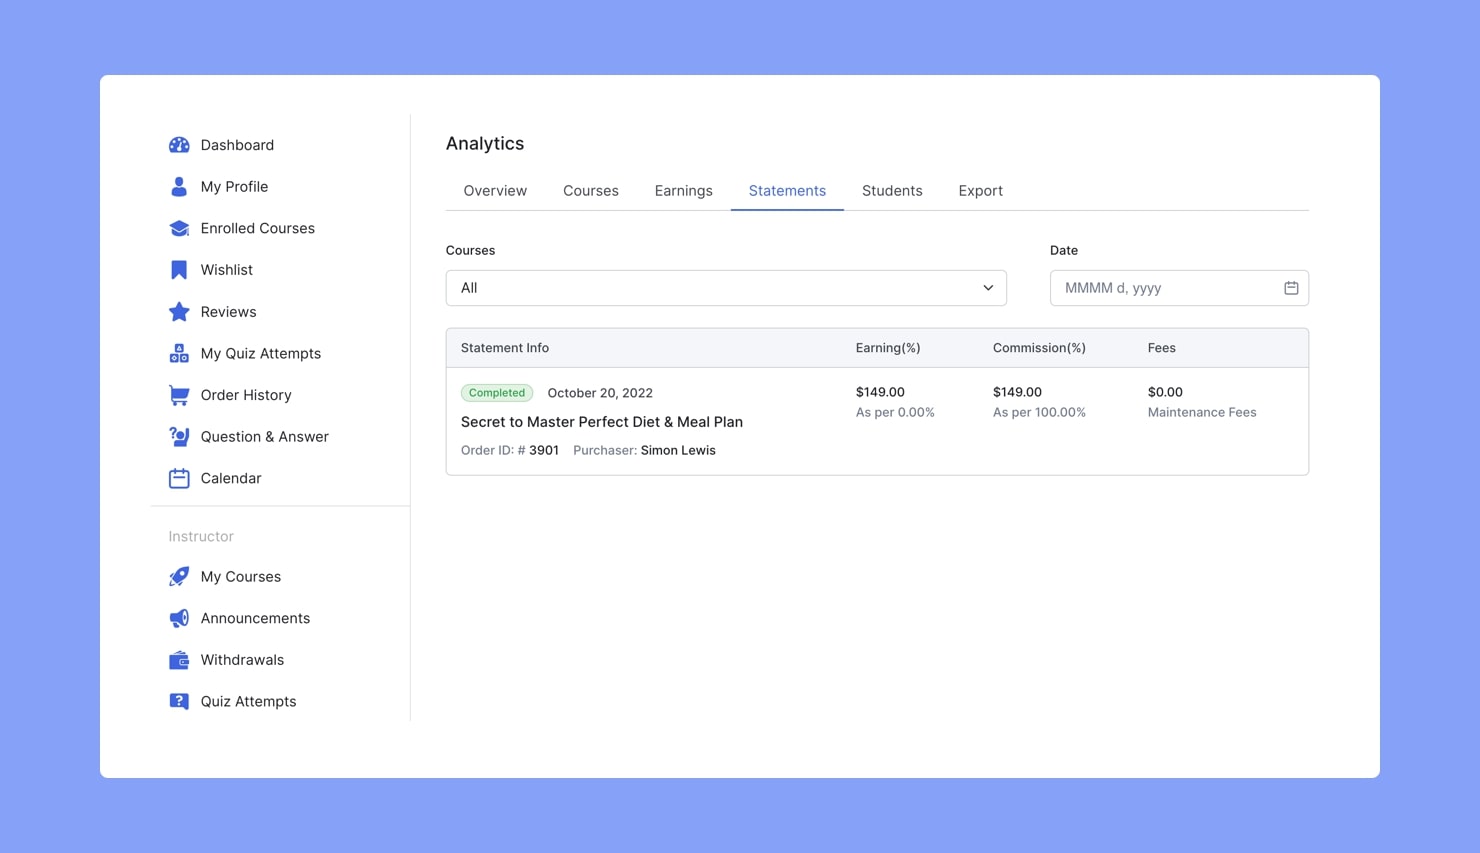
That’s the end of your journey of enrolling a student manually on a paid course. Now, the students can access the course where he was enrolled manually.
How to Increase the Enrollment Rate of Your eLearning Course?
Hitting the enrollment target isn’t a piece of cake. You have to revolve around social media, emails, or other student platforms. However, we are here to ease your enrollment increasing process. Here are some proven strategies to increase the enrollment rate on your eLearning course:
- Simplify the enrollment process
- Leverage stronger emotion
- Improve your Visibility with SEO
- Highlight the Instructors expertise
- Showcase testimonials from alumnus
- Leverage social media platforms
- Use a secure payment method
- Offer discounts occasionally
- Implement micro-learning
- Add gamification elements
- Declutter the learning materials
To learn more about these topics, you may check our dedicated article about student enrollment increasing tips for your eLearning courses.
Conclusion
Ensuring an easier and more cohesive enrolling process is the first and foremost thing for every eLearning platform. But, it’ll become a great dilemma if you fail to offer manual enrollment opportunities to your students. So, start using Tutor LMS today and enroll as many students as you want on your eLearning courses with ease!
Happy learning!
Start Using Tutor LMS Today
Ready to take your online courses to new heights? Download Tutor LMS now and enjoy a journey of eLearning excellence.
