Online education is evolving, and engagement is the name of the game. Did you know that interactive content can boost student engagement by up to 60%? If you’re using Tutor LMS, you’re perfectly positioned to create dynamic courses that captivate learners. How? Through seamless integration with H5P.
H5P empowers you to build rich, interactive experiences – think interactive videos, quizzes, presentations, and even games – that transform passive learning into active participation.
This article will be your guide to leveraging H5P within Tutor LMS. We’ll cover everything from setup to content creation, along with tips to maximize engagement and create a truly impactful learning experience. Ready to transform your courses? Let’s get started!
Getting Started with H5P in Tutor LMS
Before diving into creating interactive content, you’ll need to set up H5P properly in your Tutor LMS environment. The process is straightforward, and we’ll guide you through each step to ensure a smooth integration.
What You’ll Need
- An active installation of Tutor LMS (version 3.0 or higher)
- WordPress admin access
- The H5P plugin (free from the WordPress repository)
Installation Process
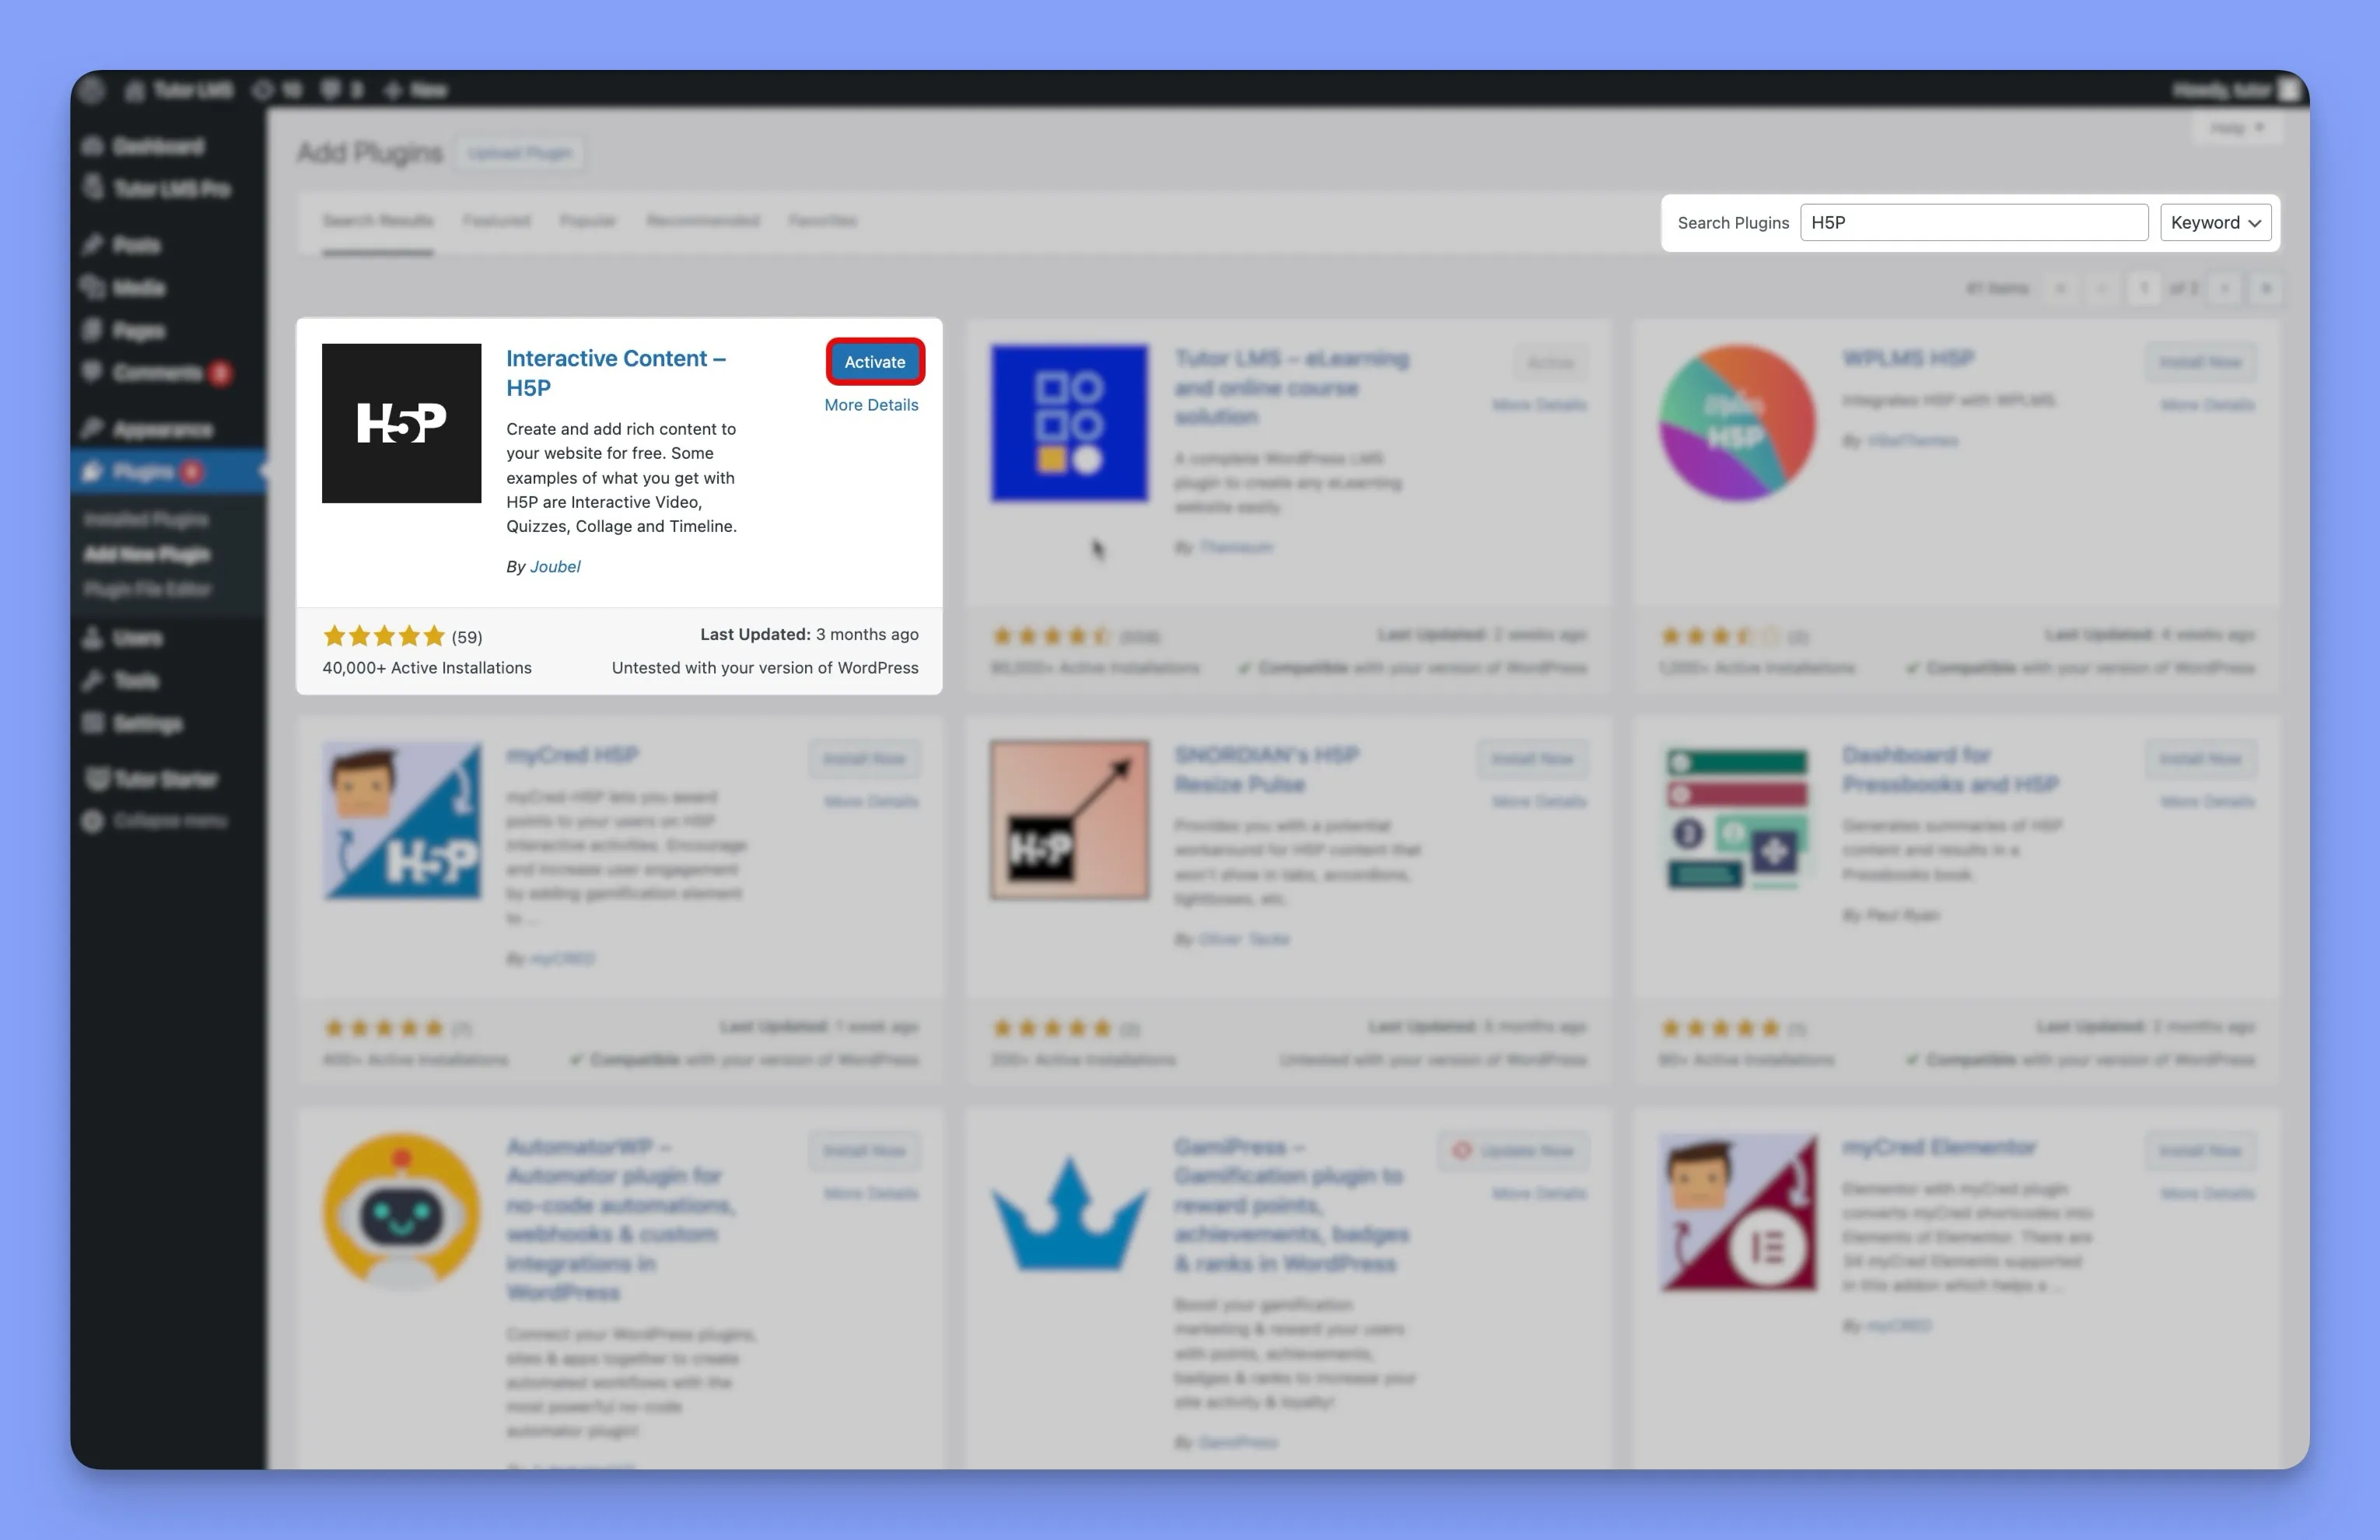
- Install the H5P Plugin: Head over to your WordPress dashboard, go to “Plugins,” and click “Add New.” Search for “H5P,” and once you find it, click “Install Now” and then “Activate.”
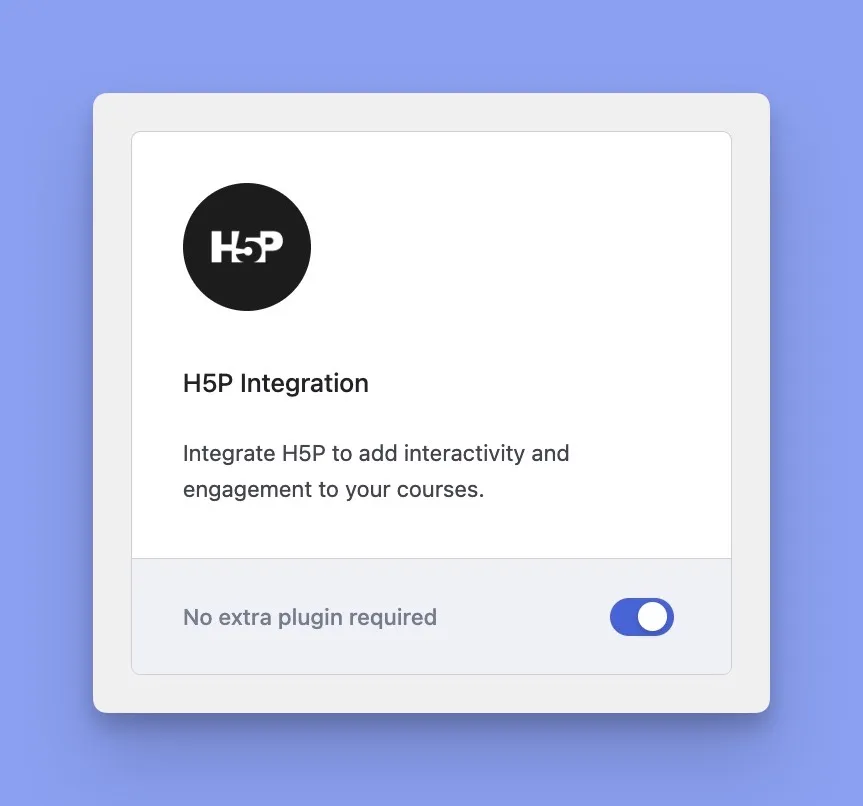
- Enable the H5P add-on in Tutor LMS: In your WordPress dashboard, navigate to “Tutor LMS” and then “Add-ons.” Locate the “H5P” add-on and simply toggle the switch to activate it.
- (Optional) Configure H5P settings: While H5P usually works great out of the box, you can customize some settings if needed. Go to “H5P” in your WordPress dashboard to explore options like content behavior and display options.
Verify Your Installation
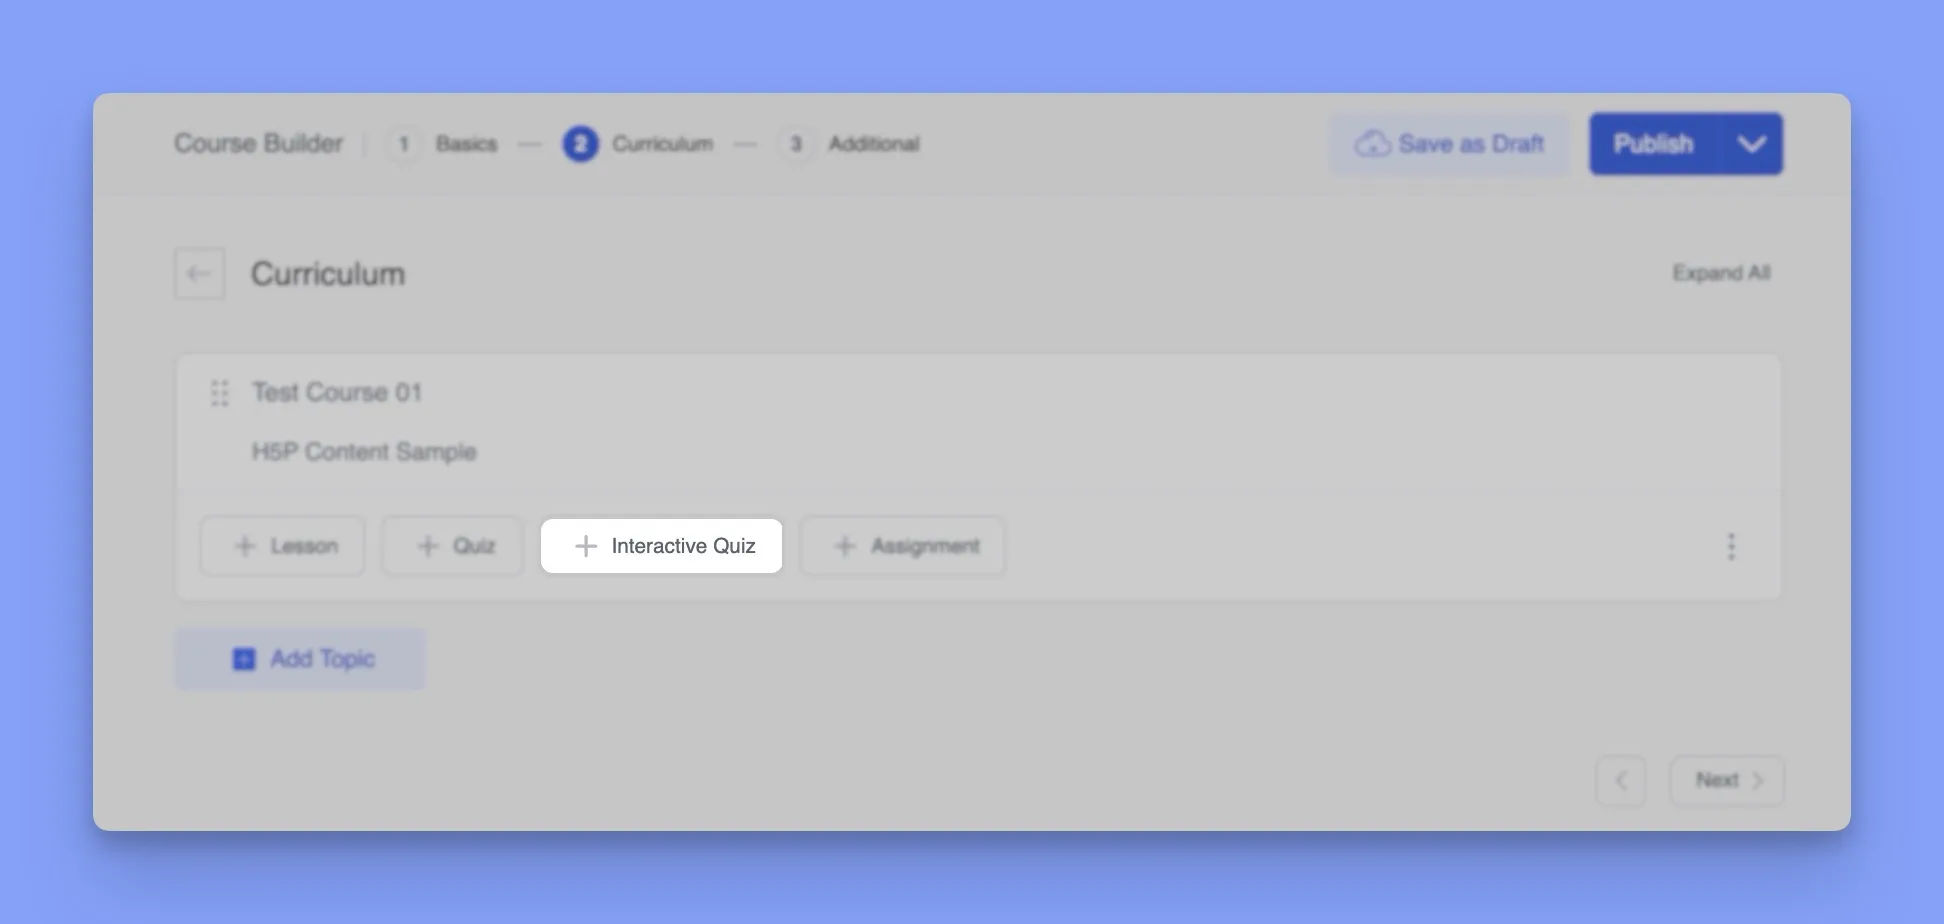
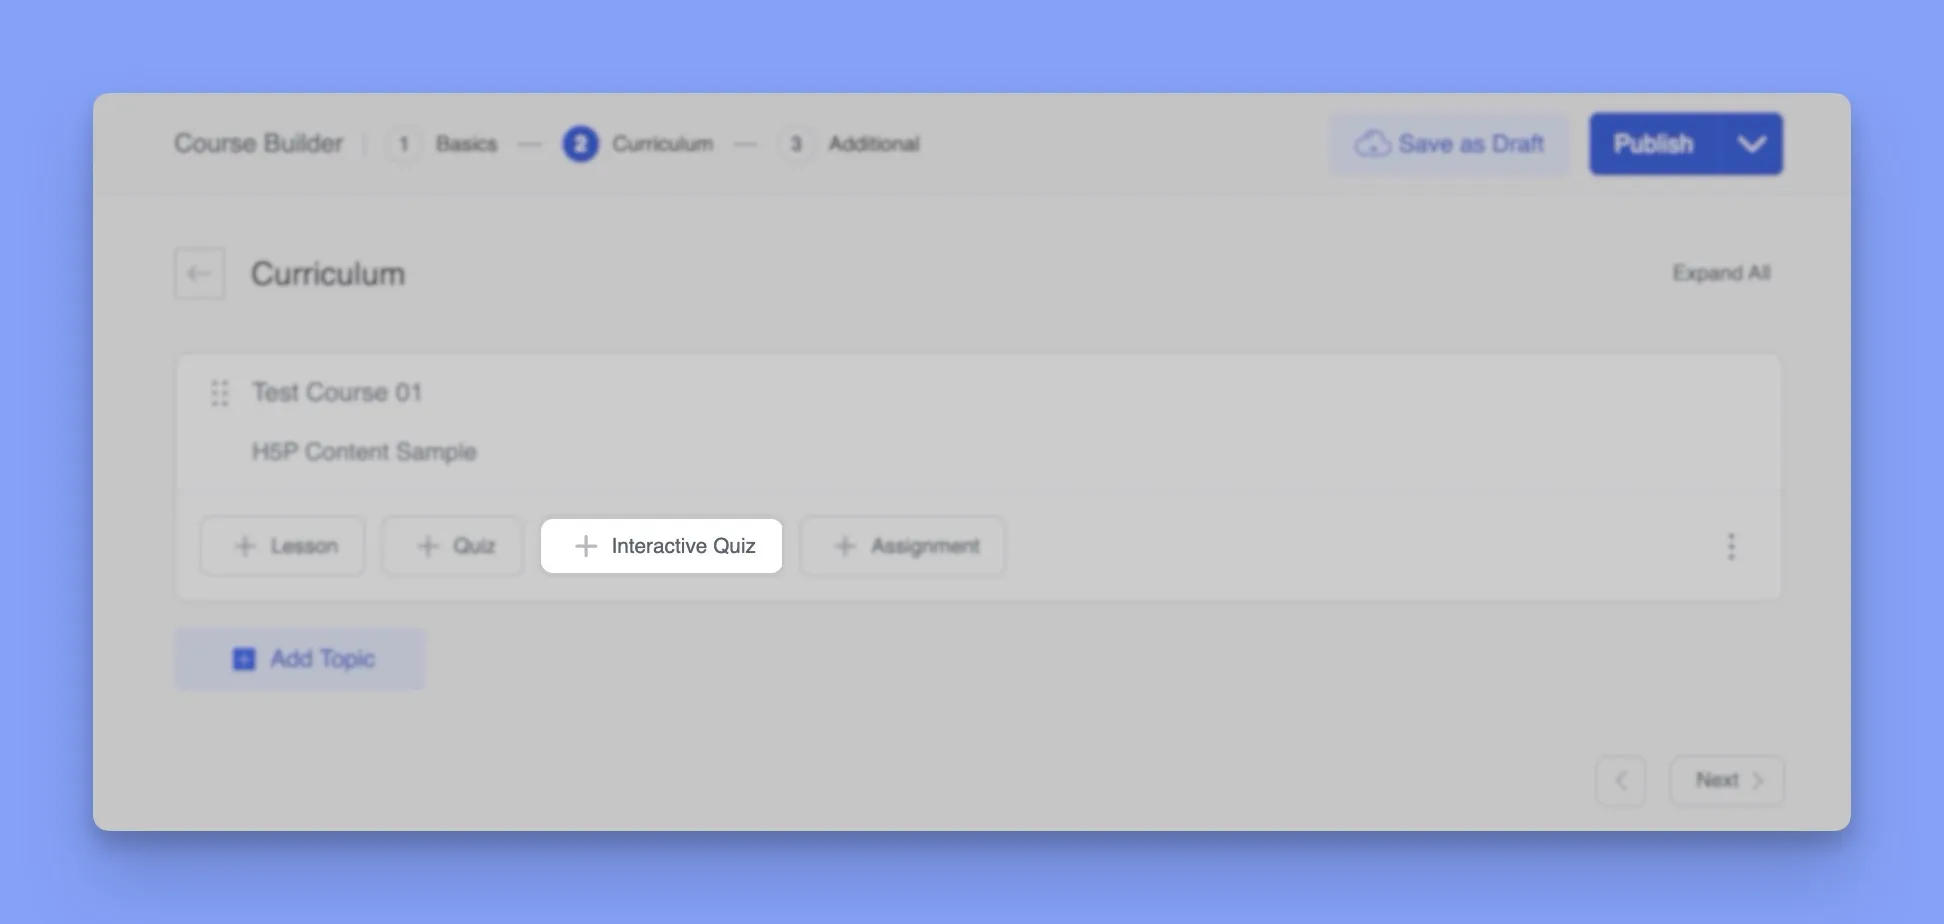
Create a quick test course topic in Tutor LMS and you should now see the “+ Interactive Quiz” button displayed alongside “+ Lesson”, “+ Quiz”, and “+ Assignment”. This confirms that H5P is successfully integrated, and you’re ready to start creating engaging interactive content for your students.
Accessing the H5P Content Hub
Okay, now comes the fun part – exploring H5P content types! To get started, you’ll need to access the “H5P Hub.” You can find this by going to your WordPress dashboard and navigating to “H5P Content” -> “Add New.” This is your creative playground where all the magic happens!
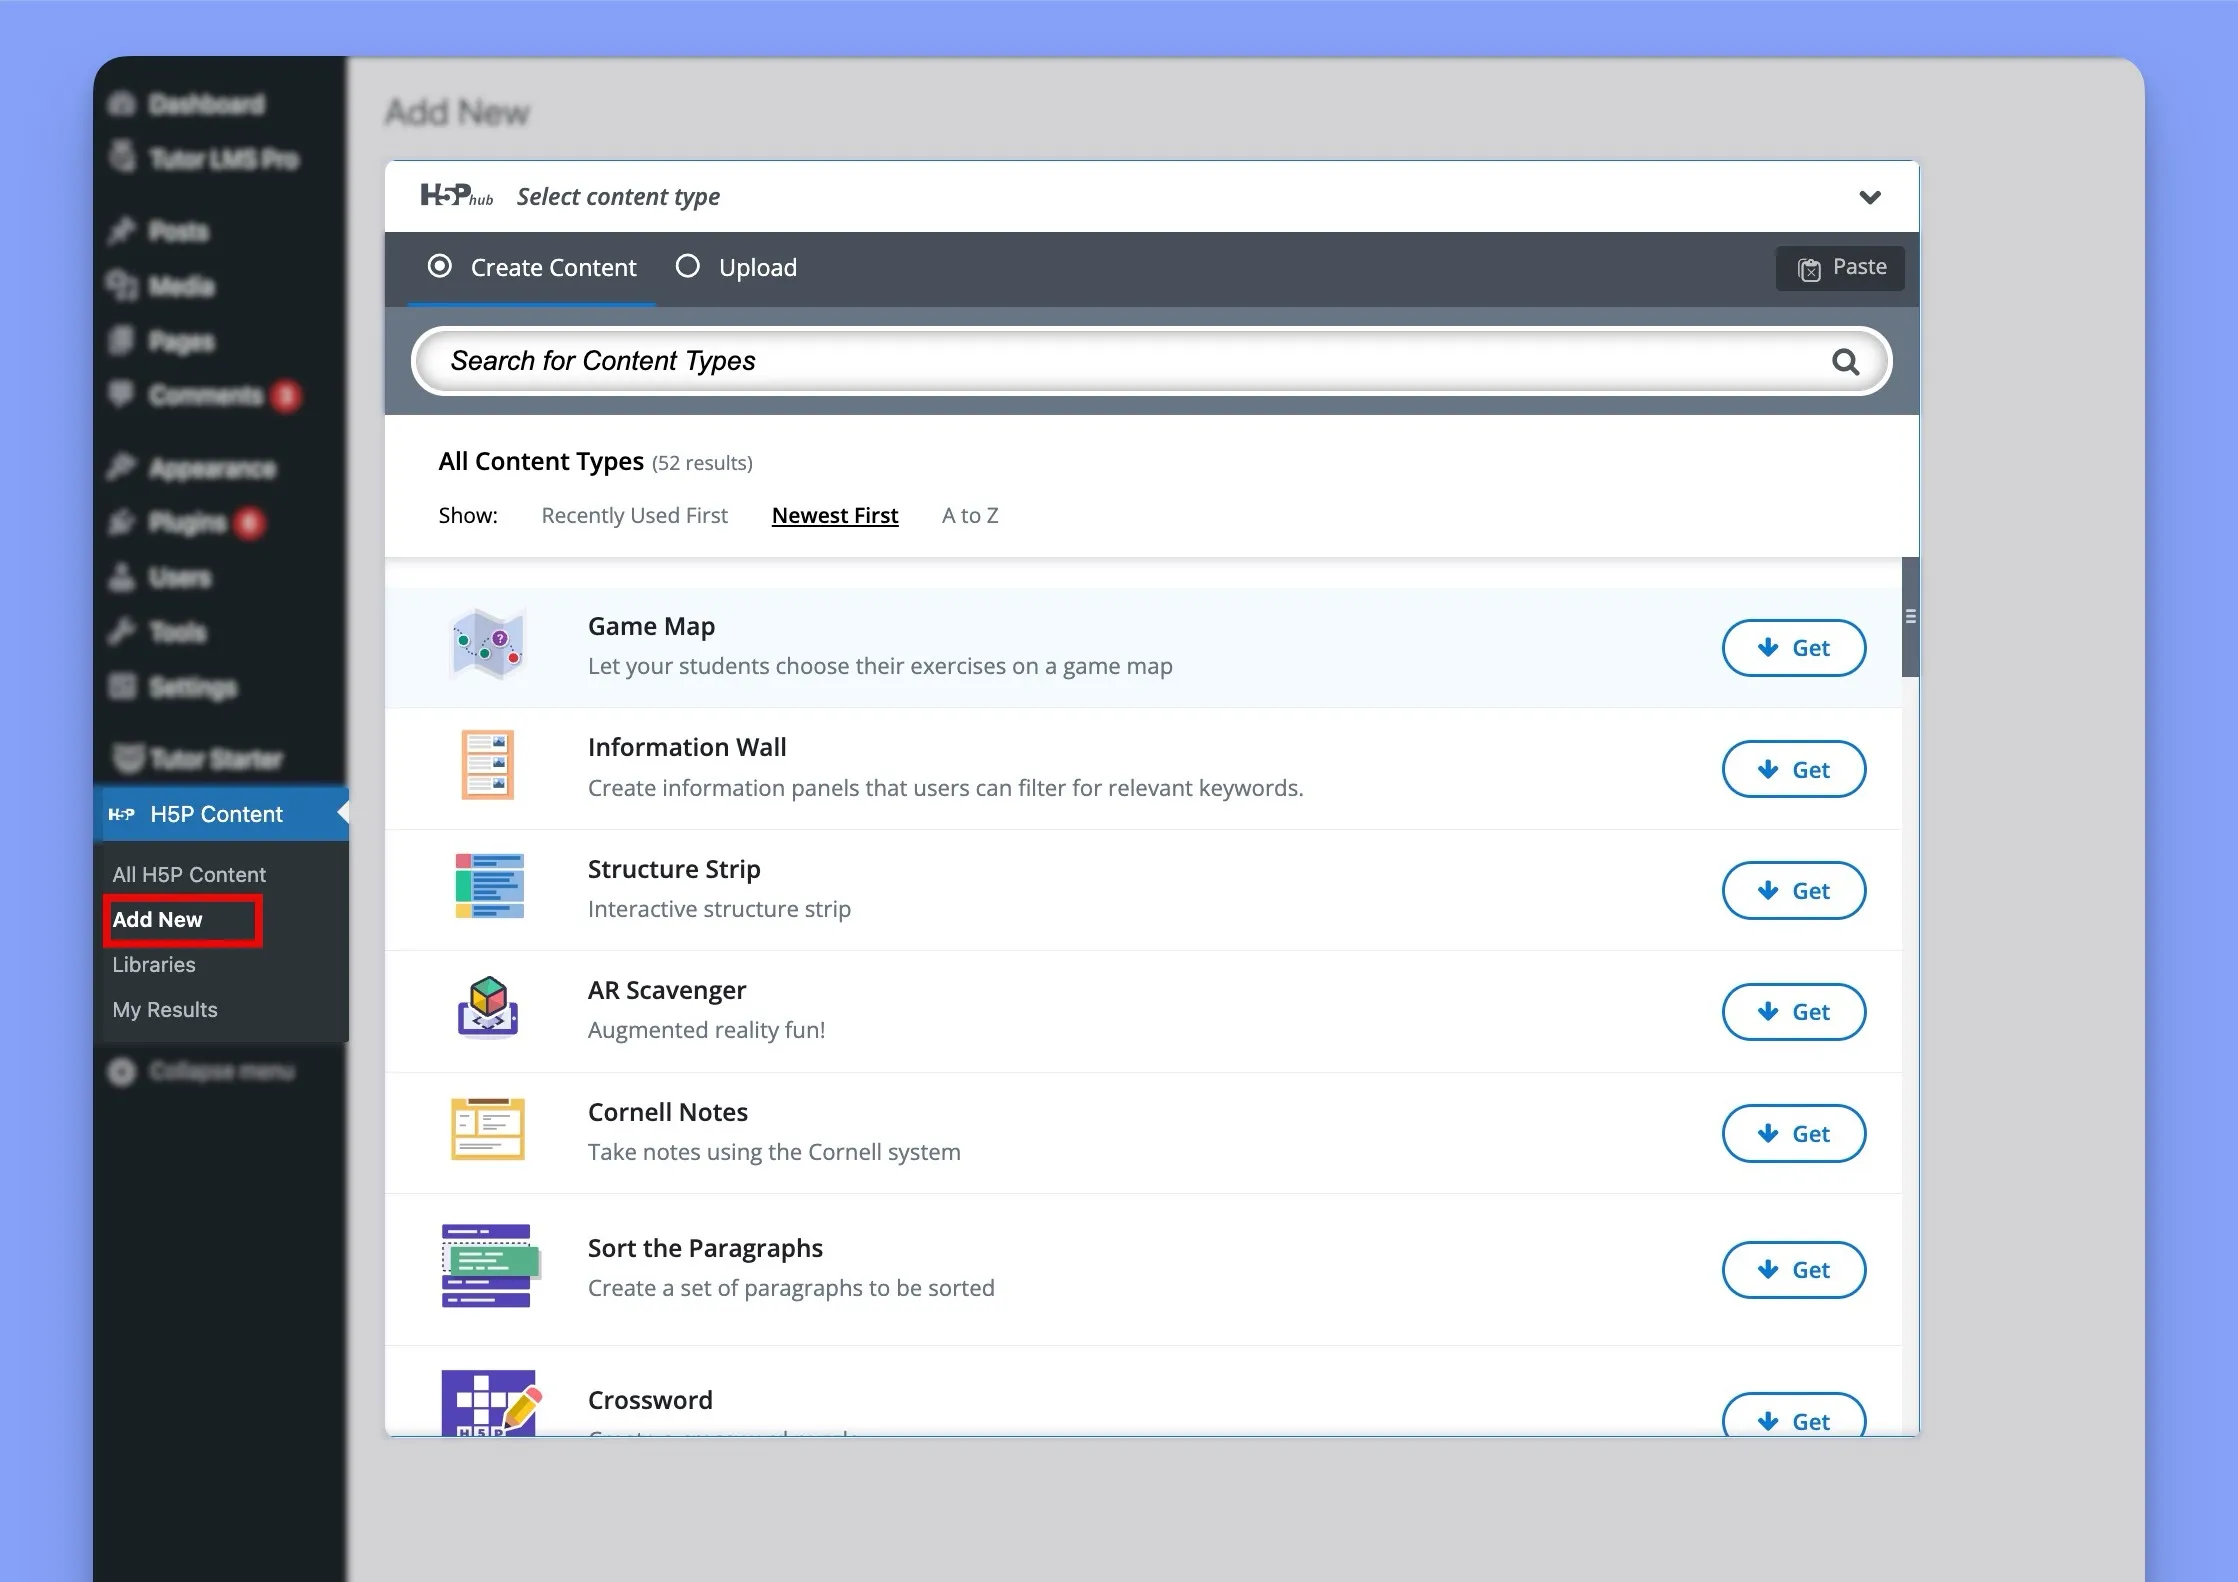
Finding Your Way Around the H5P Hub
Once inside the “H5Phub,” you’ll discover a wide array of content types, ready to be added to your learning toolkit. It’s important to note that initially, you’ll need to download each content type you wish to use. Simply click the “Get” button next to each H5P type to install it.
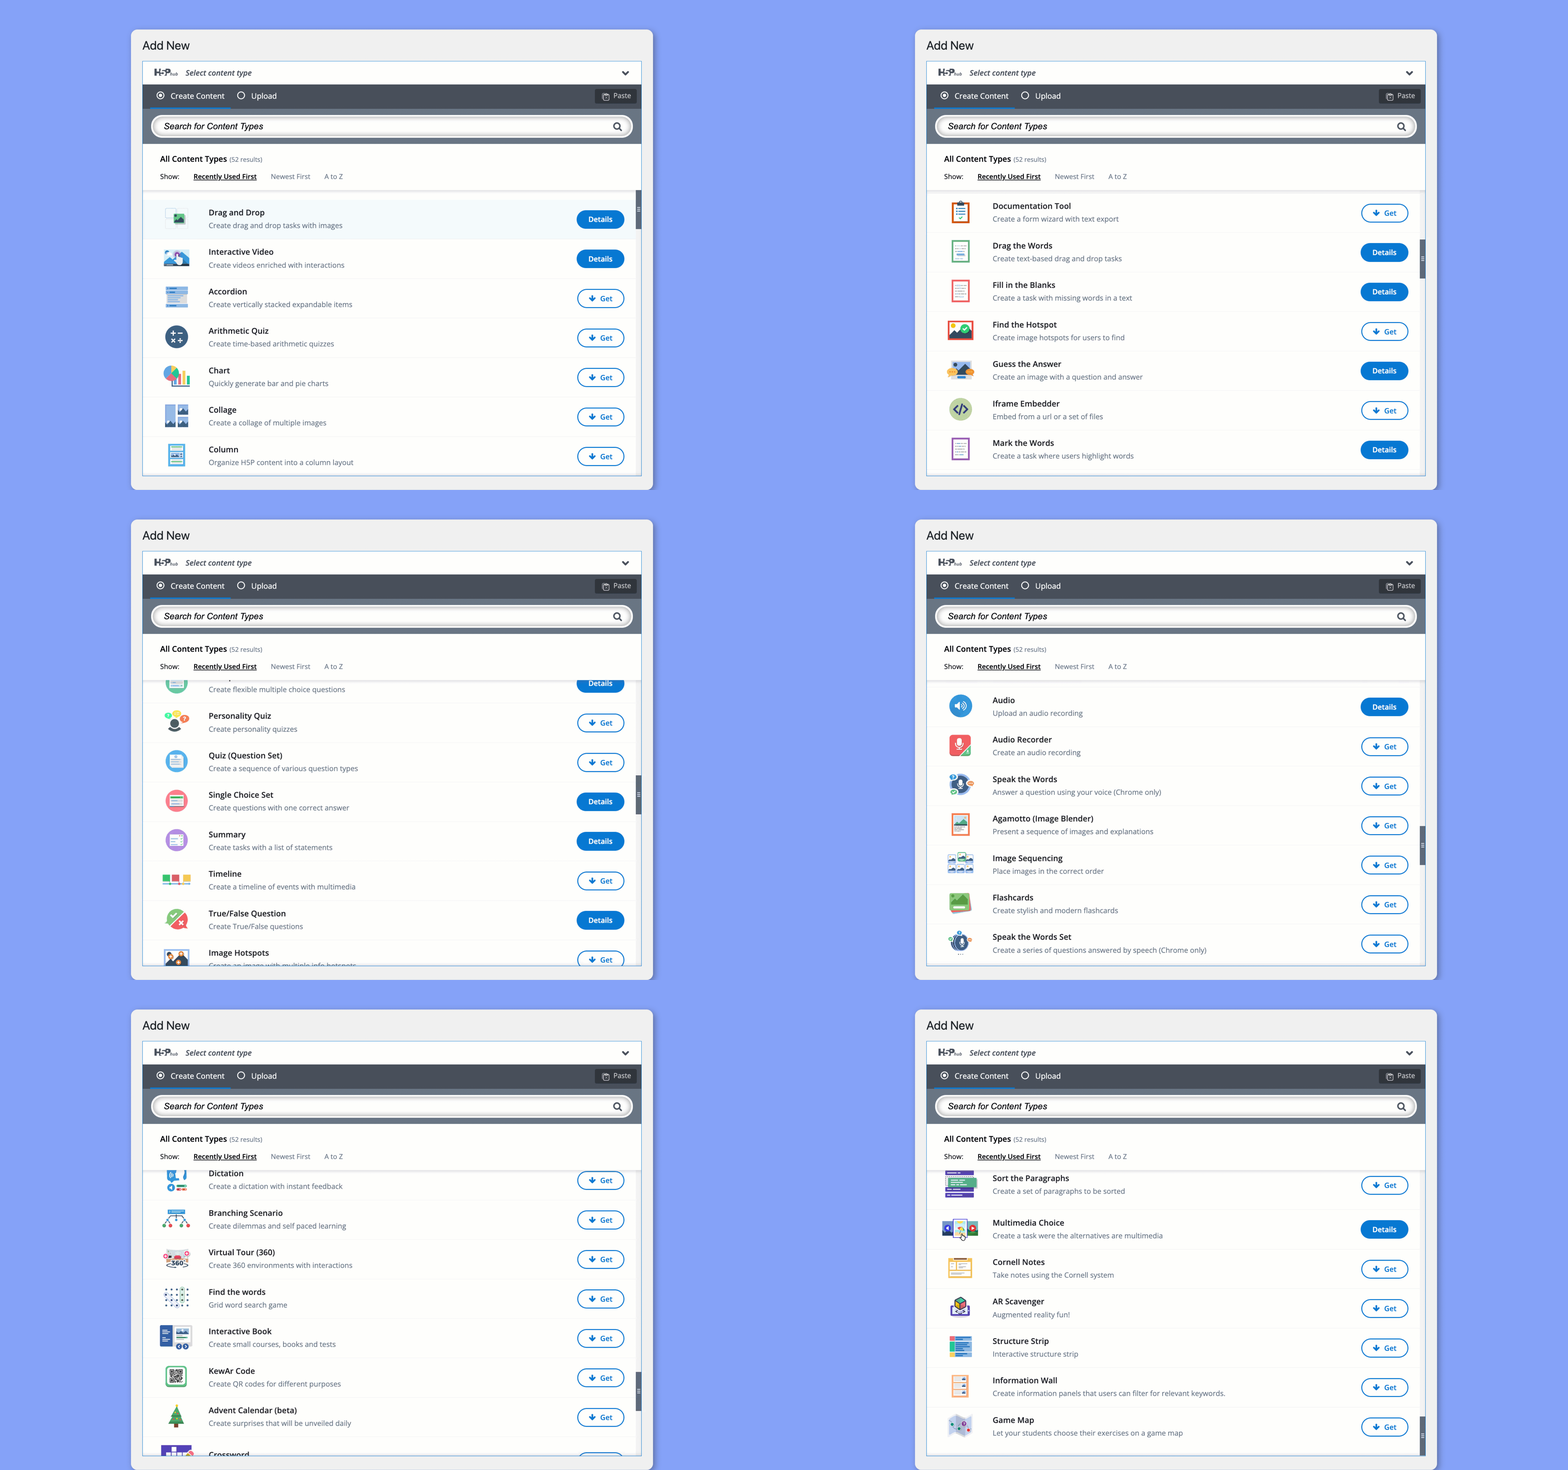
H5P offers diverse options to enrich your courses. We’re talking interactive videos that pause for questions, dynamic presentations, engaging memory games, and a variety of quiz formats. As of 2024, there were over 50 H5P content types available, and that number keeps growing!
Creating H5P Content in Tutor LMS
Now that you’ve got the basics down, let’s explore a few of the more popular H5P content types and how to create them within Tutor LMS.
How to Create an Interactive Video in H5P
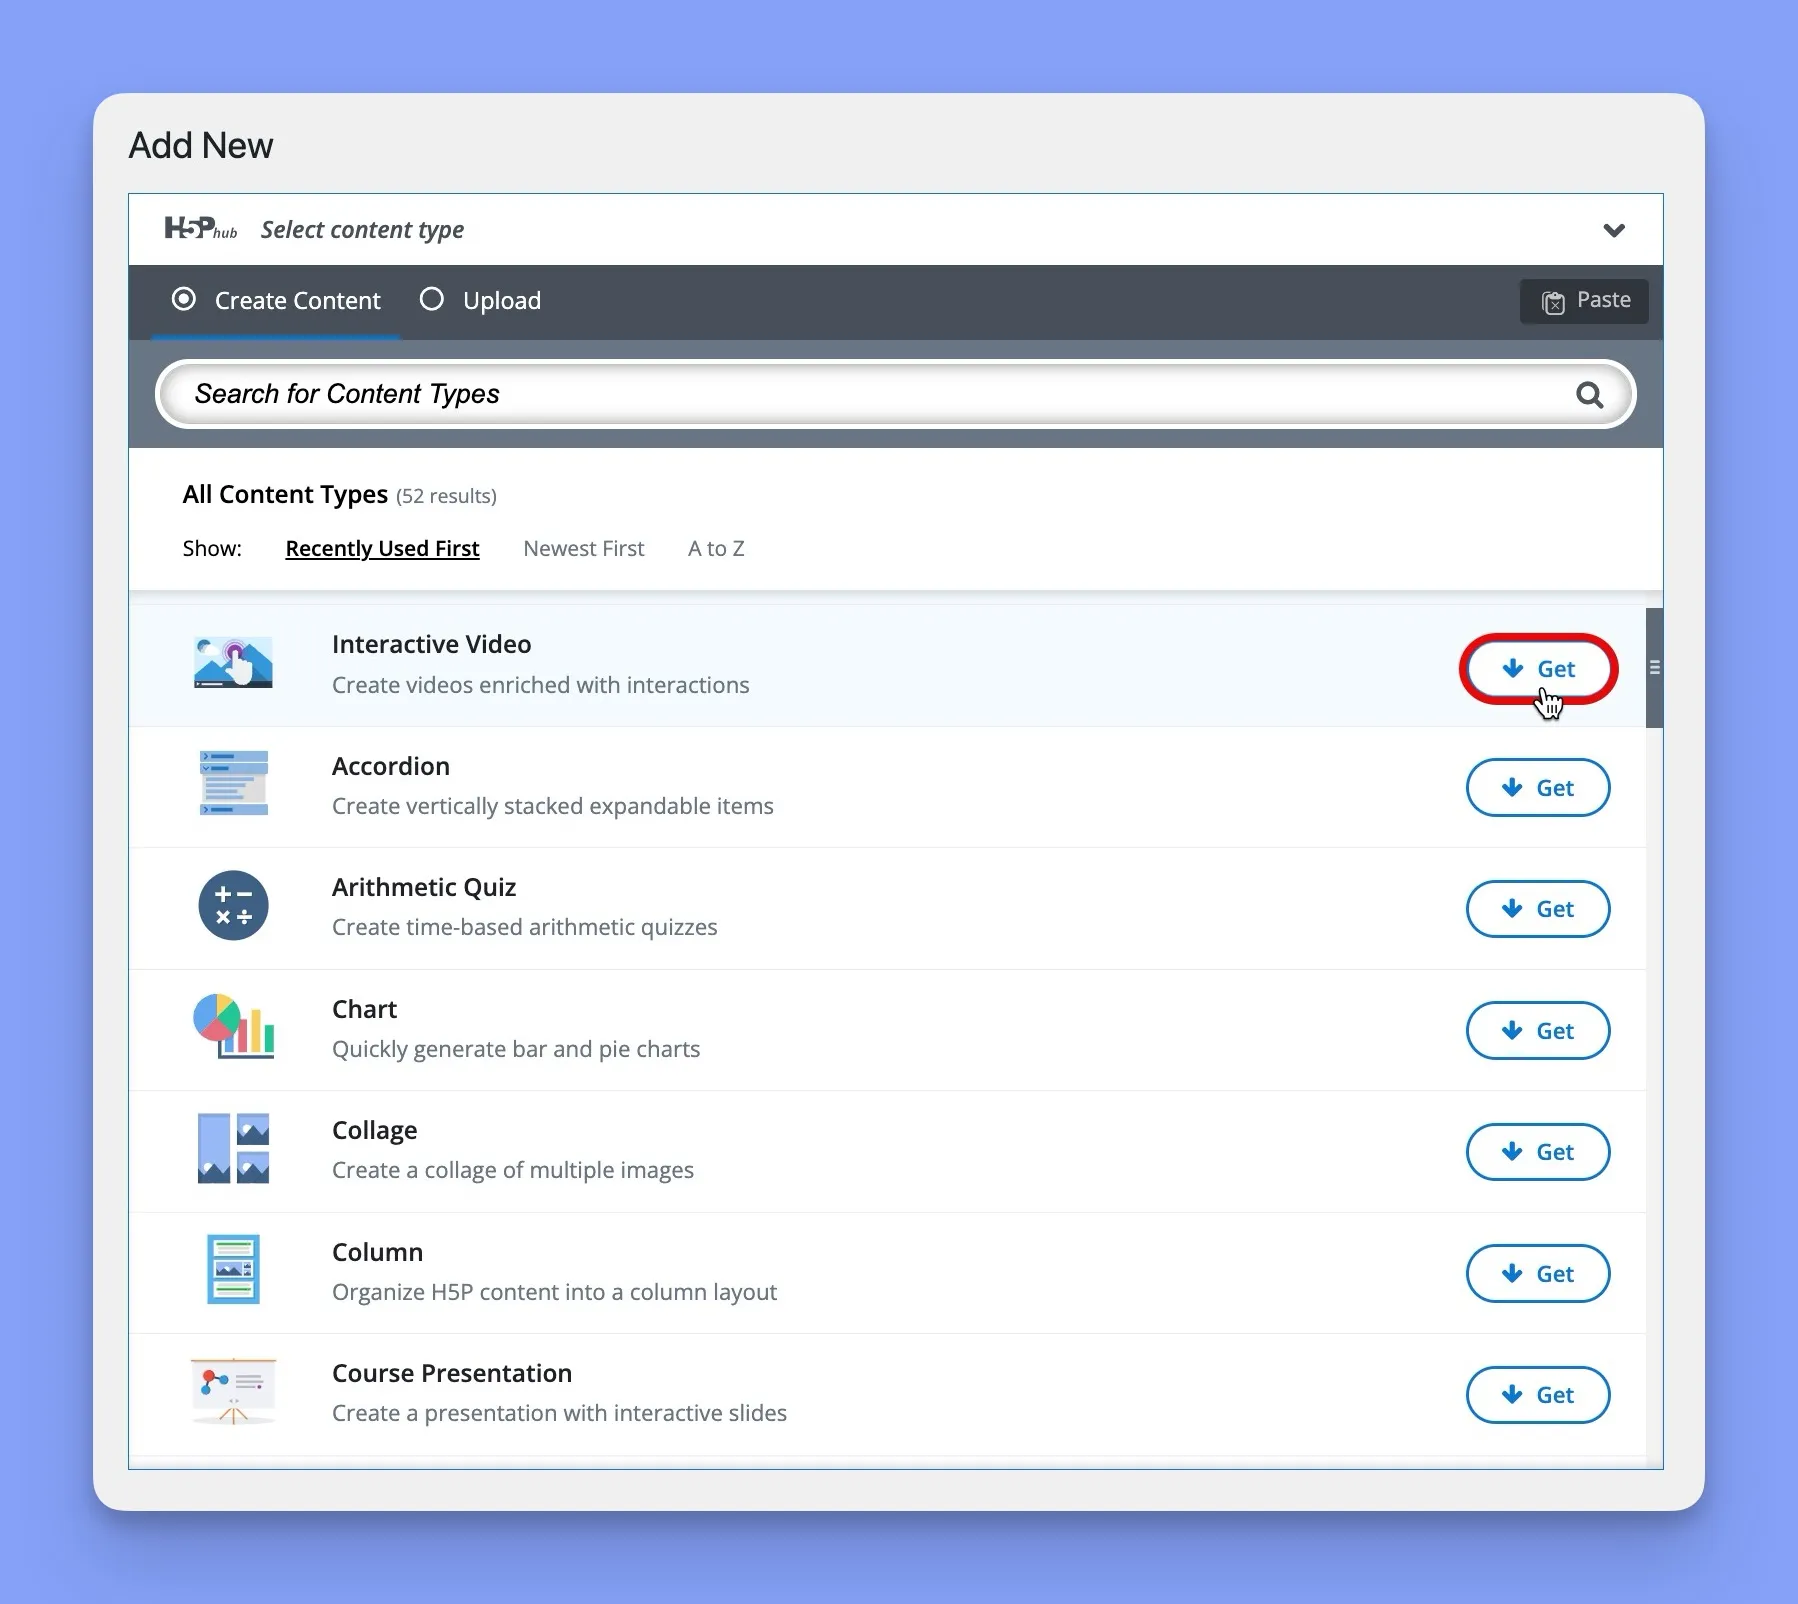
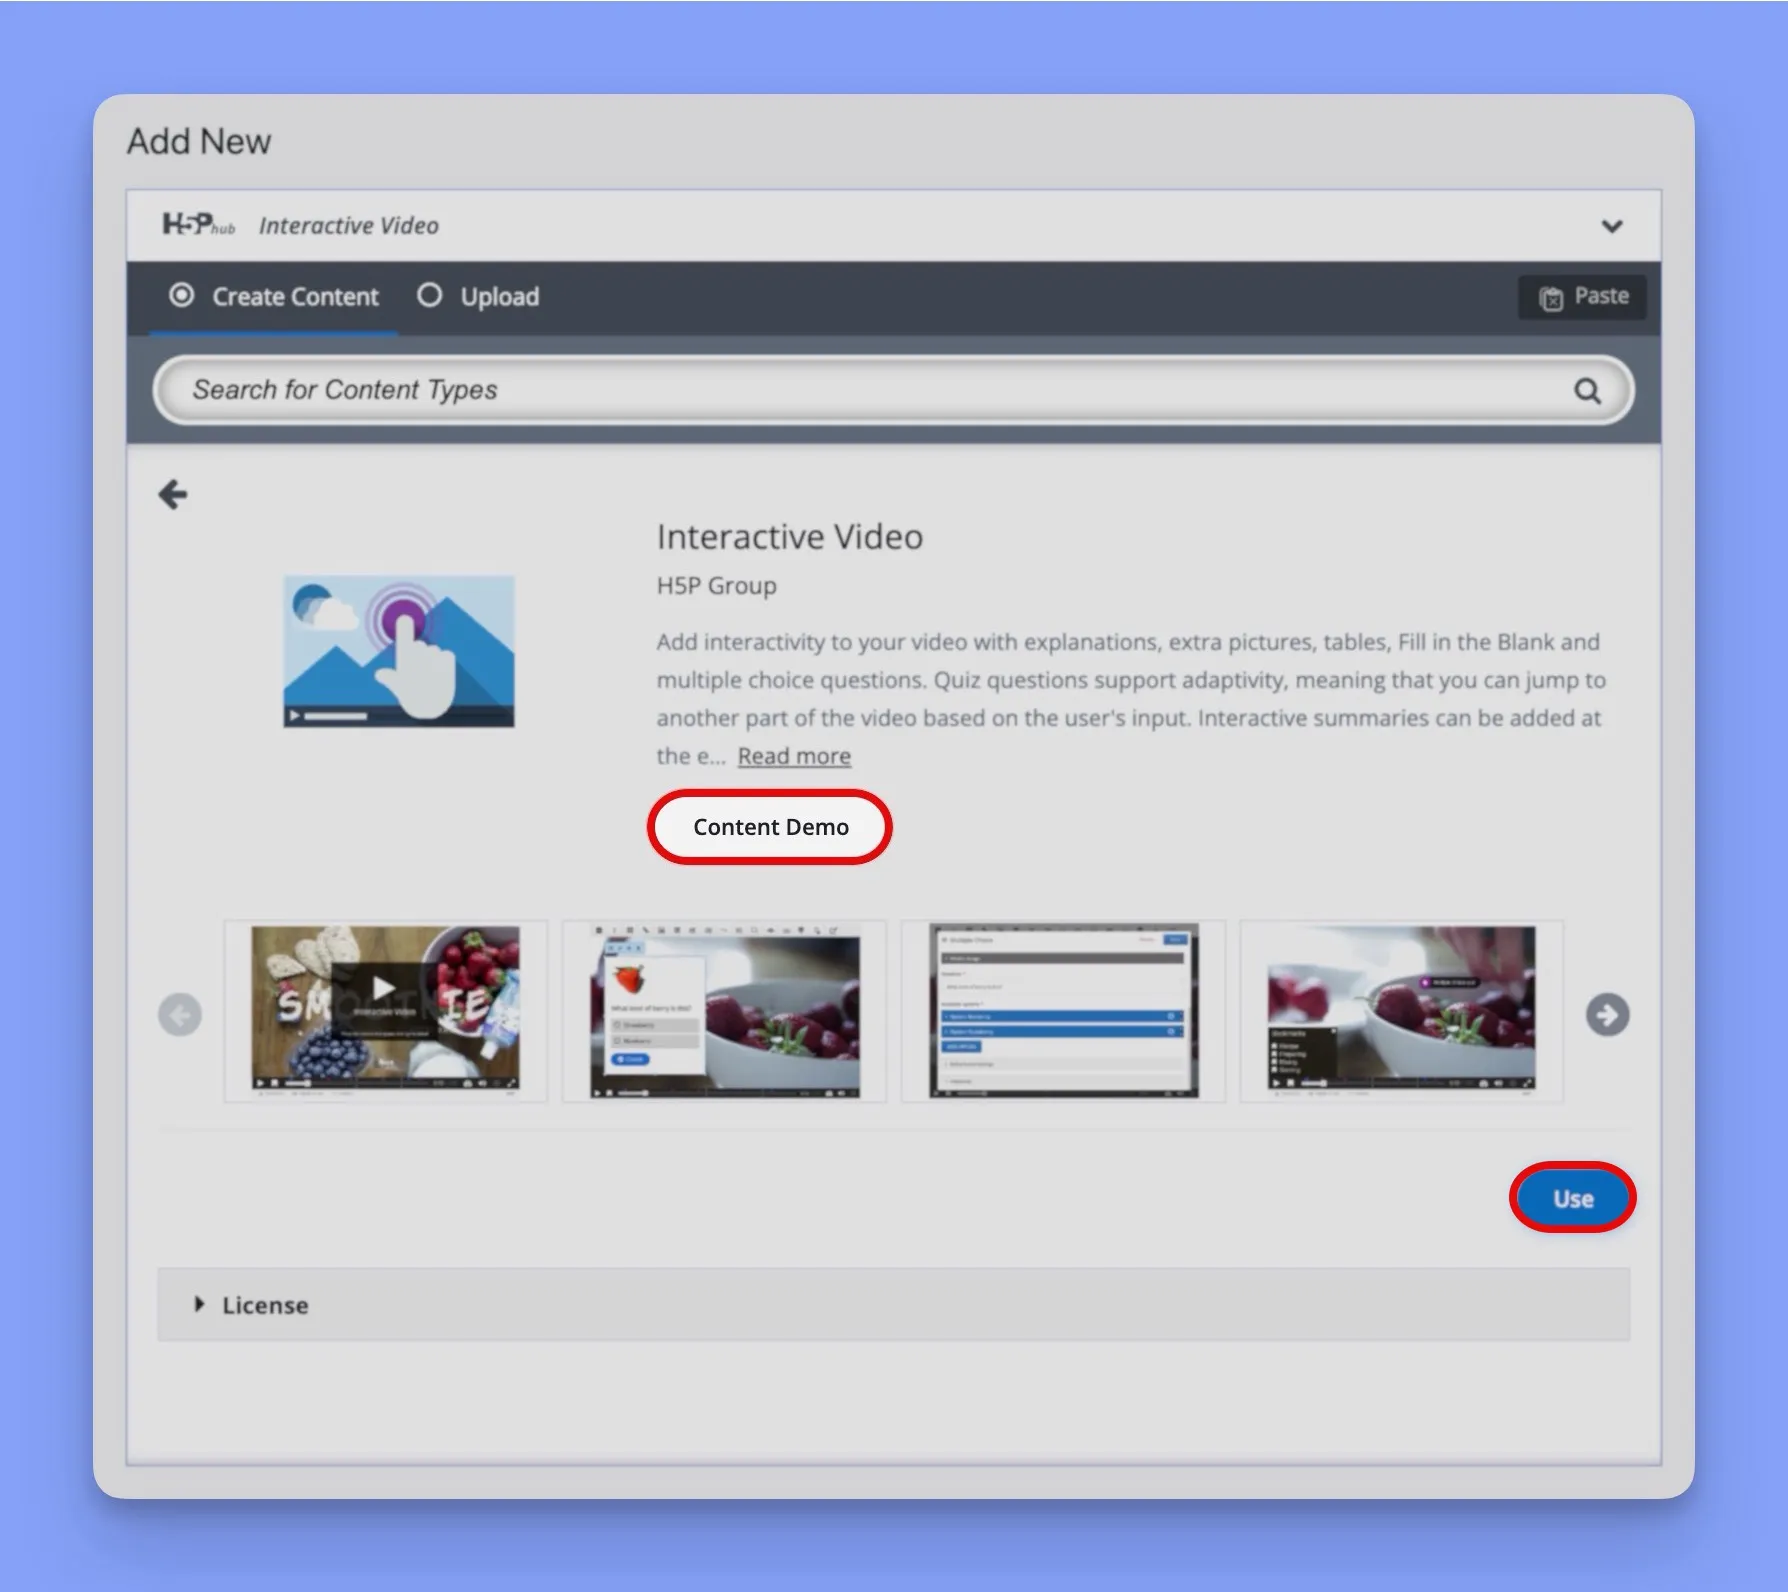
To get started, you’ll first need to make sure you have the Interactive Video content type downloaded. You can do this by going to your H5P Hub and pressing the “Get” button next to Interactive Video.
Once the download is complete, click the “Details” button to get started.
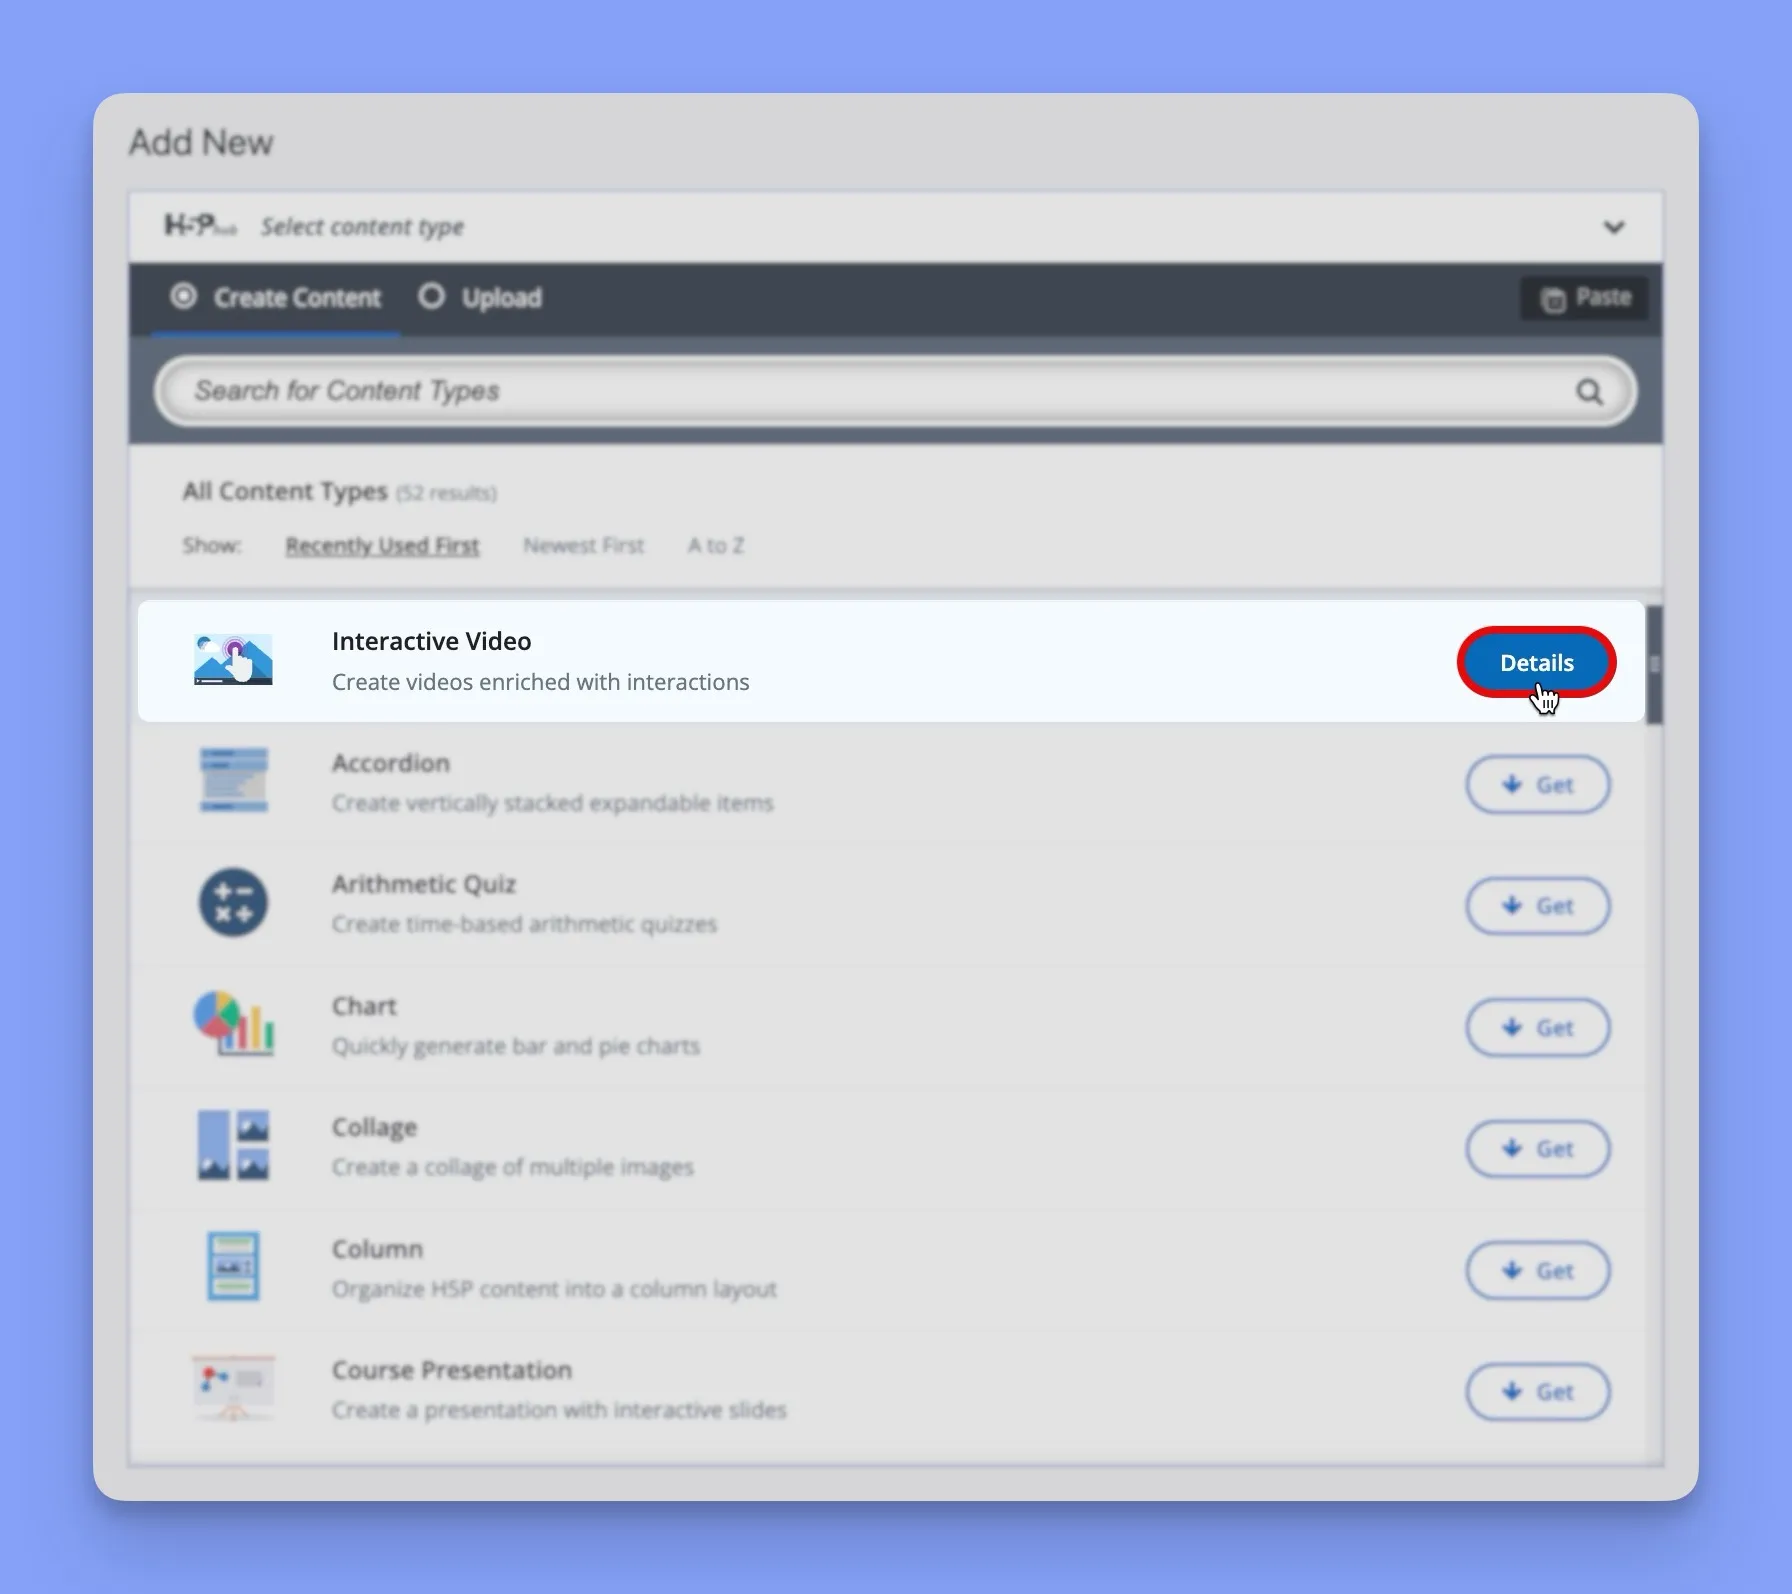
Please Note: Before you jump in, take a moment to watch the demo content for each content type in the H5P Hub. This will give you a good idea of how it works and the different ways you can use them. Once you’re feeling inspired, press the “Use” button to get started on your own creation!
Step 1: Name Your Video and Add Your Content
First, give your Interactive Video a clear and descriptive title. This will help you stay organized and make it easy for your students to find what they’re looking for.
Next, it’s time to add your video! You have two options here:
- Upload a video file: If you have a video saved on your computer, you can upload it directly to H5P.
- Provide a video link: If your video is hosted on YouTube, Vimeo, or another platform, you can simply paste the link into H5P.
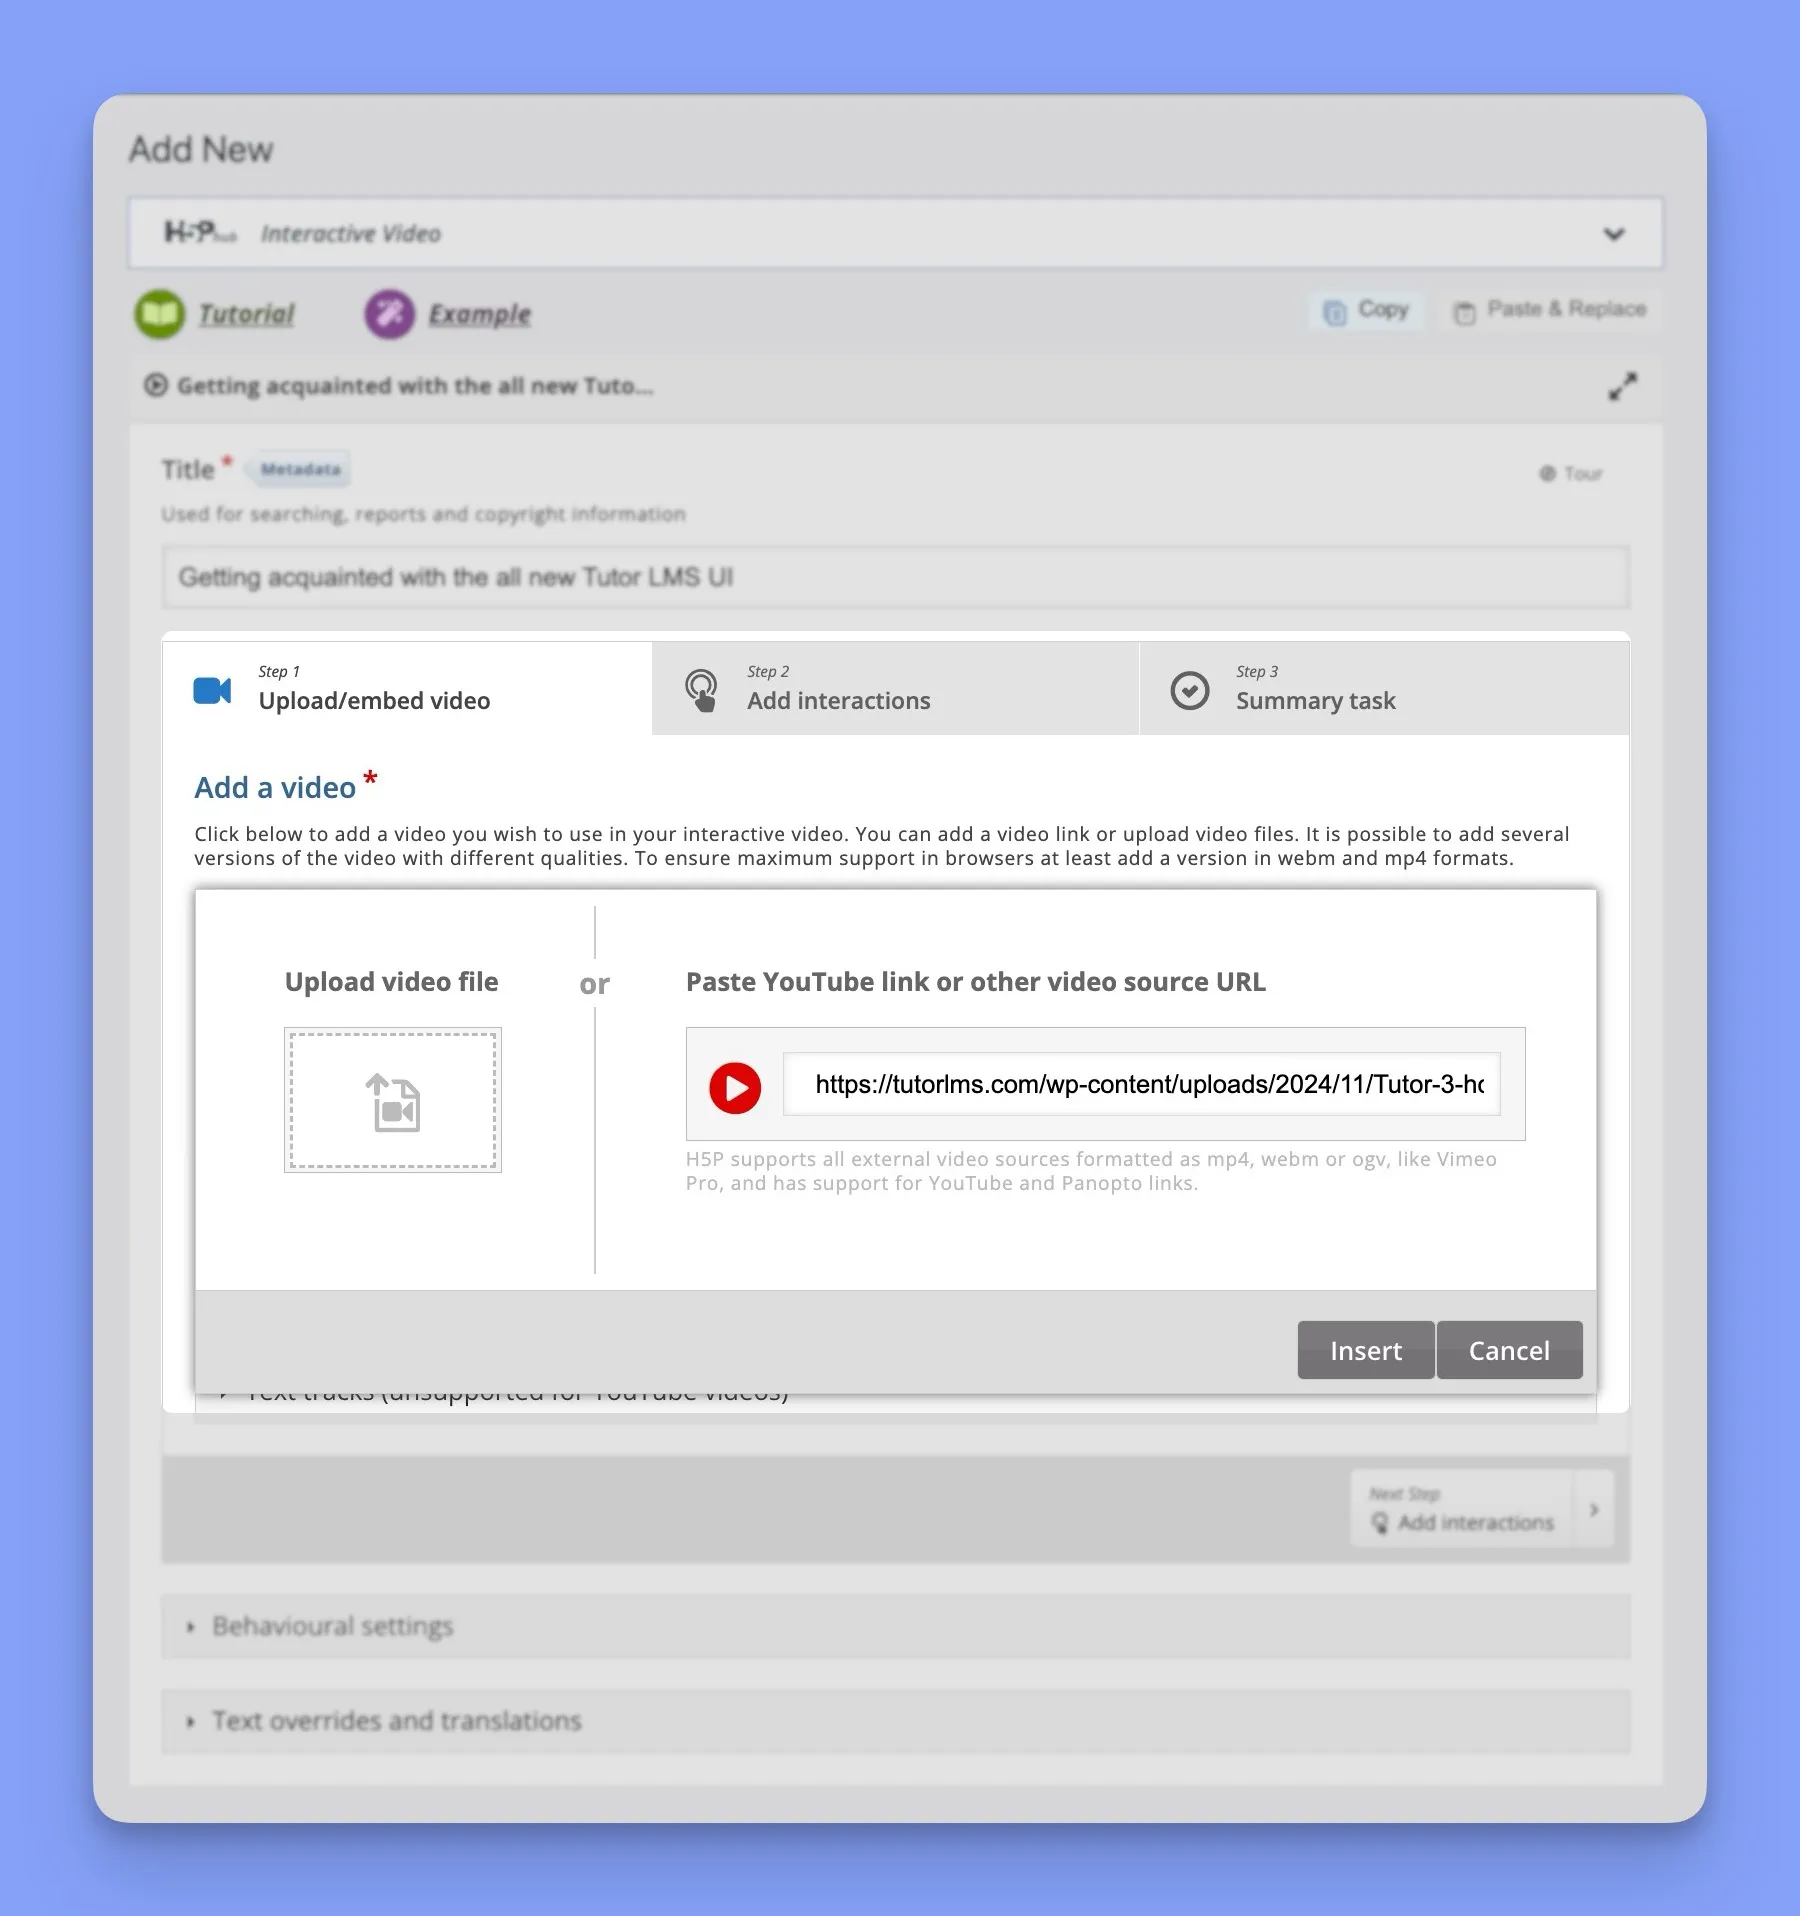
H5P supports various video formats, so you should be able to use most common video files without any issues.
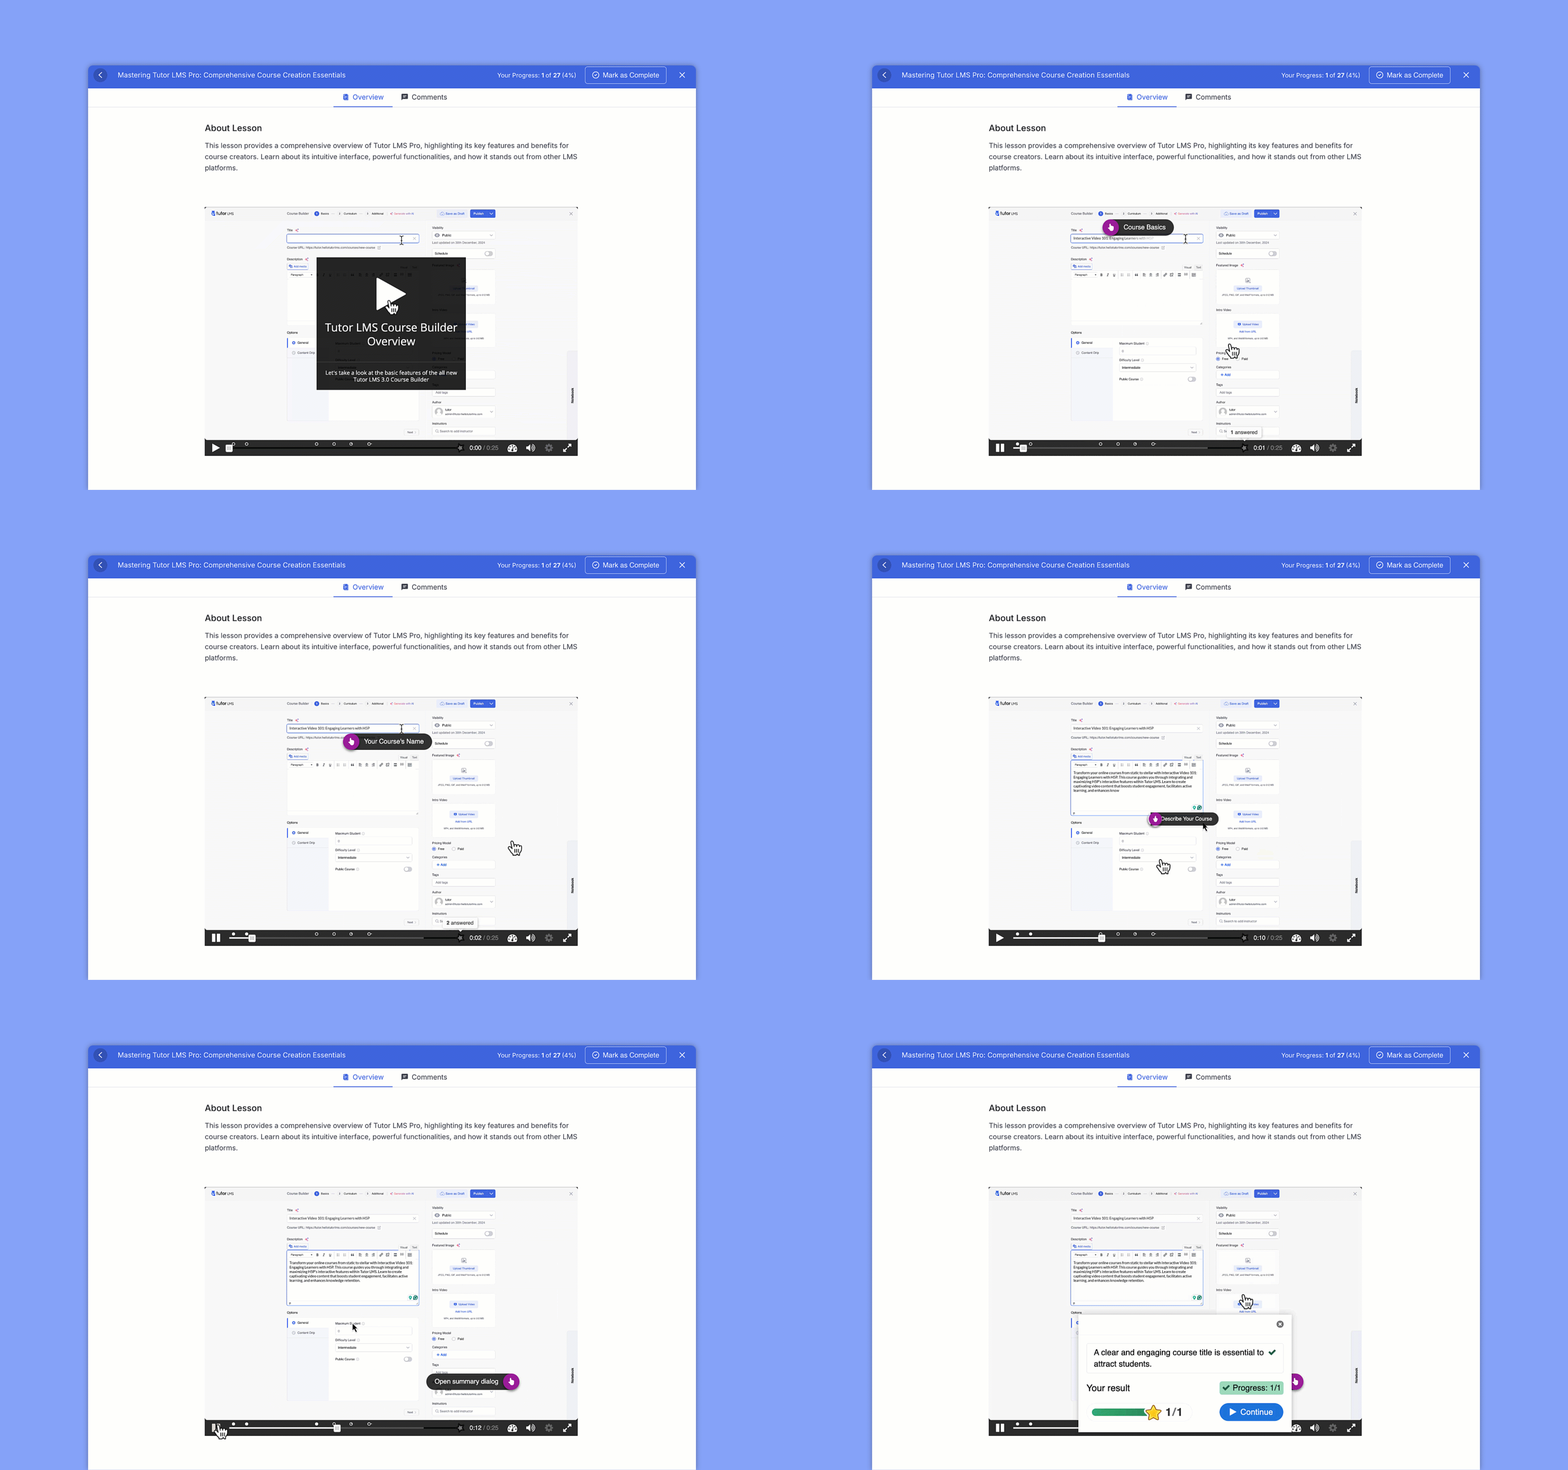
Step 2: Add Interactive Elements
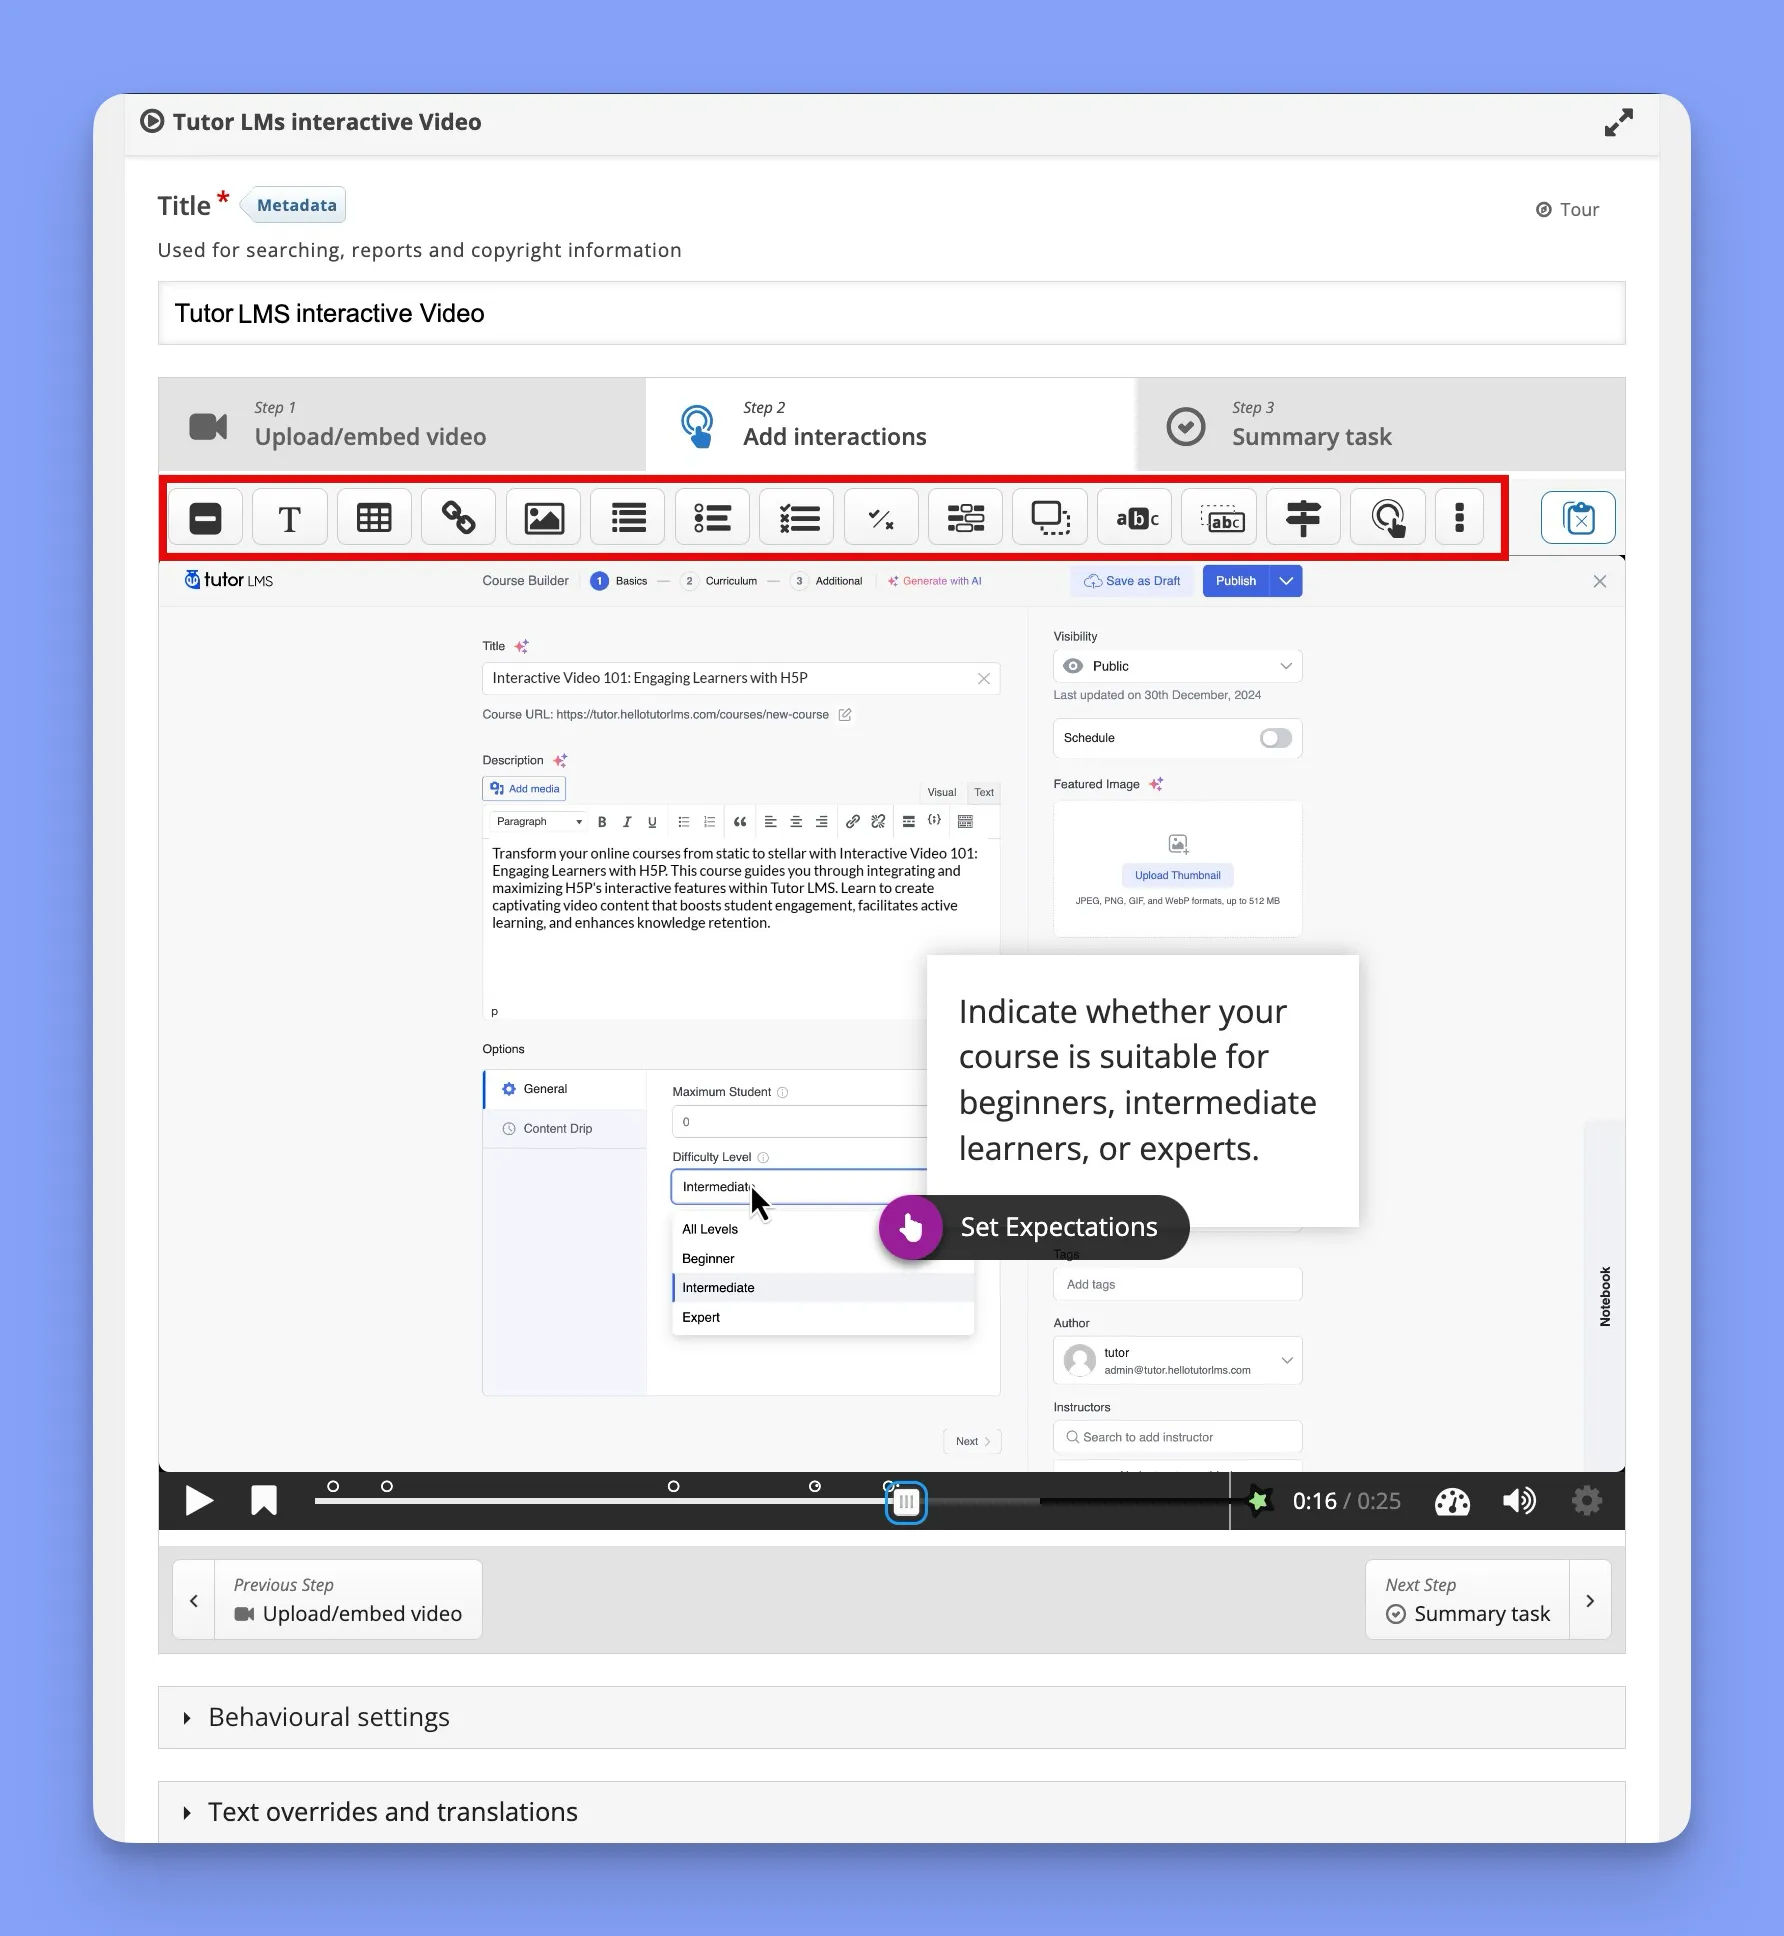
Now for the fun part, adding interactions! This is where you transform a passive video into an active learning experience. You can add a variety of interactions, such as:
- Questions: Embed multiple-choice, true/false, or fill-in-the-blank questions at specific points in the video.
- Images and Text: Add pop-up images or text boxes that provide additional information or context.
- Links: Include links to external resources or websites for further exploration.
- Interactive summaries: Create summaries that appear at the end of the video, allowing students to review key concepts.
- Hotspots: Highlight specific areas within the video frame that, when clicked, trigger additional information, actions, or navigation to other parts of the video or external resources.
Step 3: Create a Summary Task
At the end of your interactive video, you can add a summary to help your students reflect on what they’ve learned. You can create a simple text summary or use a more interactive format, such as a multiple-choice quiz or a drag-and-drop activity. Finally, click the “Create” Button to save your content.
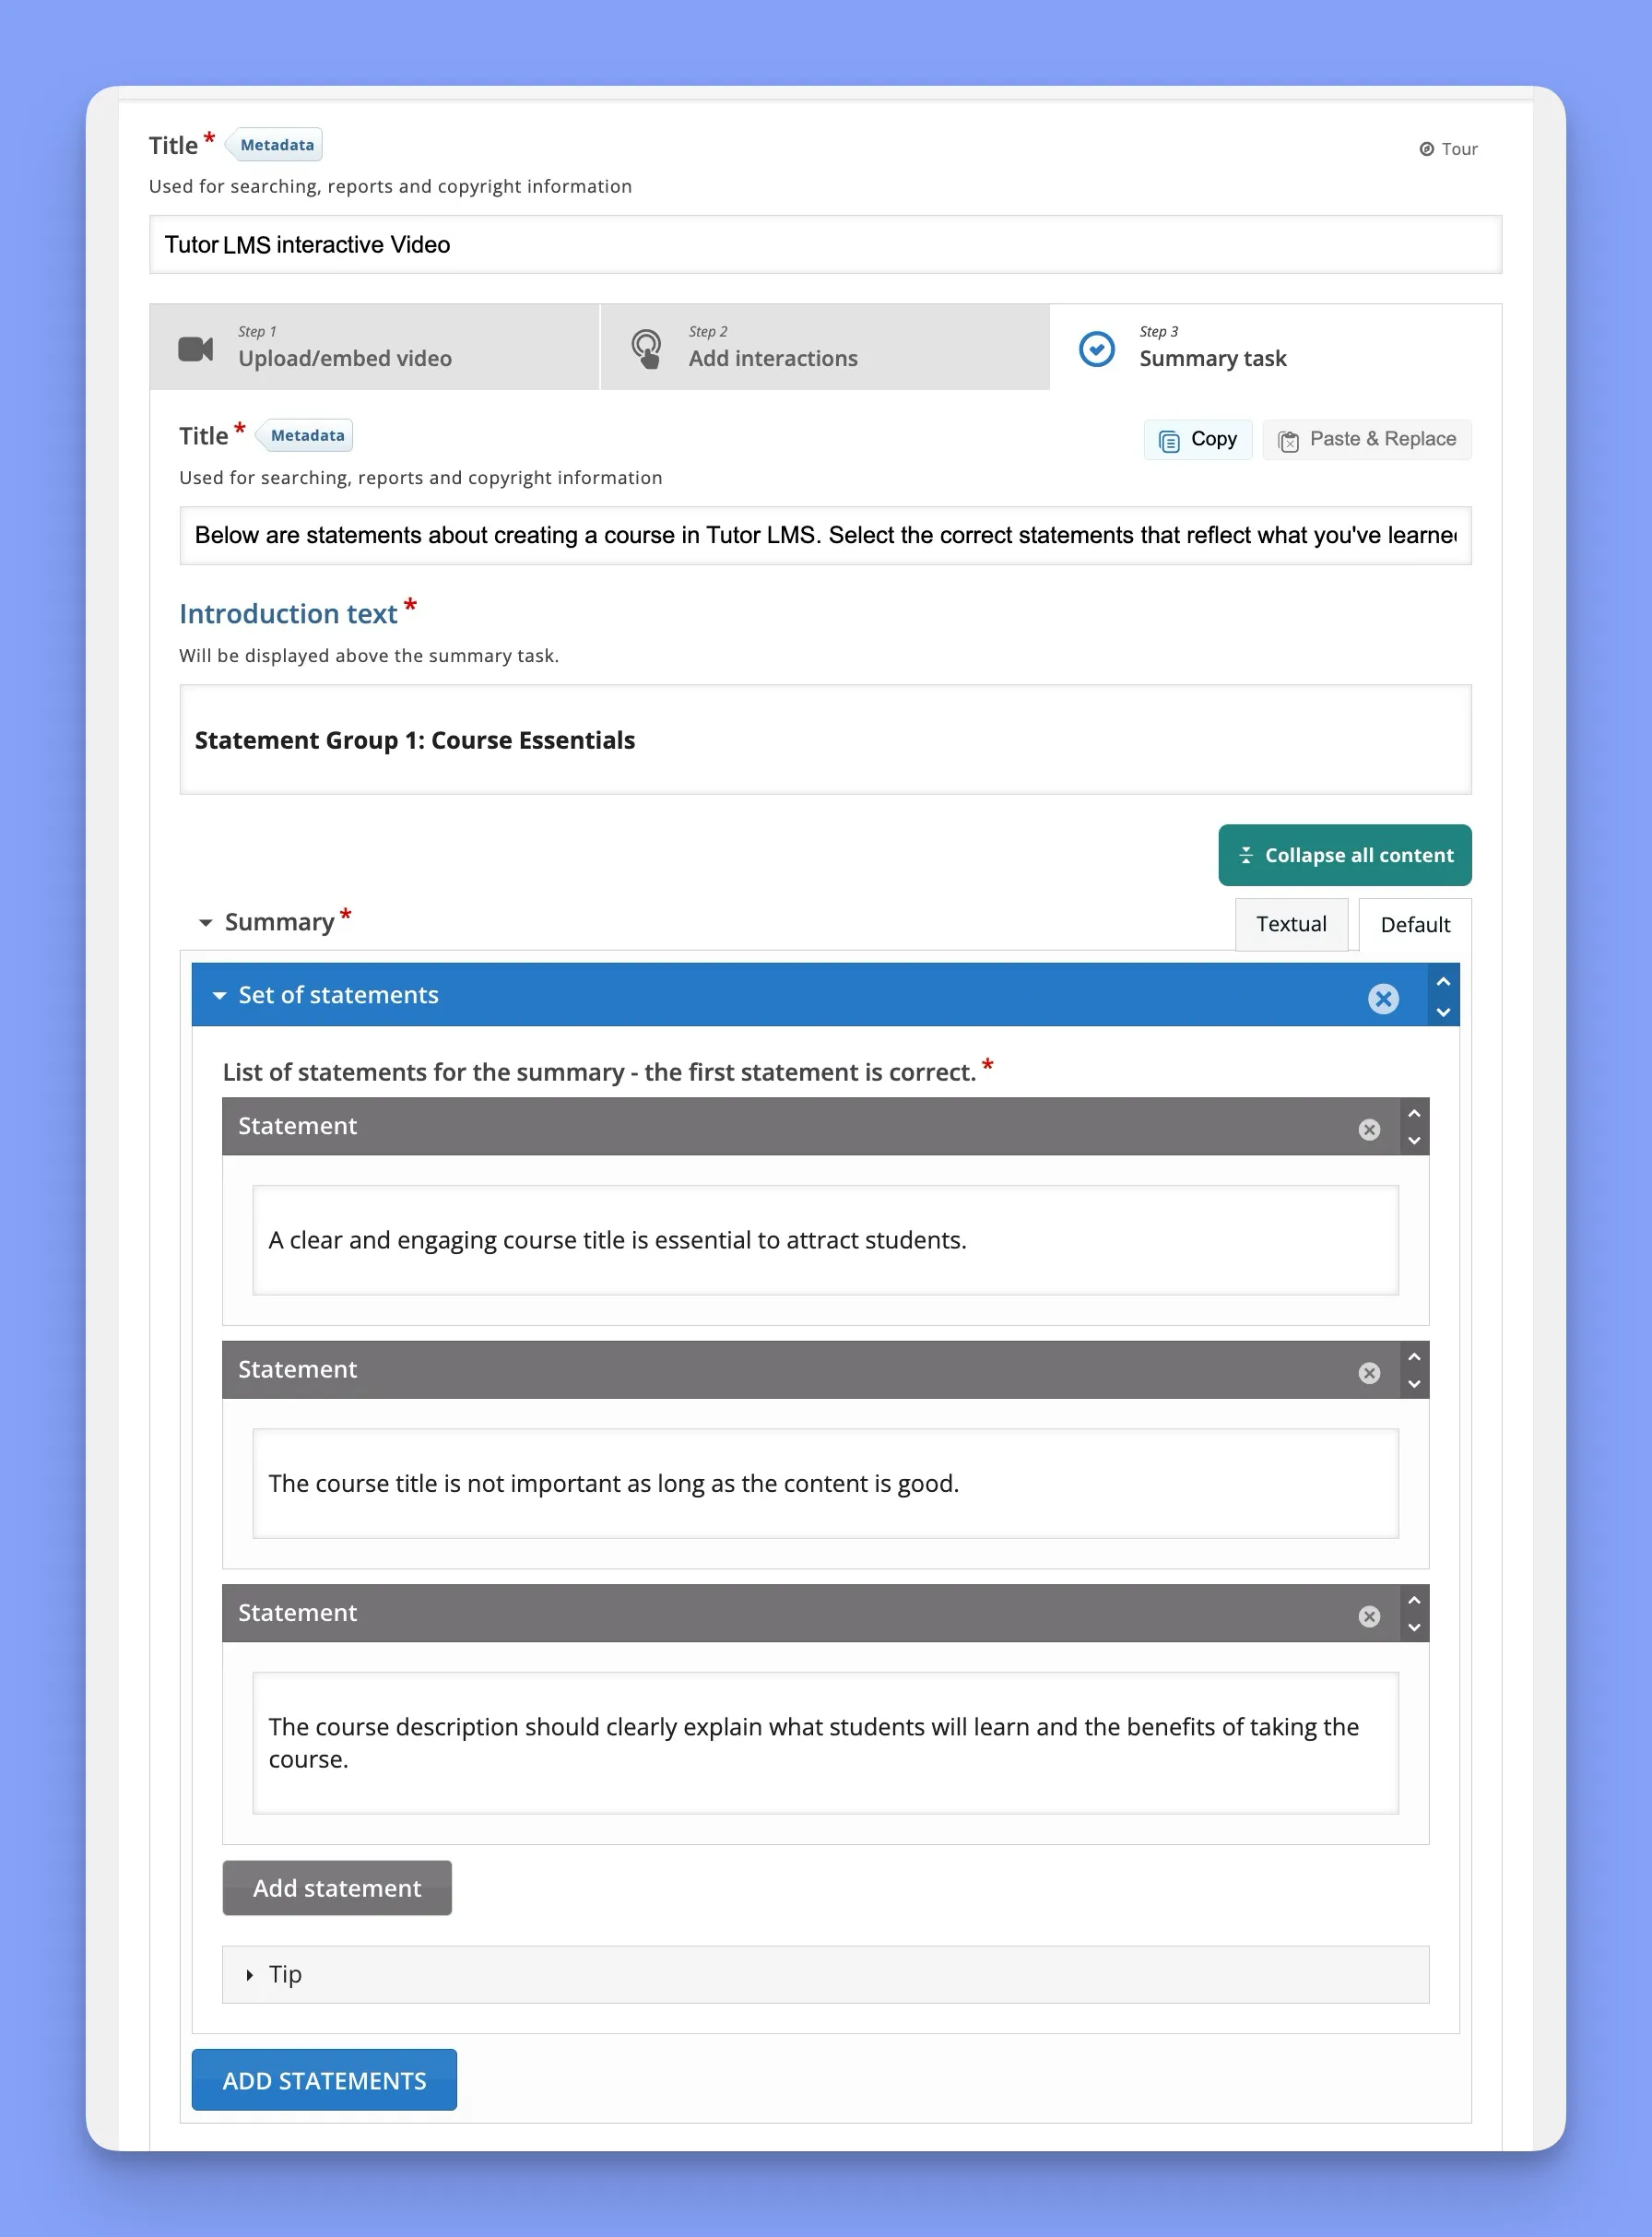
That’s it! You’ve successfully created your first interactive video. You can now locate it within your WordPress dashboard by navigating to ‘H5P Content’ -> ‘All H5P Content‘.
How to Create a Branching Scenario Content in H5
Now, let’s move on to another exciting H5P content type that can add a whole new dimension to your Tutor LMS courses: Branching Scenarios. These scenarios can offer a dynamic “choose your own adventure” learning experience.
This powerful H5P content type lets you create interactive narratives where your students’ choices shape their learning journey, making for a truly engaging and personalized experience.
Creating Your First Branching Scenario in Tutor LMS
Ready to create your own branching scenario? Let’s walk through the steps:
- Access H5P Hub: Similar to the H5P interactive video we created navigate to “WP dashboard>H5P Content> Add New” and select “Branching Scenario” from the list of content types.
- Give It a Title: Start by giving your Branching Scenario a descriptive title that reflects the content. For example, “Ethical Dilemma in Marketing.”
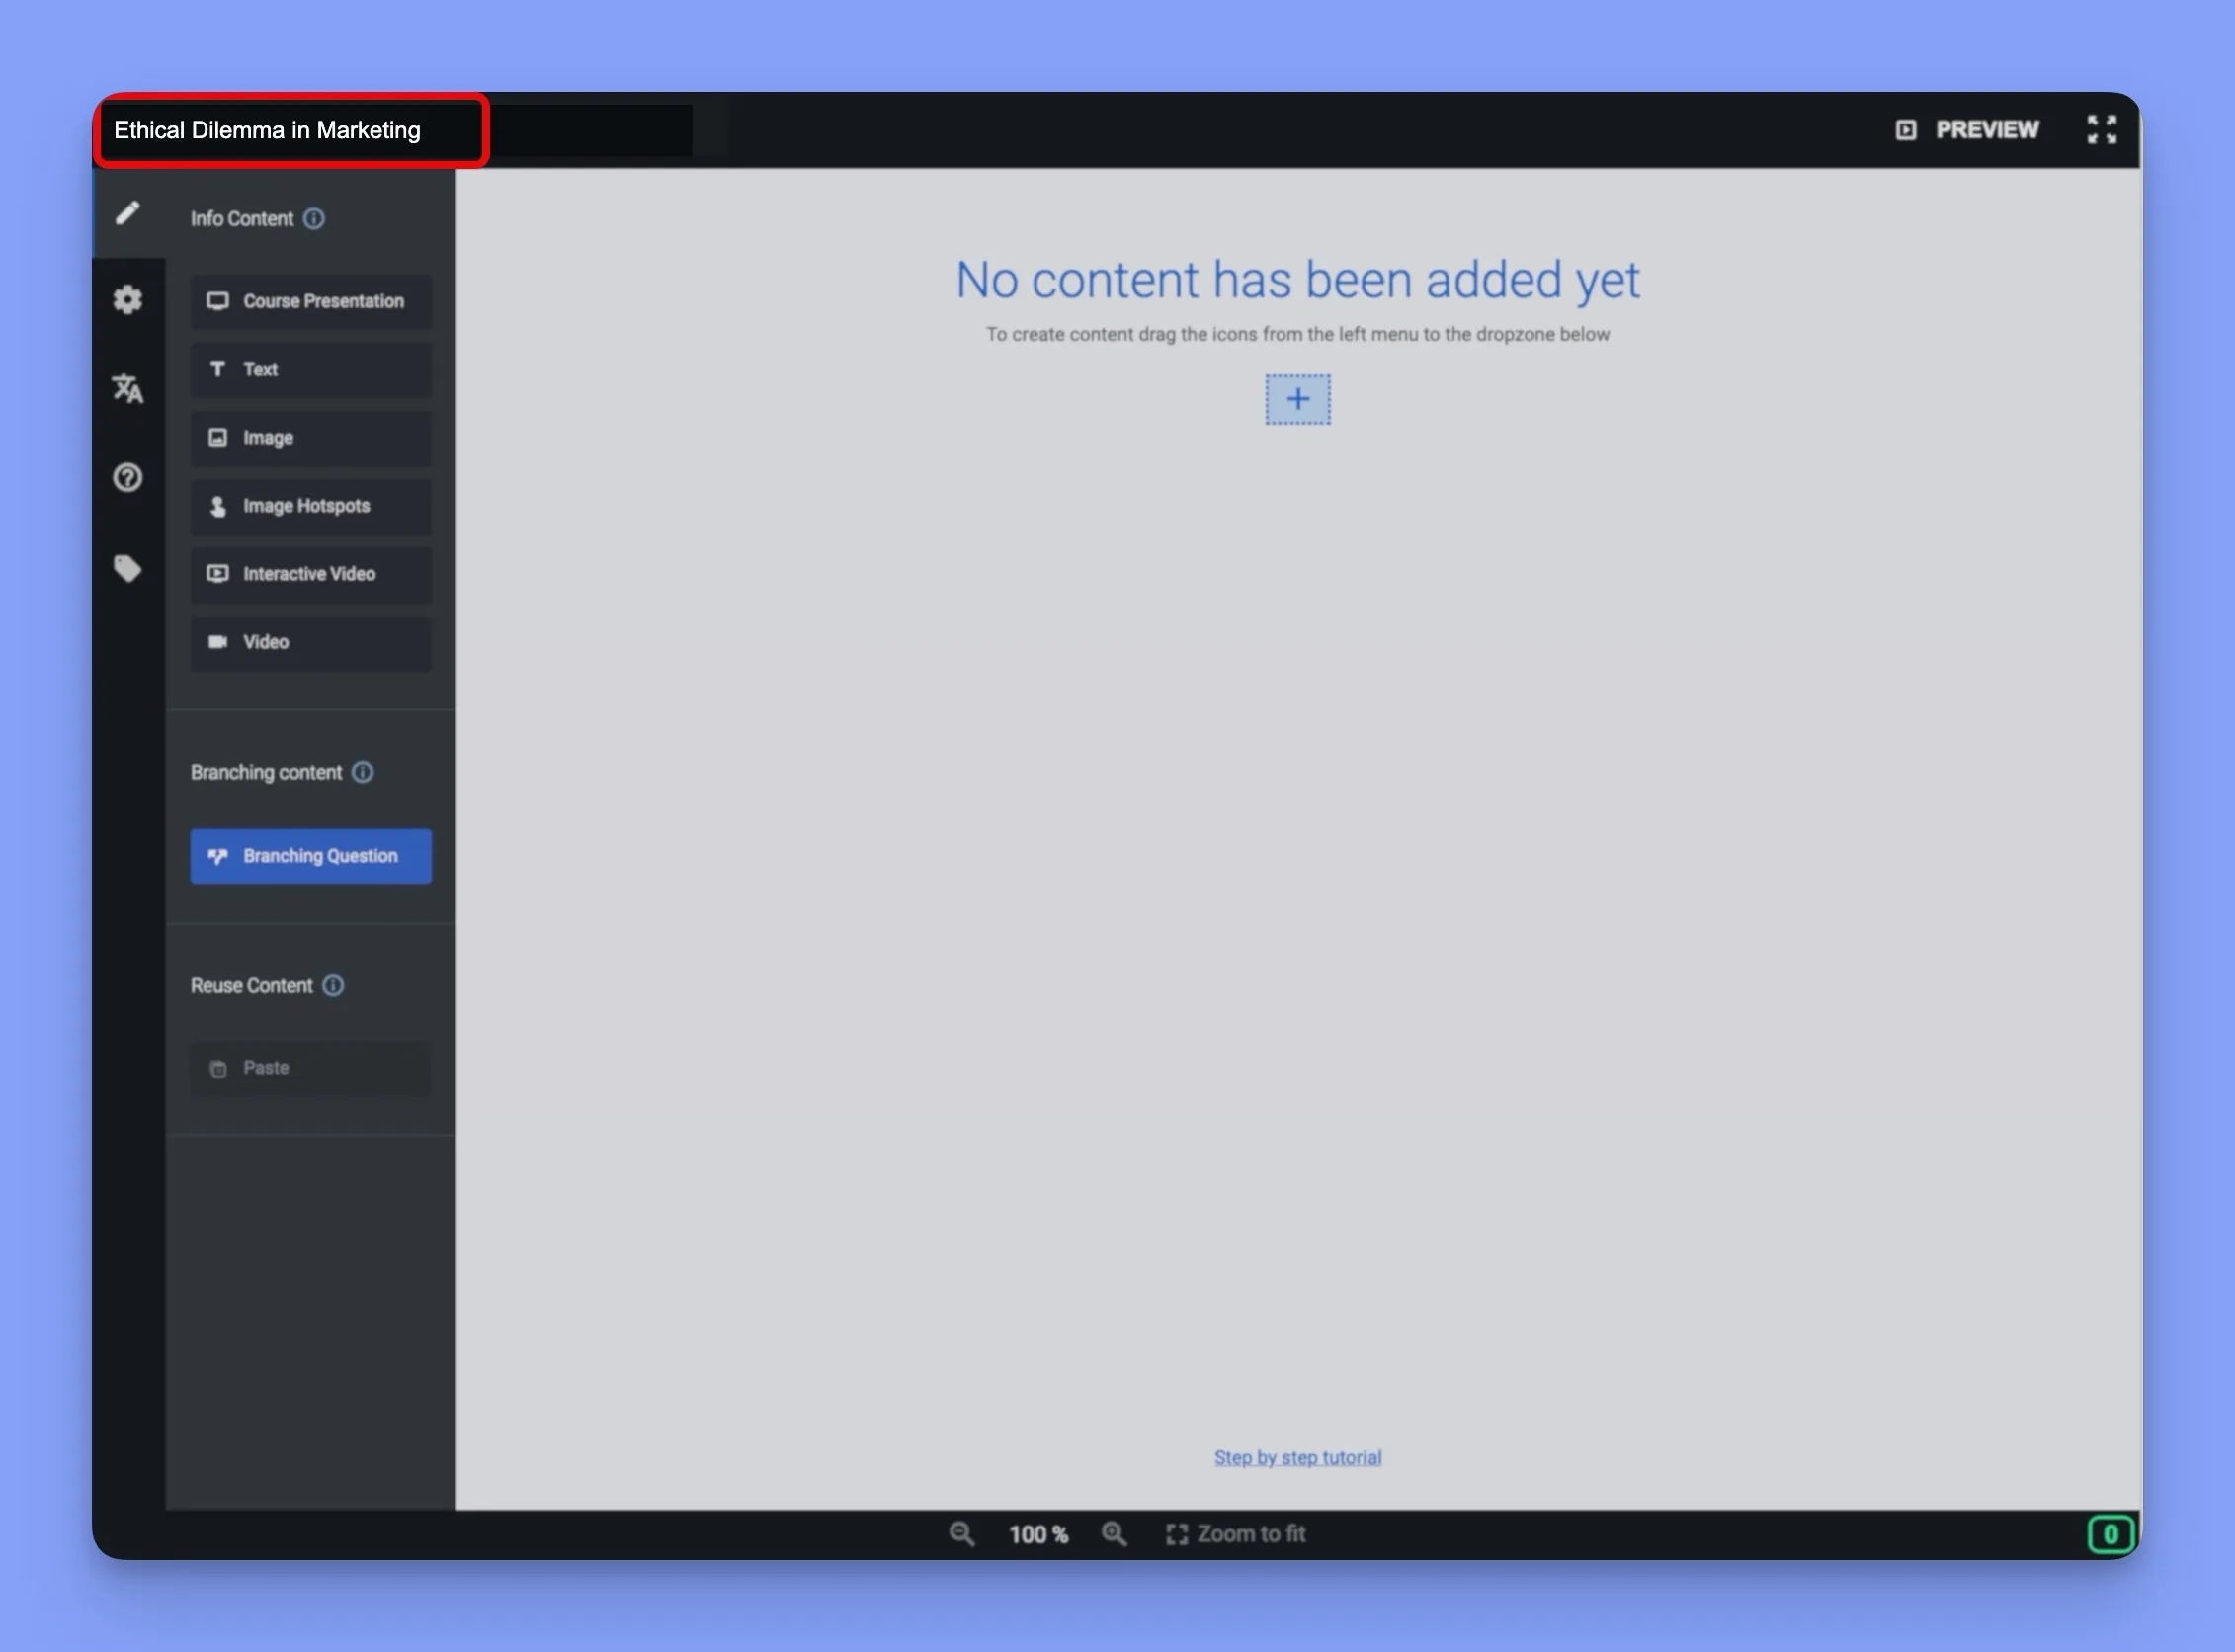
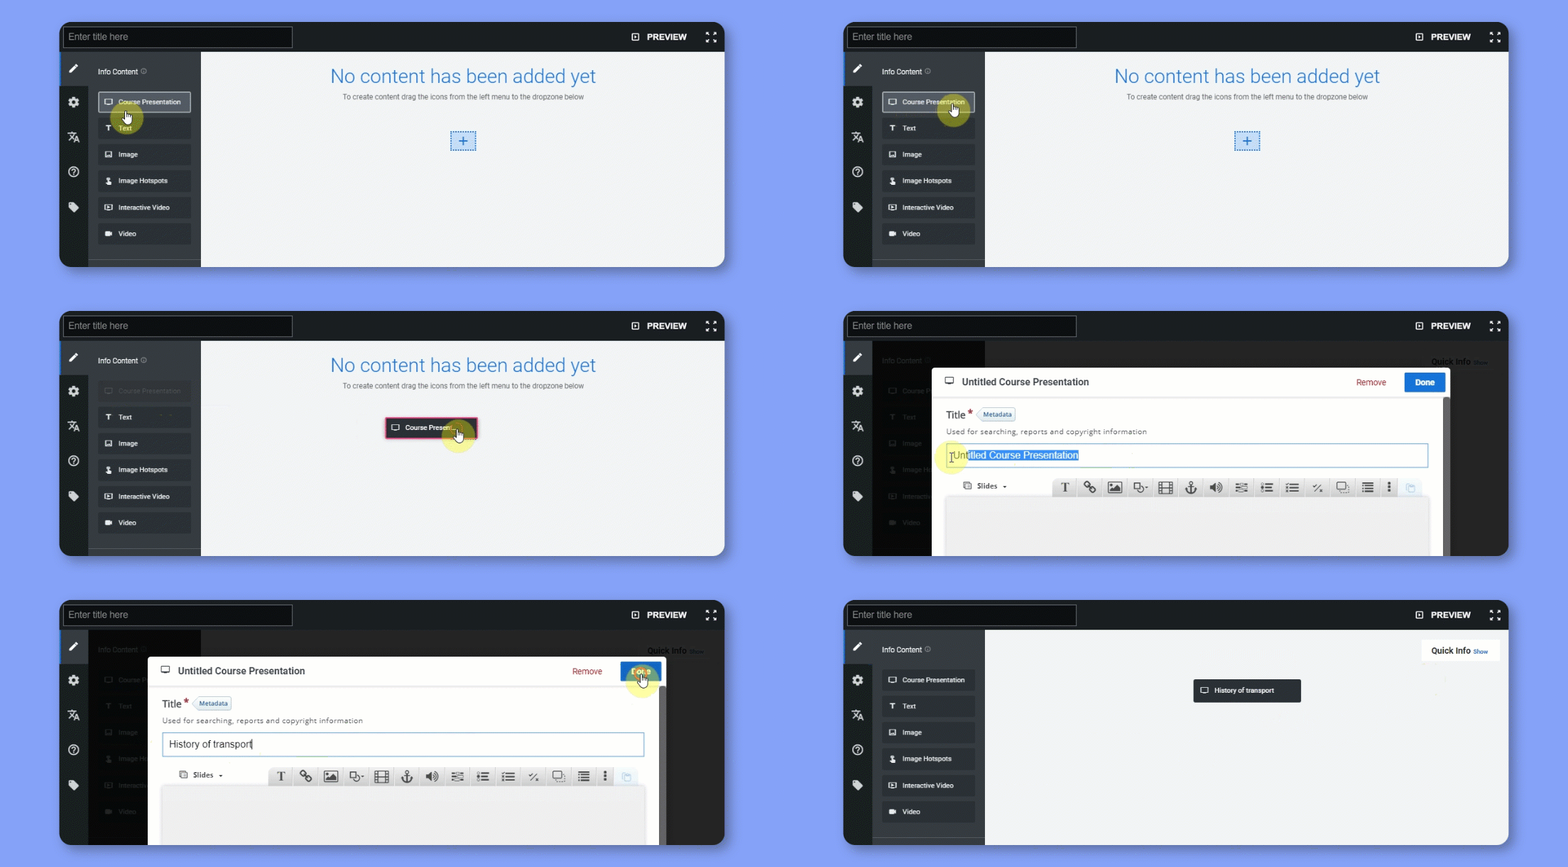
3. Build the Foundation (With Visual Drag-and-Drop): You’ll start with a blank canvas and a menu of content types on the left (Text, Image, Video, Branching Question, etc.).
Begin by dragging and dropping a content type onto the canvas for your introduction. A Text element is a good starting point, but you can also use an Image or Video to set the stage.
Click on the element you’ve added to edit its content and configure its settings.
4. Introduce the Decision Point (The Branching Question): Drag and drop a Branching Question element onto the canvas. This is where you’ll present the central question or situation that requires learners to make a choice.
Click on the Branching Question element to write your question and add answer alternatives. Each alternative will form a distinct branch in your scenario.
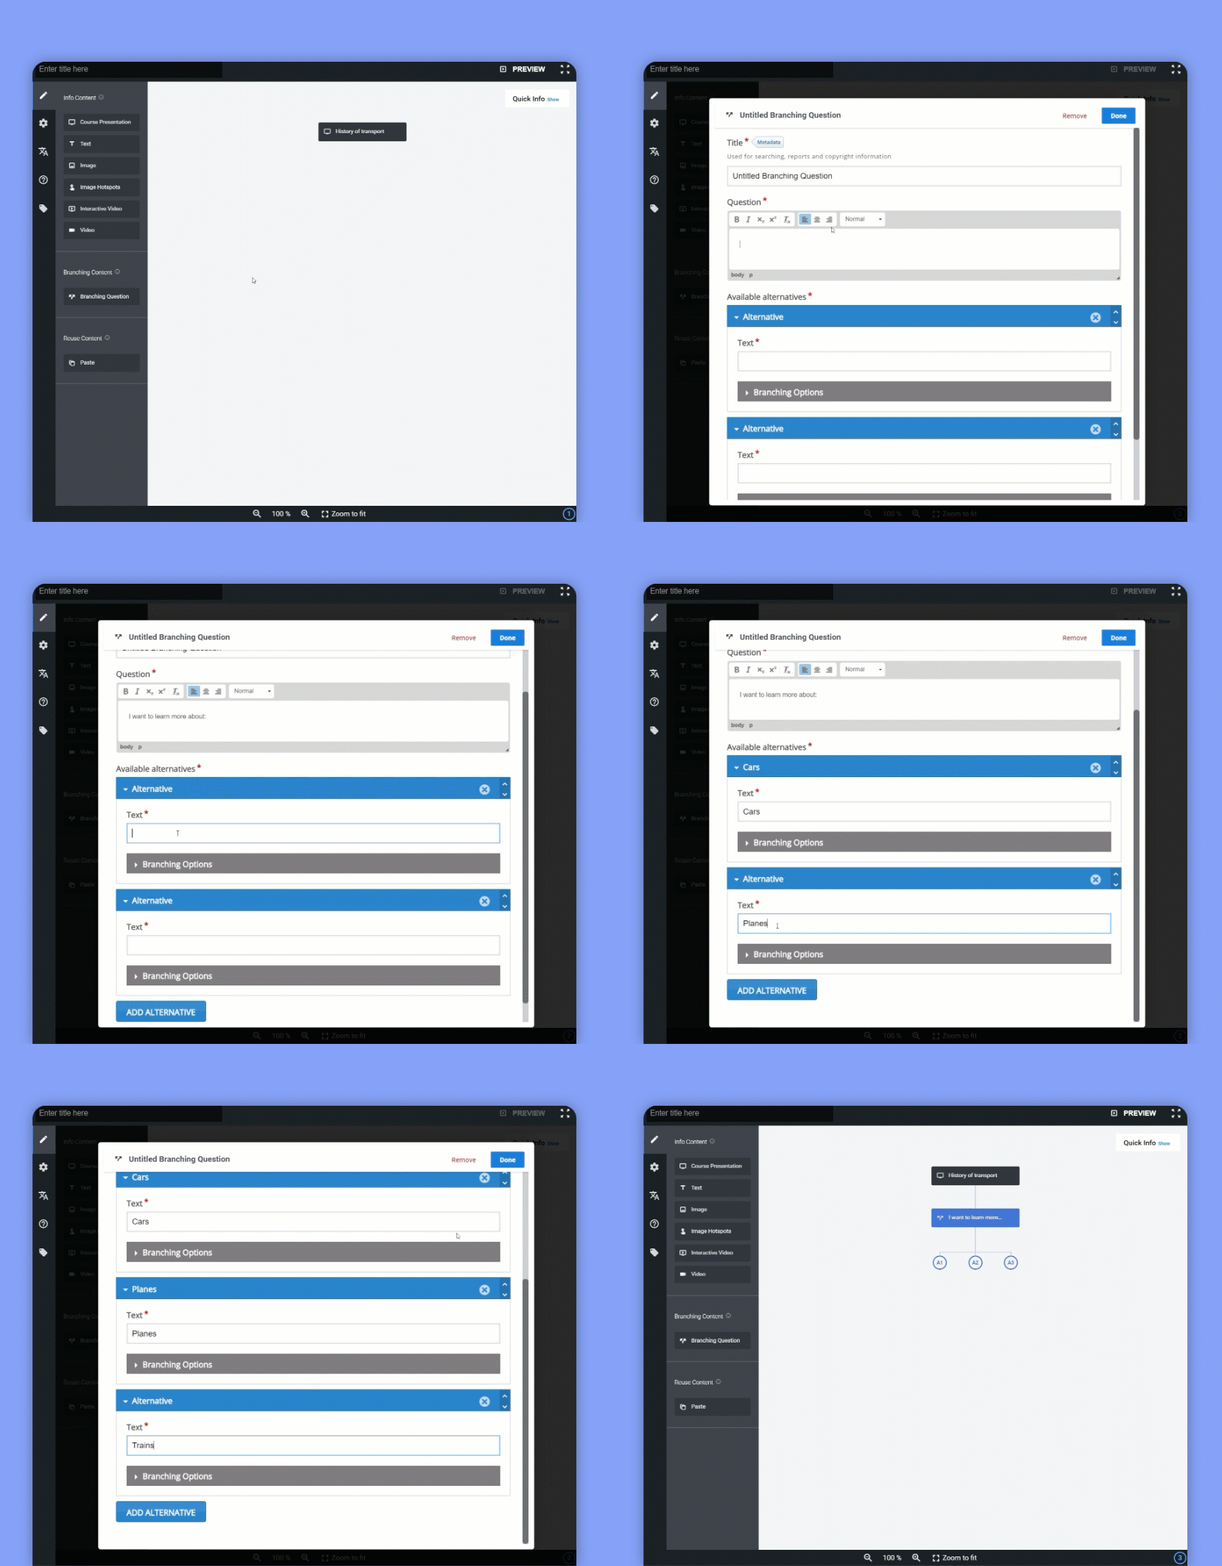
5. Develop the Branches (Shaping the Consequences): For each alternative in your Branching Question, drag and drop a new content element (e.g., Text, Image, Video) onto the canvas. This represents the consequence or outcome of that particular choice.
Connect the alternative to the new content element in your Branching Question, you get to decide. Here are your options:
- Show new content: This could be text, an image, a video, or another piece of information.
- Ask another question: Present another Branching Question to guide learners down a different path.
- Go back: Send learners back to an earlier part of the scenario.
- End the scenario: Wrap things up with personalized feedback and an optional score.
To choose what happens, use the “Branching options” menu. You can find this menu under each answer choice in your Branching Question.
Branching Scenario Tip: To streamline your content creation reuse existing H5P content. Simply copy and paste it into your scenario. You can enhance the learning experience by providing valuable feedback after each choice or piece of content is viewed.
6. Fine-Tune and Enhance: After each answer choice or content piece, you can give your learners feedback to help them understand if they’re on the right track. This feedback will pop up as they move through the scenario. If you’ve set an “end scenario,” the feedback will appear on the final screen.
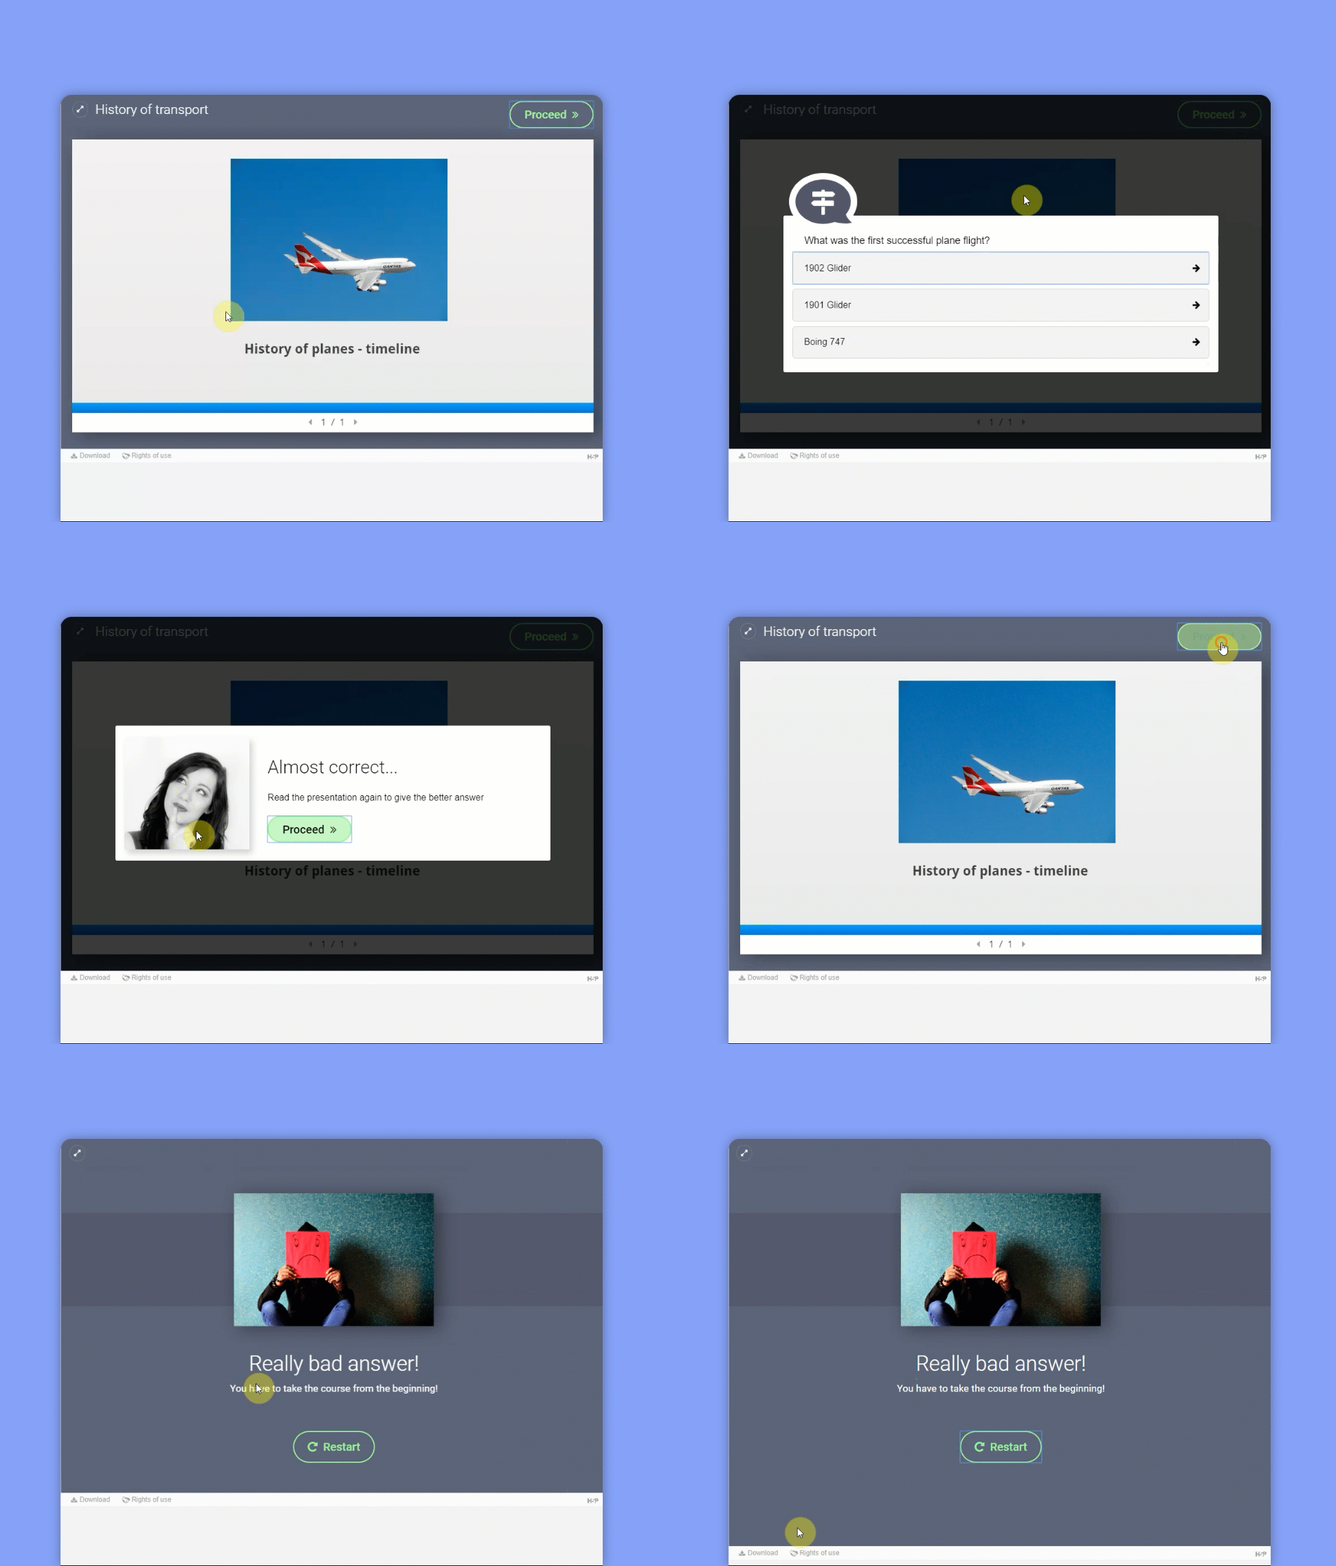
Don’t forget to explore the “Behavioral Settings” to customize options like scoring, retries, and feedback display. And don’t forget to regularly preview your scenario using the “Preview” button to ensure it flows smoothly and logically from the learner’s perspective.
Embedding H5P Content in Tutor LMS Courses
Okay, you’ve created some amazing H5P content, now it’s time to share it with the world (or, at least, with your students)! Let’s look at how you can seamlessly integrate your interactive H5P creations into your Tutor LMS courses.
Adding H5P to Your Lessons
This is where you’ll bring your courses to life by adding those interactive elements you’ve been working on. Tutor LMS makes it incredibly easy to embed your H5P content directly into your lessons. You have two main options:
1. Using the H5P Shortcode:
- Find the shortcode: Go to your H5P Content library (“WordPress Dashboard” -> “H5P Content”). Locate and click the content you want to embed and copy its shortcode. It’ll look something like this: [h5p id=”1″]
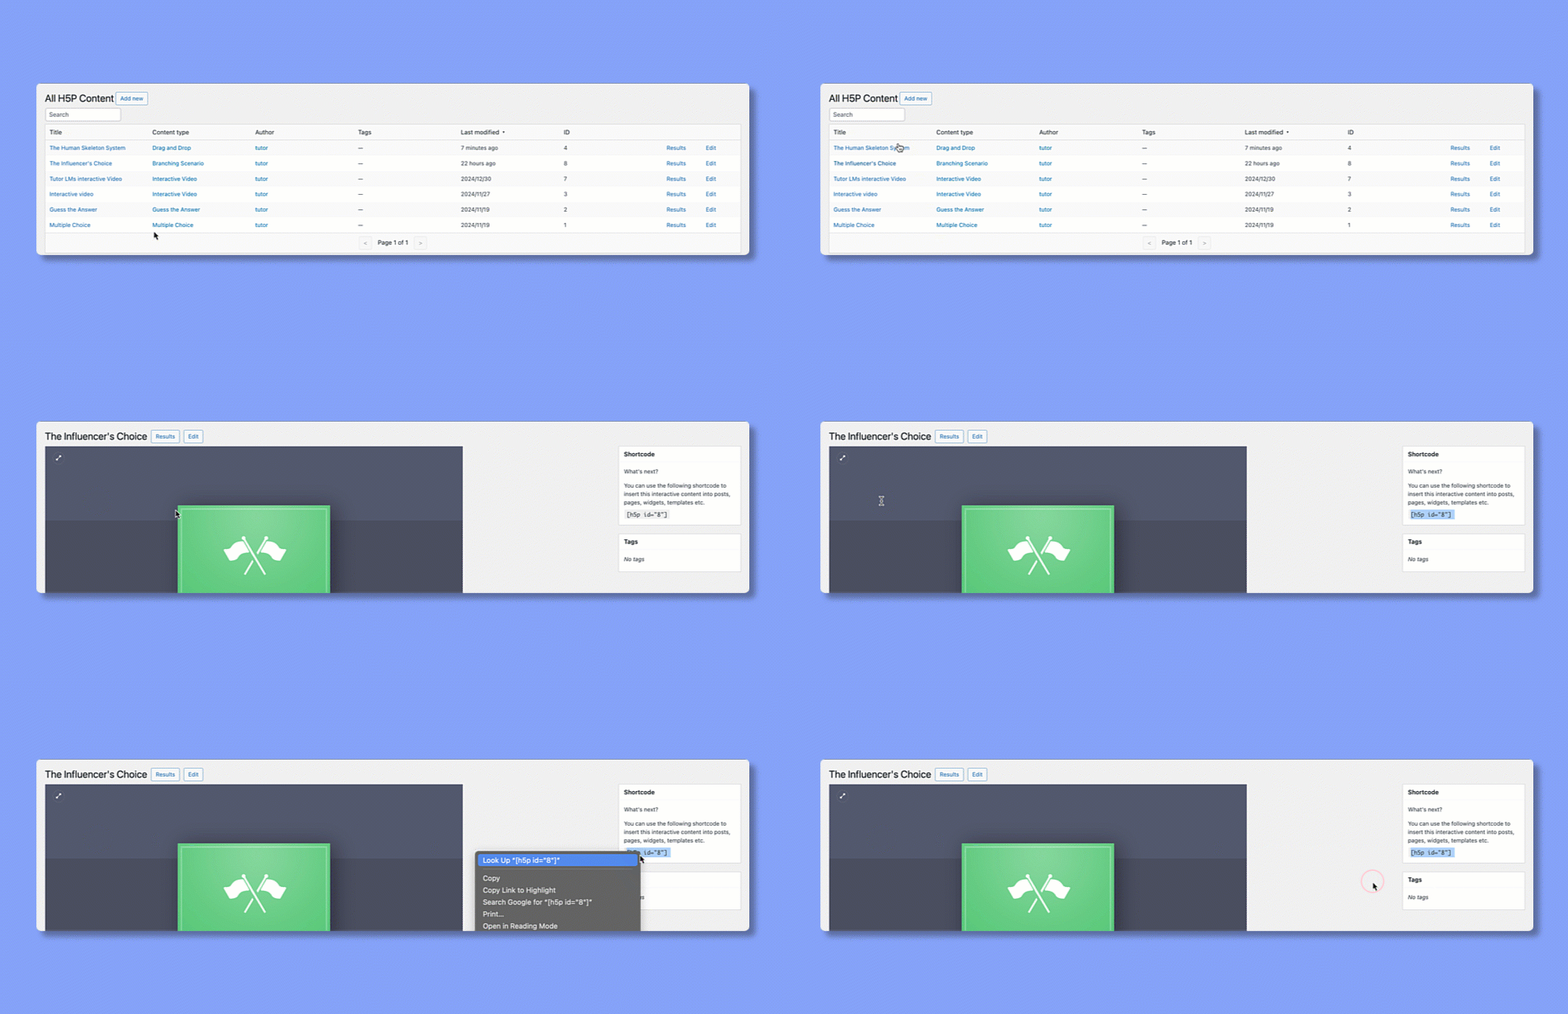
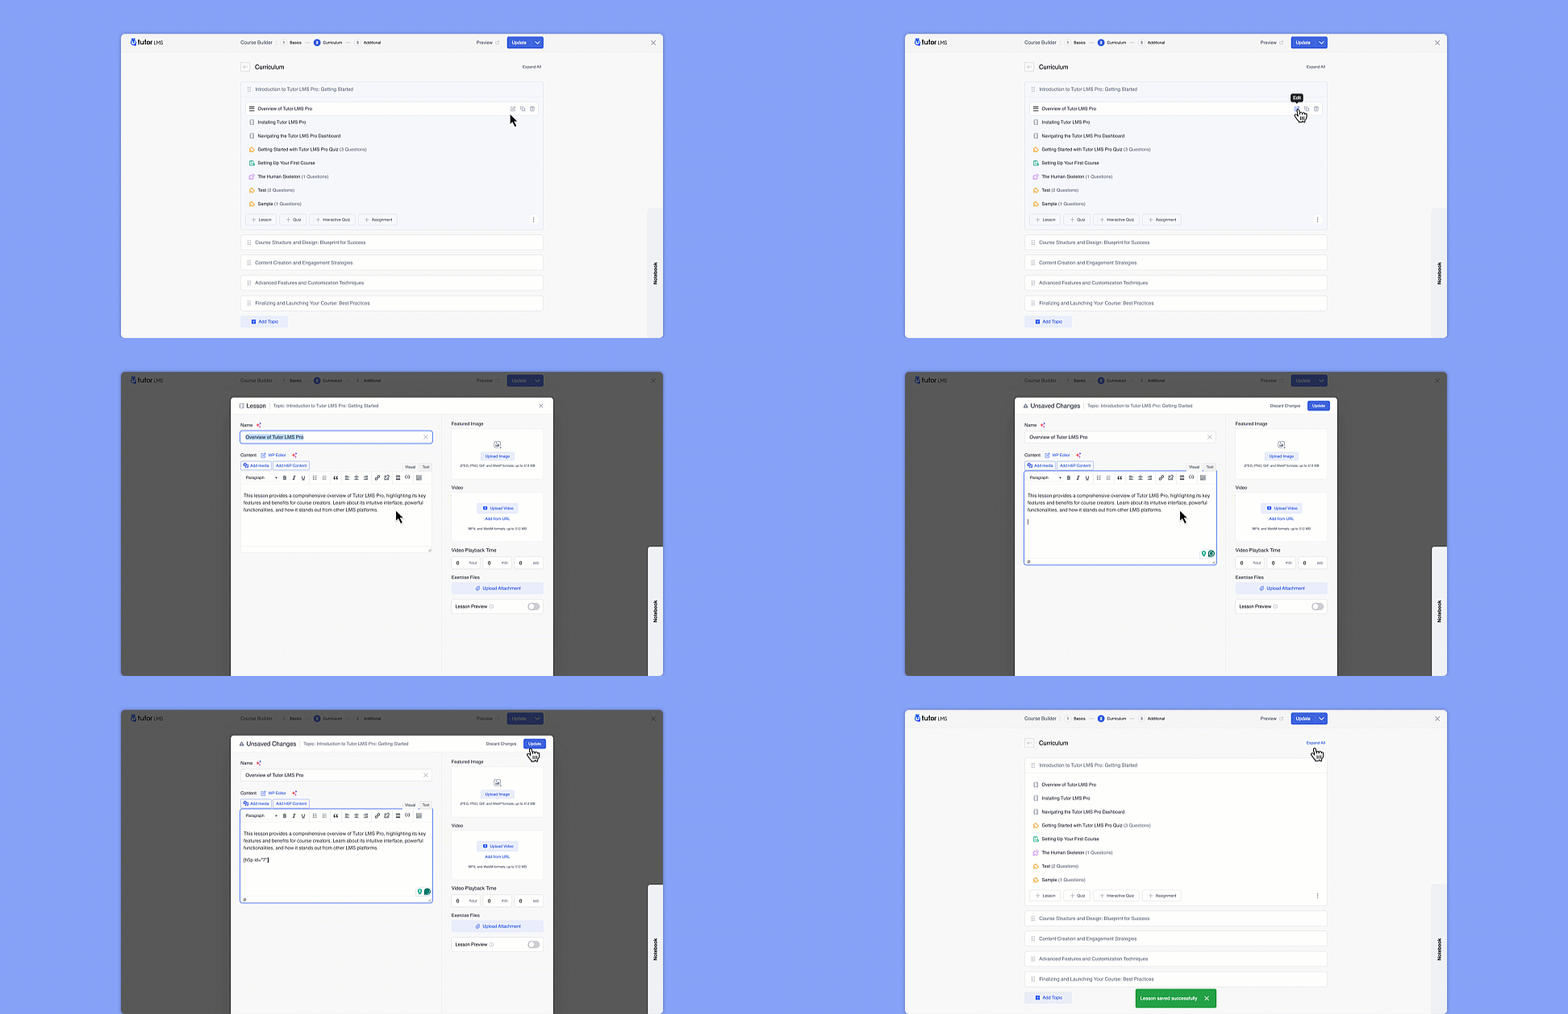
- Paste the shortcode: Open the Tutor LMS lesson where you want to add your H5P content. In the lesson editor, simply paste the shortcode wherever you want the content to appear.
2. Using the H5P Block:
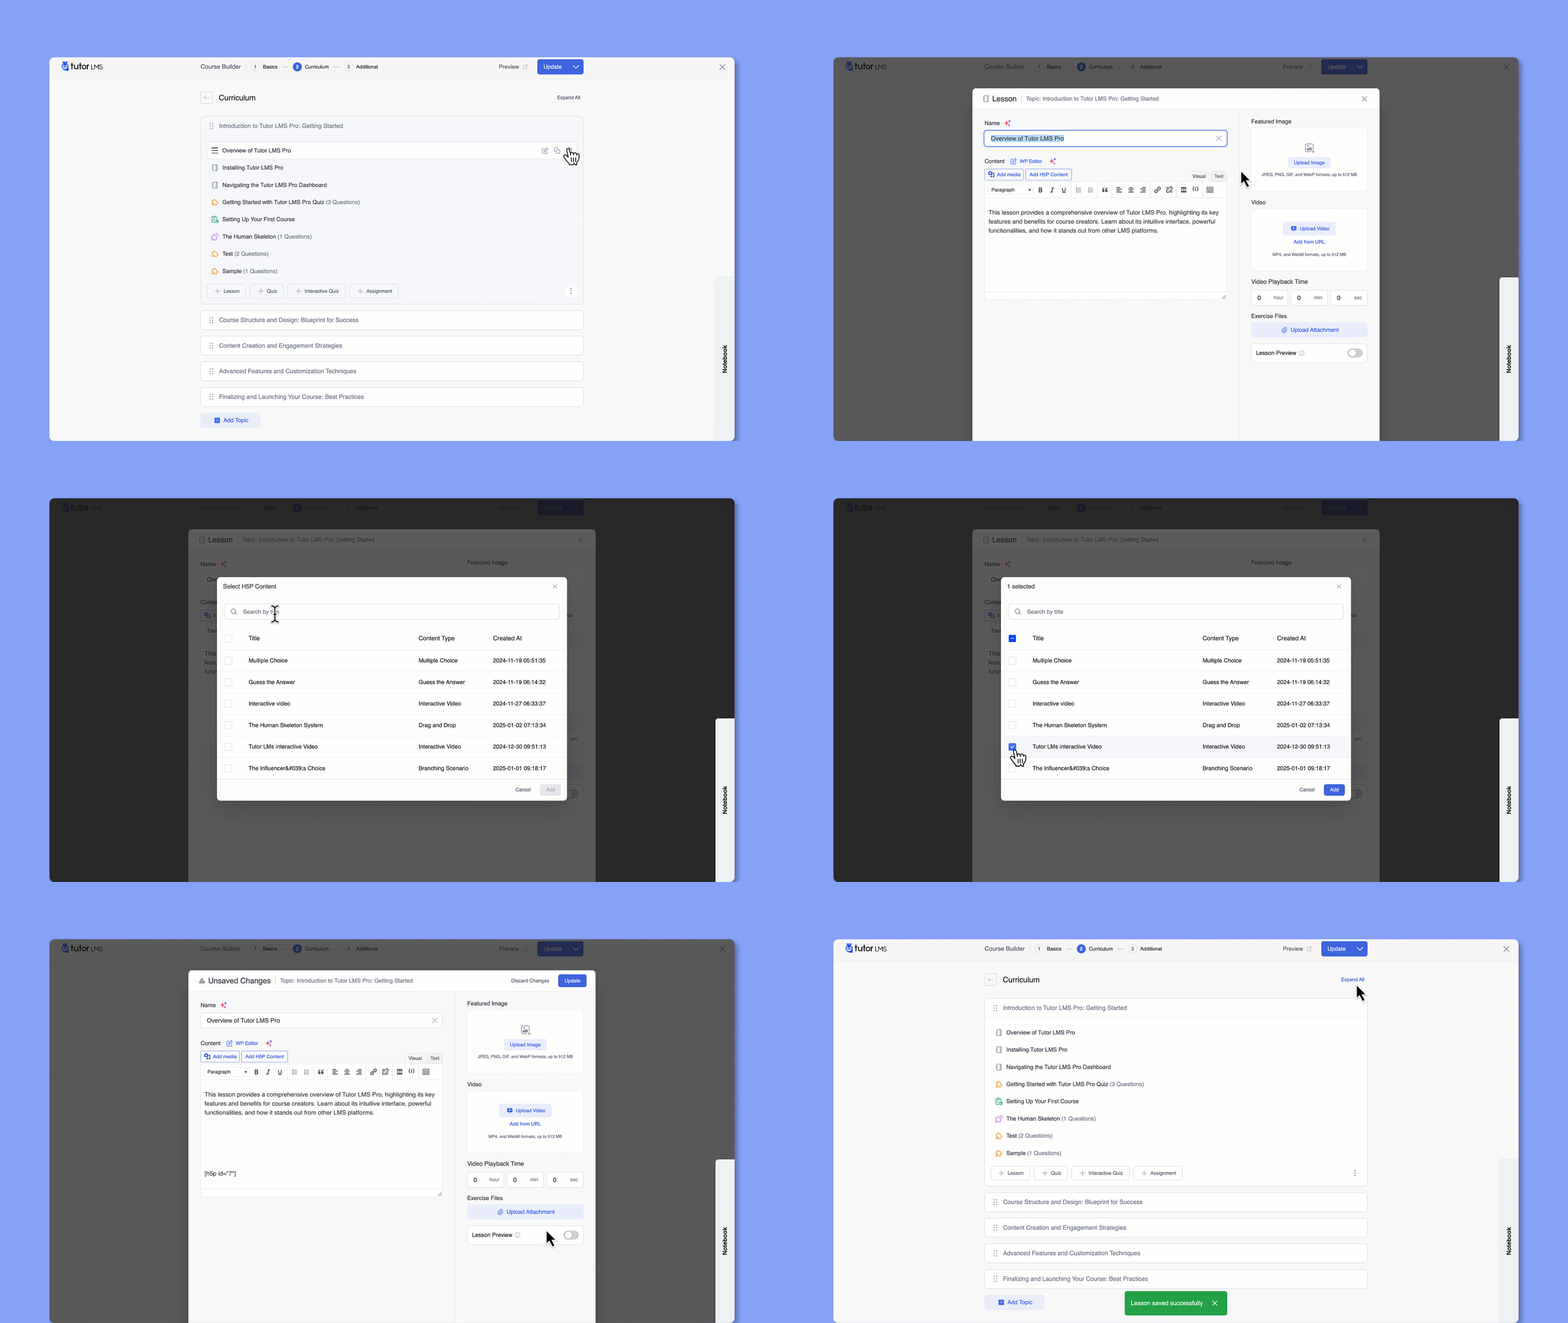
- Add the H5P block: In the Tutor LMS lesson editor, click the “Add H5P Content” button.
- Select your content: A list of your available H5P content will appear. Choose the content you want to embed and click “Add.”
Displaying H5P Content in Quizzes
Want to take your Tutor LMS quizzes to the next level? H5P makes it easy to add interactive elements that will boost engagement and make assessments more fun.
Here’s how you can integrate H5P content into your quizzes:
- Head to the Course Builder: Just like with adding H5P to your lessons, start by going to the “Course Builder” for the course you want to work on.
- Open the Curriculum and Select a Topic: Choose the topic where you want to add your interactive quiz.
- Add an Interactive Quiz: Click on the “+ Interactive Quiz” button to get started.
- Give it a Title and Summary: Enter a title for your quiz and a brief summary to give your students an idea of what it’s about.

- Add Your H5P Content: Click the “+” button to add your H5P content to the interactive quiz. You’ll be able to choose from your H5P library.
- Choose and Embed: Select the H5P content you want to add and click “Add.” Your H5P content will be embedded into the quiz.

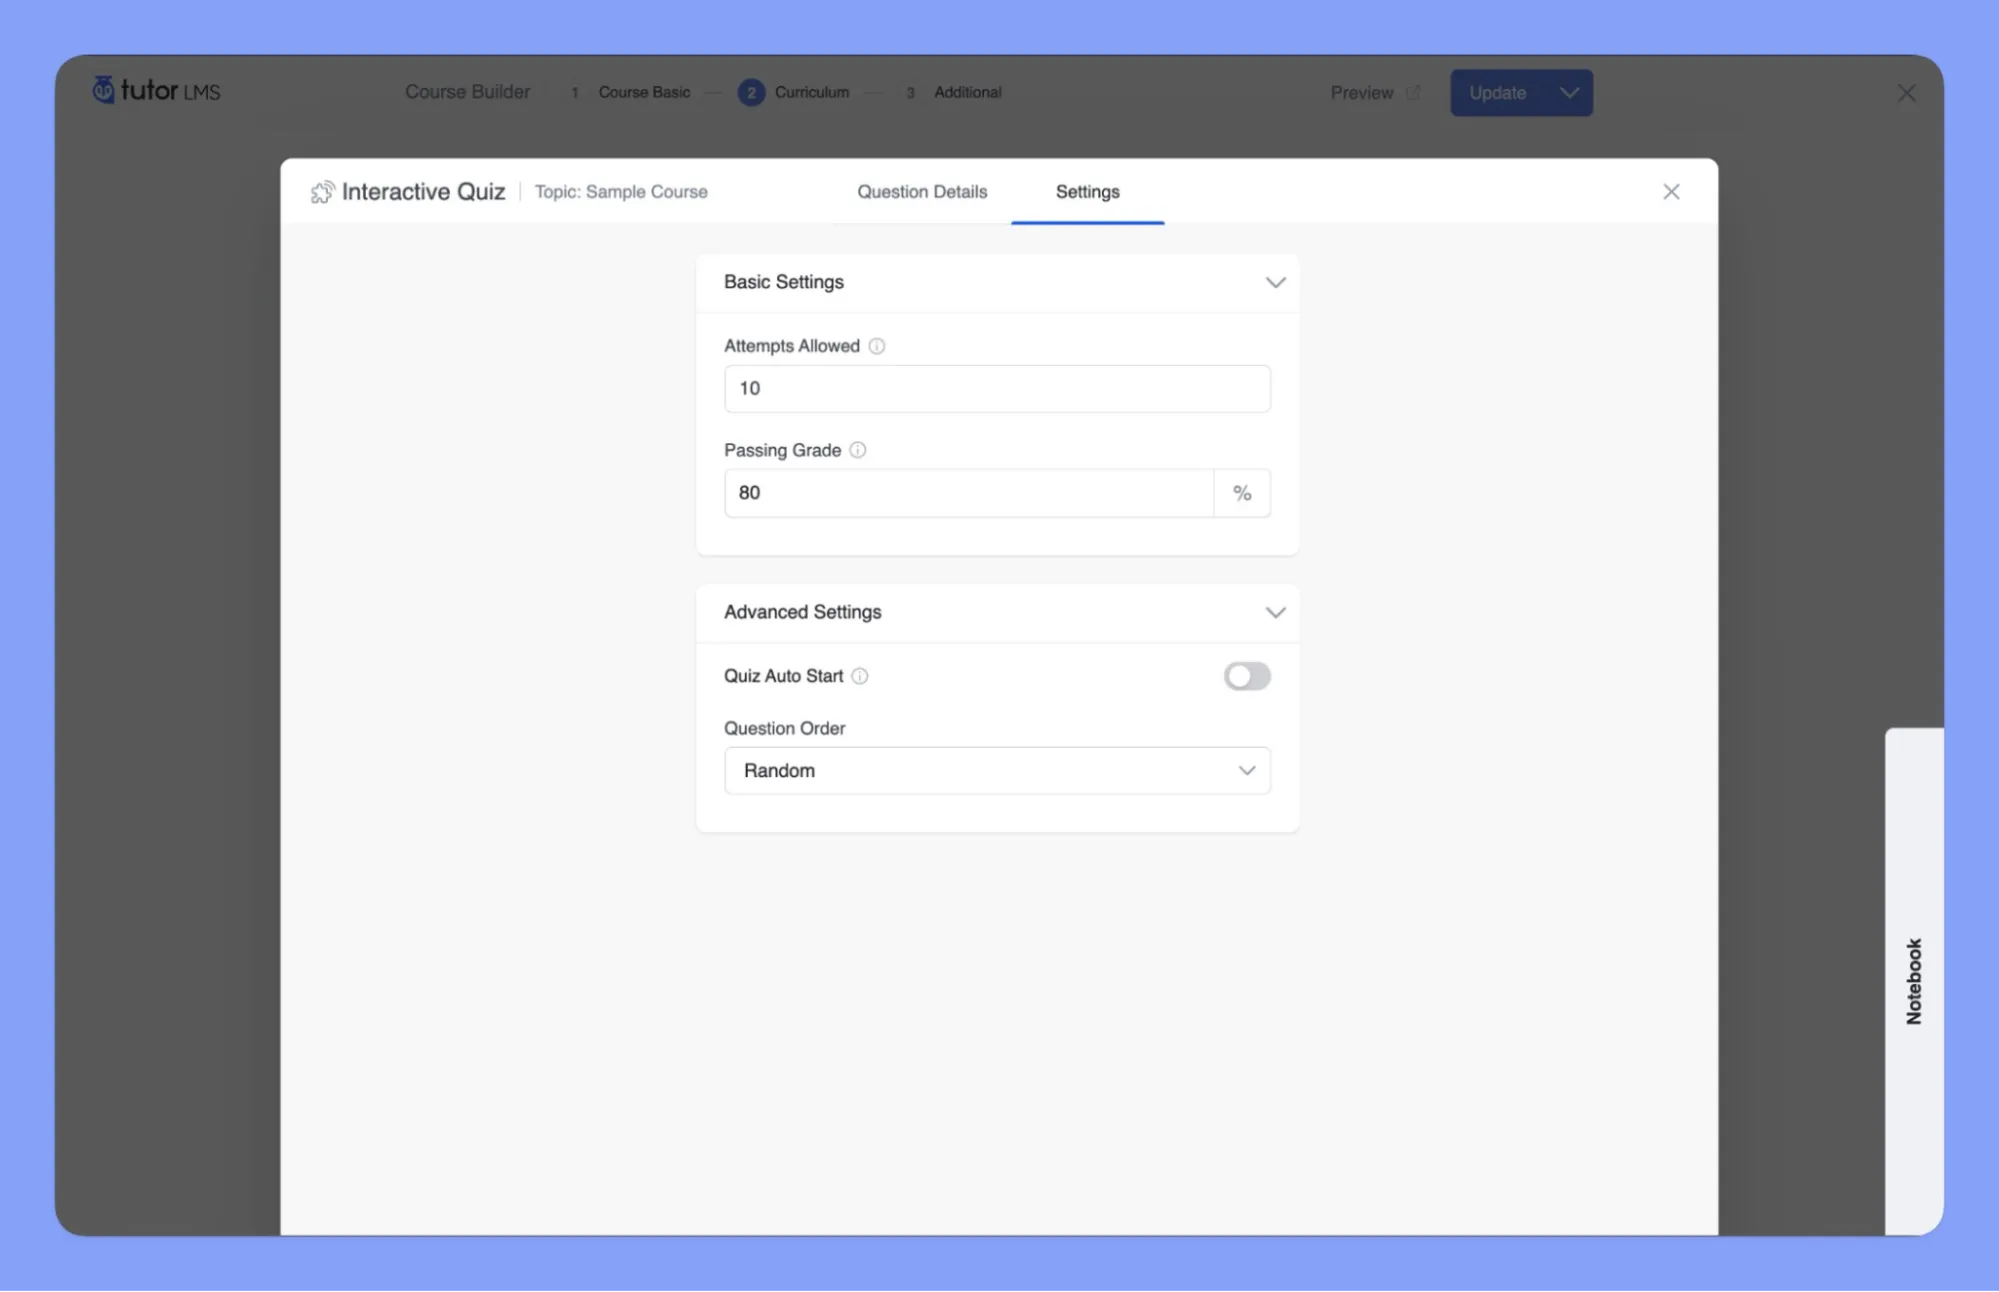
- Customize Quiz Settings: You can customize the quiz settings, such as the number of attempts allowed, passing grade, and question order.
- Save and Publish: Once you’re happy with your quiz, save the changes to your course.
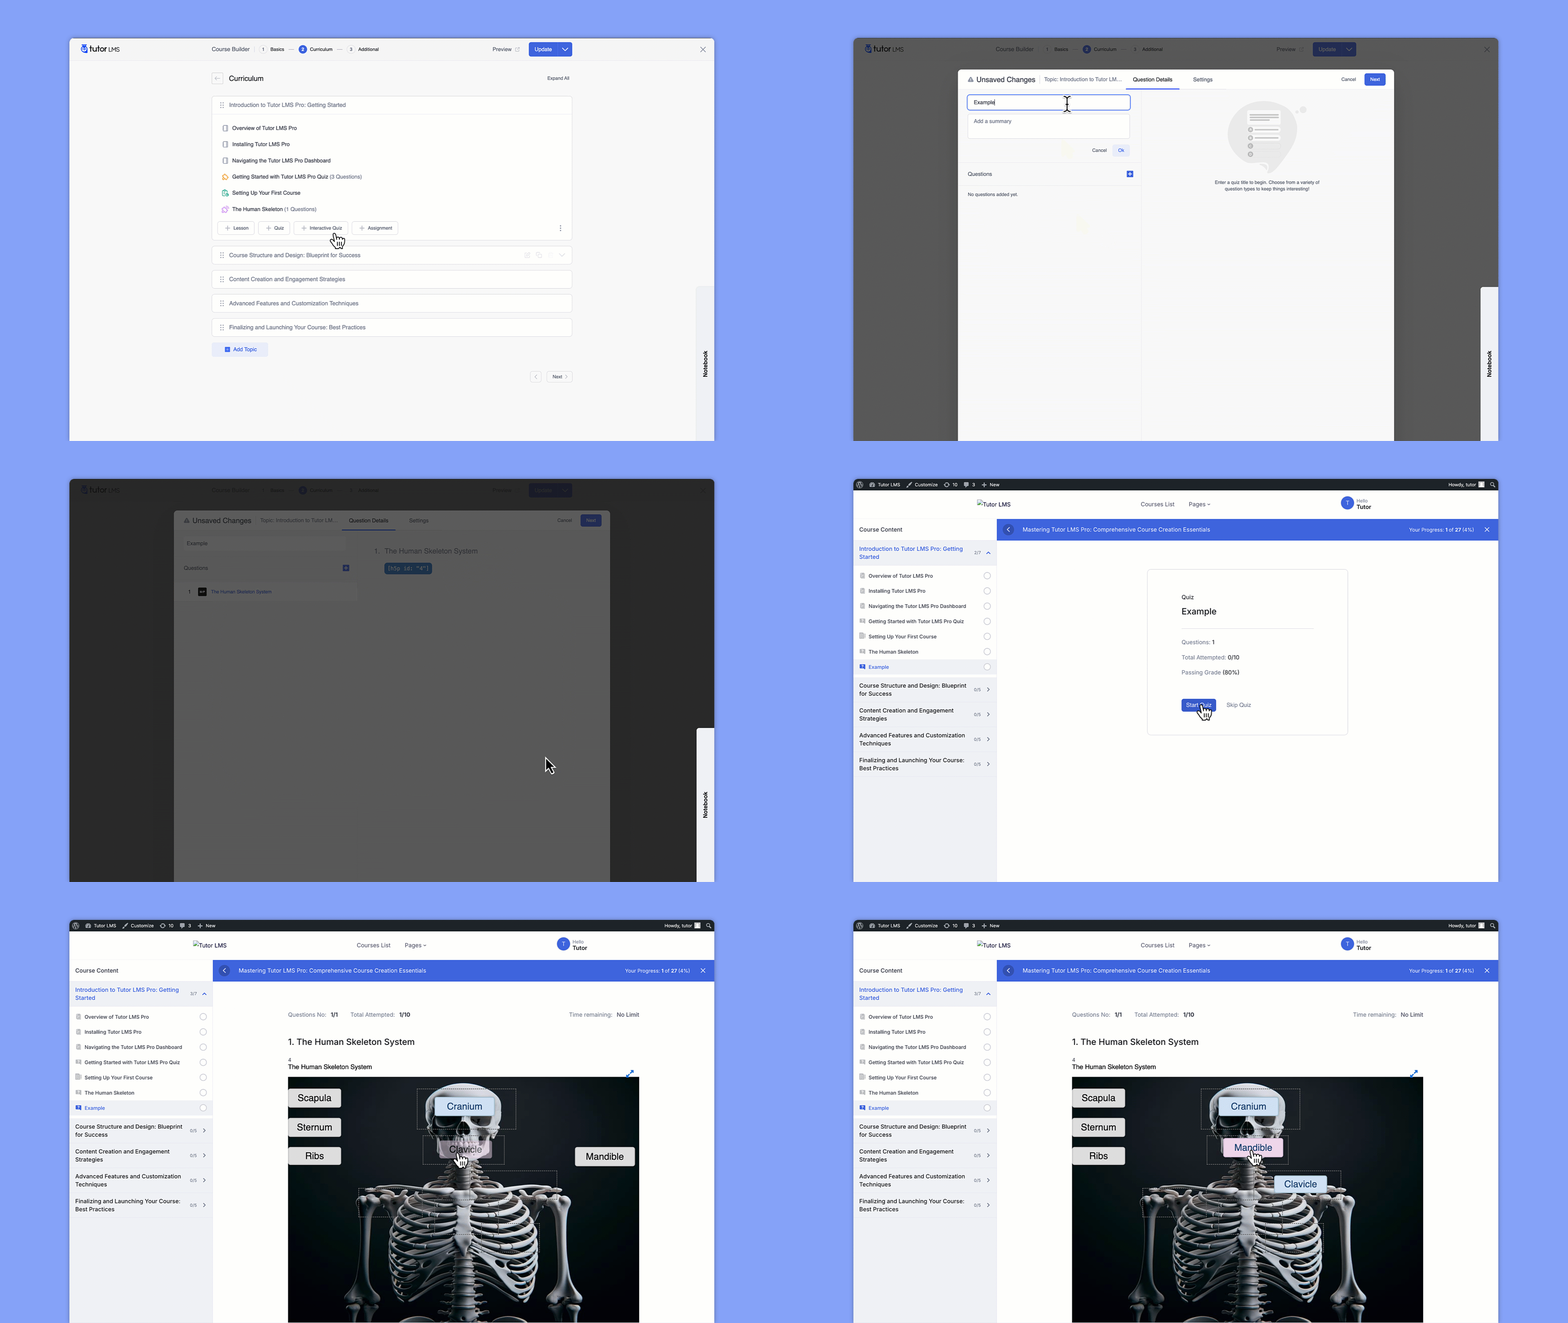
That’s it! You’ve successfully added interactive H5P content to your Tutor LMS quiz. Your students will appreciate the dynamic and engaging assessment experience.
Level Up Your Learning!
That’s a wrap! We’ve covered a lot of ground today, exploring how to supercharge your Tutor LMS courses with interactive H5P content. Remember, by adding interactive elements like videos, branching scenarios, and presentations, you can create a more engaging and effective learning experience for your students.
Now it’s your turn! Dive into the world of H5P and start experimenting with different content types. Your students will love the dynamic learning experiences you create.
Start Using Tutor LMS Today
Ready to take your online courses to new heights? Download Tutor LMS now and enjoy a journey of eLearning excellence.
