Educators often face the challenge of managing multiple courses while staying organized. This is especially true for online courses, where a learning management system (LMS) like Tutor LMS can quickly become cluttered and overwhelming.
But fear not! This article provides practical steps to streamline your Tutor LMS, master course management, and optimize your online classroom for both you and your students. We’ll explore how to declutter your LMS, group similar courses, and configure settings for a clean and efficient learning space. So let’s discover how Tutor LMS can simplify your life as an educator!
Tutor LMS Course Management: Your First Steps
Effective course management starts with a solid foundation. First, we’ll guide you through the initial setup and show you how to personalize your settings.
With just a few clicks, you can:
- Customize your course layouts: Arrange your content in a way that makes sense for you and your students.
- Configure key settings: Tailor Tutor LMS to fit your unique teaching style and preferences.
- Focus on what you love: Spend less time managing your LMS and more time creating engaging learning experiences.
Online Course Organization: Optimizing Tutor LMS Settings
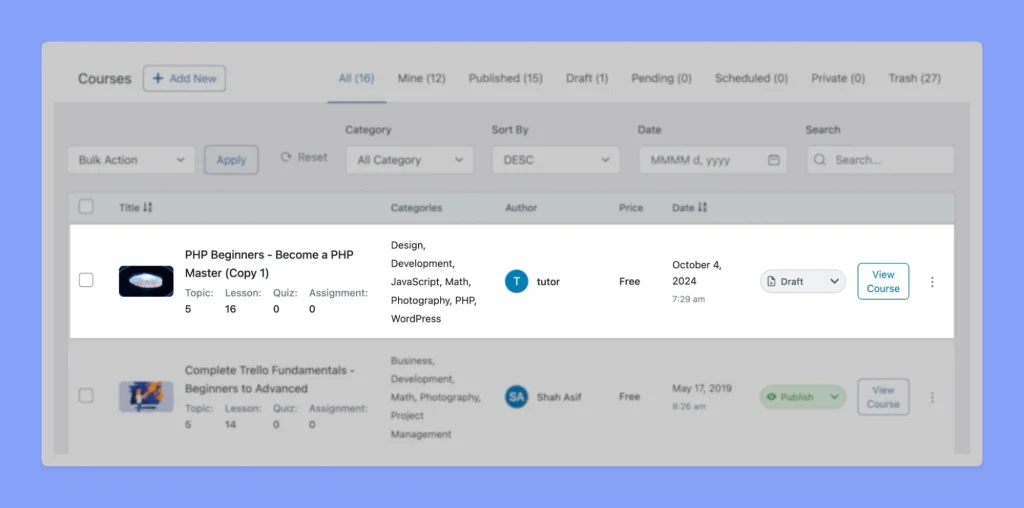
Tutor LMS provides a wealth of customization options to tailor your online classroom. To help you get started, let’s explore the key settings that will declutter your platform and enhance the learning experience for your students.
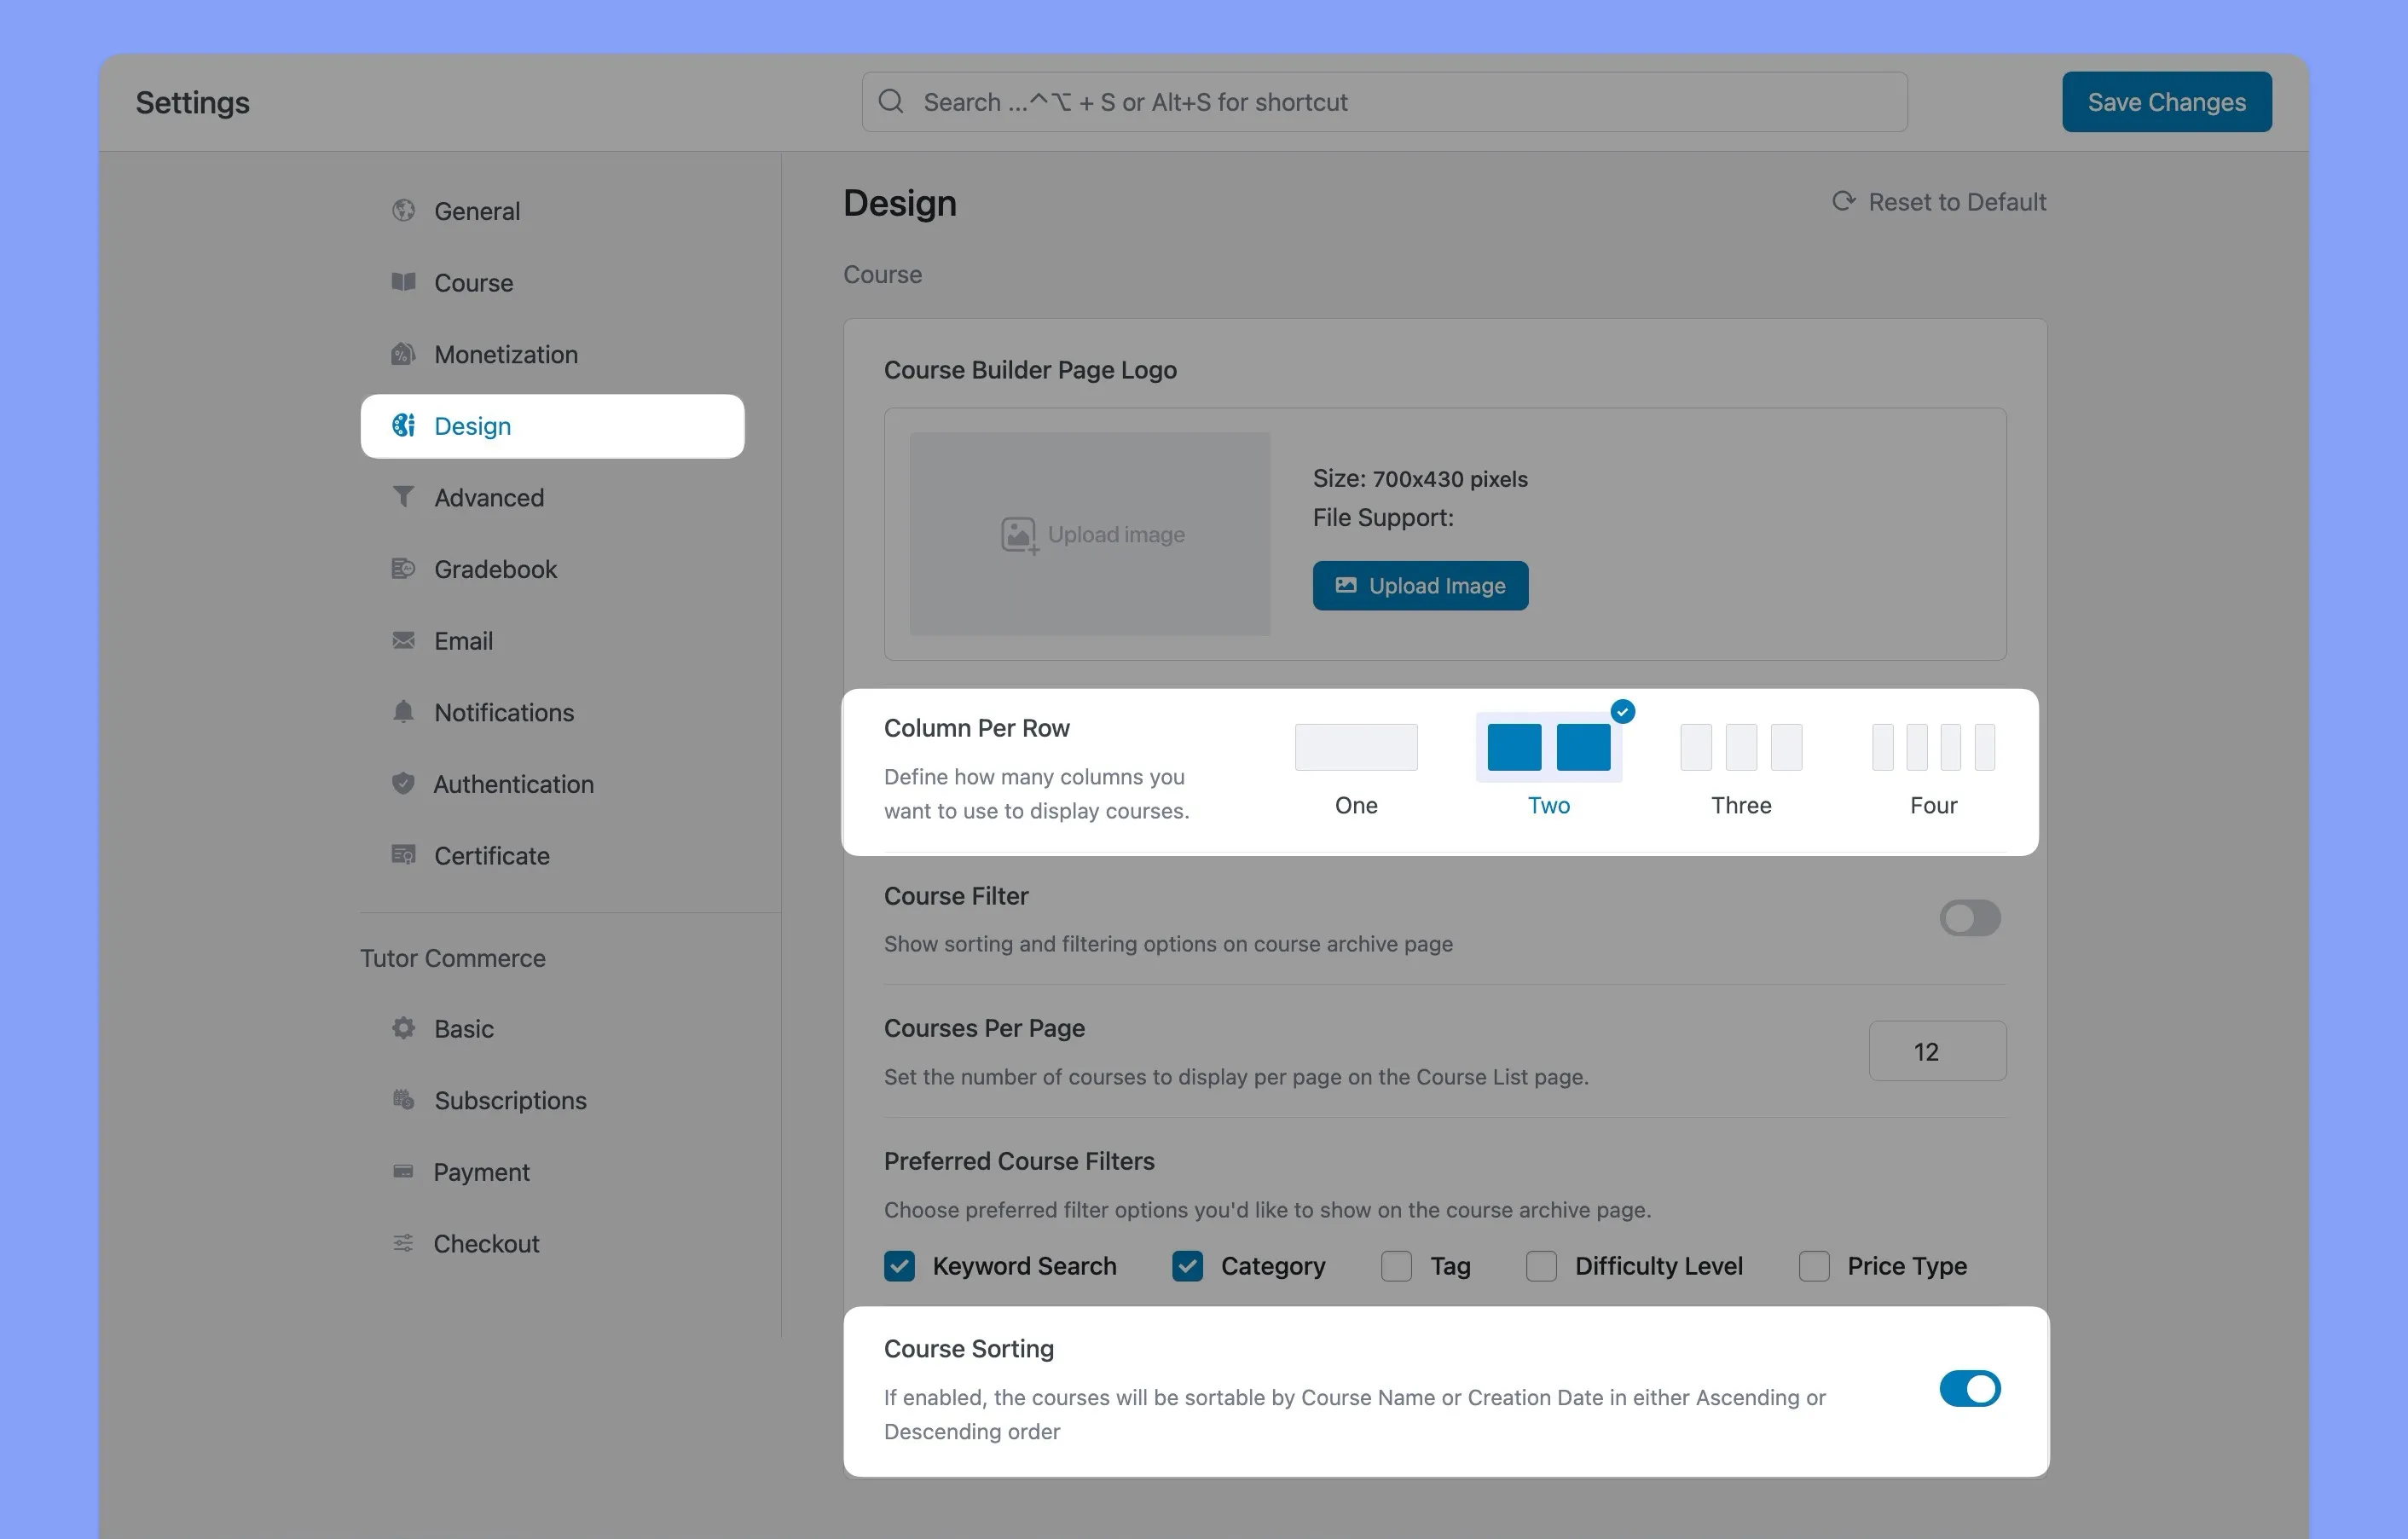
To get started, log into your WordPress dashboard and navigate to the Tutor LMS menu. Click on “Settings” and then select “Design” from the sidebar. This will open the Tutor LMS Design settings where you can configure your course layout using the following options:
- The “Column Per Row” setting allows you to choose how many courses are displayed per row on the course archive page. Using fewer columns (like 1-2) keeps each row tidy and courses easy to scan. Too many columns can look cluttered.
- The “Course Sorting” toggle lets users sort courses by name or date added. Sorting neatly structures the course list rather than a purely chronological list which may seem random.
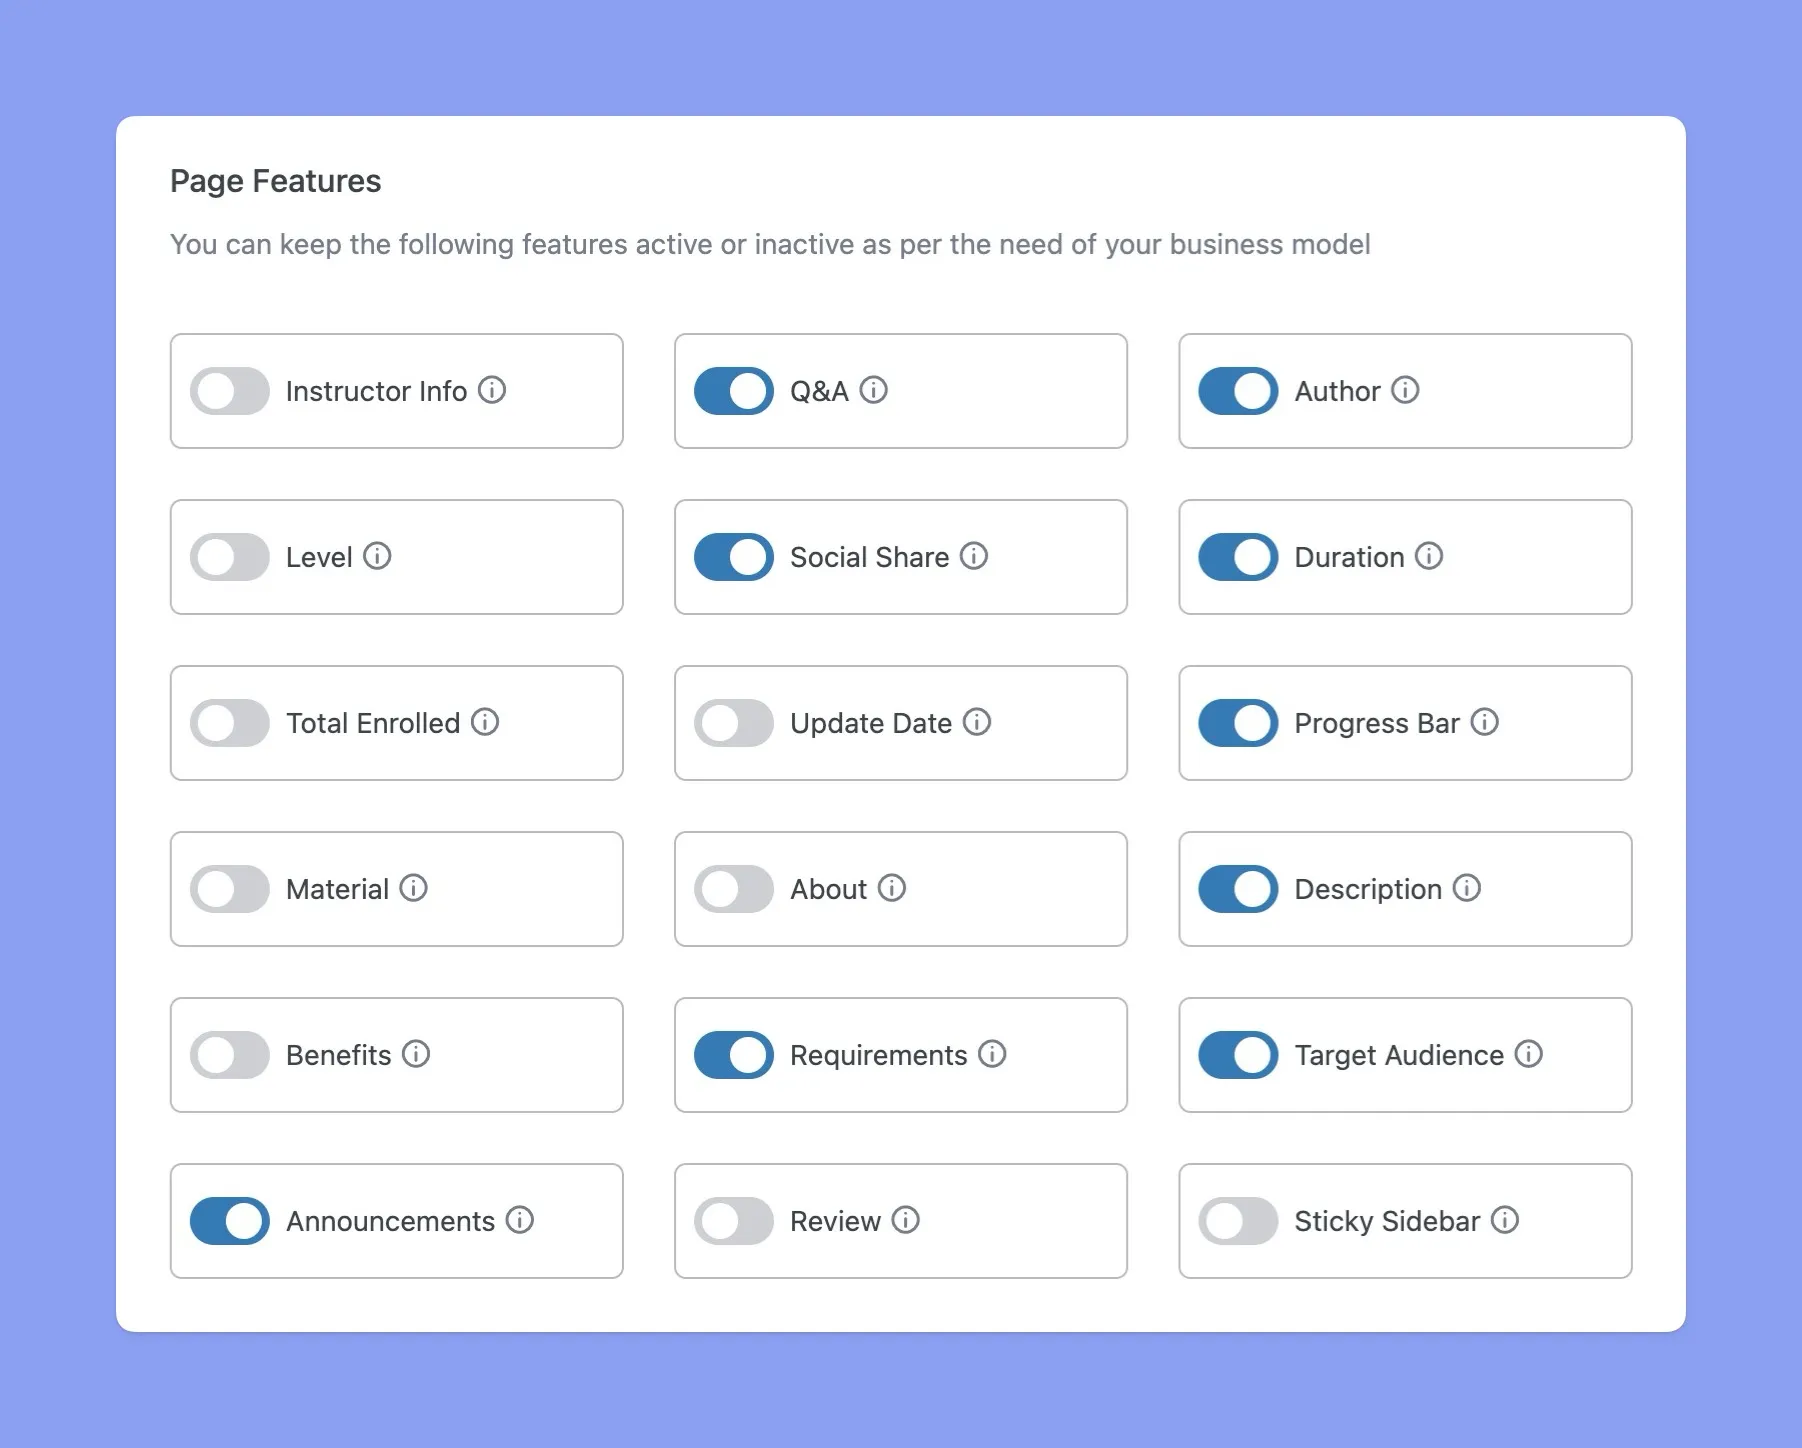
- The “Page Features” settings allow granular control over elements displayed on the course details page. Too many enabled features can clutter the page. For clean course organization, we recommend only enabling essential details like Description, Requirements, Author, Level, and Progress Bar amongst others. Limiting page elements helps organize information and prevent a cluttered LMS layout.
This sets up the basic structure, but don’t stop here! Later in this article, we’ll dive into even more Tutor LMS settings and configurations that will take your course organization to the next level.
Now that we’ve covered the basics of setting up your Tutor LMS site, in the next section we’ll explore proven strategies to keep all your eLearning courses tidy and organized over time.
LMS Organization Best Practices for Tutor LMS
A well-organized LMS is crucial for efficient course management and a positive student experience. Let’s explore some best practices to keep your Tutor site tidy and engaging.
Categorize Your Courses in Tutor LMS
When your eLearning catalog grows, students need help finding what they need. Improve course organization by using Tutor LMS categories. This allows you to group similar courses together, simplifying navigation and LMS organization.
For example, you may have broad categories such as “Math,” “English,” “Science,” and so on. You can also create more specific subcategories within these groups, like “Algebra Courses” under “Math”.
The benefits of categorized courses are two-fold:
For Instructors:
- Easily group new courses under the appropriate subject when creating content
- Streamline the process of assigning courses to categories after setup
- Enable category-based filters to simplify student searches
For Students:
- Quickly narrow down classes by selecting a category filter
- Effortlessly discover all courses related to their learning interests
- Reduce time wasted hunting through irrelevant or mismatched courses
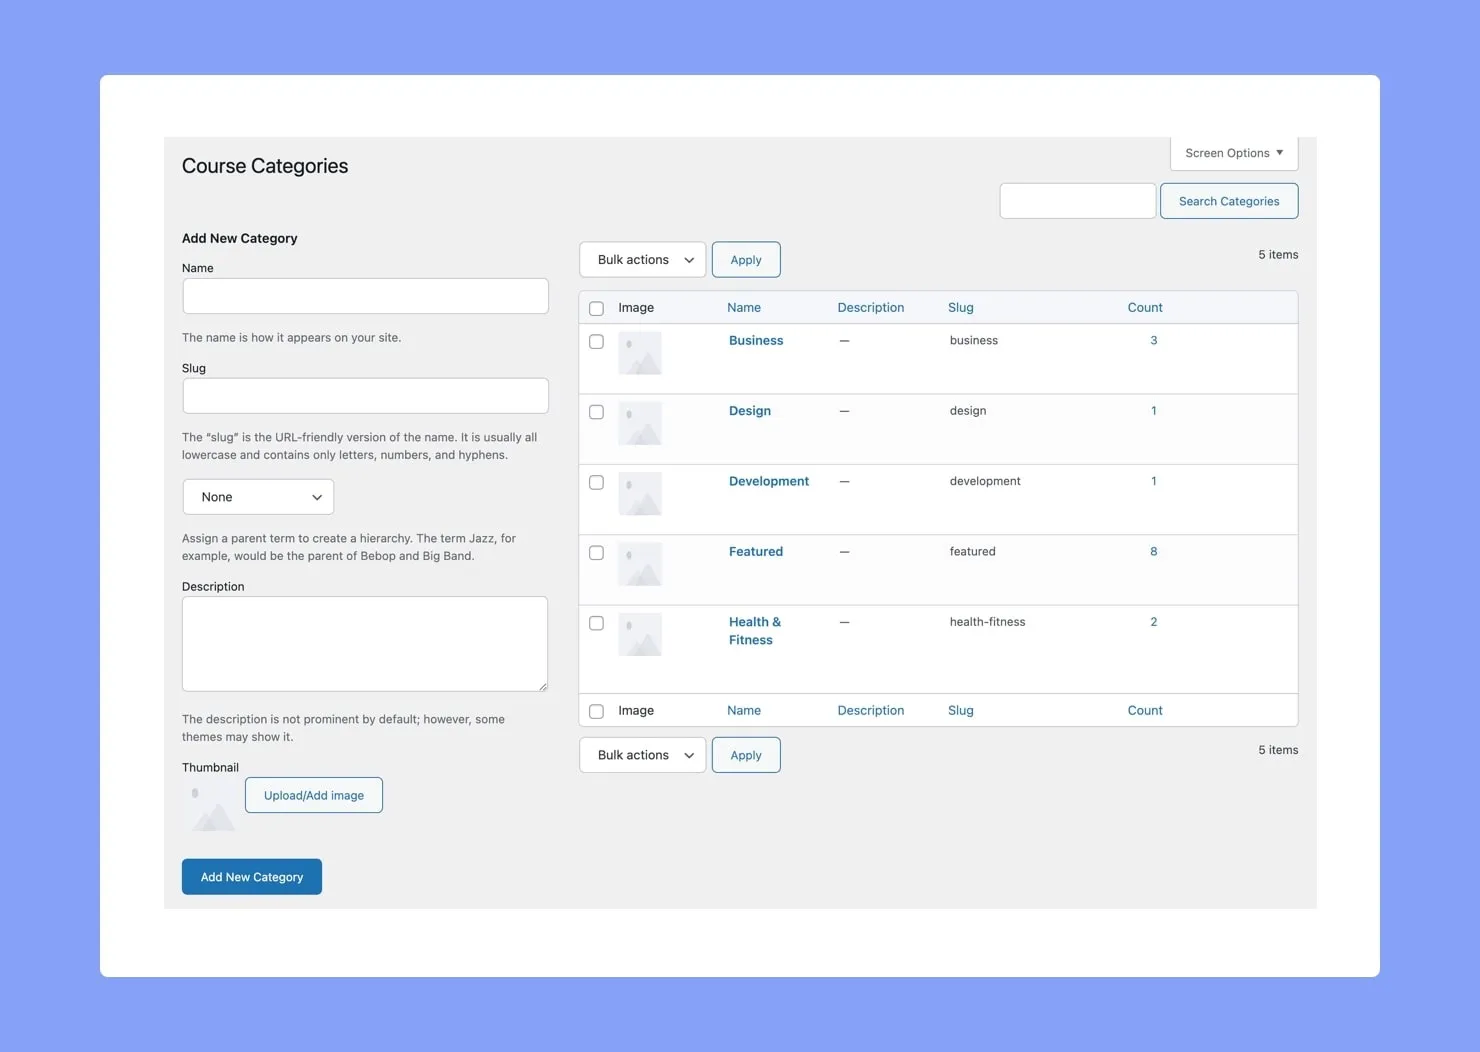
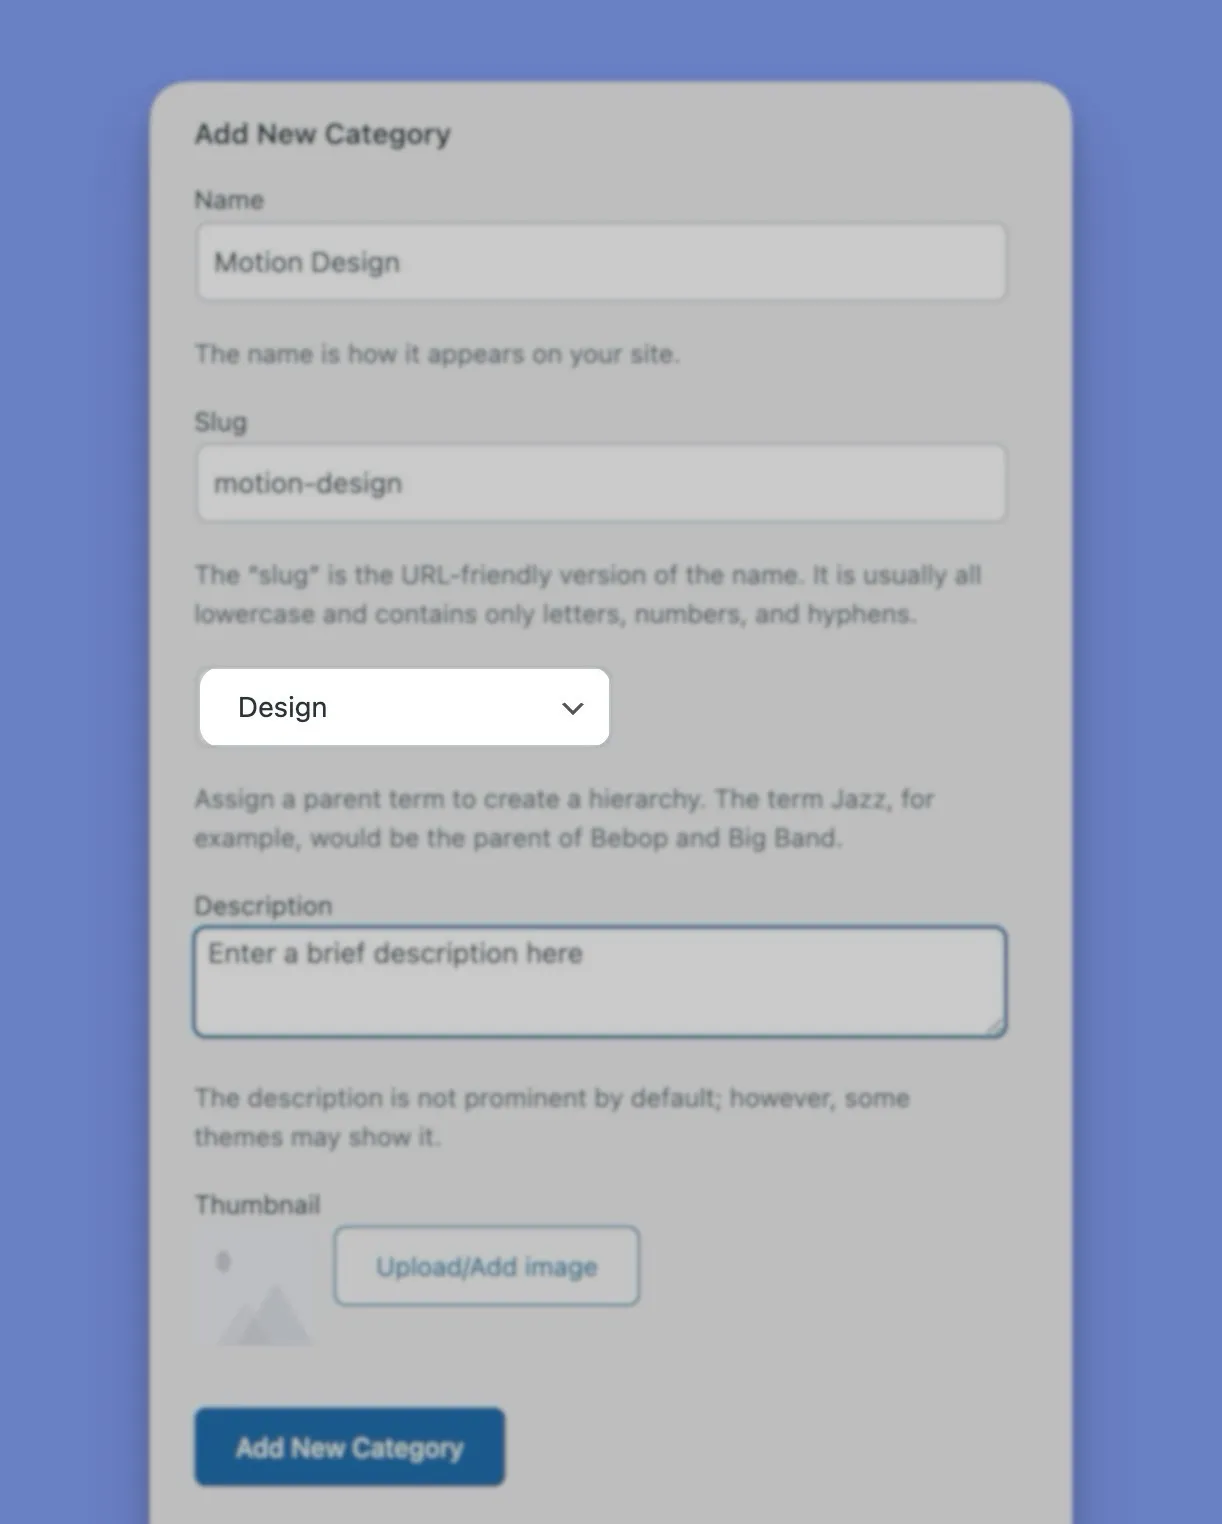
Creating categories and subcategories in Tutor LMS involves organizing your course content into a structured hierarchy.
Here are the steps involved:
- Log in to your Tutor LMS admin dashboard using your credentials.
- Click on the “Categories” option to start creating a new category.
- On the left side of the page, you’ll find fields that need to be completed for the new category.
- Once you’ve filled in the necessary details, click the “Add New Category” button to create and publish the new category.
Creating a Subcategory:
Follow steps 1 to 3 from the “Creating a New Category” section. Now, to create a subcategory:
- Choose a parent category from the “Parent” dropdown. This will link the subcategory under the selected parent category.
- Fill in the other fields, such as name, slug, description, and thumbnail.
- After completing the subcategory details, click “Add New Category” to publish the subcategory.
Once your category foundations are set up, assign each new course to its matching category. Everything stays neatly sorted!
With a streamlined course catalog, learners can swiftly find the courses they need. Categories create order from disorder by organizing courses into intuitive groups. Proper course categorization is key for tidy LMS organization and management.
Improve Online Course Discoverability with Tutor LMS Tags
Categories group similar courses, but what about all those one-of-a-kind classes that need labeling? That’s where tags come in! Tags are short keywords and phrases that identify topics within a specific course. They make your course catalog easy to search for.
Descriptive tags enhance course discoverability in several ways:
- Help learners pinpoint specific classes matching their interests – ex. searching “algebra” or “chemistry” tags
- Provide an additional filtering method beyond categories for laser-focused searches
- Give customized dimension to individual courses beyond their category
For instance, an algebra course could have tags like “equations, functions, algebra,” while a biology course may be tagged with “cells, human body, life science.”
With descriptive tags, students can swiftly find the perfect course by searching for tags that match their interests. Way better than hunting through a massive course list!
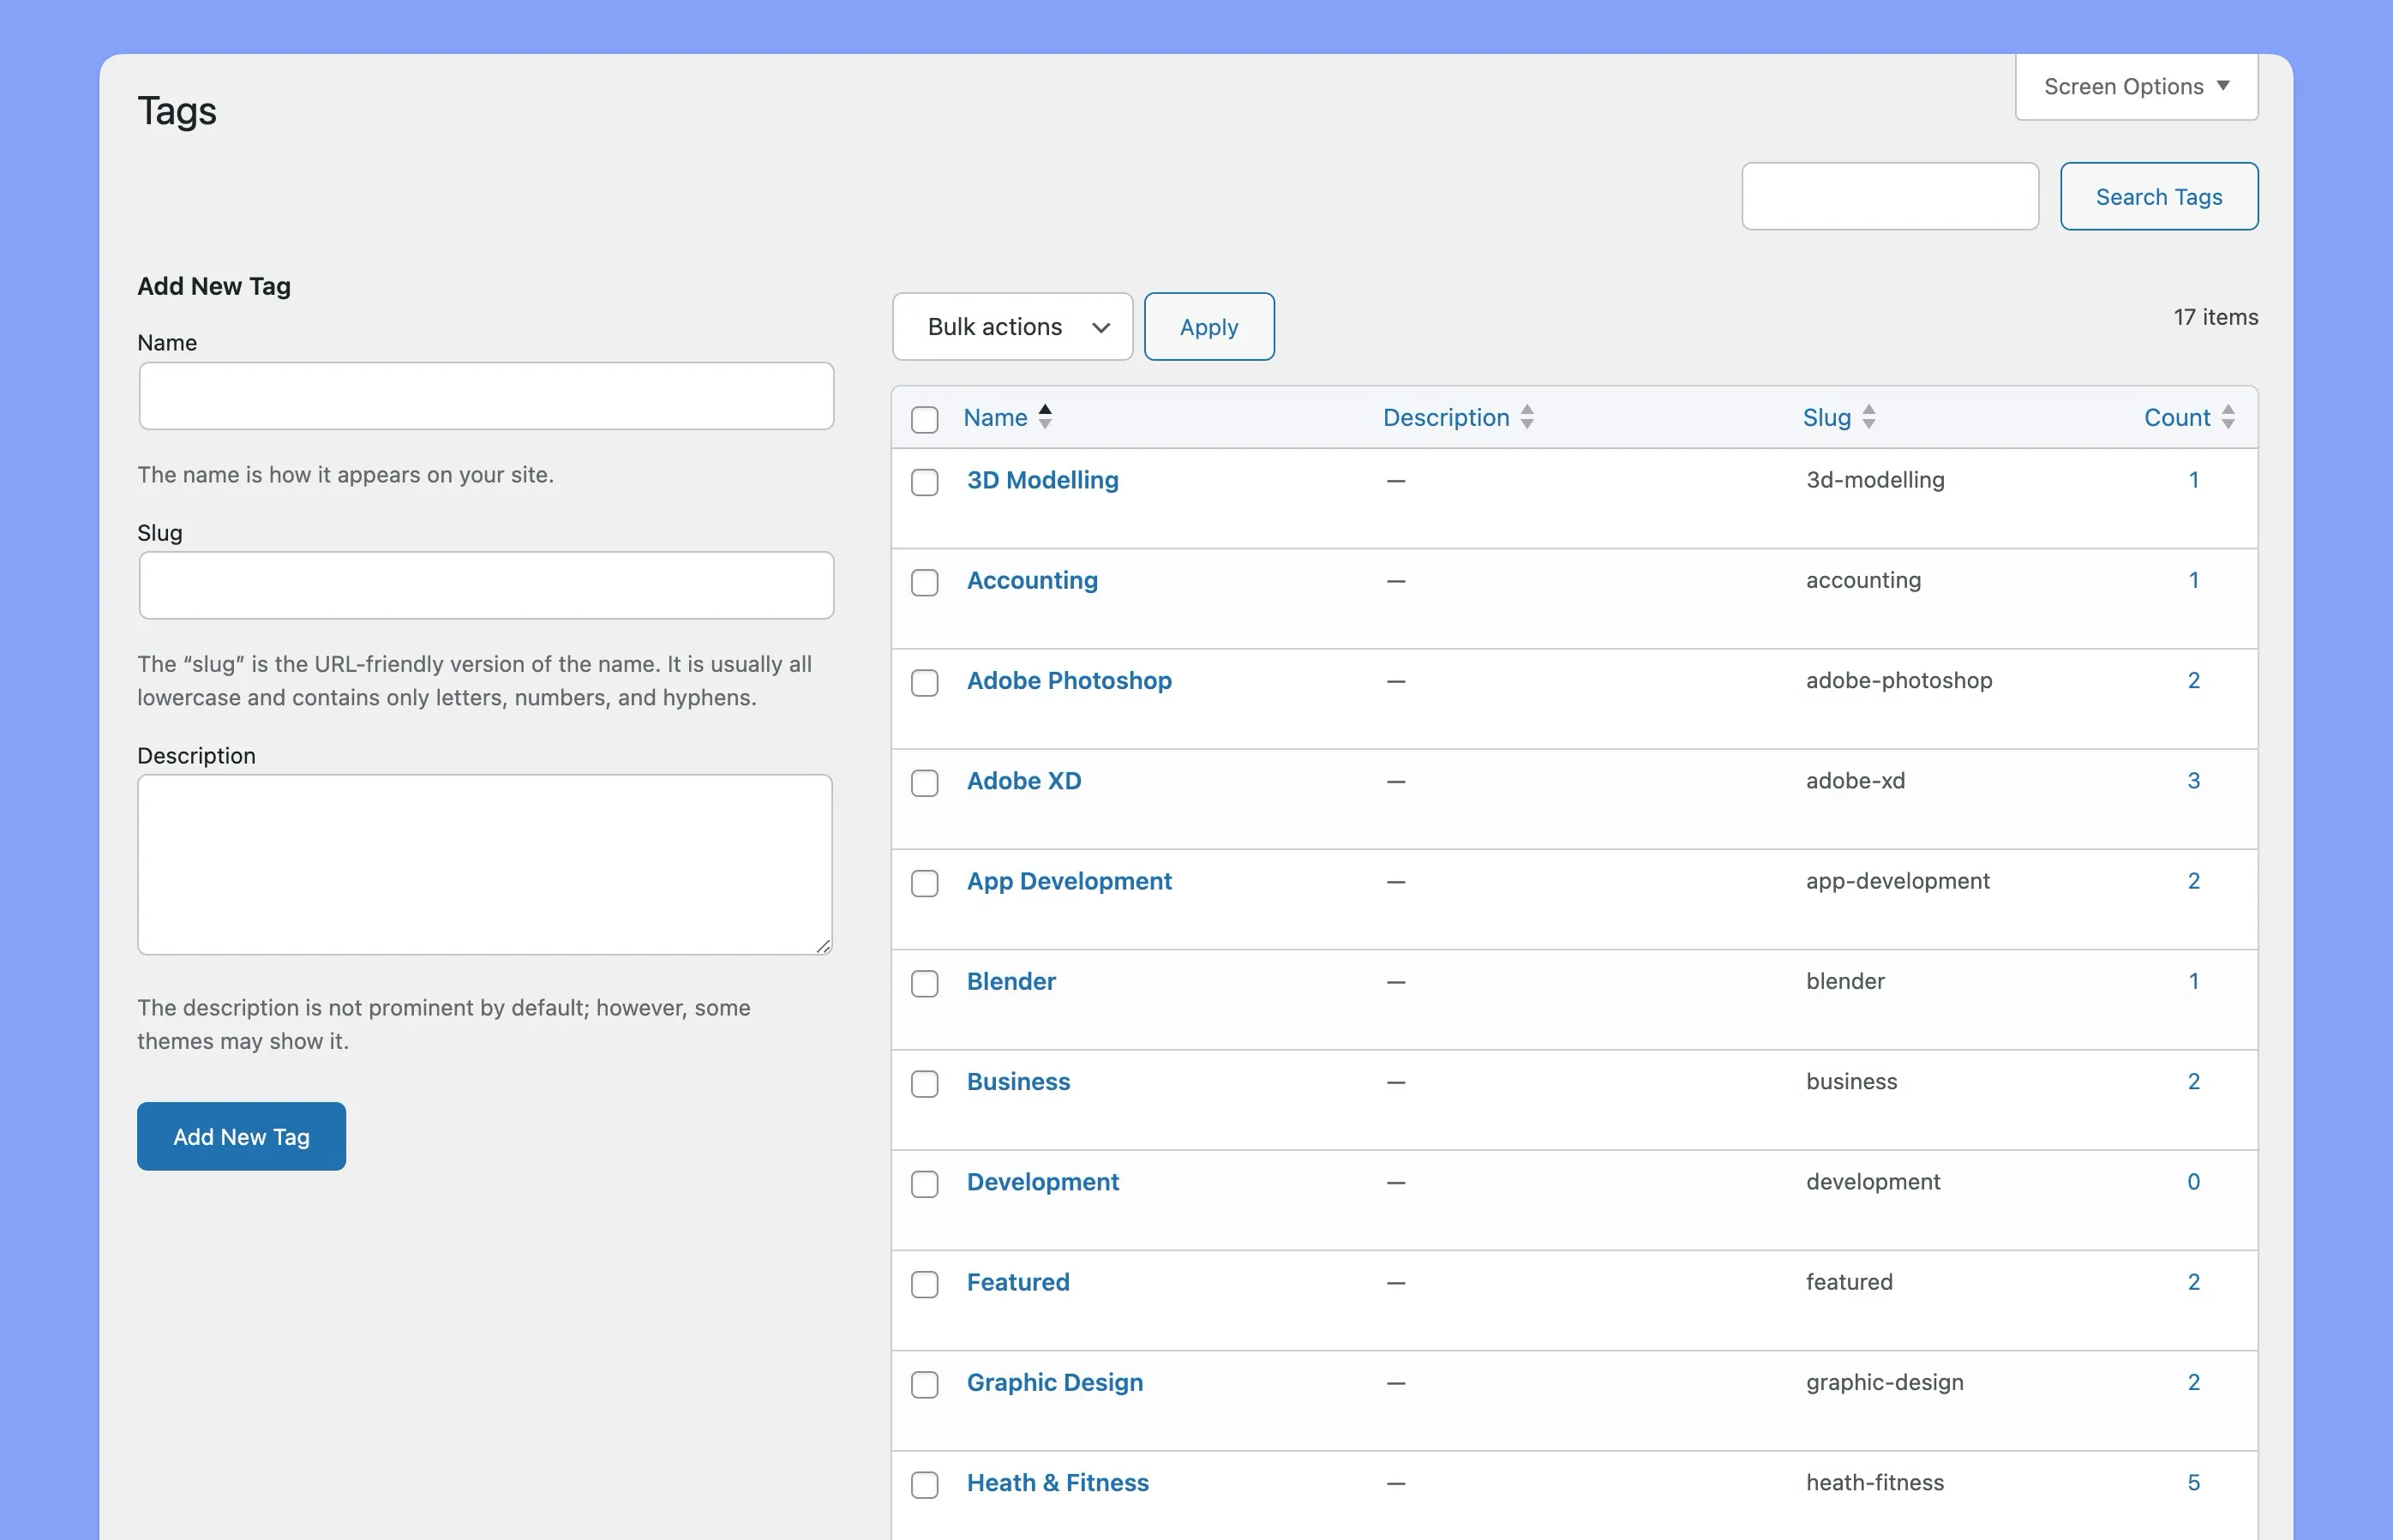
Adding “Tags” in Tutor LMS is very simple:
- Click on the “Tags” option in your Tutor LMS admin dashboard.
- To add a new tag, fill in the required fields on the left side:
- Name: Enter the name of the tag.
- Slug: Provide a URL-friendly slug for the tag.
- Description: Add a description for the tag.
- Click “Add New Tag” to save the new tag to the Tags directory.
Tags work hand-in-hand with categories, providing an additional search mechanism to cut through the course clutter. Make your LMS discoverable and search-friendly with customized course tags.
Help Students Find Your Online Courses With Filters
Between categories, tags, and courses, your Tutor LMS site has a ton of content! Filters make it easy for students to cut through the noise and narrow down their search.
Filters are customized criteria that learners can use to filter course lists, such as:
- Subject – Math, Science, English e.t.c
- Instructor name
- Date created
- Course length
With the right filters, students can hone in on the perfect classes in seconds. No more aimlessly digging through hundreds of courses!
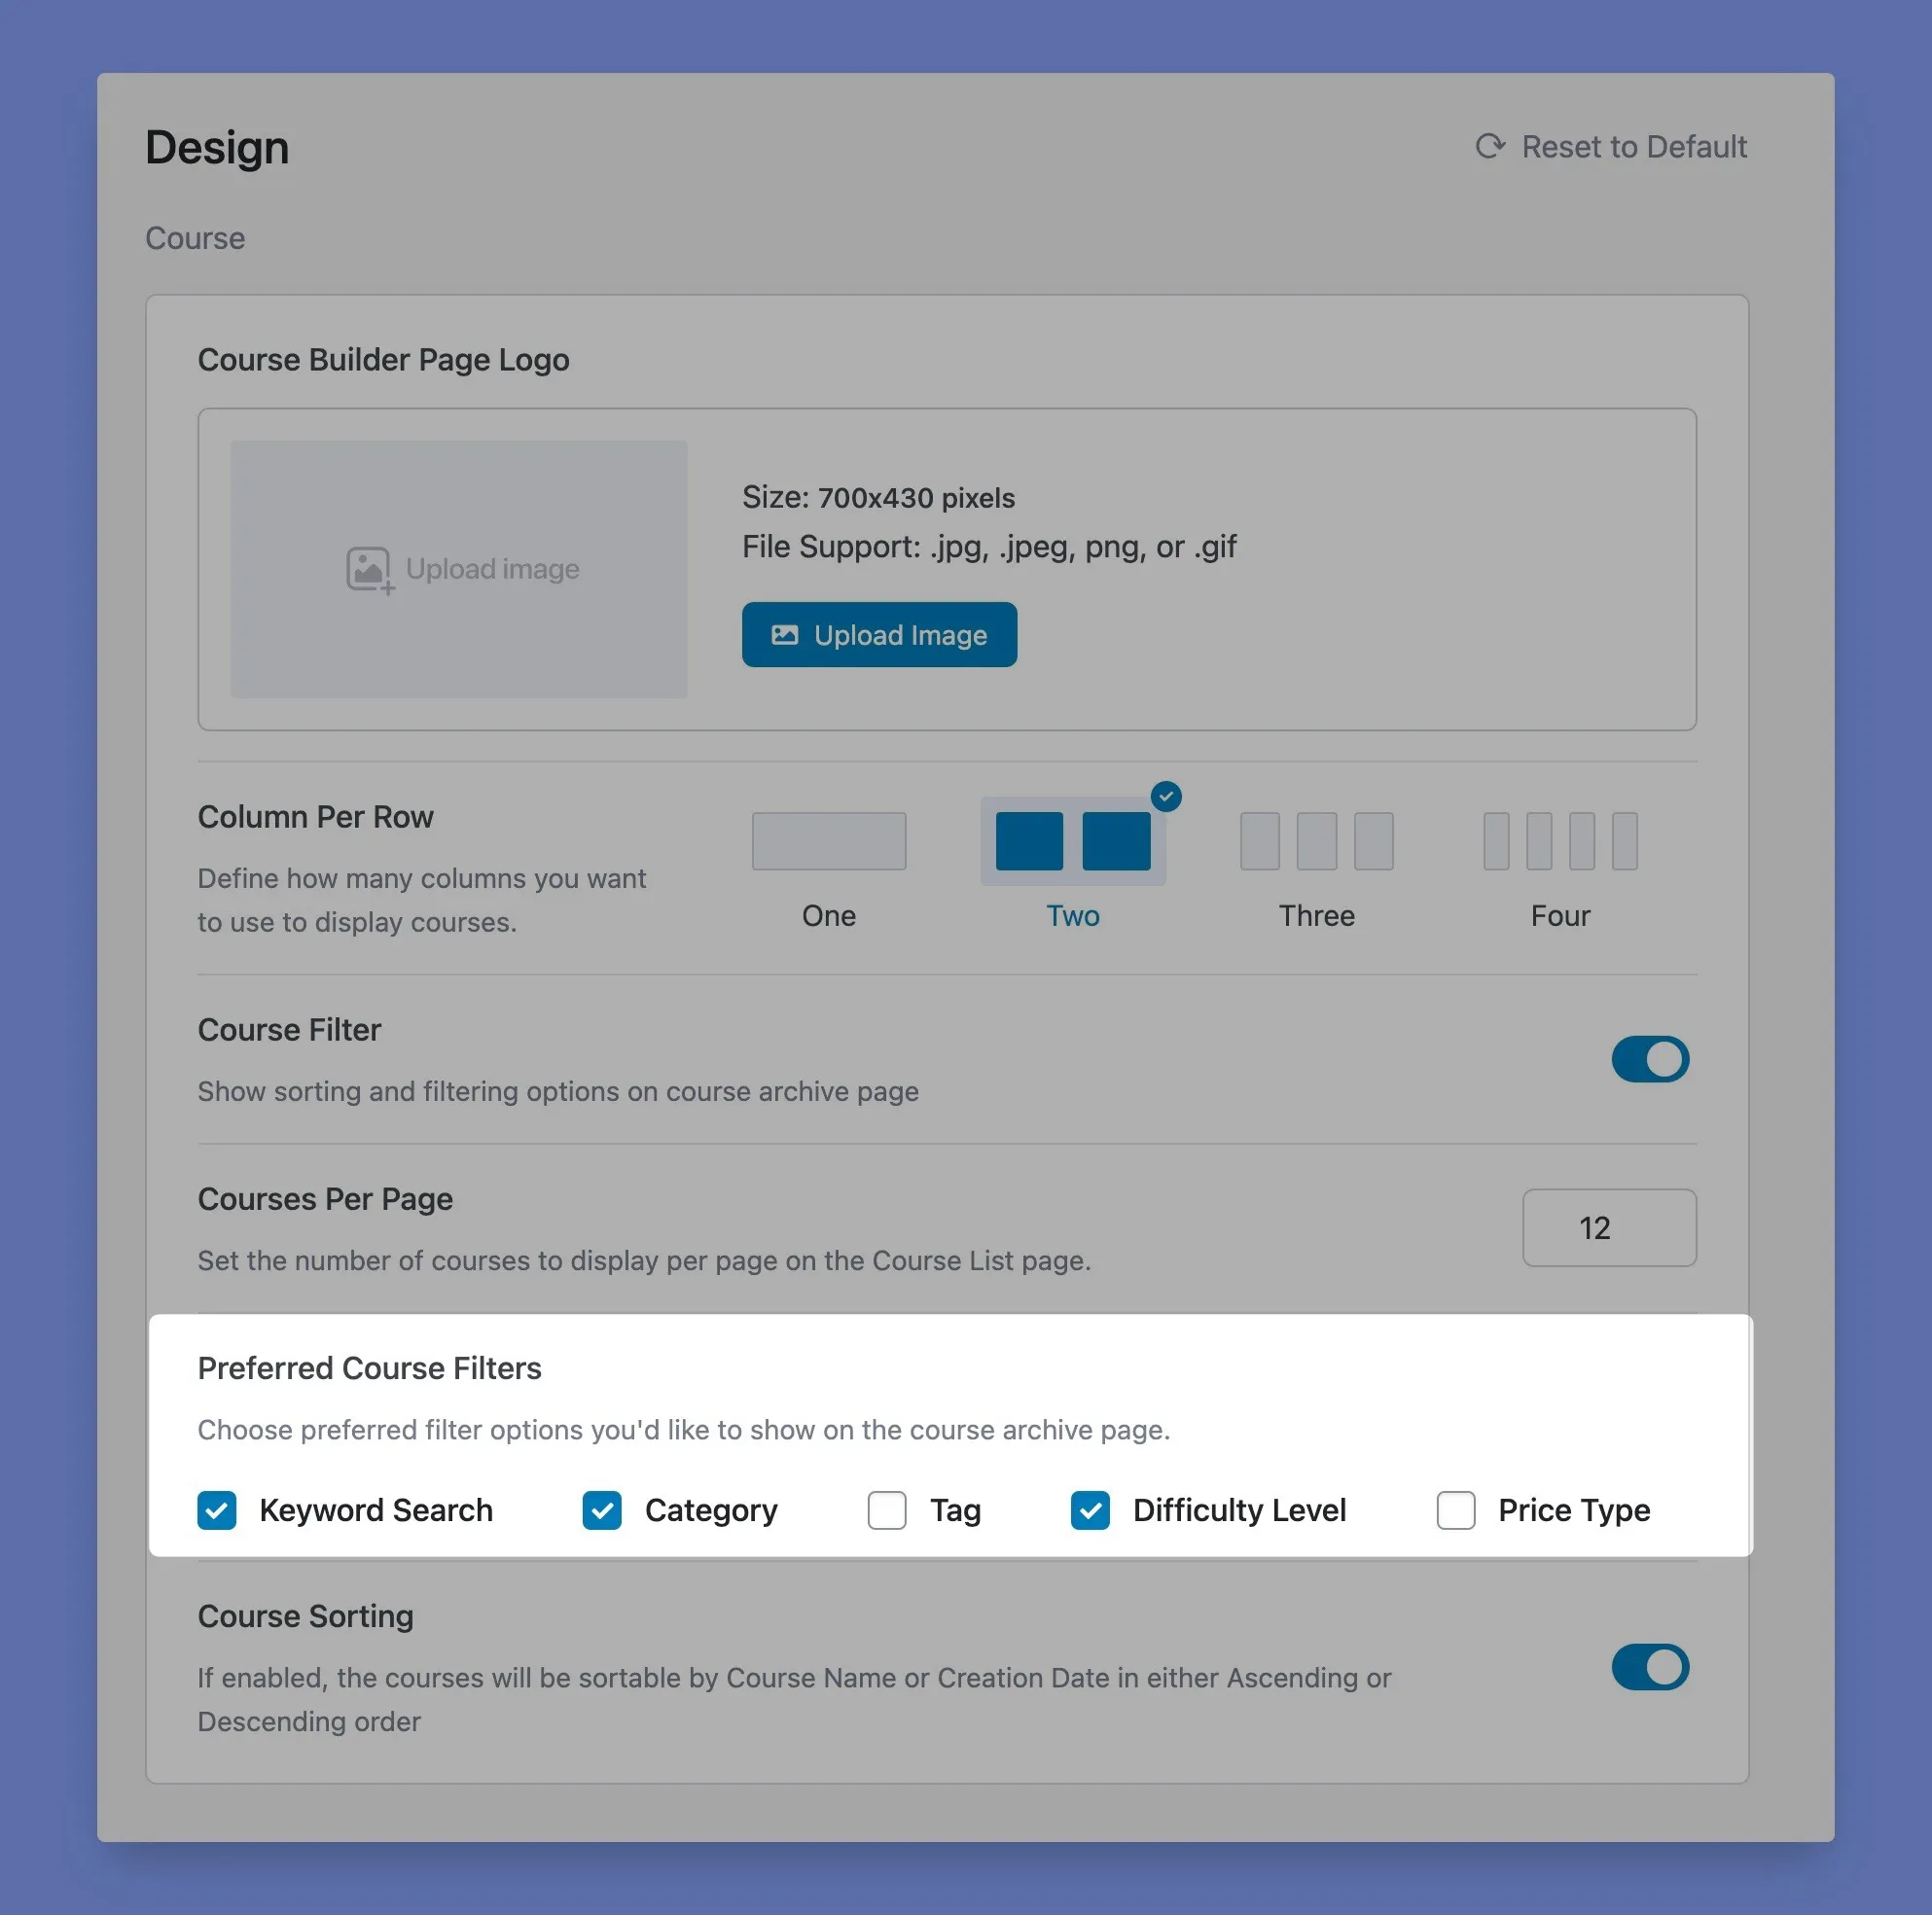
Adding filters to your Tutor site is very straightforward:
- Go to the Settings page by navigating to “Tutor LMS> Settings” from the admin dashboard.
- Click on the “Design” option in the sidebar.
- Scroll down and look for the “Preferred Course Filters” section.
- Check the boxes next to the filters you want to use, like “Keyword Search”, “Category”, “Tag”, “Difficulty Level”, or “Price Type.” You can choose one or multiple filters.
- Once you’ve selected the filters, click the “Save Changes” button at the bottom.
Now, your learners can quickly refine their course search using your custom filters. The right filters make a world of difference in discovering the best courses!
Save Time By Duplicating Courses
Creating an updated version of an existing course? Starting a course that covers the same concepts? Tutor’s duplicate course feature has you covered.
Duplicating courses allows you to easily:
- Roll out updated versions of old classes
- Create multiple sections of popular topics
- Maintain consistency across similar courses
No need to build from scratch each time! The duplicate tool is a real time-saver.
To duplicate courses in Tutor LMS, follow these steps:
- Access the Course Menu in Tutor LMS
- Locate the course you want to duplicate and click the vertical ellipsis icon (︙) next to it.
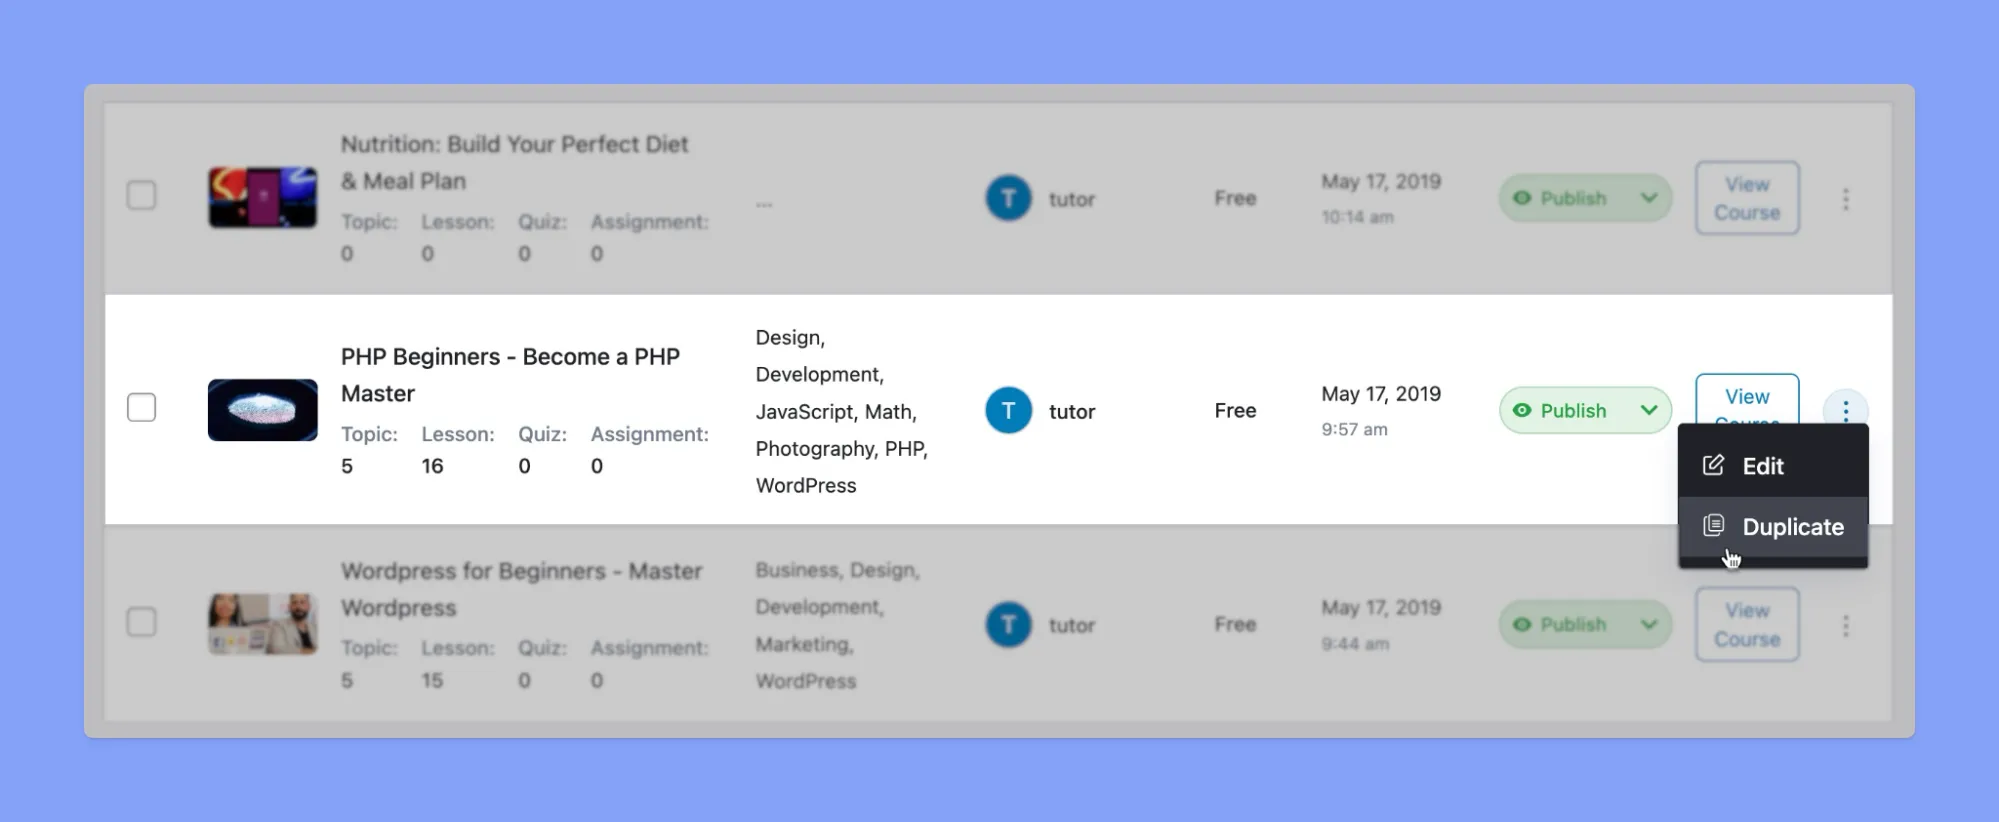
- From the dropdown menu, select “Duplicate.” Confirm your choice.
- An exact copy of the course will be created with the word “Copy” in its name. You can rename it as needed.
- The duplicated course retains lessons, quizzes, and certificates from the original course.
- The new duplicated course will be listed under “Courses” in the Course Menu.
Now you have an exact copy to tweak instead of starting from zero. Give it a try!
Get Streamlined with Manual Enrollments
Keeping track of student enrollments can get messy fast as your course catalog expands! But the Manual Enrollments add-on helps you structure enrollments and take back control.
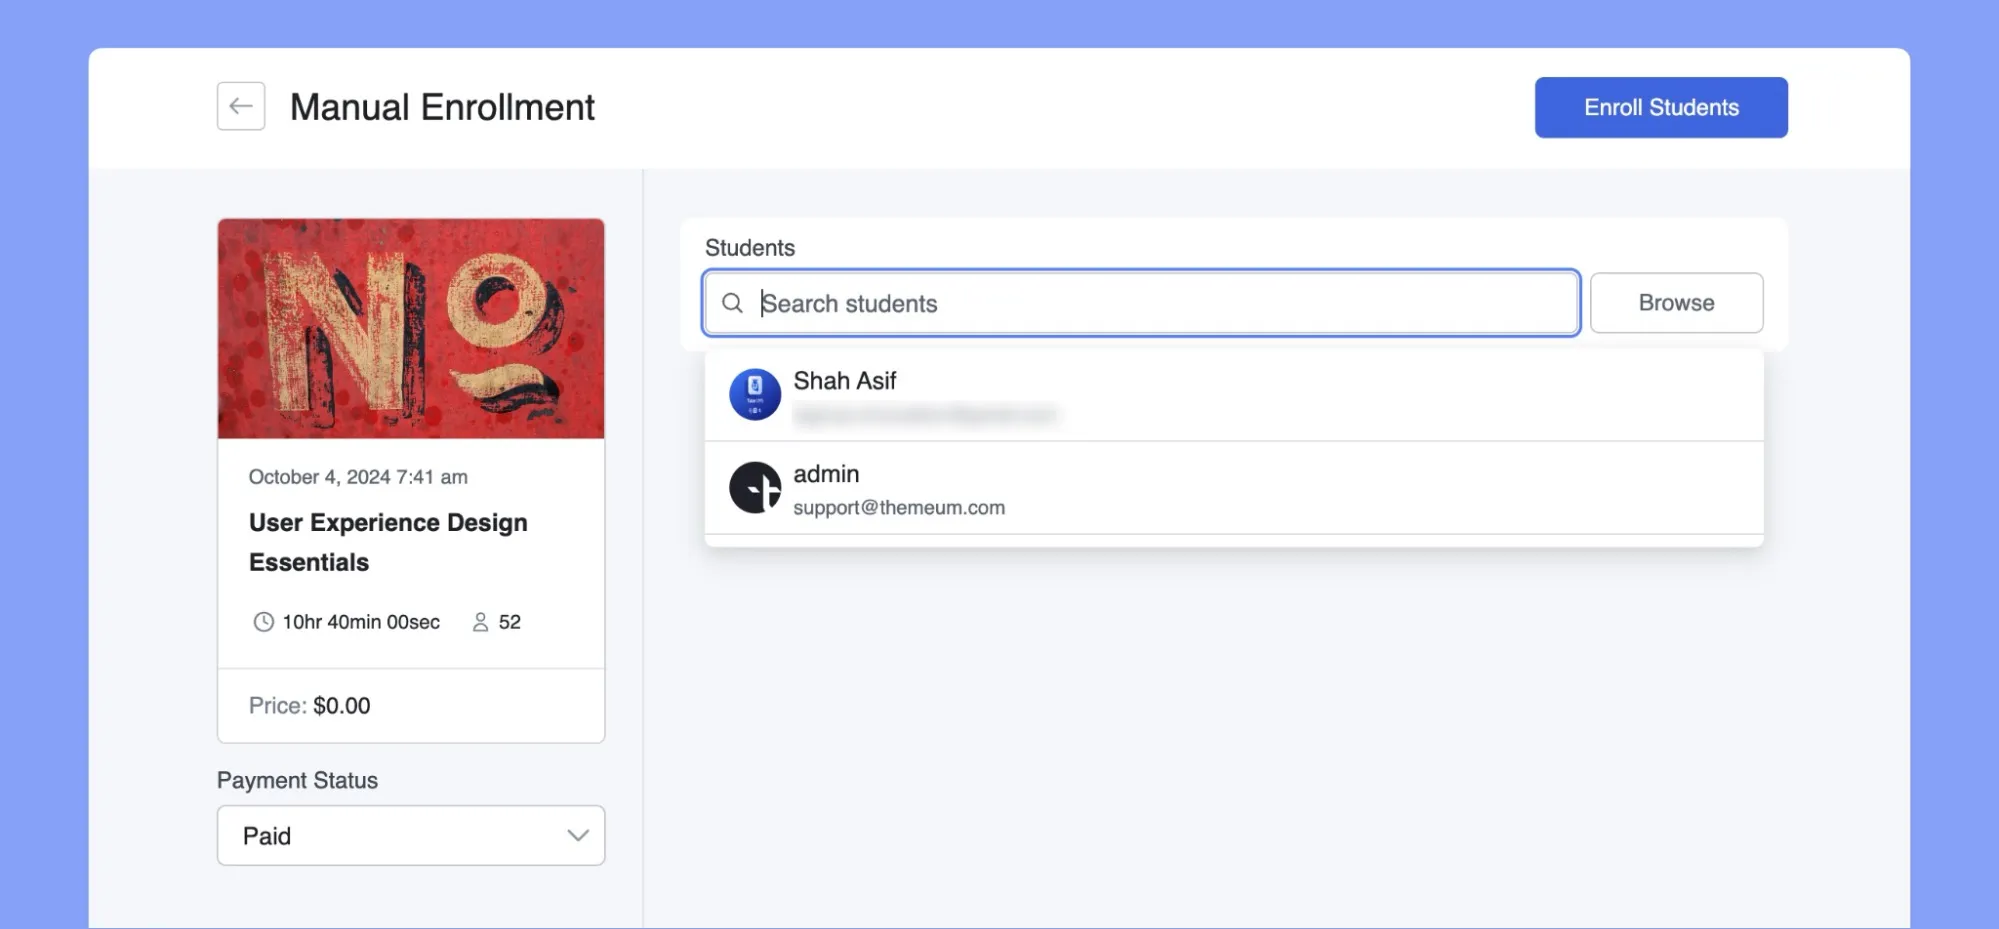
With manual enrollments, you can hand-pick which students join each class instead of just allowing random self-enrollment. The benefits of manual enrollment are:
- You can build custom student groups tailored to each course.
- Approve enrollments on a course-by-course basis. Control access and only allow approved pupils to join.
- Easily view enrollments on the dashboard to identify any that need to be made.
- Simply add or remove learners from courses to declutter rosters.
The enrollments dashboard gives you an eagle-eye view of all student placements. You can deliberately shape each class for maximum efficiency. Streamlining enrollments by hand prevents enrollment bloat and clutter.
Want to know everything about manual enrollment? Check out our complete manual enrollment guide. It goes over the feature in-depth so you can master the process.
Tune Up Your LMS with Regular Check-Ups
An organized learning management system, much like a tidy bedroom, requires ongoing maintenance. Setting reminders for periodic checkups can prevent your LMS from descending back into cluttered chaos.
Consider adding these tasks to your calendar at regular intervals:
- Categories – Update for new courses often. Remove unused categories.
- Filters – Tweak filters if course offerings change.
- Tags – Check tags fit current courses. Fix odd tags.
- Course titles – Update any name changes.
- Files and resources – Delete unused documents and media.
Think of it like an organizational tune-up! Just some periodic maintenance keeps your LMS running smoothly. With regular check-ups, you’ll catch inconsistent names, redundant files, and other clutter. Your LMS will stay clutter-free and easy to navigate!
More Tips for an Organized Tutor Site
Keeping your LMS clutter-free takes effort, but it’s worth it! Here are some extra tips for optimizing organization in Tutor:
- Turn on Spotlight Mode from Tutor LMS settings to hide headers/footers and remove distractions when learners view lessons.
- Enable Content Summary to collapse long course descriptions with a “Read More” button on the Course Details page. This declutters the overview page.
- Use Auto Redirect to Courses to send students right to their enrolled course content after purchase. Removes extra steps.
- Set Automated Load Next Course Content to create seamless transitions between lessons.
- Enable Auto Course Complete to mark courses finished when all content is completed automatically. Tidy progress tracking.
- Choose Attachment Open Modes like “New Tab” to prevent downloads from cluttering student devices.
- Use Auto-Hide for Quiz Details to declutter student review and history pages after attempts.
- Select minimal layouts for instructor/student profiles for clean, distraction-free pages.
- Enable Sticky Sidebar to keep course navigation accessible while scrolling through long pages.
Take advantage of the many customization options available in the “Course” and “Design” sections of your Tutor LMS settings. The more you tailor these to suit your needs, the more user-friendly your LMS site becomes. Don’t settle for the default settings – really make Tutor your own with these organization tips!
Achieving and Maintaining LMS Organization
Keeping your online courses organized can feel overwhelming at times, but it doesn’t have to be! With strategic use of tools like categories, tags, filters, and manual enrollments, you can transform your Tutor LMS site into a tidy, streamlined learning environment.
Implementing even a few of the tips covered can make a massive difference in decluttering your site and boosting usability. Take it step by step. Start with simple changes like categories or custom filter customizations first. Consistency is key! So take a breath, and know that order is attainable, even for the most sprawling course sites!

Start Using Tutor LMS Today
Ready to take your online courses to new heights? Download Tutor LMS now and enjoy a journey of eLearning excellence.