A Comprehensive Guide to Integrating Zoom with Tutor LMS for Increased Connectivity

Online school can get pretty boring with nothing but static lectures and plain text assignments. But what if you could bring your online classes to life with live video chats? Well, you totally can! By integrating Zoom with Tutor LMS, you can launch incredible virtual classrooms directly from your online course.
Keep reading as I walk you through exactly how to connect Zoom and Tutor LMS in just a few simple steps. Trust me, it’s easier than you think! Plus, I’ll explain what all the technical jargon actually means along the way.
Once we’re done, your online course will be way more engaging. No more falling asleep at your laptop! With Zoom, you can have truly interactive classes, connect with your classmates, and bring the energy of in-person learning online. So what are you waiting for? Let’s get Zoom up and running in your Tutor course!
Why Integrate Zoom with Your LMS?
Before we get into the nitty-gritty details, let’s quickly discuss “why” you’d want to integrate Zoom with Tutor LMS in the first place.
You’re probably familiar with Zoom as the popular video conferencing app everyone used when quarantine first started. While Zoom is excellent for one-off video calls, it doesn’t work as smoothly for scheduled classes except when it’s integrated with a learning management system like Tutor LMS. Apart from this, there are several other major benefits that come along with this integration.
Here are some of the benefits you get when Zoom is integrated directly into your LMS:
- No more sharing meeting links!: Integrating Zoom with Tutor LMS Pro makes joining live classes super simple. You don’t need to switch between different apps or remember long meeting URLs. Everything is right there in the course.
- Better security: Tutor keeps your class roster and permission settings separated from your Zoom account for privacy.
- Synced calendars: Your Zoom sessions will automatically display on your Tutor course calendar. No more mismatched schedules!
- Easier class management: You can manage your Zoom calls like any other Tutor assignment or activity.
- Flexible Scheduling: Zoom and Tutor LMS Pro enable easy scheduling of classes. If you can’t attend a live class, there’s usually a recording available for later viewing. This flexibility helps you keep up with your lessons, even with a busy schedule.
- Interactive Learning Experience: With Zoom, you can easily turn on your video and audio to engage with your classmates and teachers. You can use features like screen sharing, polls, and breakout rooms to make your lessons more interactive.
So, in summary, an integrated Zoom gives you a smoother experience and classroom-like setup for your video sessions, rather than one-off call links. Ready to get started? Let’s get Zoom and Tutor talking!
Getting Started with Zoom Integration
Before you start setting up Zoom integration with Tutor LMS Pro, make sure you have the following two plugins installed and enabled:
- Tutor LMS v2.7.0 or later
- Tutor LMS Pro v2.7.0 or later
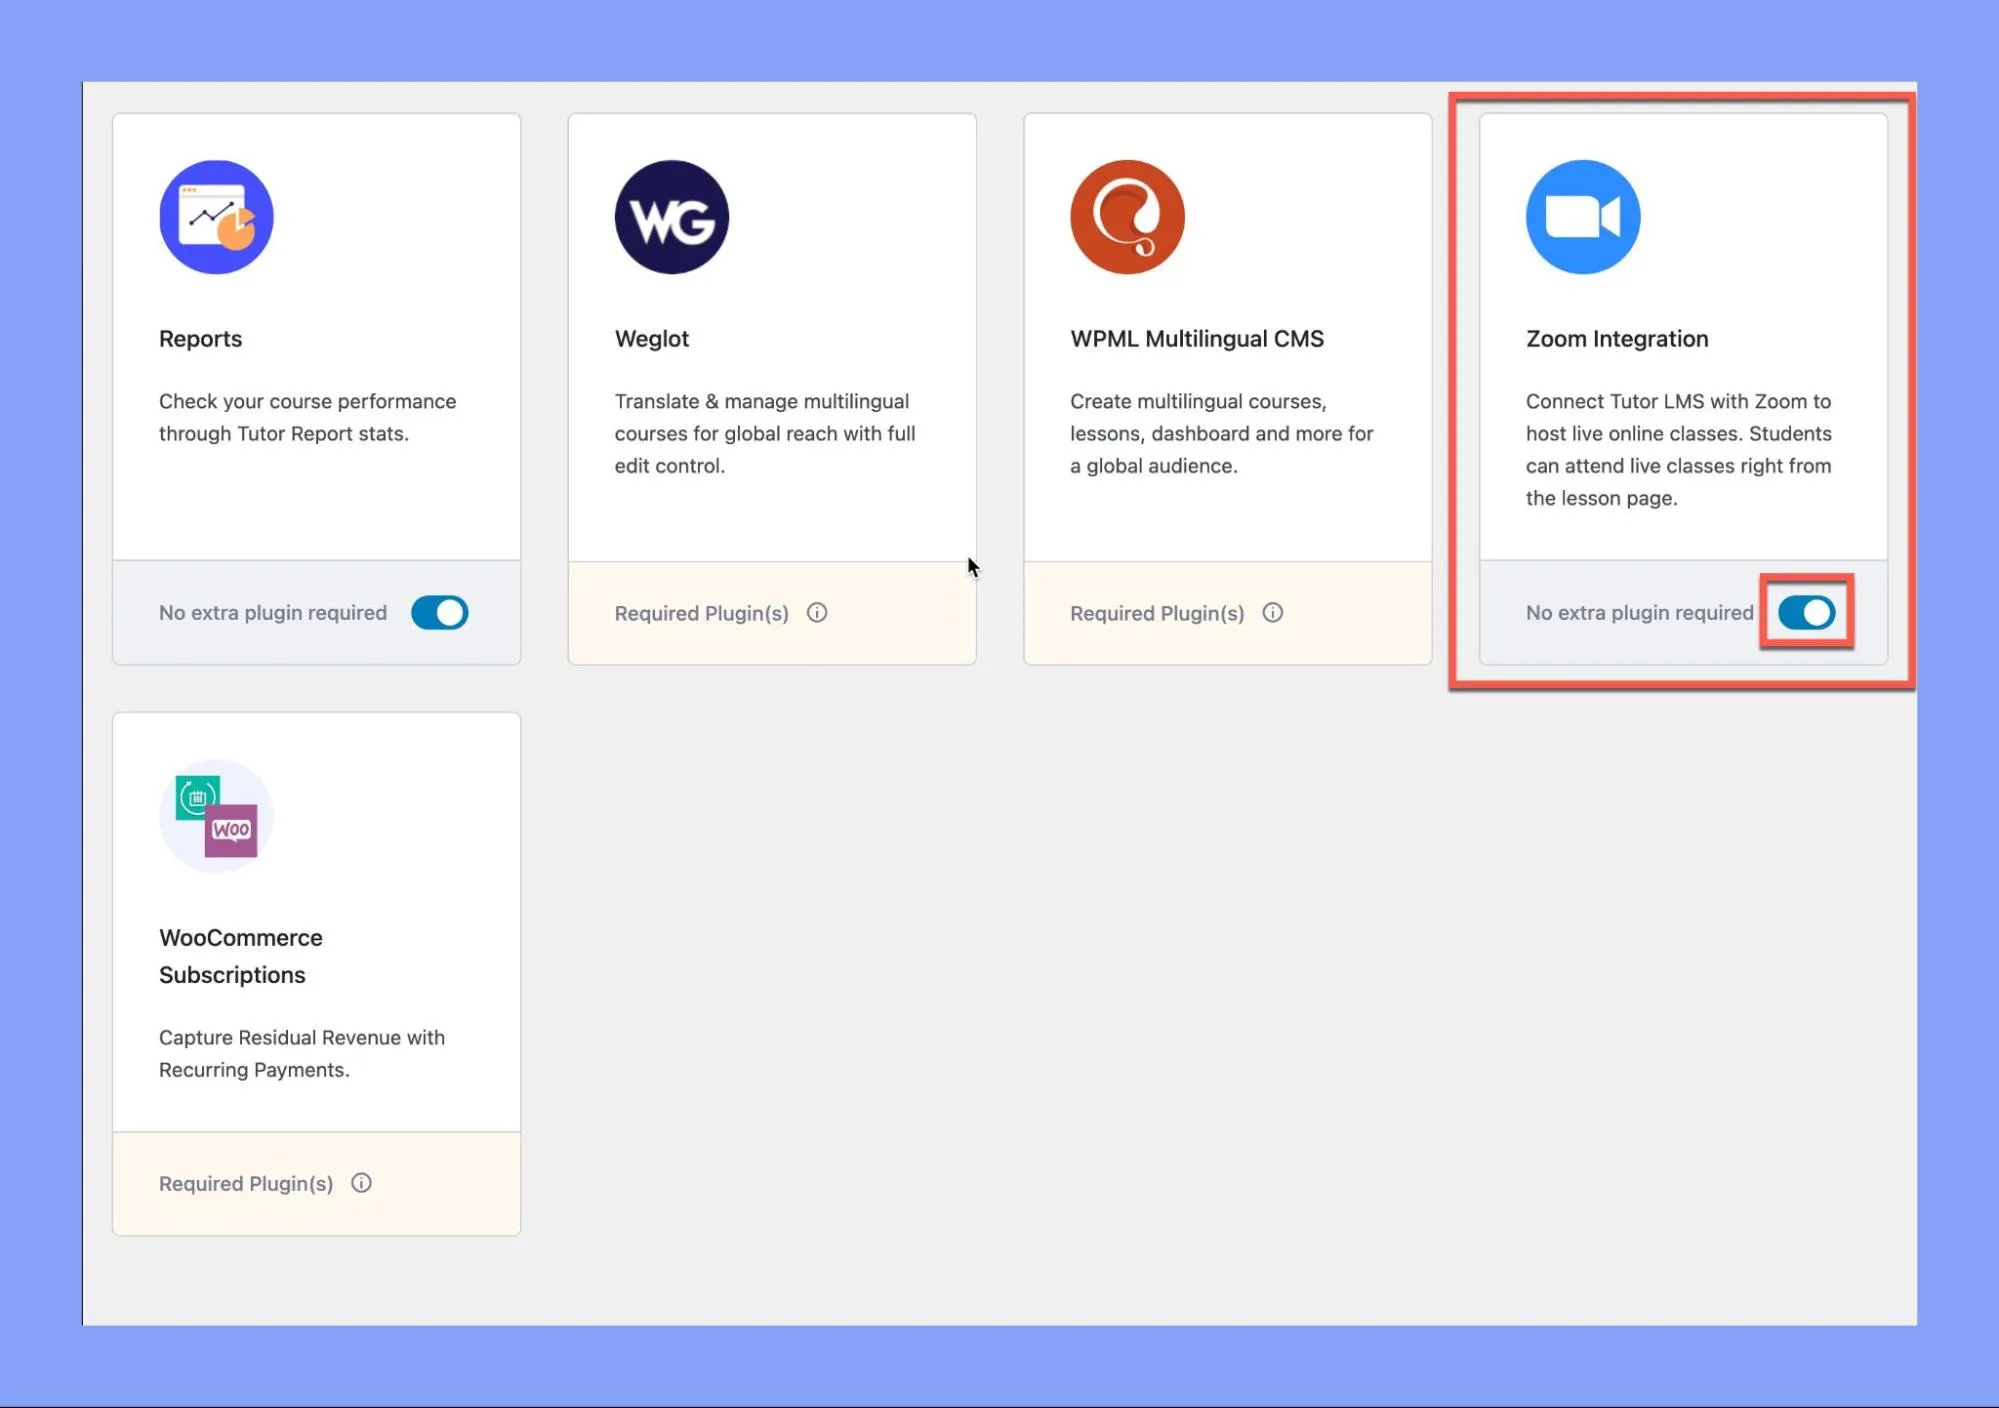
Another preliminary step is to enable the Zoom addon for Tutor LMS Pro. Here is how to do it:
- Log in to your Tutor LMS dashboard
- Go to Tutor LMS Pro > Add-ons.
- Scroll down and search for “Zoom Integration.”
Toggle the button to “Active” the addon.
Keep in mind that while Zoom (both free and pro) can be integrated with Tutor LMS Pro, the paid version of Zoom does not come included. If you want to use Zoom’s pro features, yyou will need to purchase the pro version separately.
Another important detail is that each instructor must connect their own API details from the backend dashboard to manage their meetings. The admin’s account cannot be shared by all instructors due to issues like rescheduling or cancellation.
Step 1: Creating a Zoom Account
The first step towards setting up Zoom integration with Tutor LMS Pro is to create a Zoom account. Visit Zoom’s website and sign up.
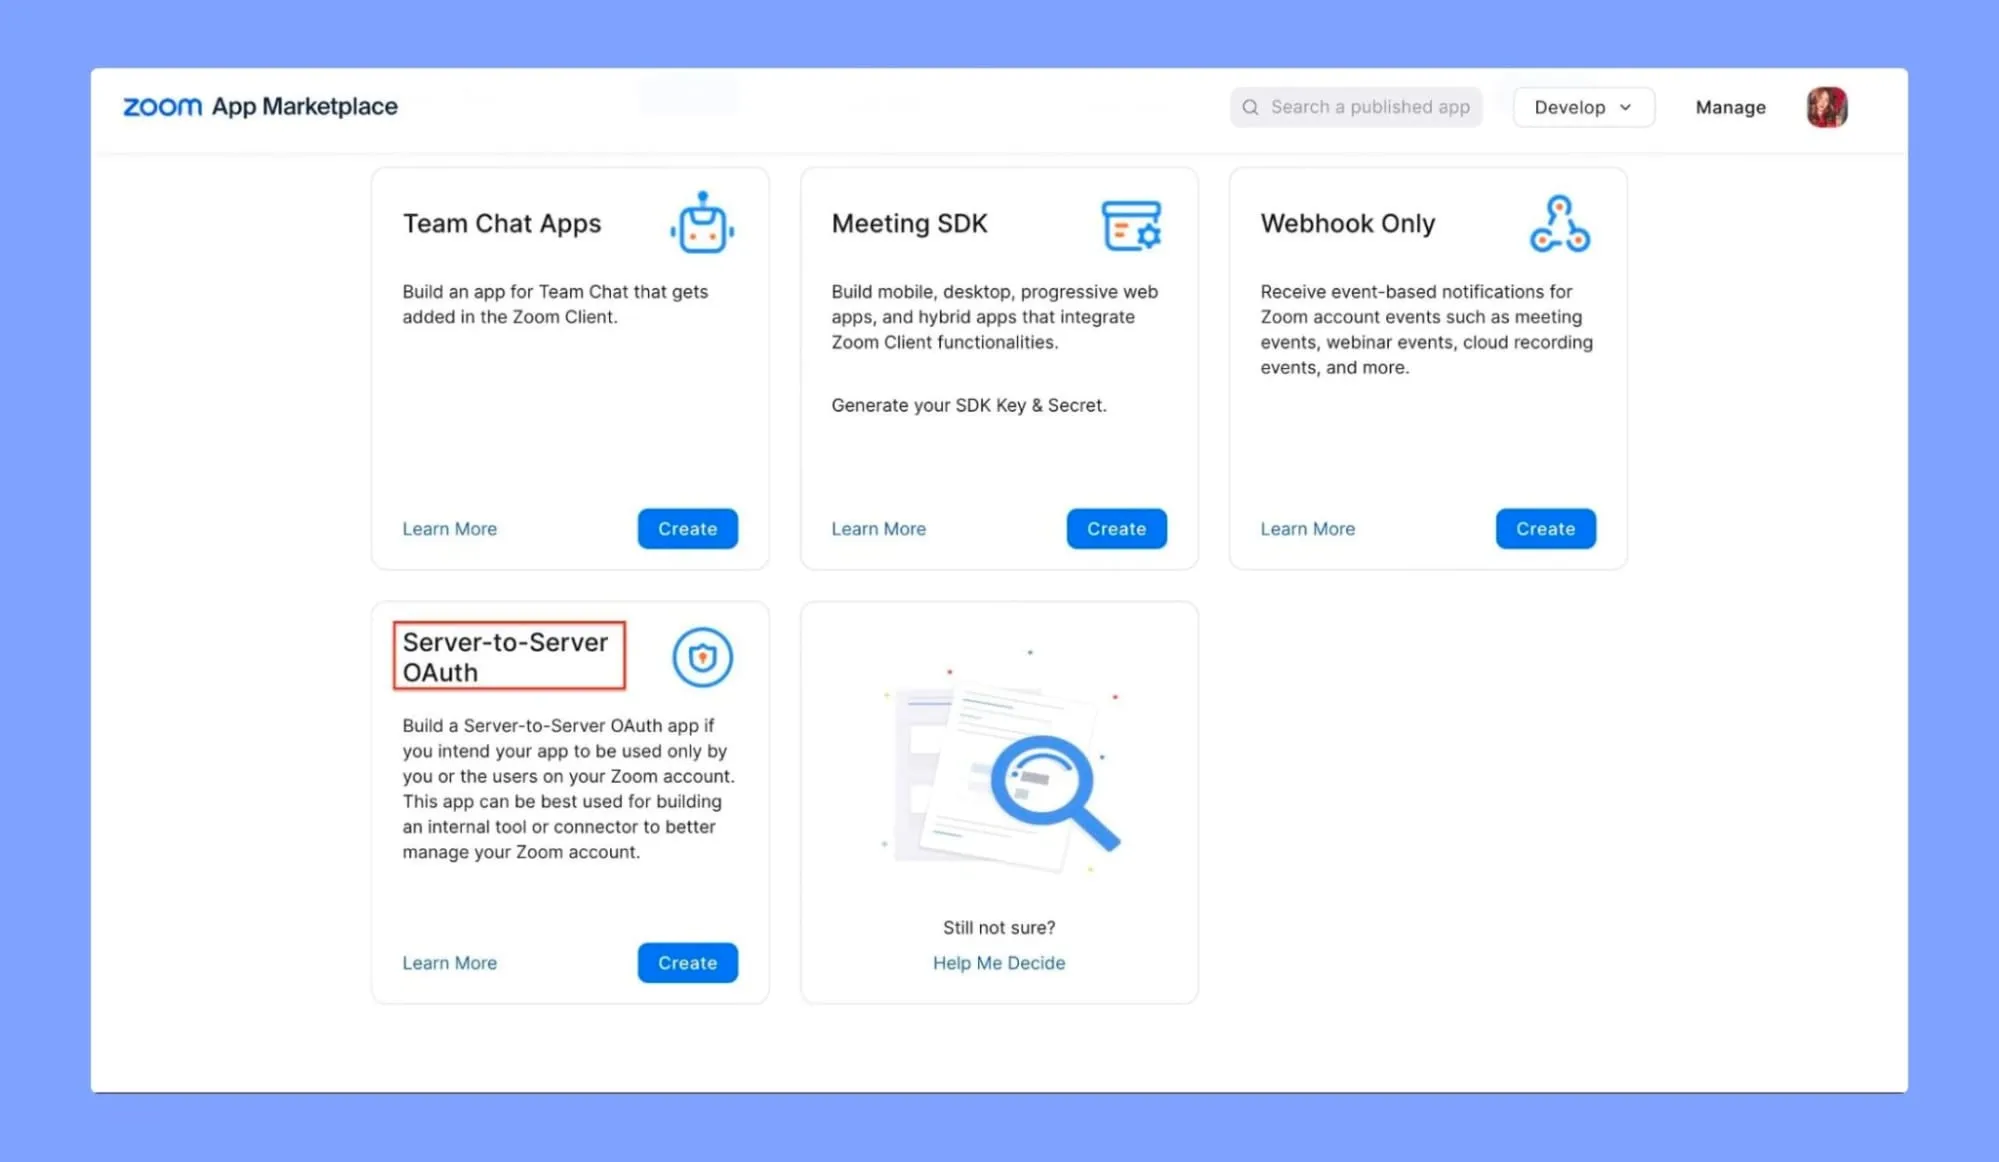
Step 2: Creating a Server-to-Server OAuth App
After creating an account, you must create an app that will connect Tutor LMS to Zoom. Follow the steps given below to create a Server-to-Server OAuth app:
- Go to the Zoom App Marketplace Developer Dashboard and log in with your Zoom account.

- Scroll down to find “Server-to-Server OAuth”. Click on “Create” under the Server-to-Server OAuth app type.
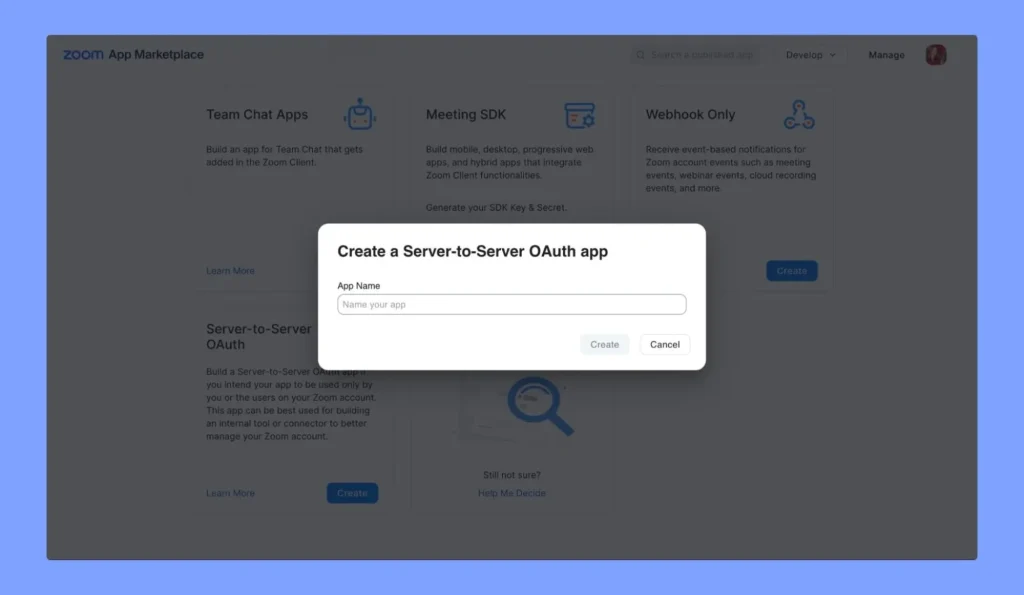
- Fill in the App Name field and click on Create.
- You will be redirected to the App credentials page. But first, you need to fill in the required Information & Scopes to Activate your app.
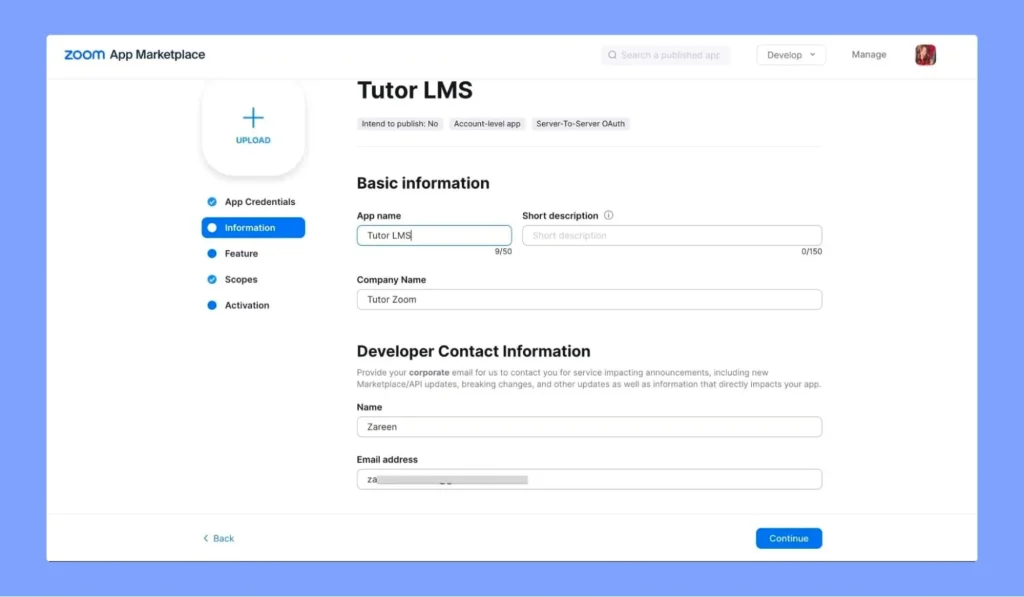
- Go to “Information” to set your Company Name and Developer Contact Information, i.e. your name and email address.
- Next, go to the “Scopes” section and configure your app’s necessary scopes based on your Tutor LMS integration requirements. We recommend selecting all the scopes for Meeting, Webinar, Recording, and User.
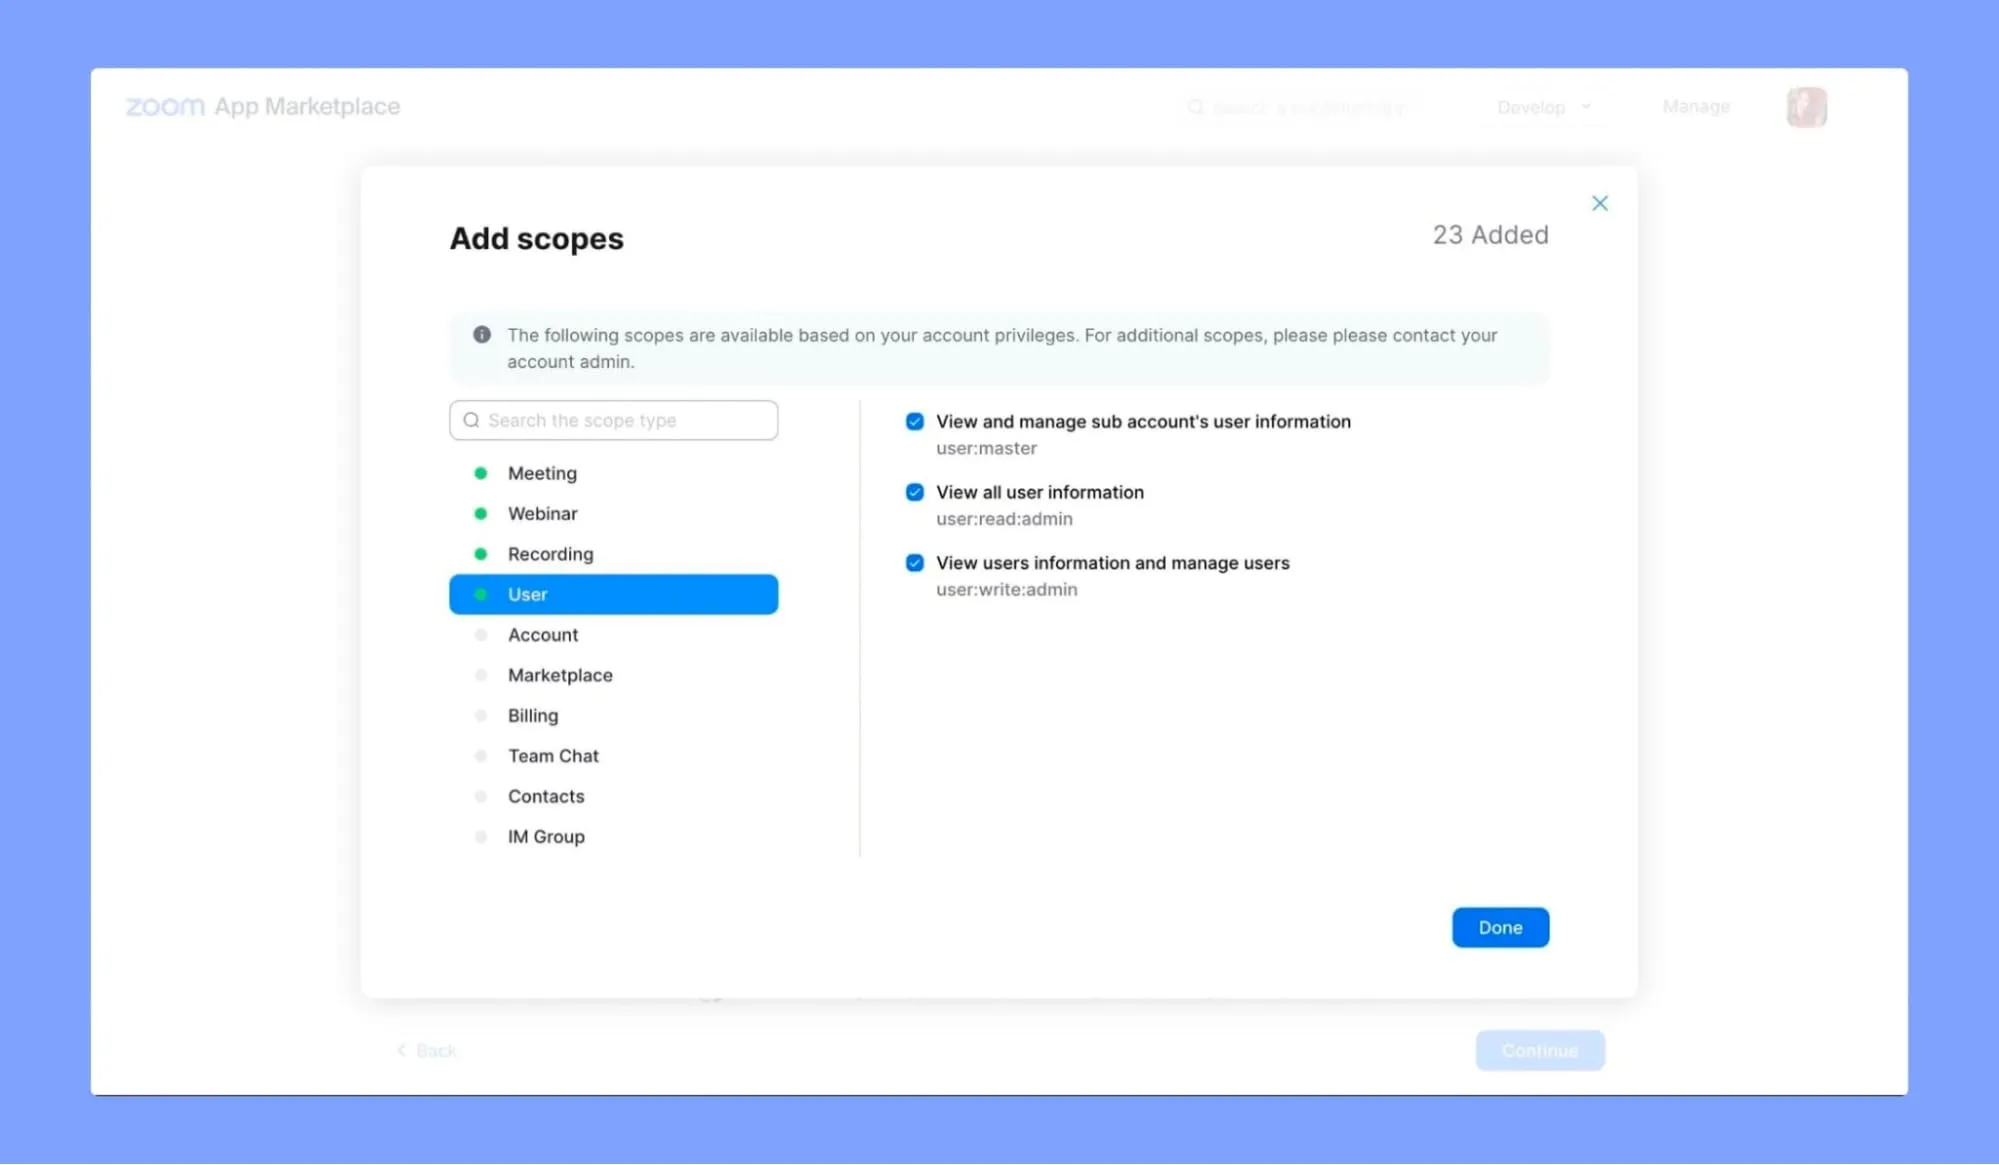
Important: Configure the necessary scopes based on your Tutor LMS integration’s features. To ensure the integration works smoothly, please select the following required scopes.
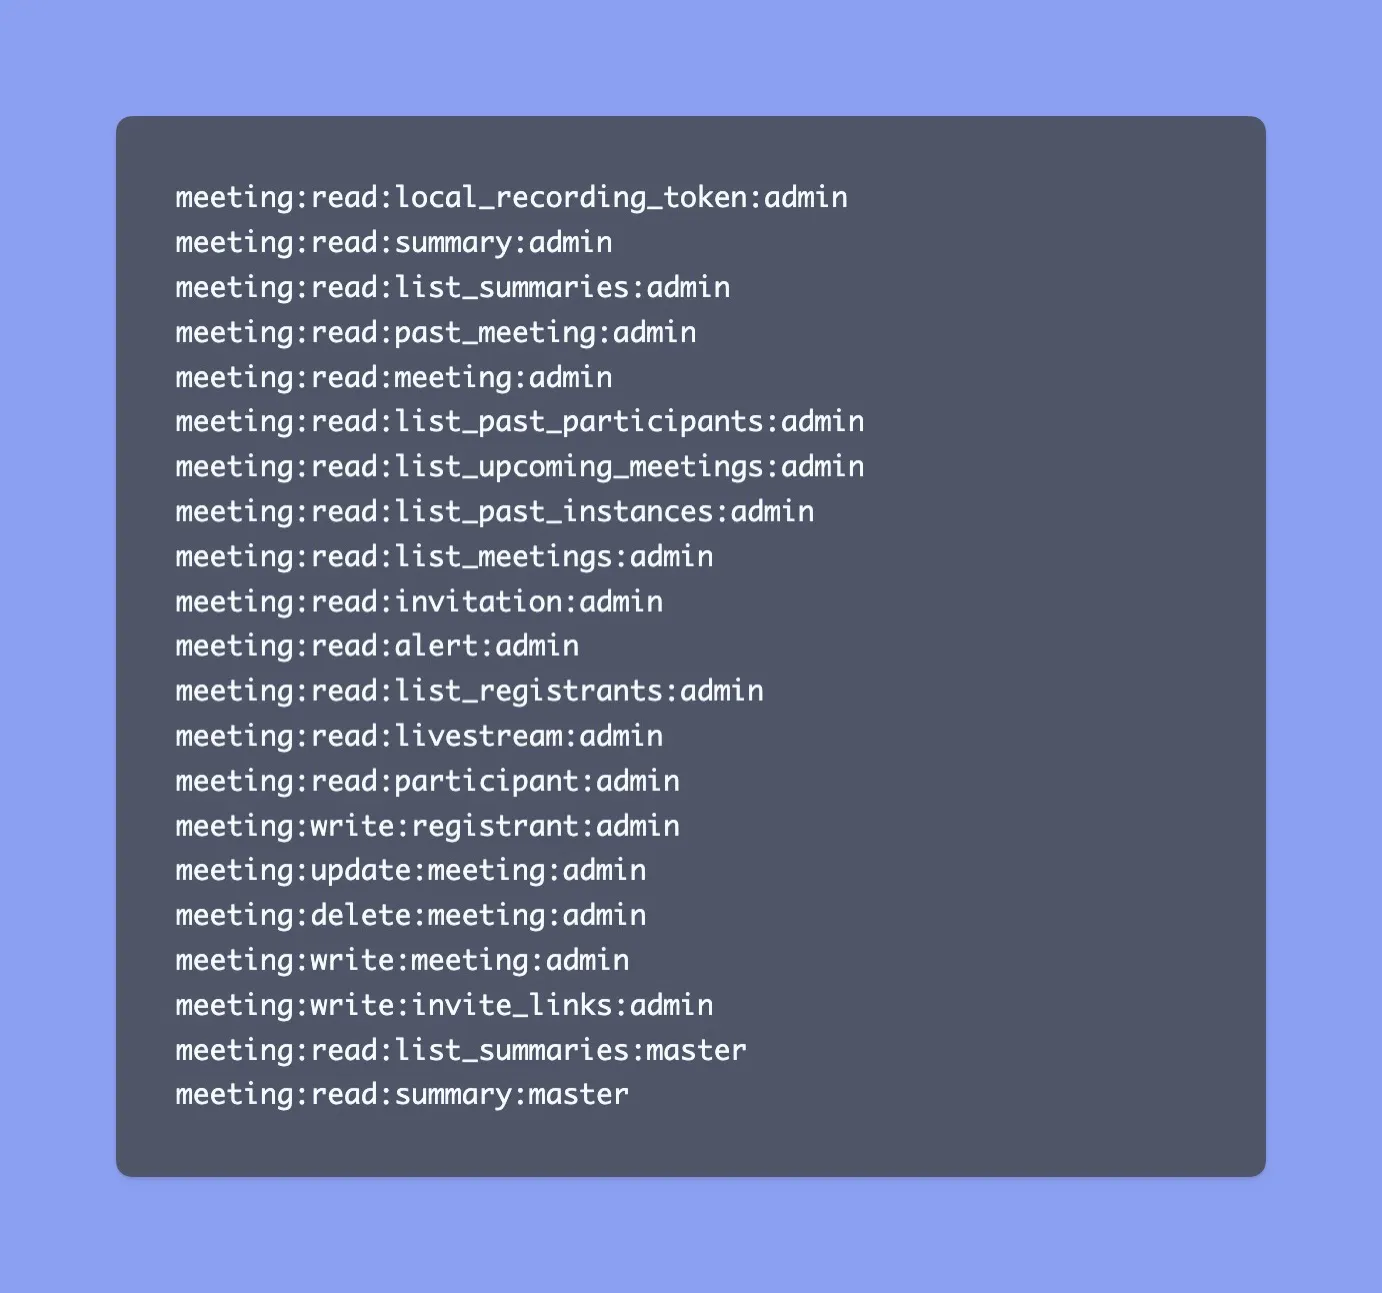
Meeting Scopes:
Recording Scopes:

Webinar Scopes:
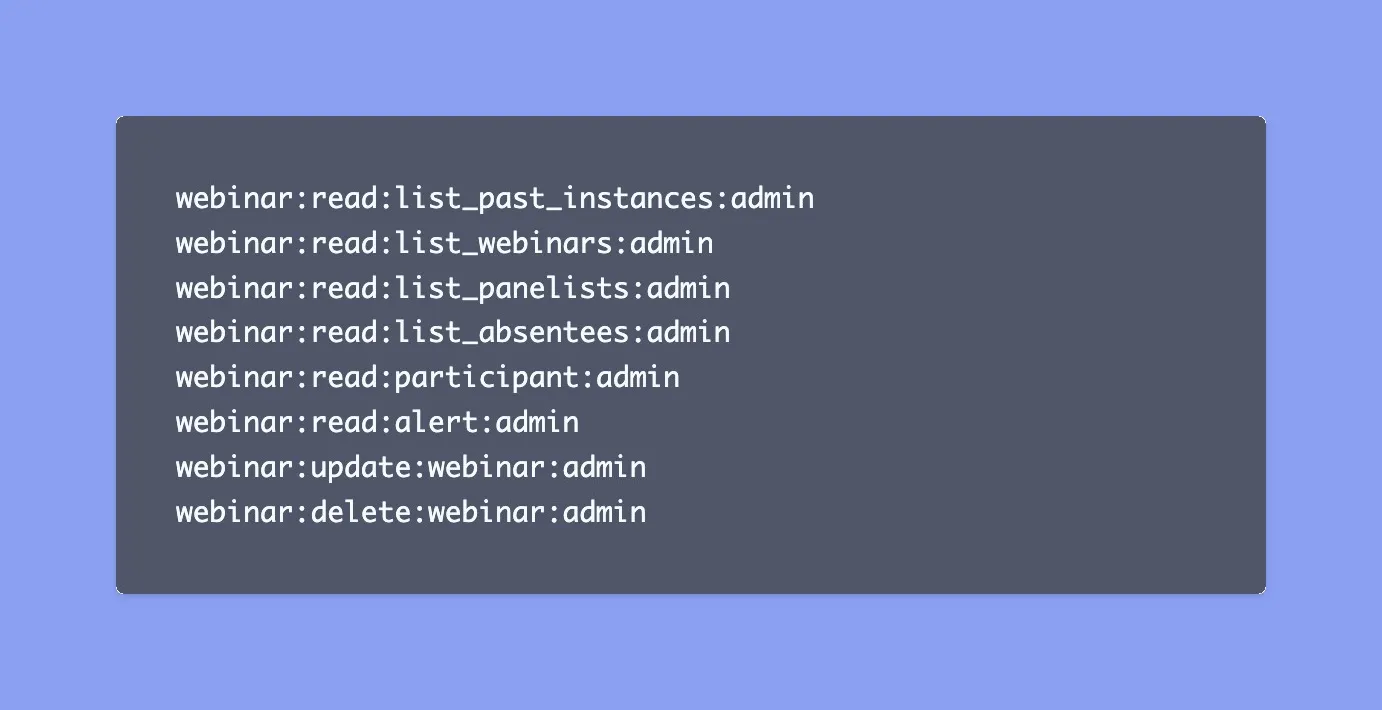
Quick Tip: If you are having trouble finding these specific scopes, please use the search bar on the “Add Scopes” page for your convenience. For an easy way to copy the scopes, visit our documentation page.

- Go to “Activation”, and click on “Activate your app”.
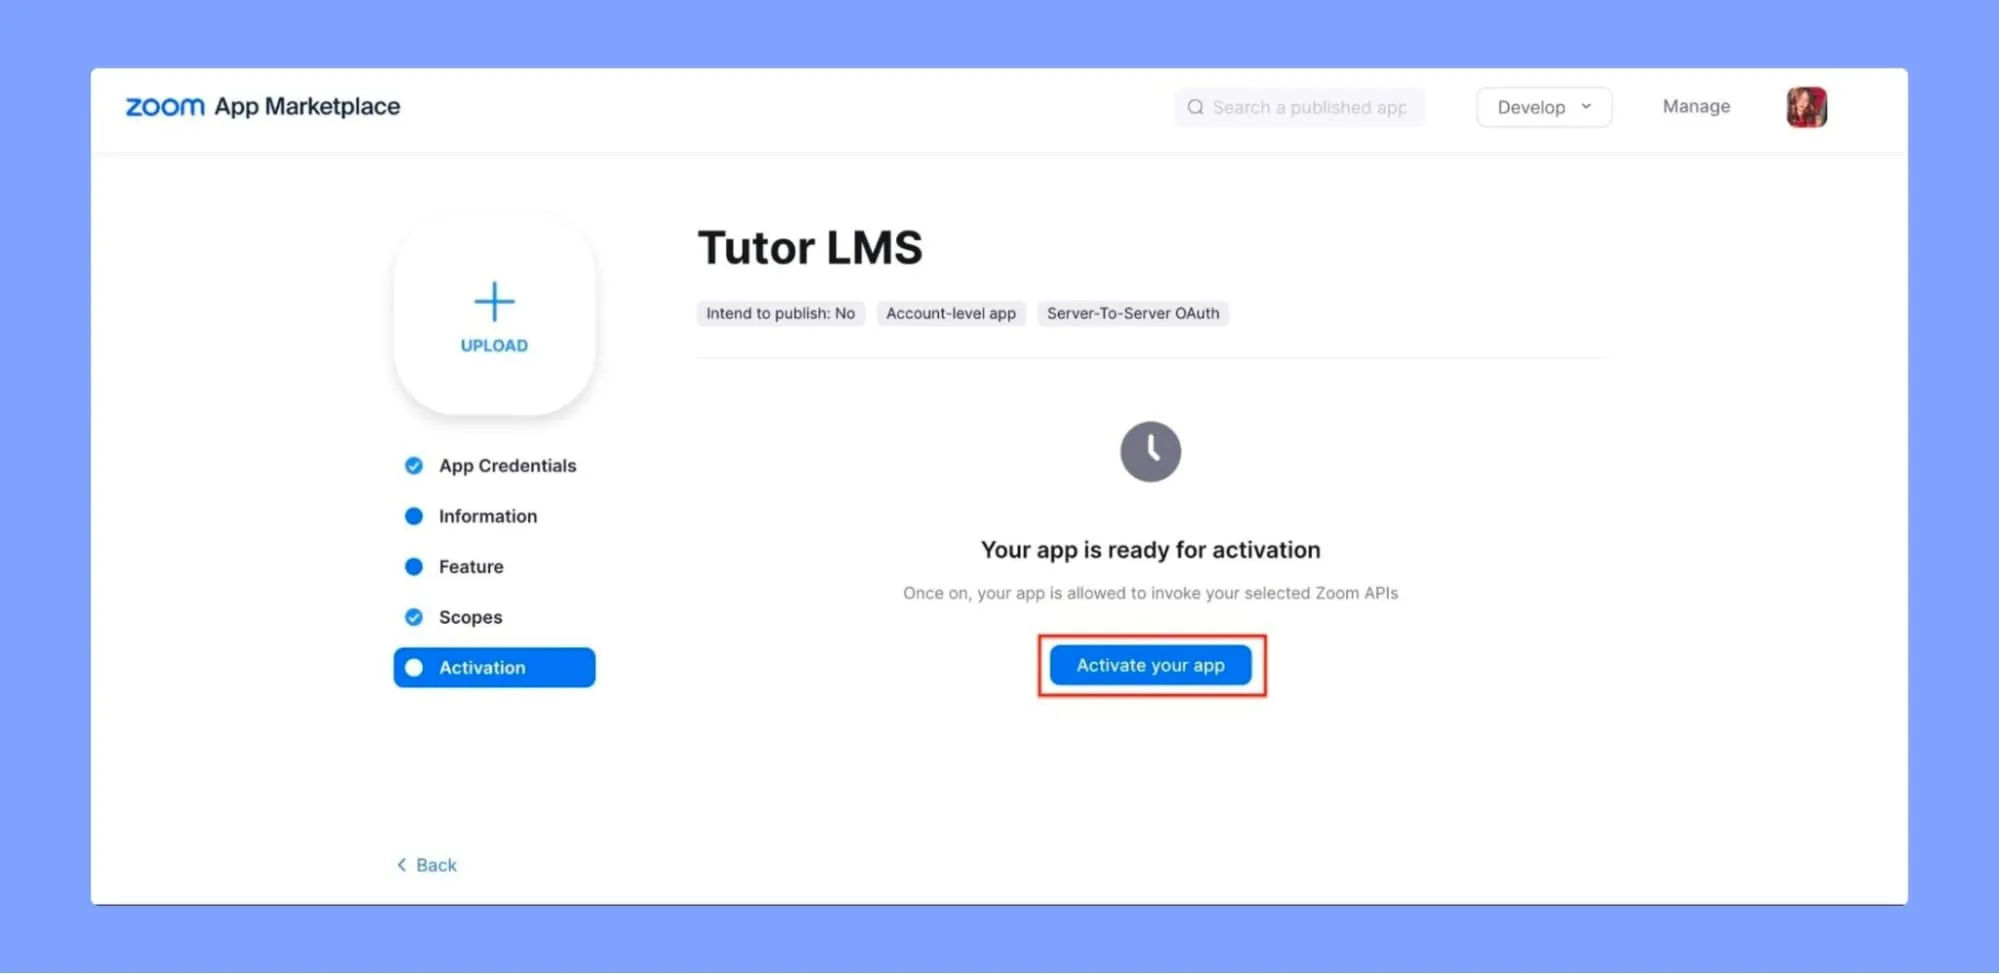
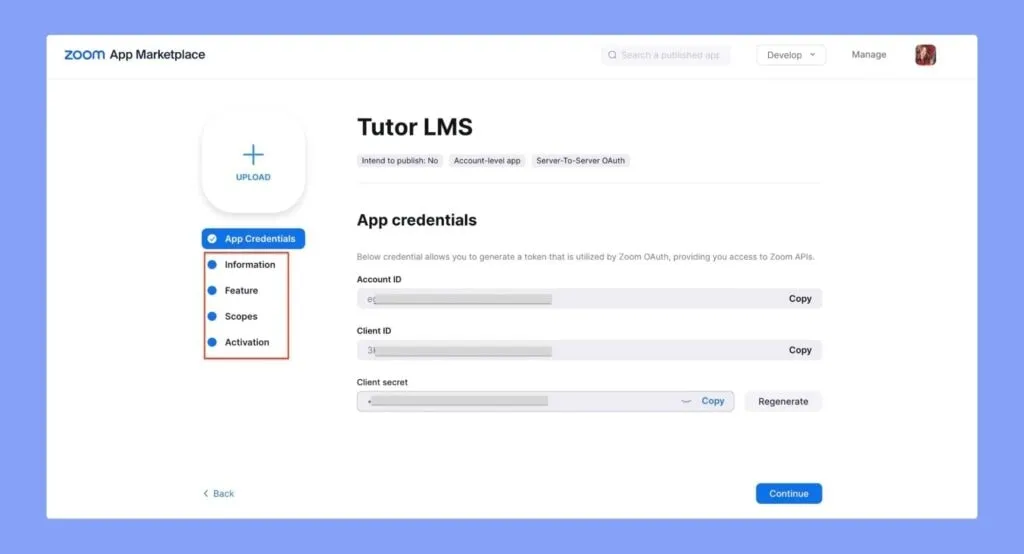
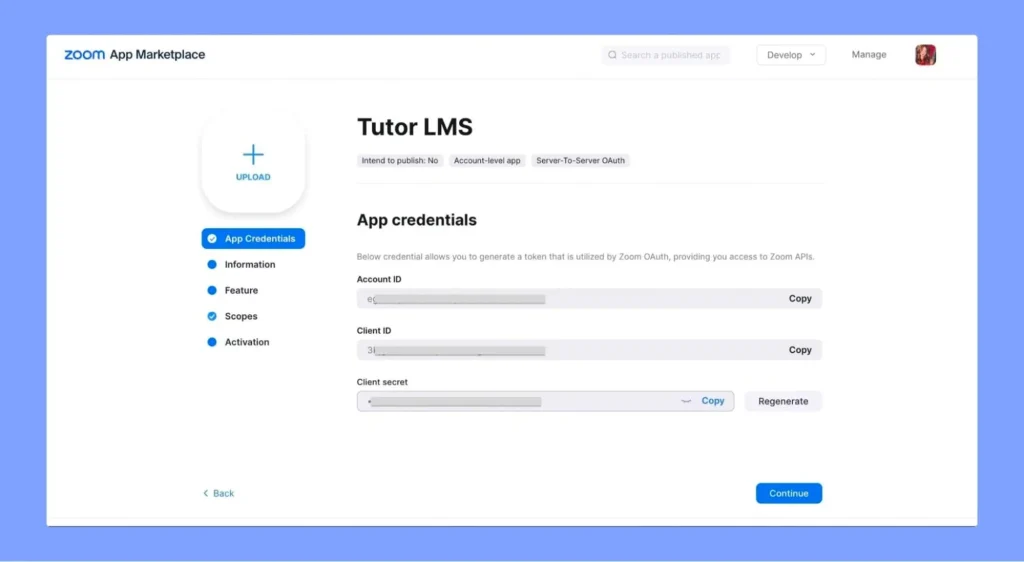
- Once your Server-to-Server OAuth app is activated, go to “App Credentials” to obtain the Account ID, Client ID, and Client Secret. Keep these credentials handy, as you will need them in the coming steps.
Step 3: Connecting Zoom to Tutor LMS
To connect Zoom to Tutor LMS, follow the steps given below:
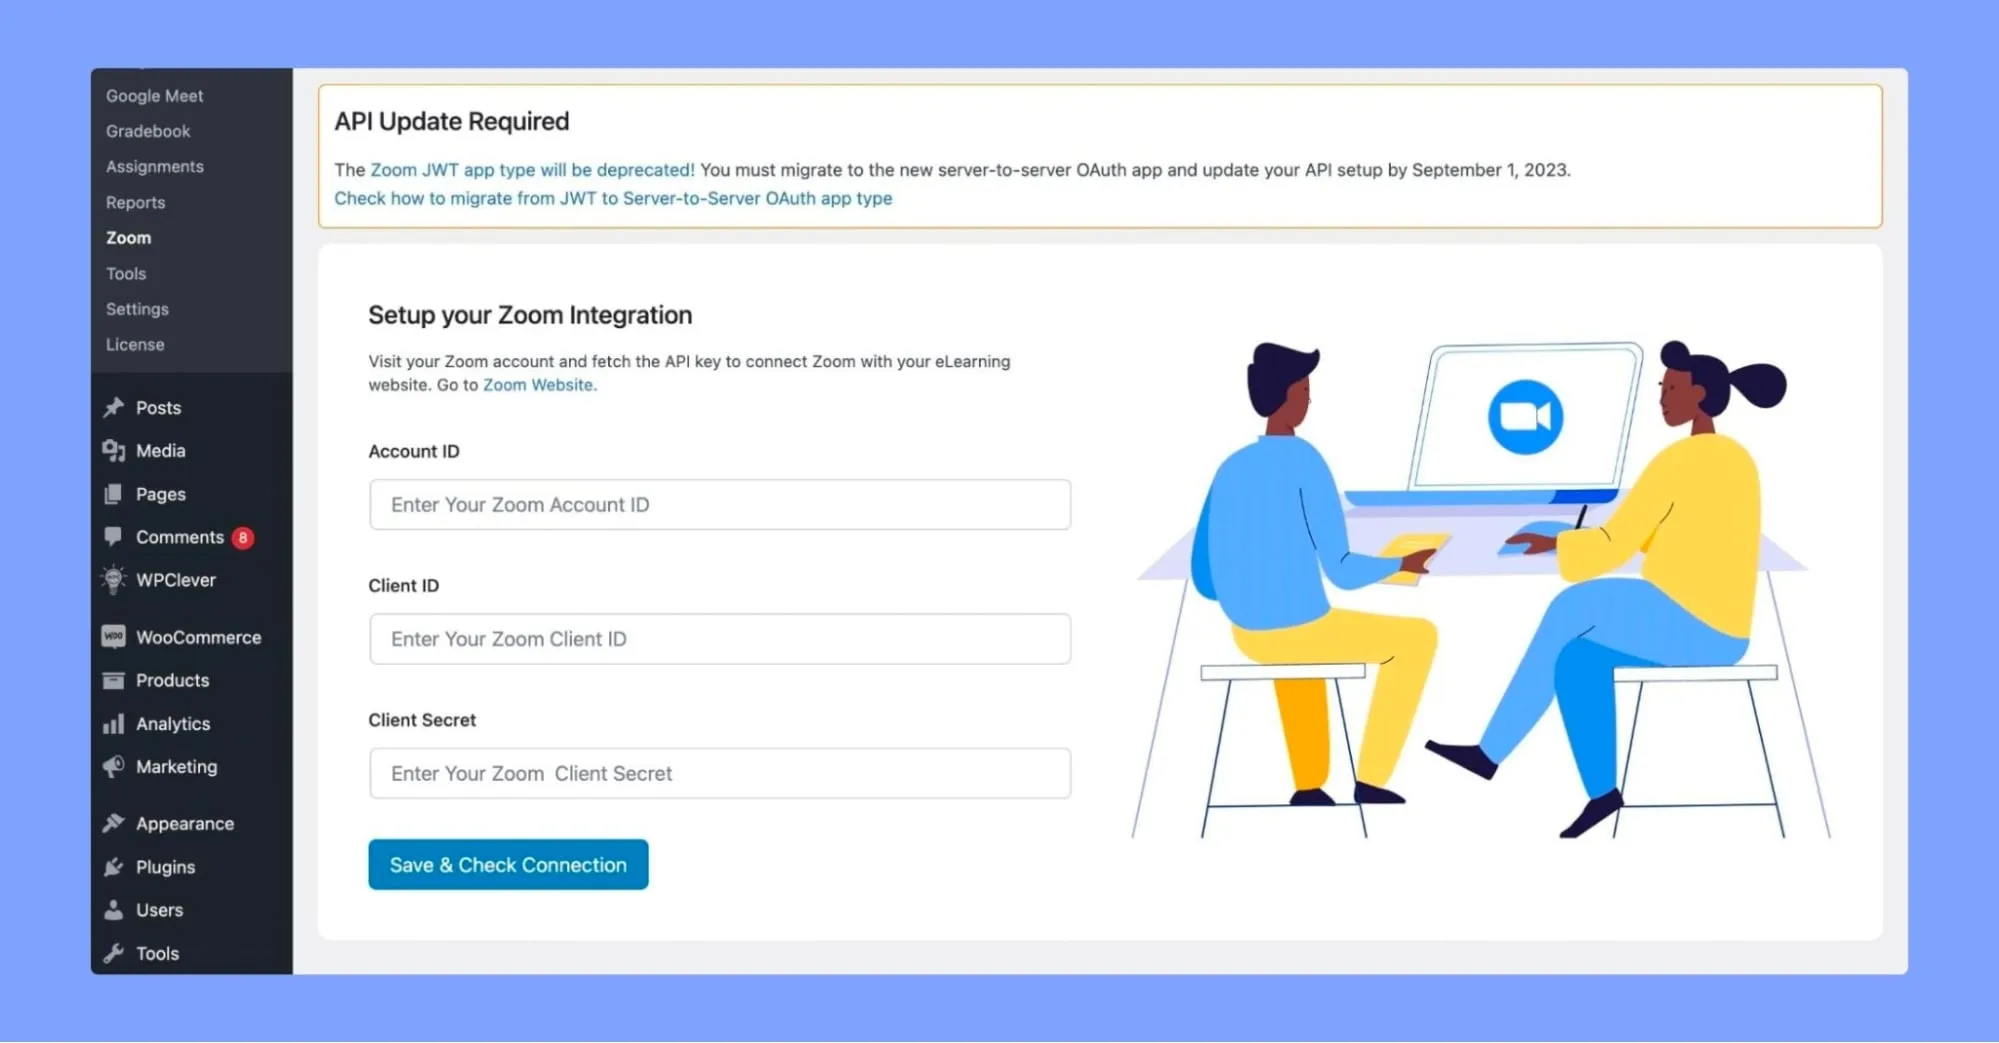
- Go to your WordPress backend dashboard and navigate to Tutor LMS Pro > Zoom > Set API. Instructors can also go to the Frontend Dashboard > Zoom > Set API for the same purpose.
- Add the new Server-to-Server OAuth app credentials (Account ID, Client ID, and Client Secret) obtained from the previous step.
- Click on “Save & Check Connection” to update the integration settings.
Step 4: Create a Zoom Meeting
Now that you have everything set up, it’s time for the fun part – creating a live Zoom meeting inside your course!
Adding a Zoom meeting is quite simple and only takes a few clicks. Just follow along with this quick step, and you’ll have your first meeting up and running in no time.
- From the backend or the frontend, either visit a course of your choice in edit mode or create a new course.
- Scroll down to the Zoom Meeting section and click on the “Create a Zoom Meeting” button.
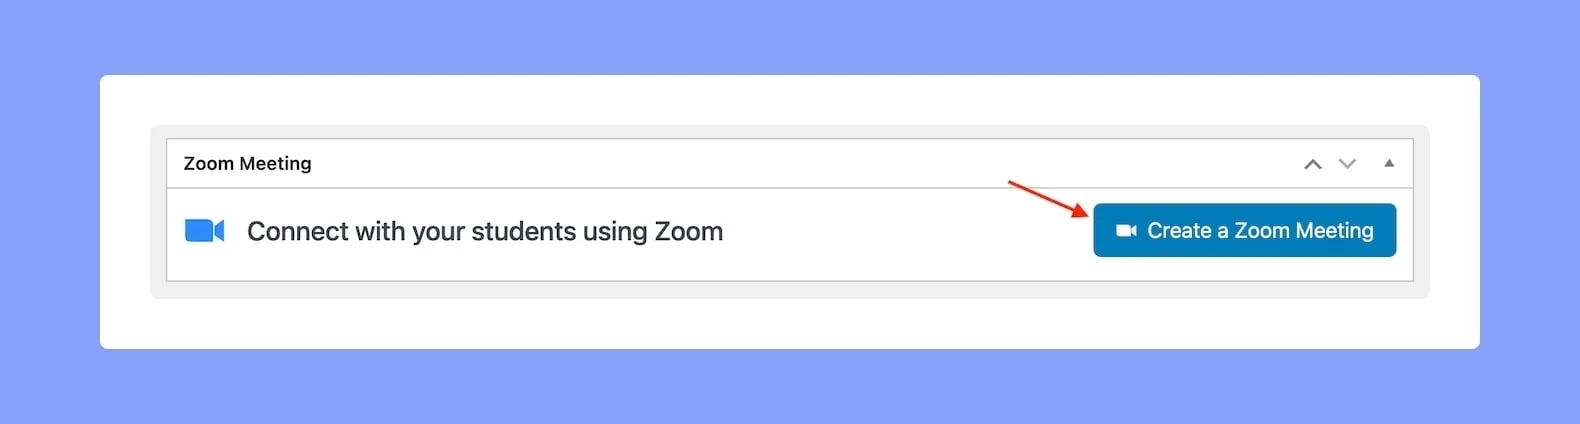
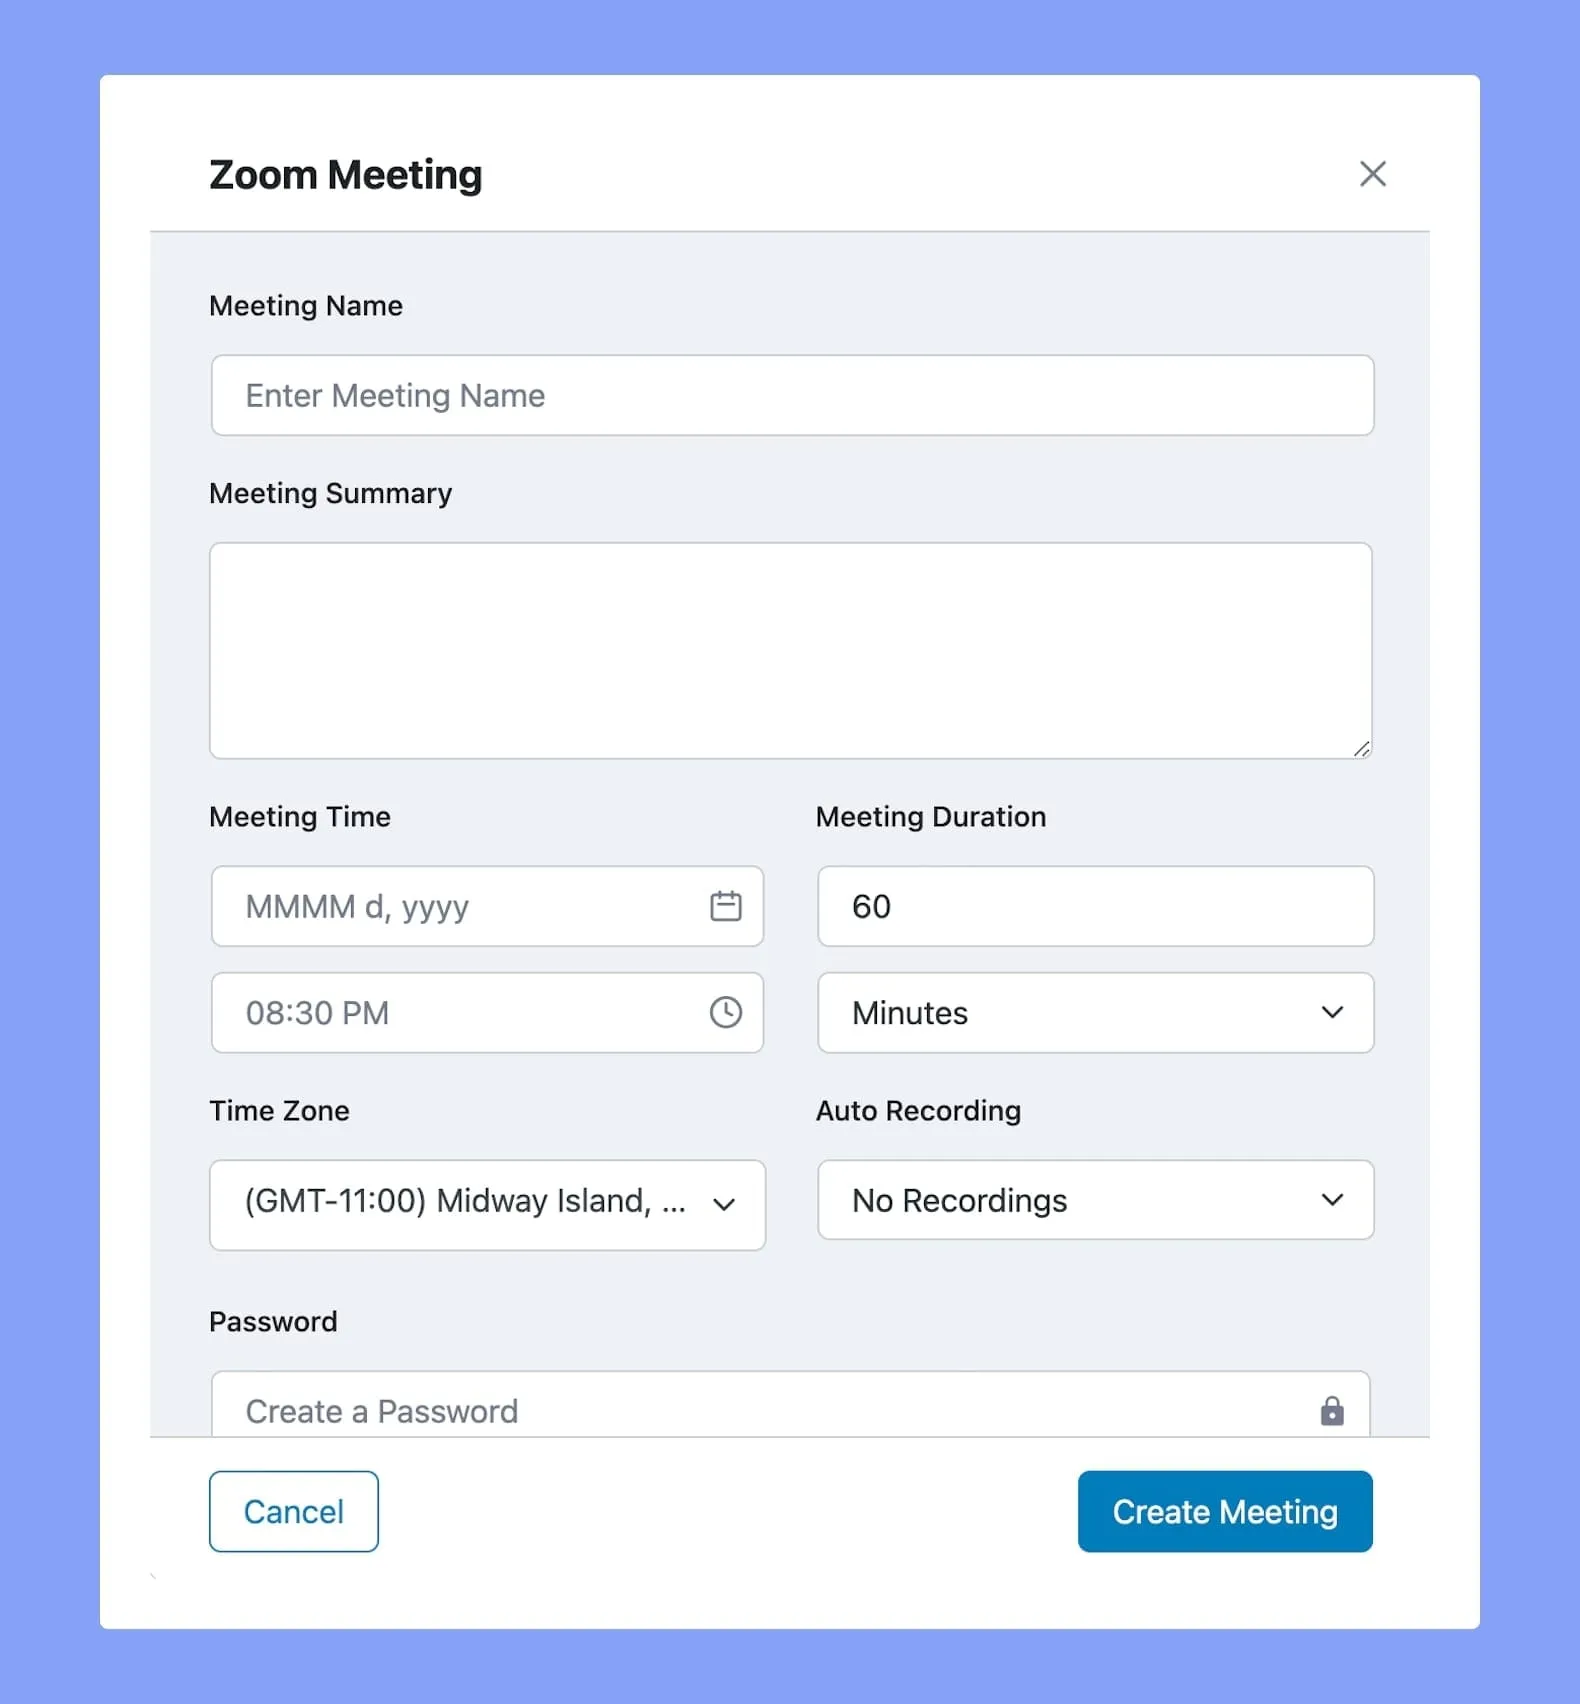
- This will open the Zoom Meeting form, where you can fill in the following meeting details:
- Meeting Name: Give the meeting a name.
- Meeting Summary: Give a summary of what the meeting is about. Mention topics to be covered, type of meeting, etc.
- Meeting Time: Select the time and date of the meeting.
- Meeting Duration: Select the duration of the meeting. Keep in mind that if you are a free user of Zoom, you cannot hold meetings longer than 40 minutes.
- Time Zone: Specify the time zone for the meeting.
- Auto Recording: Specify the Recording type of the meeting. Local will store the meeting on a user’s PC, while Cloud will use Zoom Cloud Storage. You can also select No Recording to simply disable this option.
- Password: Set a password that will restrict people from accessing the meeting randomly. Only the students with the proper credentials will be able to access the Zoom meeting.
- MeetingsHost: This section will display the name of the meeting host.
- Finish off by clicking on the “Create Meeting” button. You’ll then see this meeting appear under “All Meetings” in the Zoom Panel.
Creating a Live Lesson
Alternatively, you can create topic-specific live sessions through the Course Builder section. It’s straightforward and quick. First, expand the topic you want to focus on. Then, click on the “Zoom Live Lesson” button. This action opens the live lesson form.
In the form, you’ll need to fill in the details just like before. Add the meeting name, summary, time, duration, and any other relevant information.
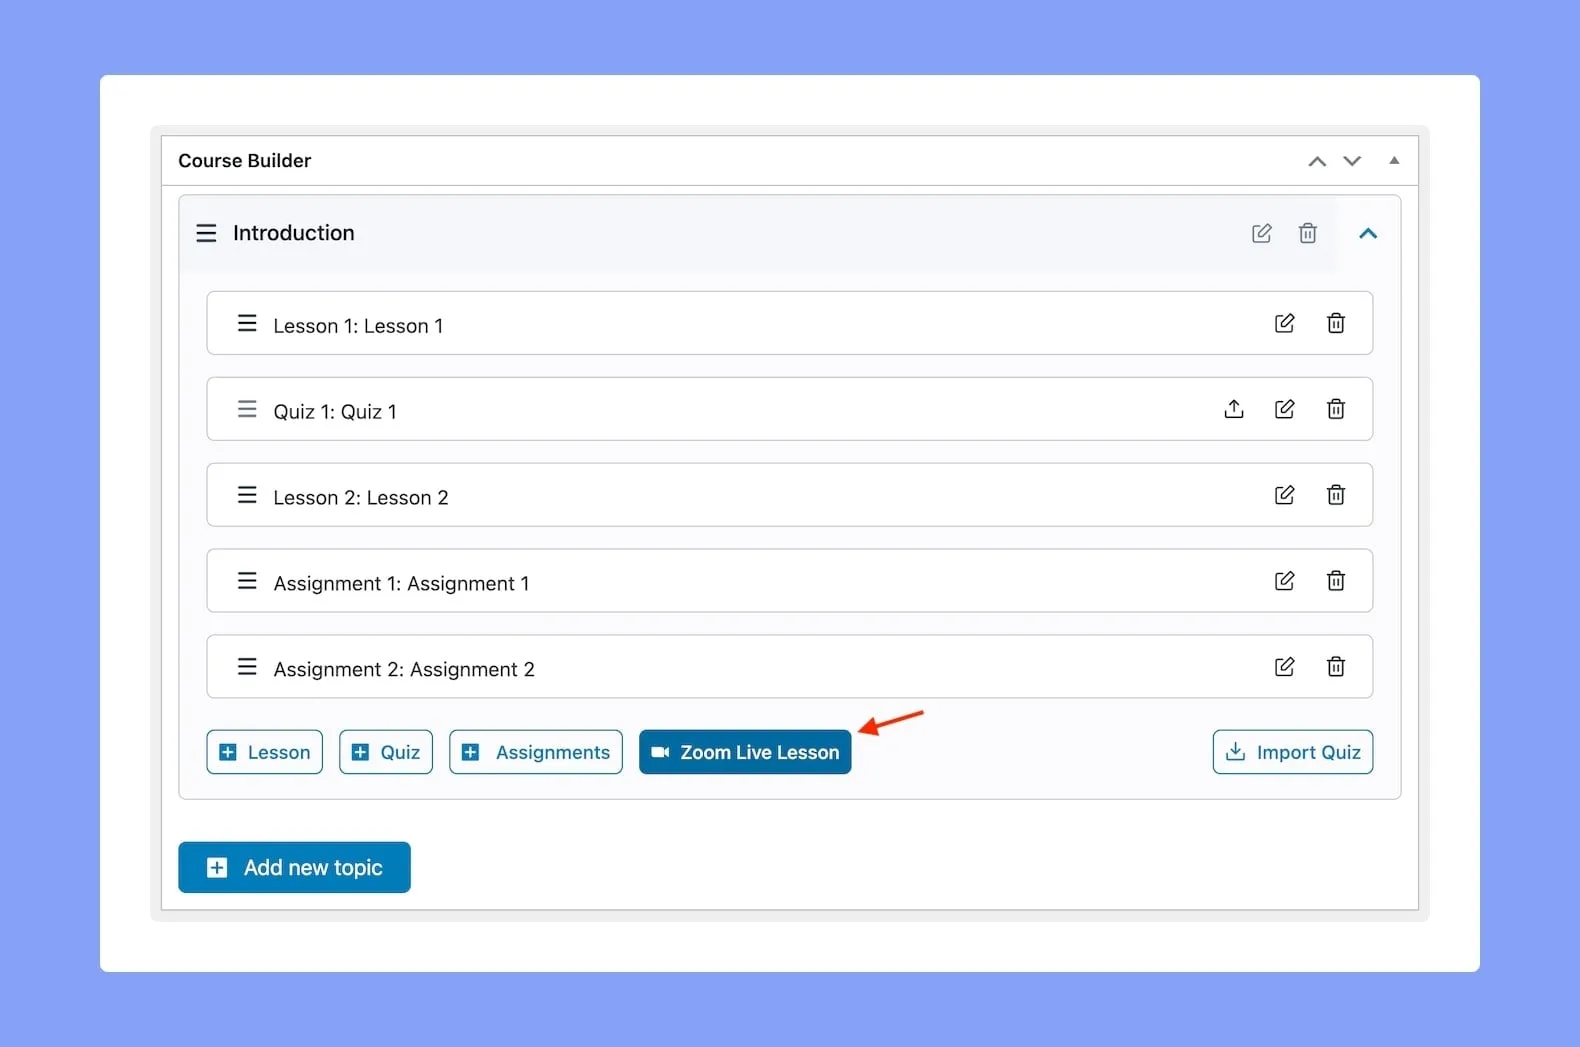
This method helps you organize your lessons around specific topics, making your sessions more focused and engaging for your students.
NOTE: Students joining through the browser will not be able to store the meeting, as only the Zoom app can store the meeting.
Step 5: Testing and Verifying
You’re so close to the finish line! You’ve now integrated Zoom and Tutor LMS. But before you start scheduling live classes, it’s vital to test that everything is working right.
First, create a test meeting to check the integration. Set a fake date and time, maybe next week. Give it a name like “Tutor LMS Test Meeting.”
Next, go to your Tutor LMS dashboard and find the test meeting you just created. Click on it to join and see if it launches your Zoom app. If it does, congratulations! Your integration is working.
You should also check if the following options are working correctly:
- Can you edit meeting details in Tutor LMS?
- Do deleted meetings disappear from both platforms?
- Can you start meetings from both Tutor and Zoom?
Spend some time testing out all the features you plan to use for your classes. It’s better to catch any issues now rather than later when you have real students waiting. Don’t skip this step, testing sets you up for success later.
Leverage the Zoom Backend Panel for Meeting Management
So now you have Zoom connected to your Tutor LMS, great! But we aren’t done yet. The Zoom backend panel unlocks some really useful features to take your virtual classes to the next level.
With just a few clicks in the Zoom Panel, you can view, edit, and delete upcoming and past meetings. It’s like your central dashboard to control all your live class sessions.
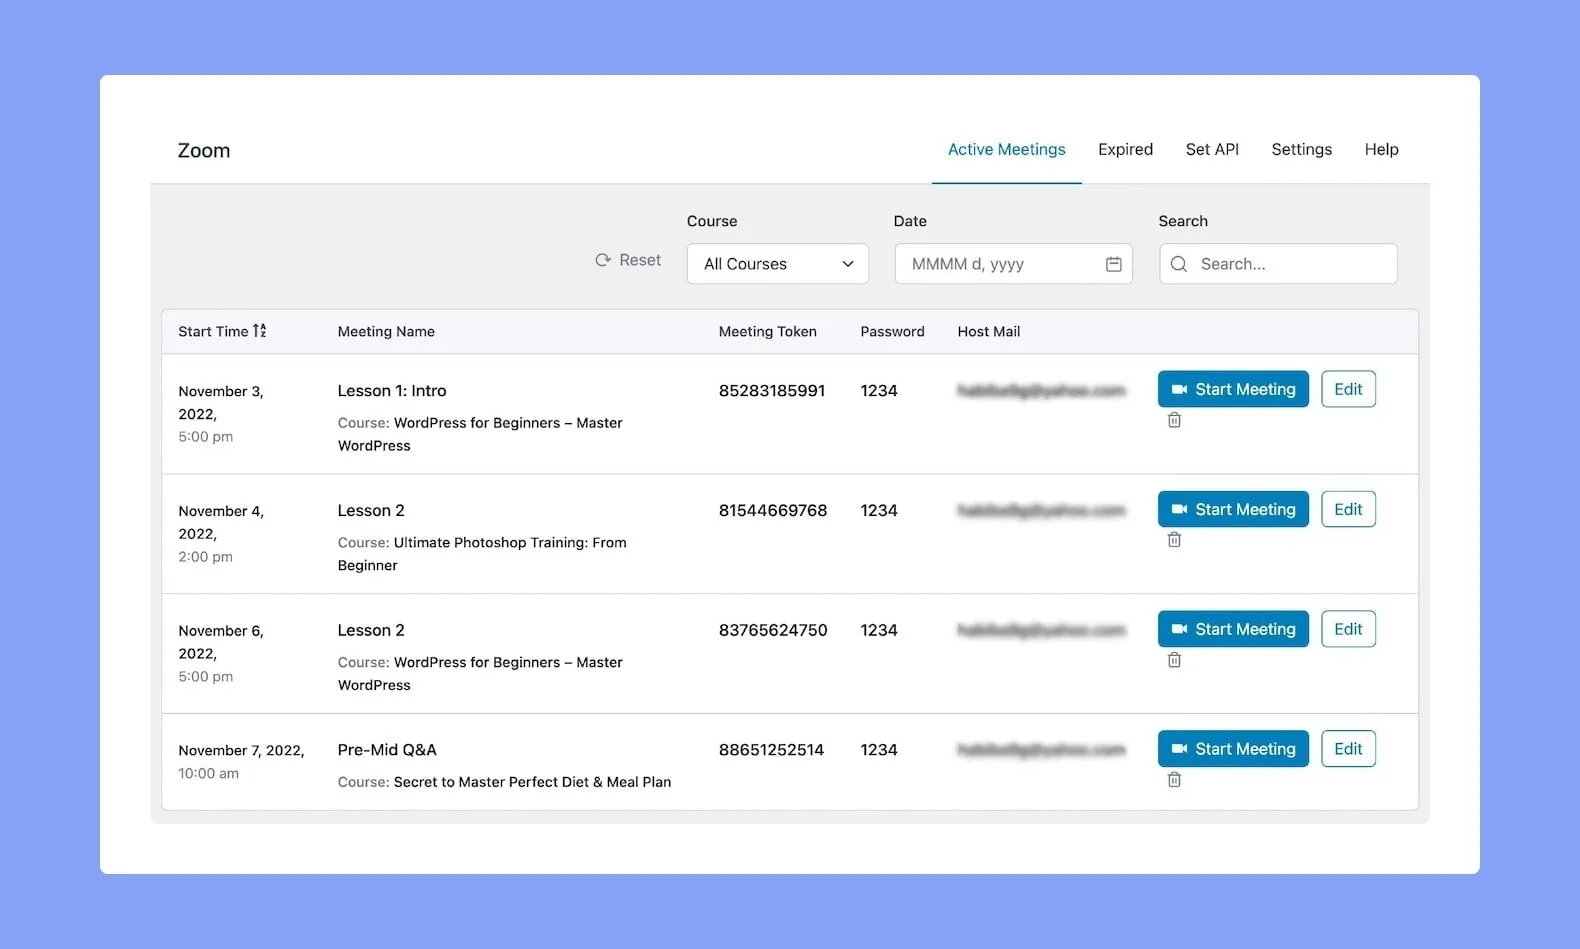
1. All Meeting Lists
Once your Zoom Integration is set up and connected, you will notice a new tab called “All Meetings.” This tab provides a detailed list of all the future Zoom Meetings that are currently scheduled.
Here, you can search for meetings and filter by course, date, or status. You can also edit these meetings directly from this panel as well as delete them.
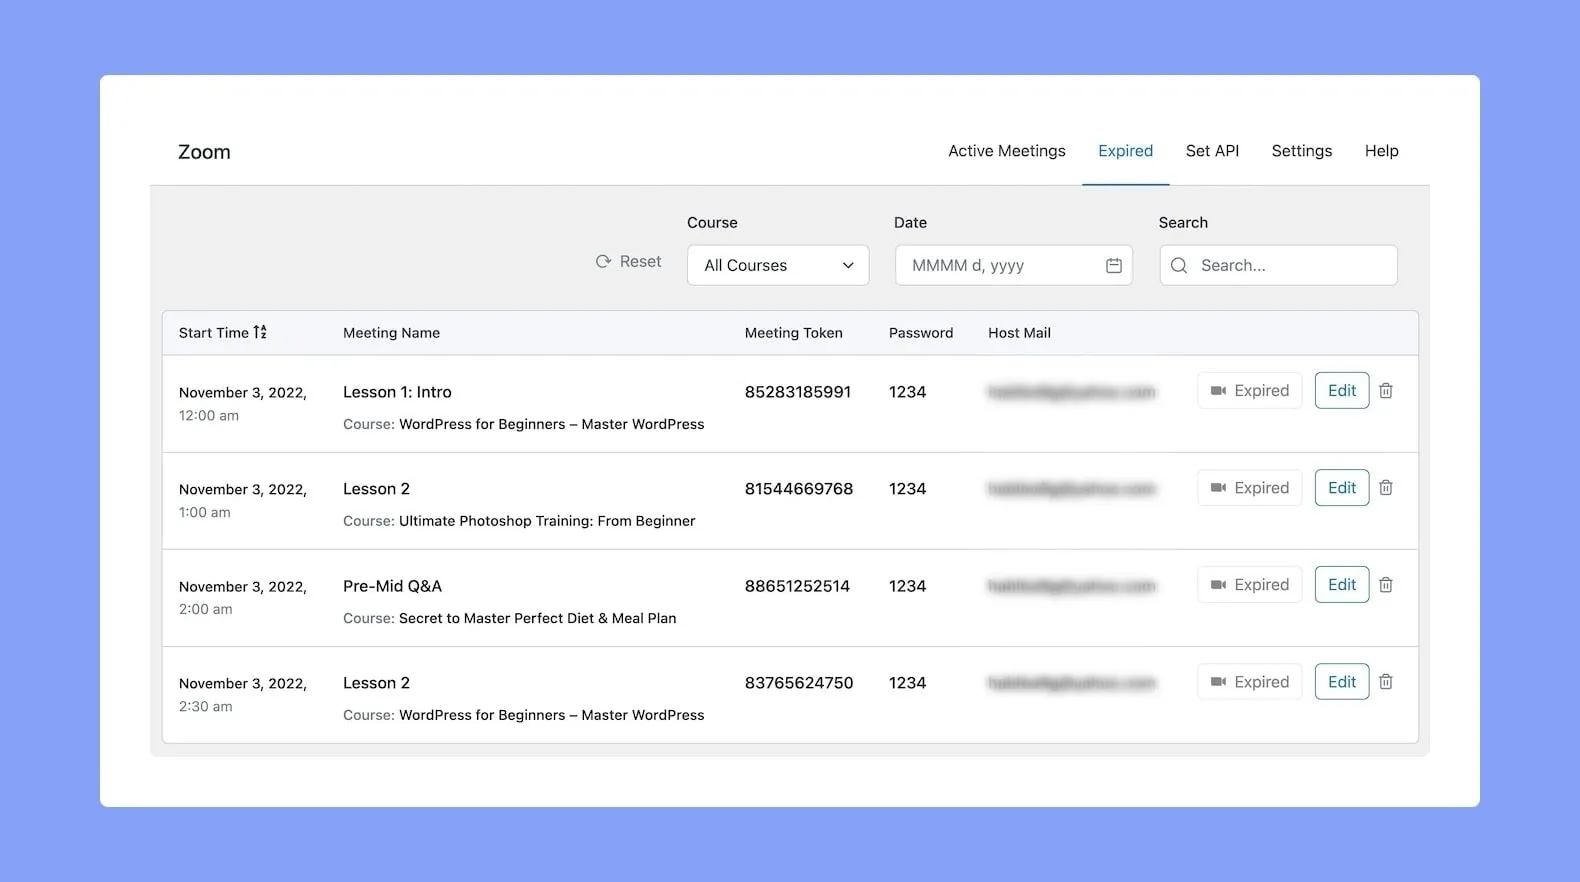
2. Expired Meetings
In the “Expired Meetings” tab, you’ll find all the Zoom Meetings that have already taken place. Similar to the previous tab, you’ll be able to search, filter, edit, and delete past meetings.
If you need to reschedule an expired meeting, simply click on the edit button and update the date & time. This will automatically move the meeting from the “Expired Meetings” tab and put it back under the “All Meetings” tab.
This feature helps you keep track of past sessions while allowing flexibility to reschedule if needed. It keeps your meeting management organized and efficient.
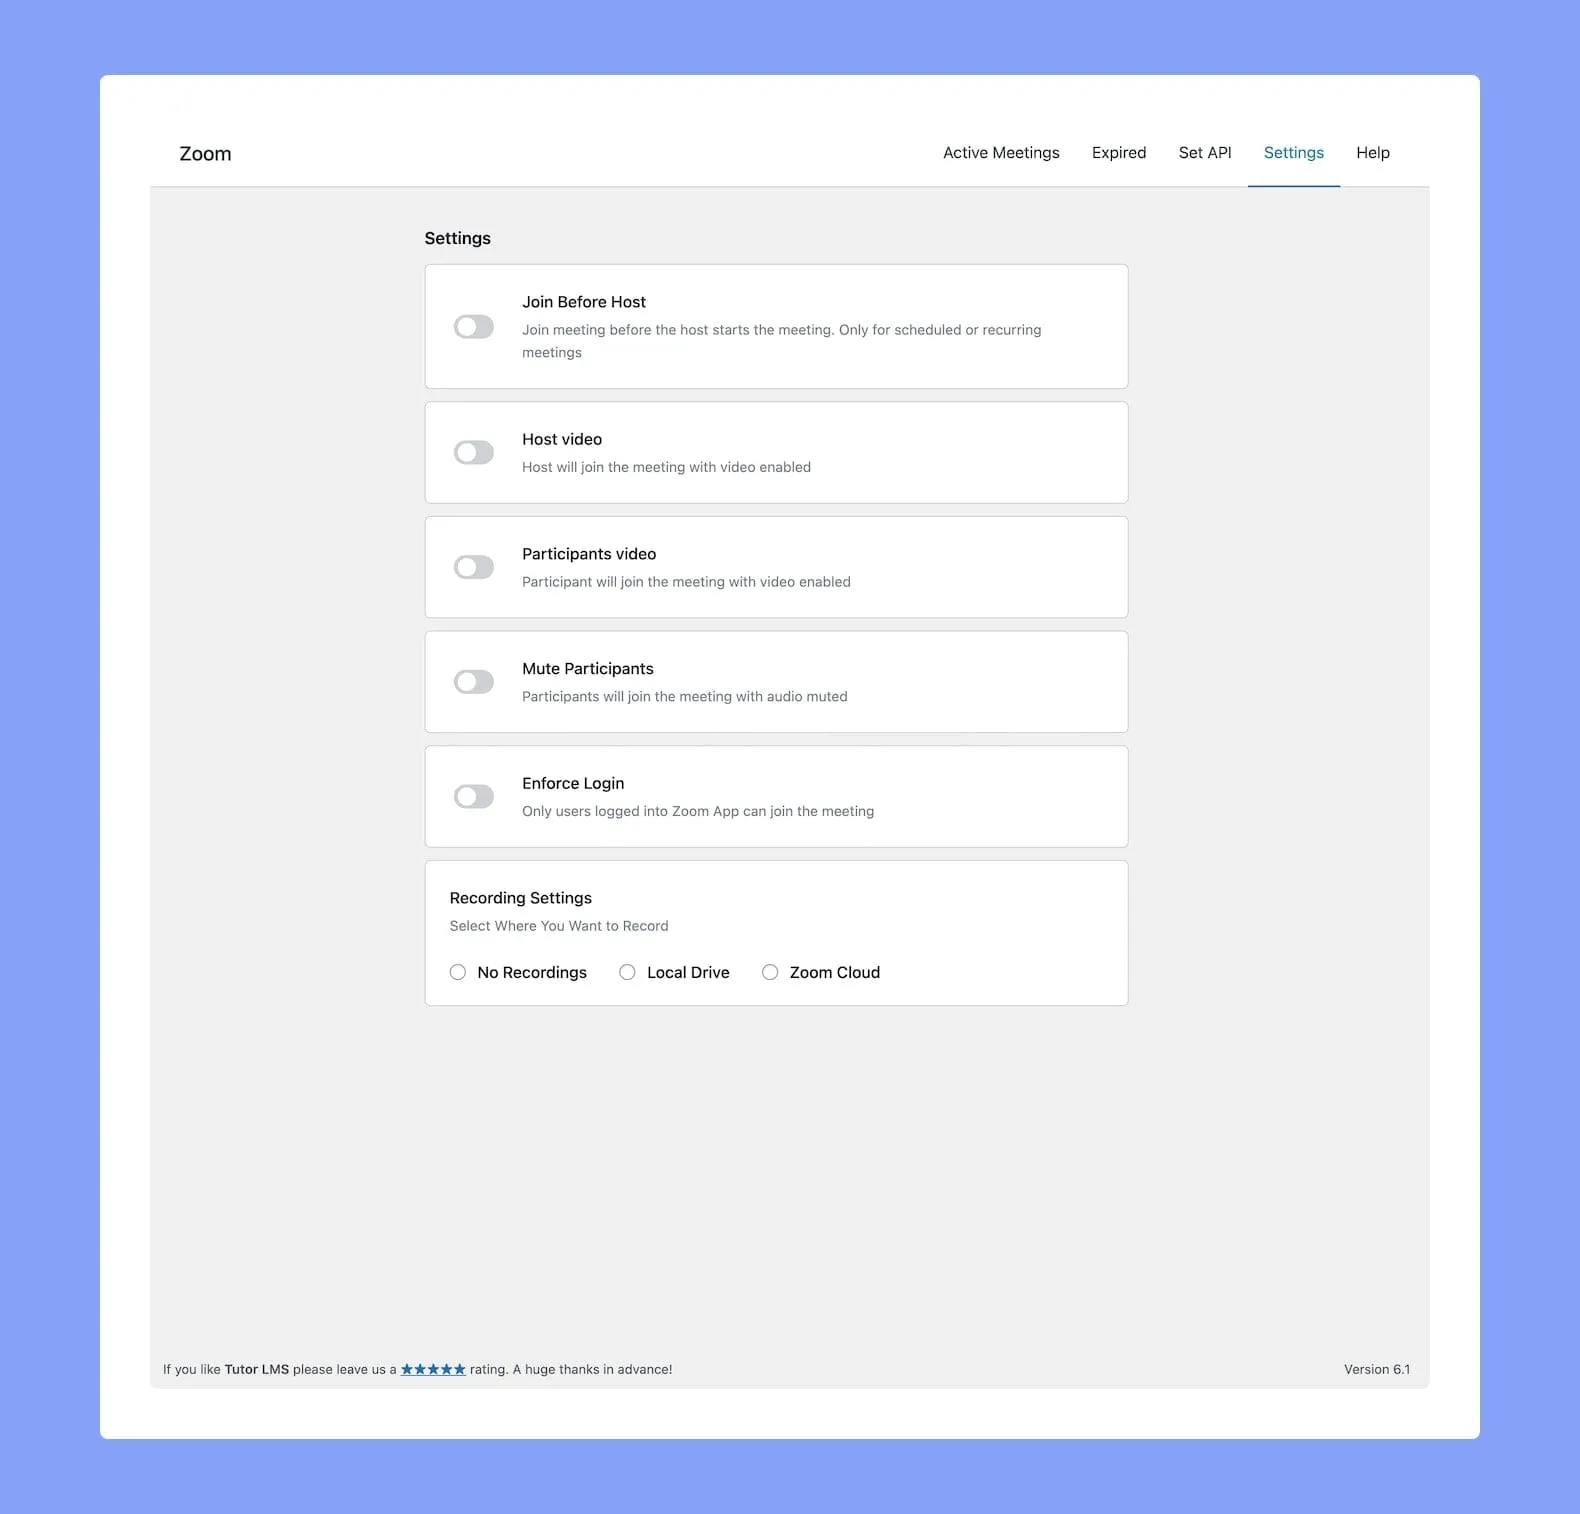
3. Settings
In the Settings tab, you can customize how your meetings run. Here are some key options:
- Join Before Host: Allow students to join the meeting before the instructor arrives.
- Host Video: Start the host’s video automatically when they join.
- Participants Video: Enable participants’ video as soon as they join.
- Mute Participants: Mute participants’ audio when they enter the meeting.
- Enforce Login: Ensure that only users logged into Zoom can join the meeting.
For recording settings, you also have several choices:
- No Recordings: Disable recording altogether.
- Local Drive: Save recordings on your computer.
- Zoom Cloud: Store recordings in Zoom’s cloud storage.
These settings let you control the meeting environment, ensuring it fits your teaching style and needs.
Wrapping Up Our Guide
Connecting Zoom with the Tutor LMS platform opens up new possibilities for enriched online learning. When thoughtfully implemented, this integration can greatly benefit both educators and learners. Instructors are empowered to craft immersive classes that keep students motivated and engaged from start to finish. Learners enjoy an interactive, collaborative environment tailored to their needs.
By leaning on the strengths of each platform, educators at all levels can create one-of-a-kind virtual experiences. Zoom facilitates real-time communication and collaboration. Tutor LMS enables customized curriculum delivery and progress tracking. Together they pave the way for transformative e-learning.

Start Using Tutor LMS Today
Ready to take your online courses to new heights? Download Tutor LMS now and enjoy a journey of eLearning excellence.