Hello there, fellow knowledge seekers! Welcome to the exciting world of eLearning, where education meets innovation. Today, we are going to discuss something that will make your virtual classrooms even better and improve your remote learning experience. So, are you ready to find out how to bring the mighty Google Meet and Tutor LMS together?
In this article, we’ll show you how to integrate Google Meet in Tutor LMS for immersive online learning. We’ll cover everything from setting up the integration to creating and joining a Google Meet meeting. Whether you’re a teacher who wants to improve your online classes or a student who wants to have a better learning experience, keep reading to learn how to use Google Meet with Tutor LMS.
A Brief Overview and Advantages of Using Google Meet Integration with Tutor LMS Pro
Now, you may be asking yourself what is Google Meet and how can it benefit your remote learning experience. Imagine a digital learning environment that allows you to connect with your students and peers face-to-face, overcoming physical barriers and distance.
But wait, there’s more! When you integrate Google Meet with Tutor LMS, it opens up a world of possibilities. You can participate in live video lessons, ask questions in real-time, collaborate with your peers on group projects, and even take part in interactive quizzes and polls. It’s like bringing the physical classroom experience right to your fingertips!
Why Should You Use Google Meet Integration Addon for Tutor LMS Pro? Let’s Find Out!
So, why exactly should you use Google Meet Integration Addon for Tutor LMS? Well, combining the robust features of Tutor LMS with the real-time collaboration and feedback capabilities of Google Meet allows you to create an immersive and engaging learning experience. So Let’s take a brief look at some of the reasons why you should use this integration:
- Connect and Interact in Real Time: With this addon, you can join live video lessons with your teachers and classmates. It’s like being in a real classroom, just from the comfort of your home! You can ask questions, participate in discussions, and even collaborate on group projects. No more feeling disconnected from your peers or missing out on classroom interactions.
- Stay Organized and On Track: The Google Meet Integration Addon seamlessly integrates with Tutor LMS Pro, your trusty online learning platform. This means you can effortlessly access your class schedules, assignments, and resources in one place. No more searching through different tools or feeling overwhelmed with multiple tabs open on your screen. Everything you need is right at your fingertips!
- Engage in Interactive Learning: Say goodbye to boring lectures! This addon allows your teachers to create interactive lessons using Google Meet. They can share their screen, show videos, present slides, and even conduct quizzes or polls to keep you actively engaged. Learning becomes fun and exciting, rather than just staring at a screen.
- Flexibility and Convenience: With this Addon, you have the freedom to attend your classes from anywhere with an internet connection. Whether you’re at home, on the go, or even on vacation, you won’t miss out on your lessons. Just log in to Tutor LMS Pro, join the Google Meet session, and you’re good to go!
A Step-By-Step Guide on How To Setup Google Meet Integration For Tutor LMS Pro
So are you ready to take your online learning experience to a whole new level? Well, we have a detailed guide all set! So say goodbye to complicated setups and hello to an easy step-by-step guide that will walk you through the process of setting up Google Meet Integration for Tutor LMS Pro:
Note: Please be advised that this integration is only available for pro users of Tutor LMS. Therefore, you will need to have the Tutor LMS pro plugin installed and activated.
Step 1: Enable the Google Meet Integration Add-on:
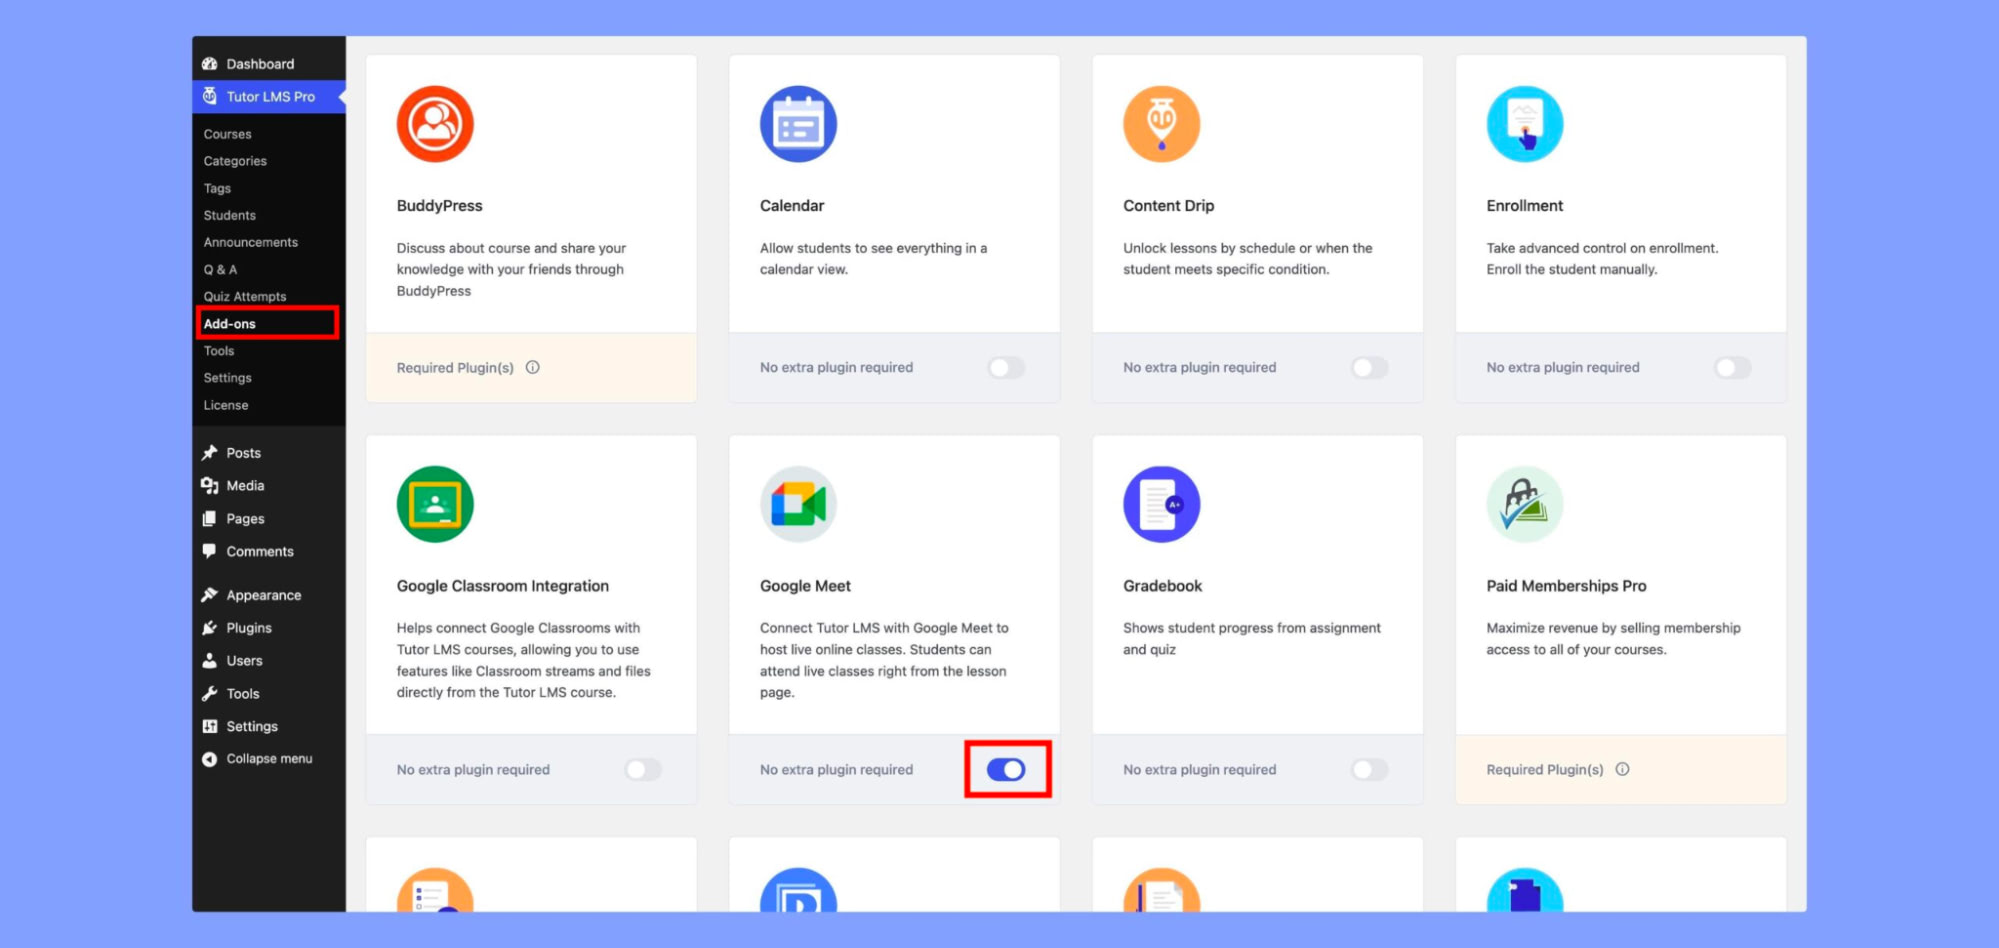
To begin, make sure you have the Tutor LMS Pro plugin installed and activated. Then, go to your WordPress backend and navigate to Tutor LMS > Addons. Look for the Google Meet addon and turn it on. This will enable the Google Meet integration.
Step 2: Configure Google App Credentials
Next, you need to configure Google Developer Console. Follow the steps below:
Open Google Developer Console in a separate browser window or tab
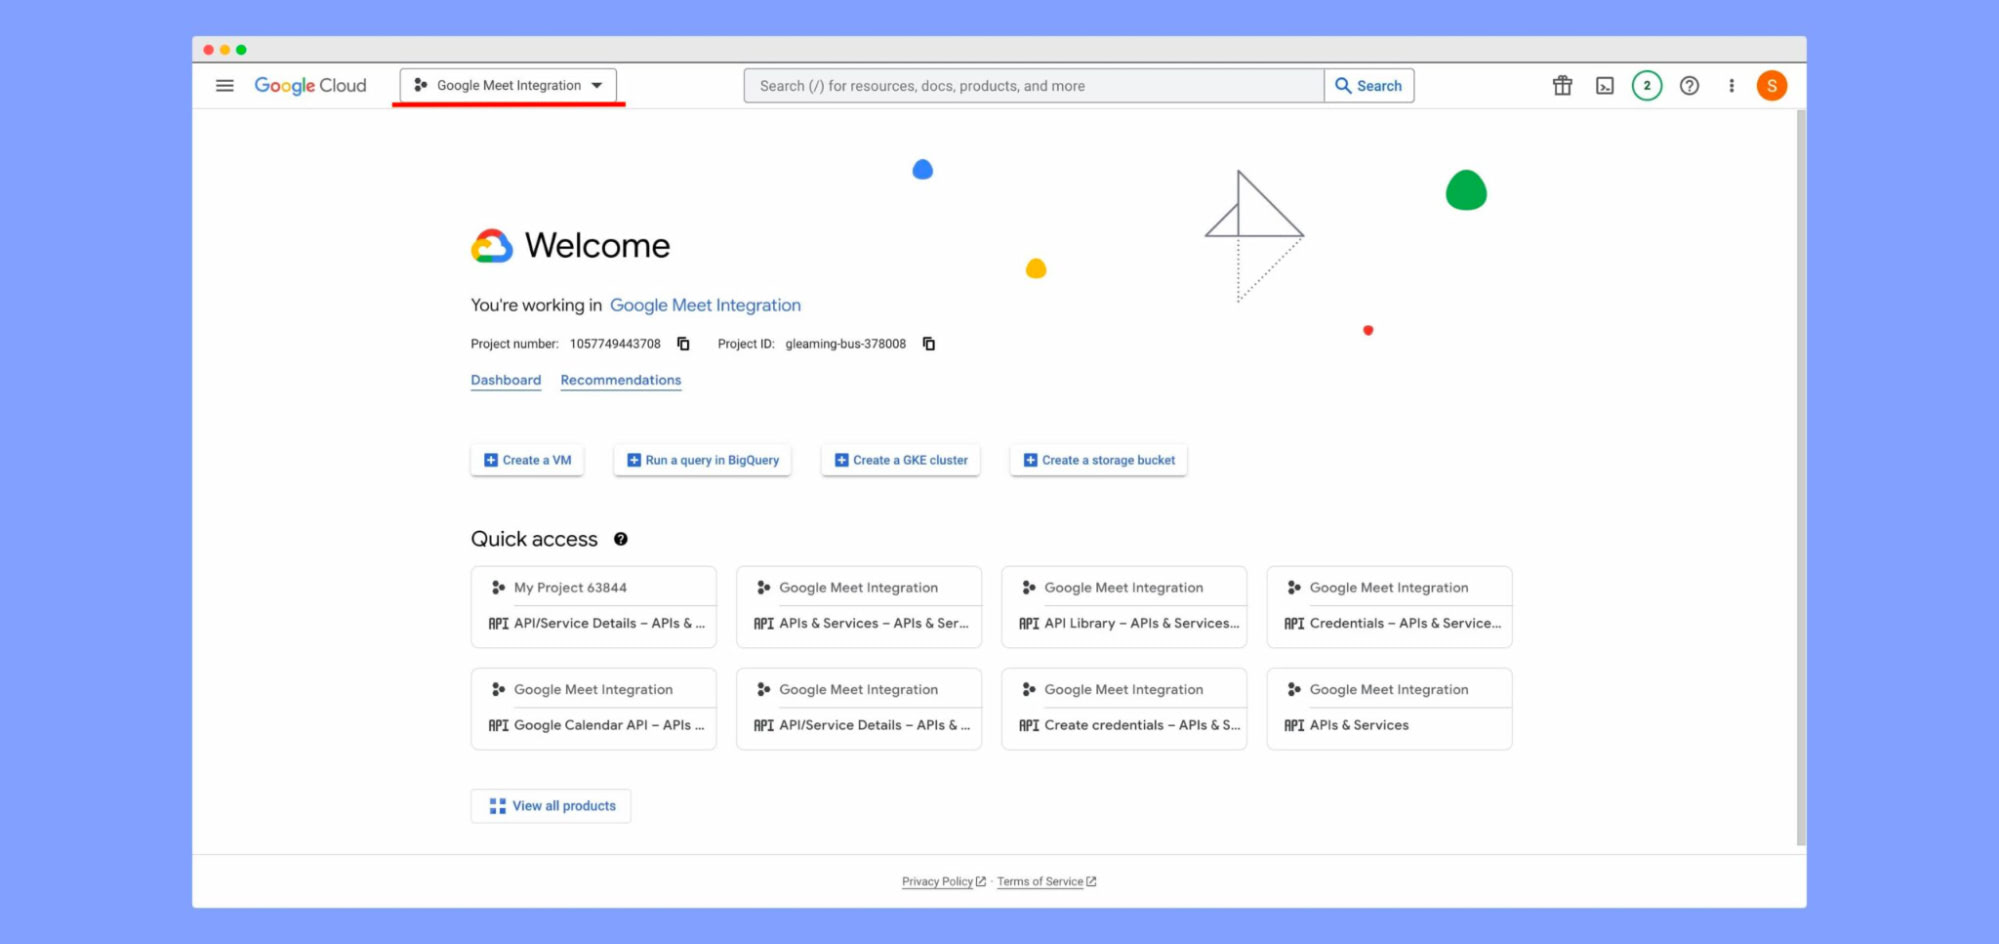
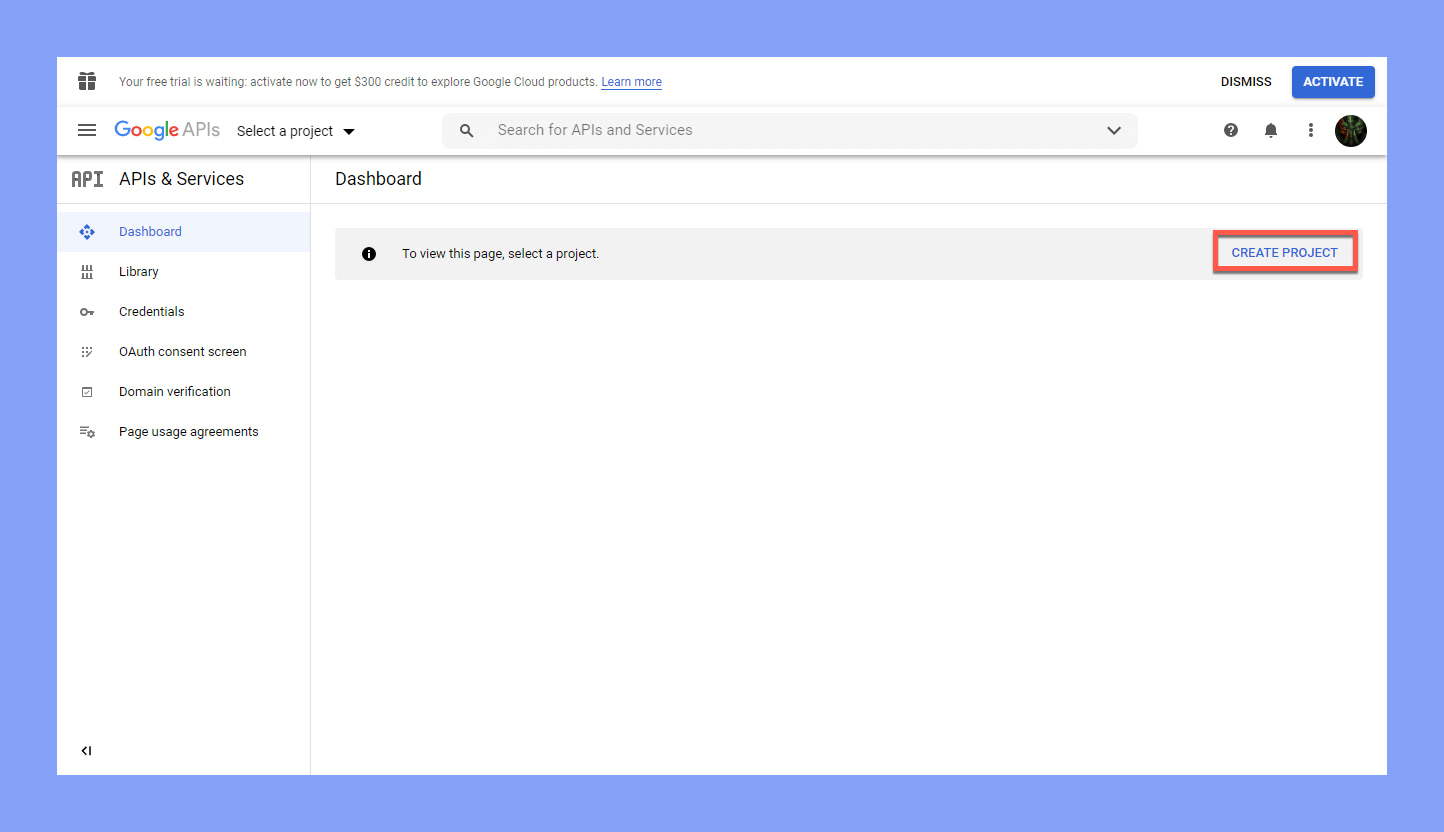
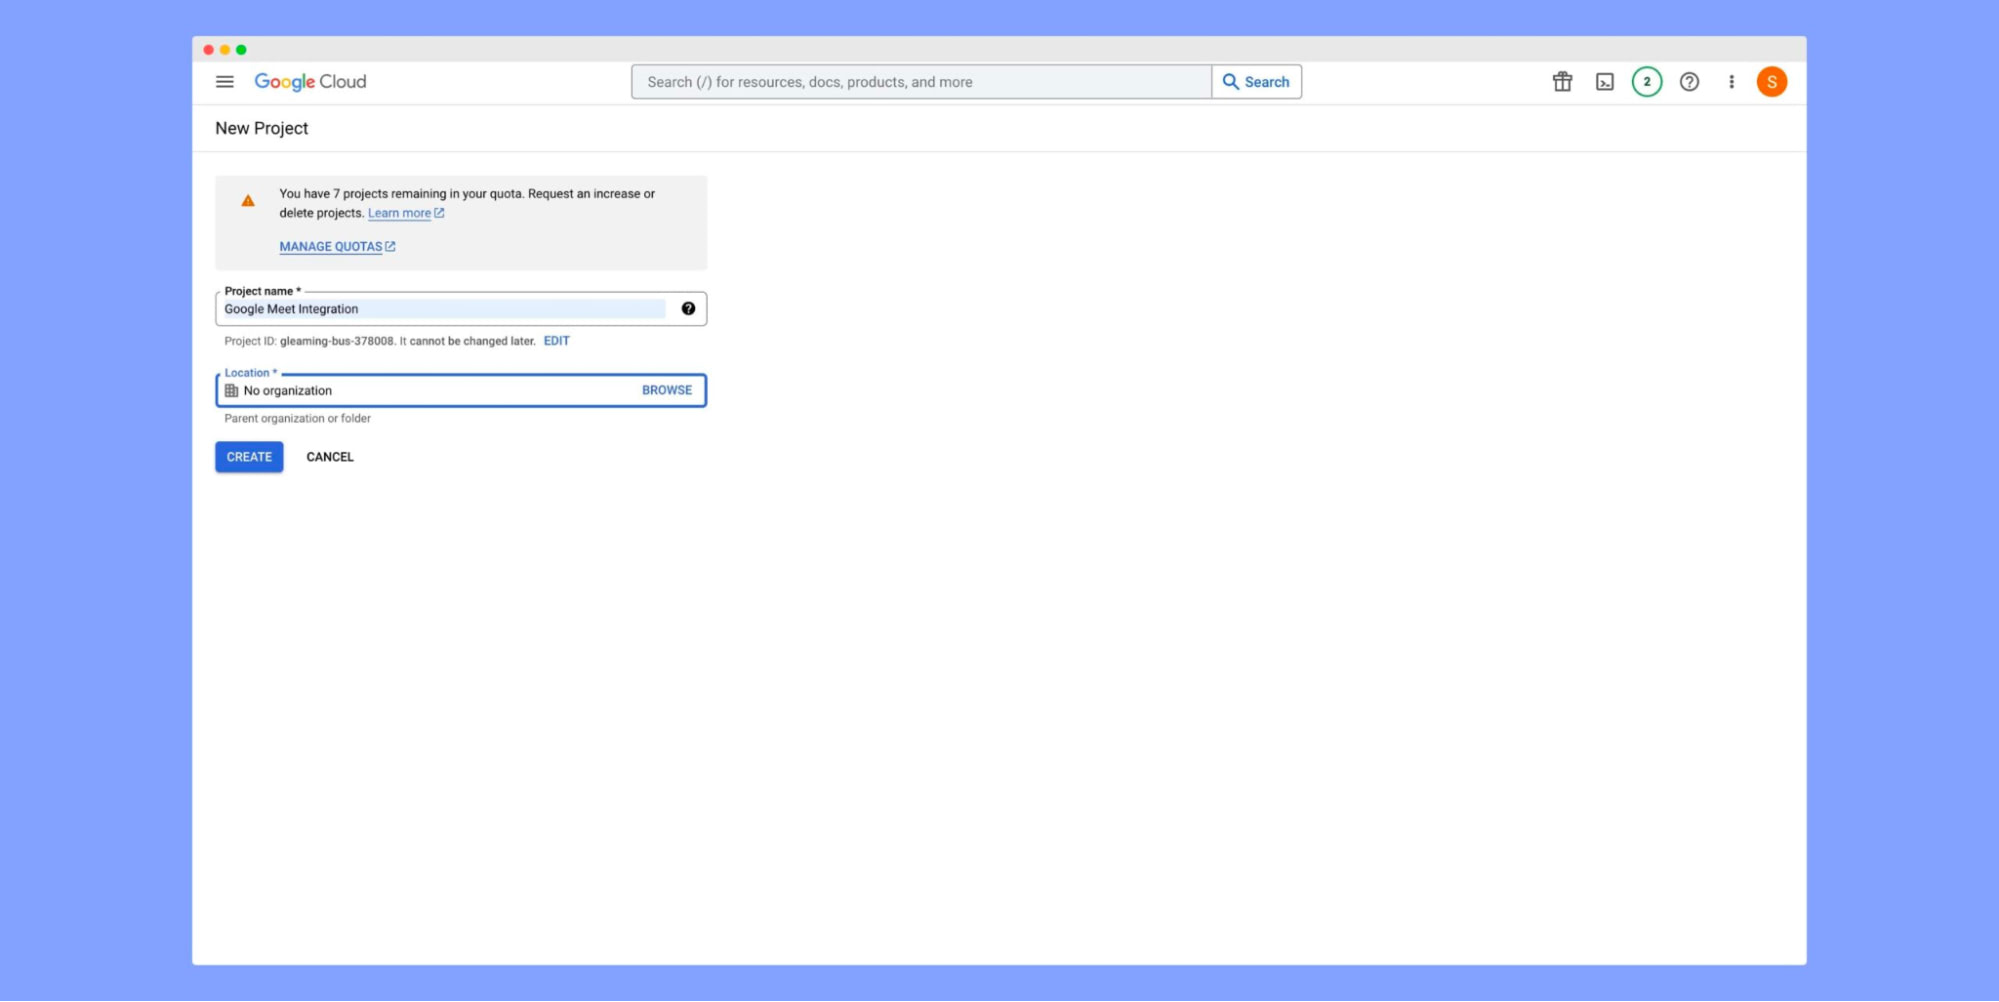
Once you’re signed in, create a new project by clicking on the “Create Project” button.
Give your project a unique name that helps you identify it easily, like “Tutor LMS Integration.”
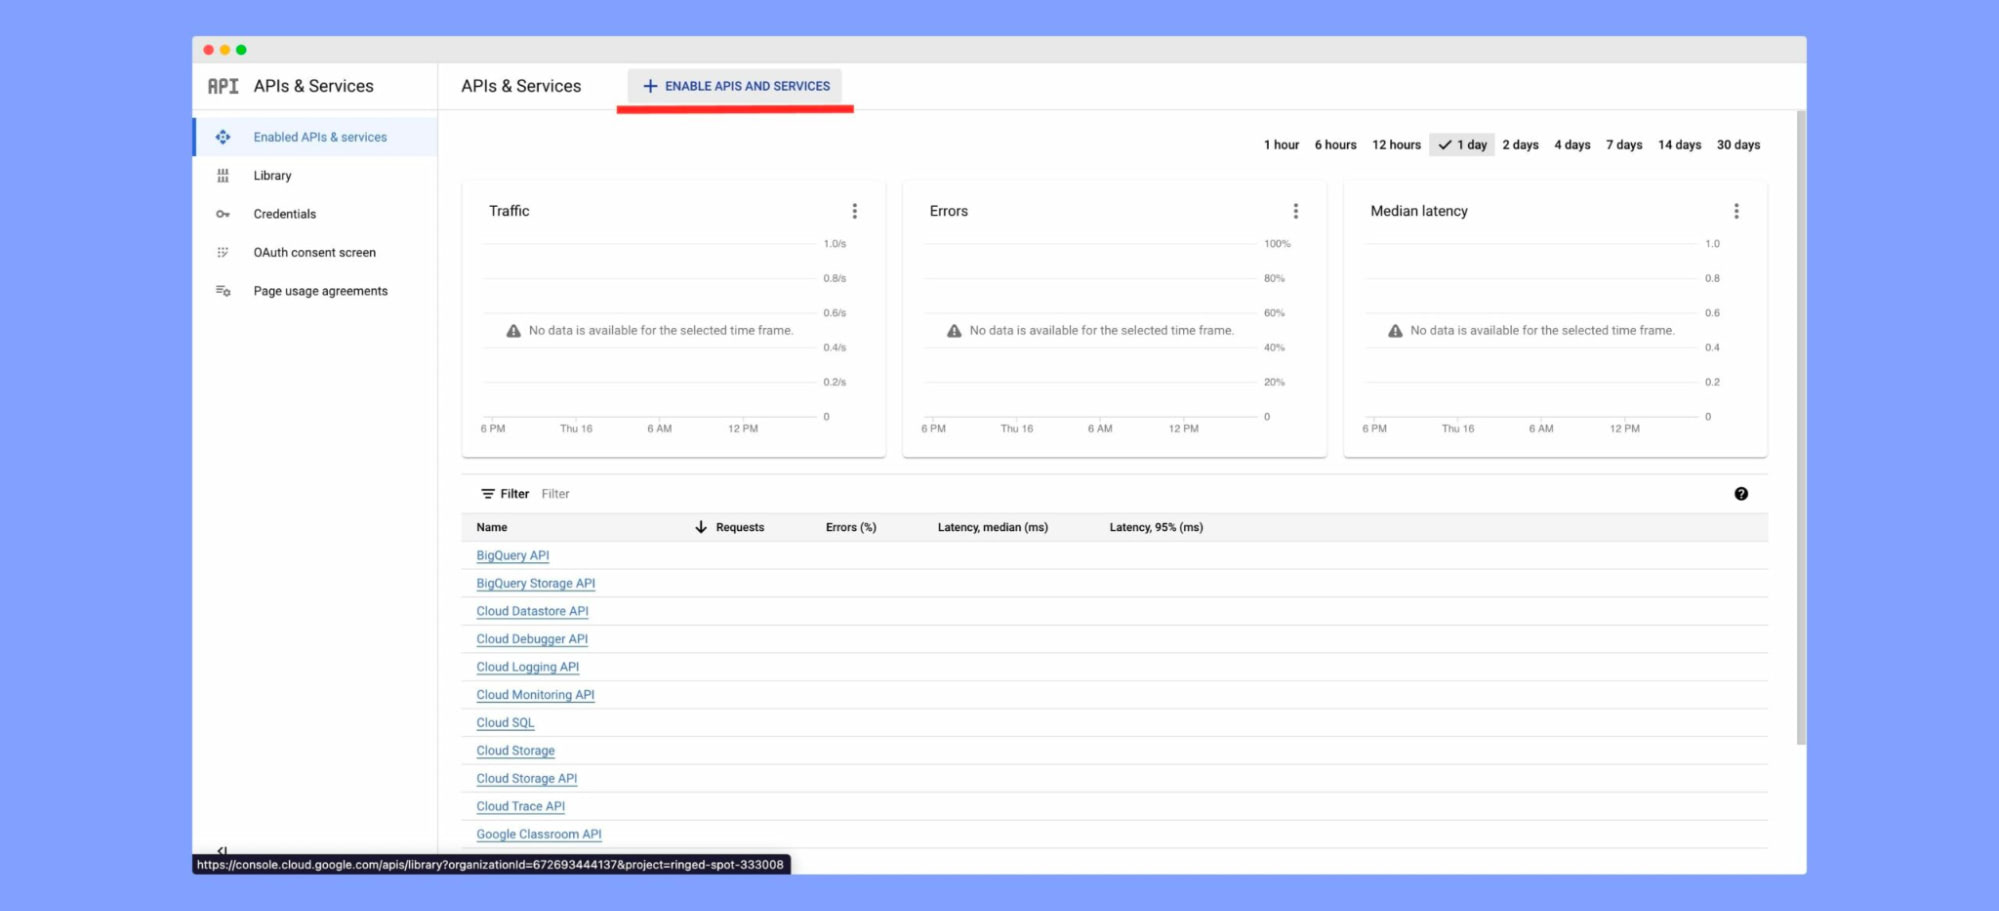
Enable the Google Calendar API for this project by clicking on “Enable APIs and Services” to activate the Google Calendar API for this project.
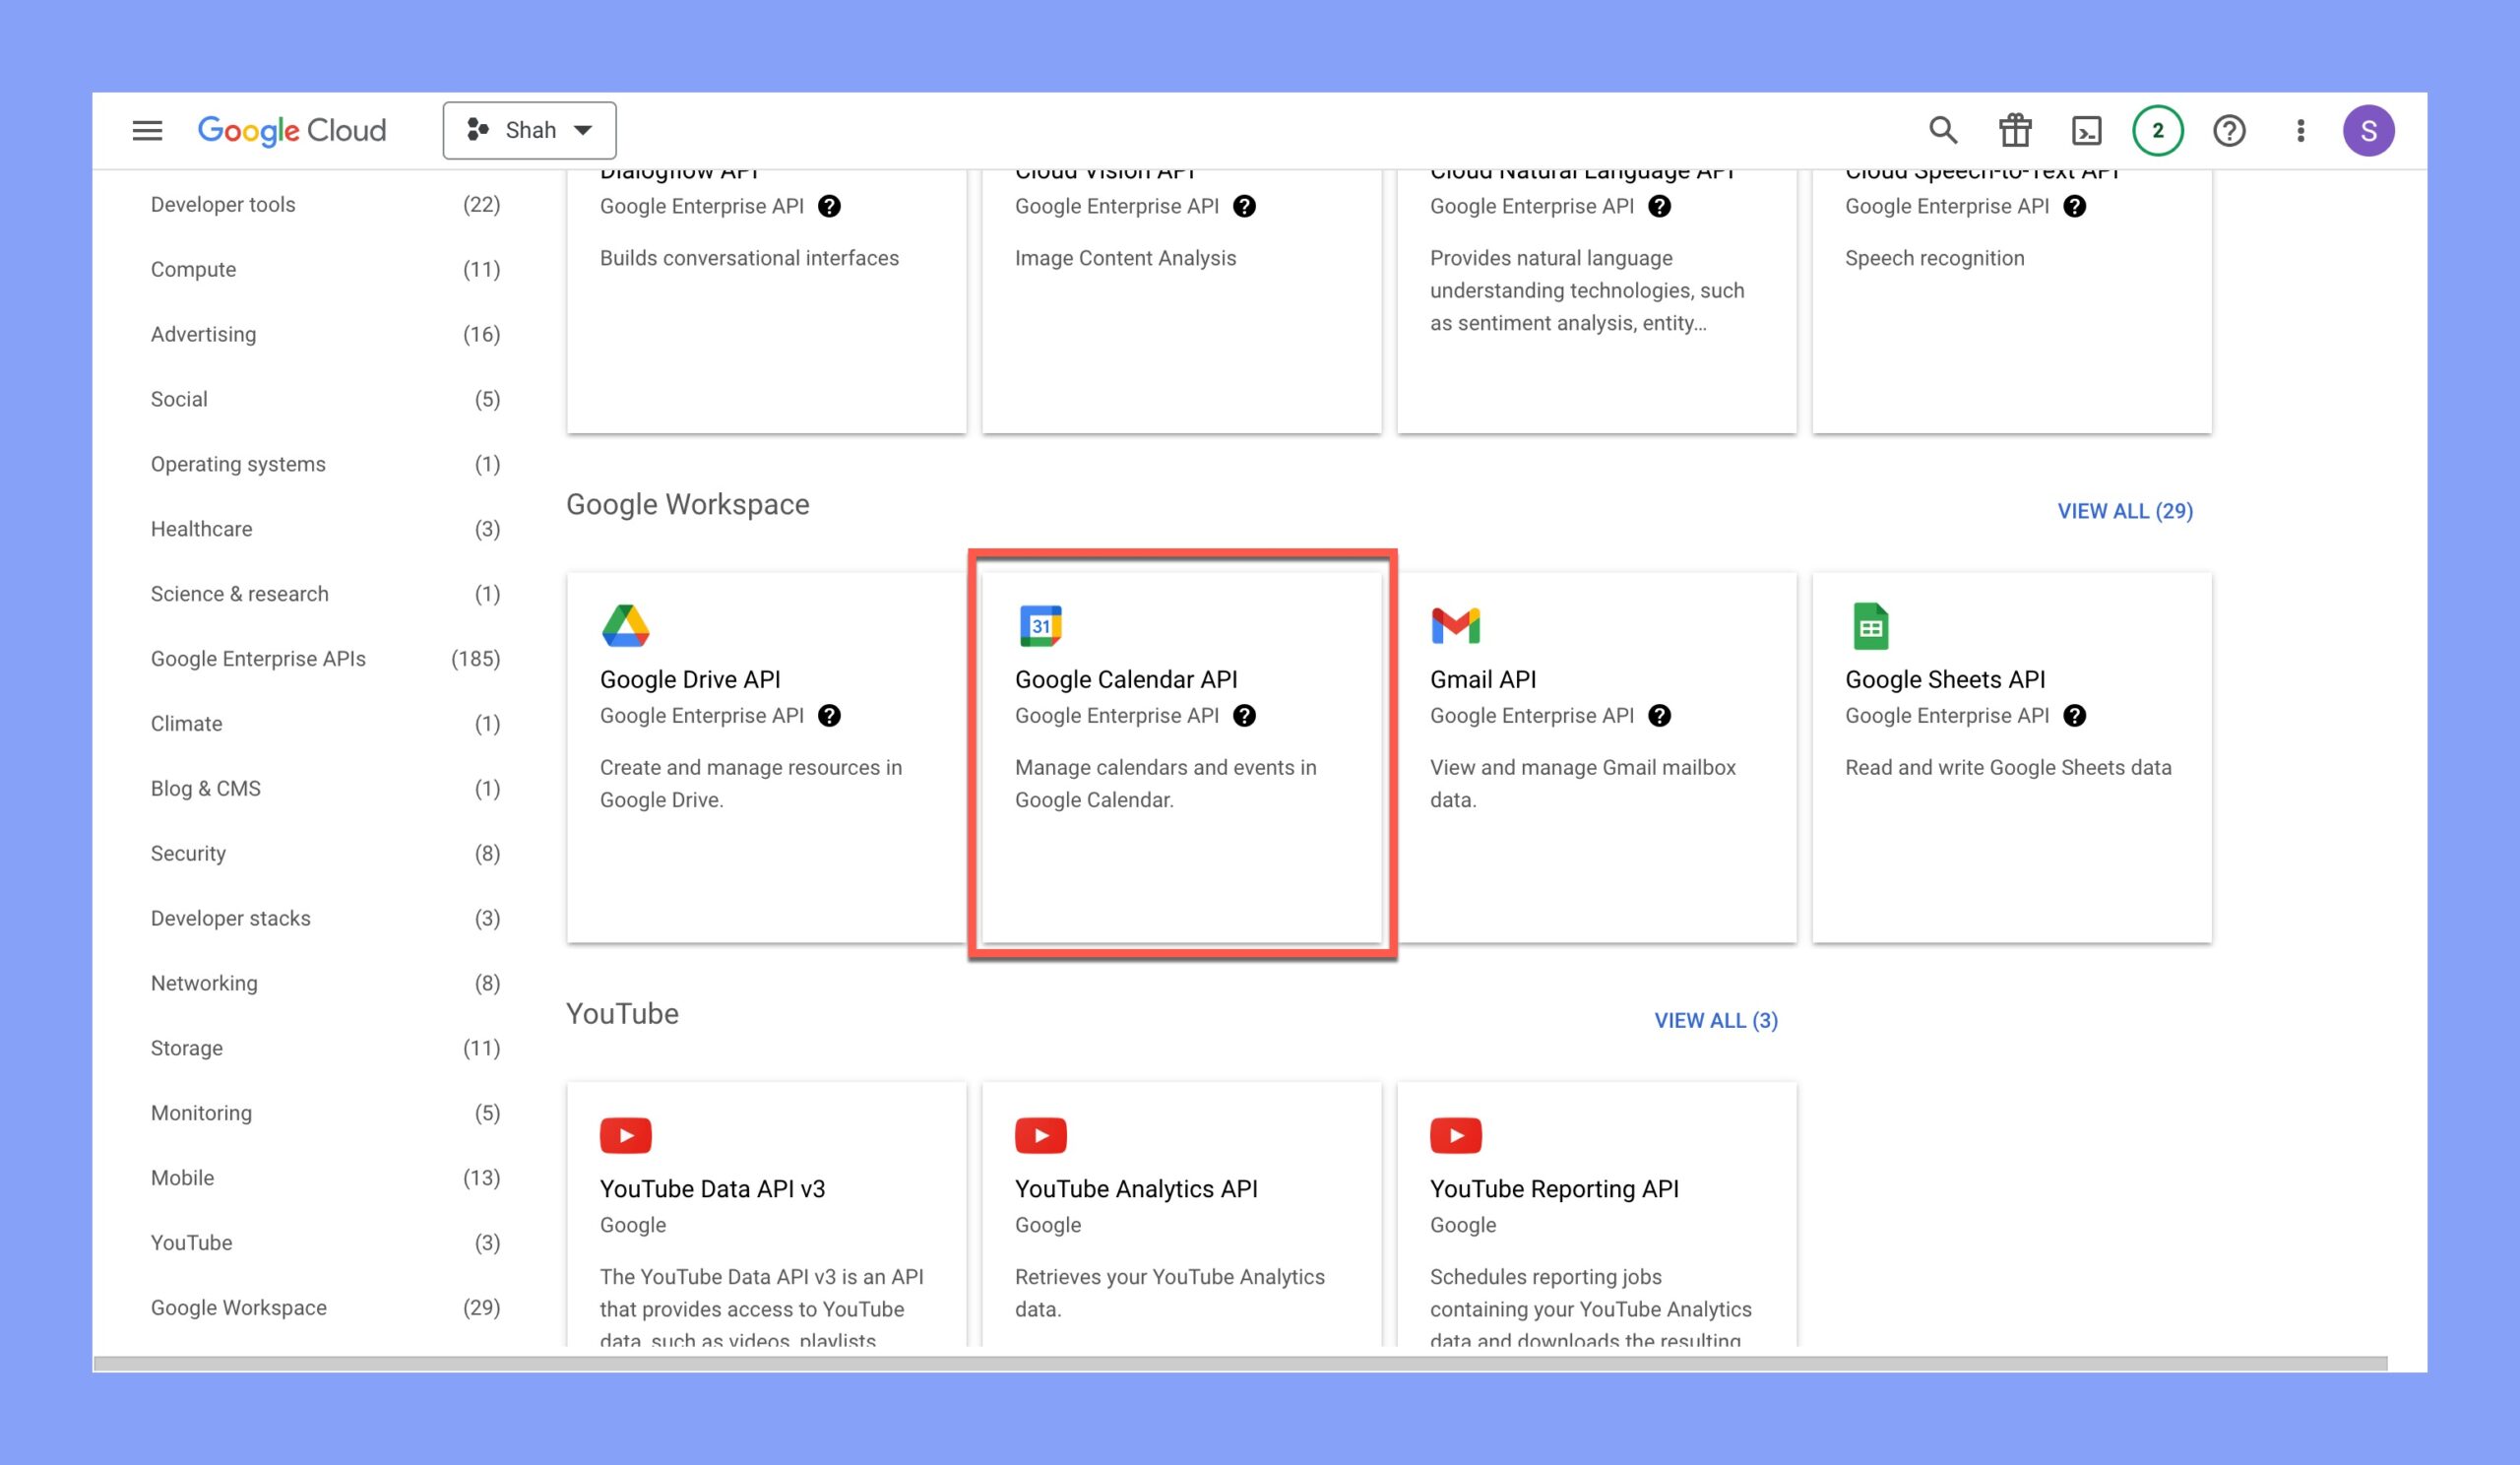
Next, go to the “Google Calendar API” in the API Library. If you cannot find the option try looking for a search field on the page and type in “Google Calendar API”.
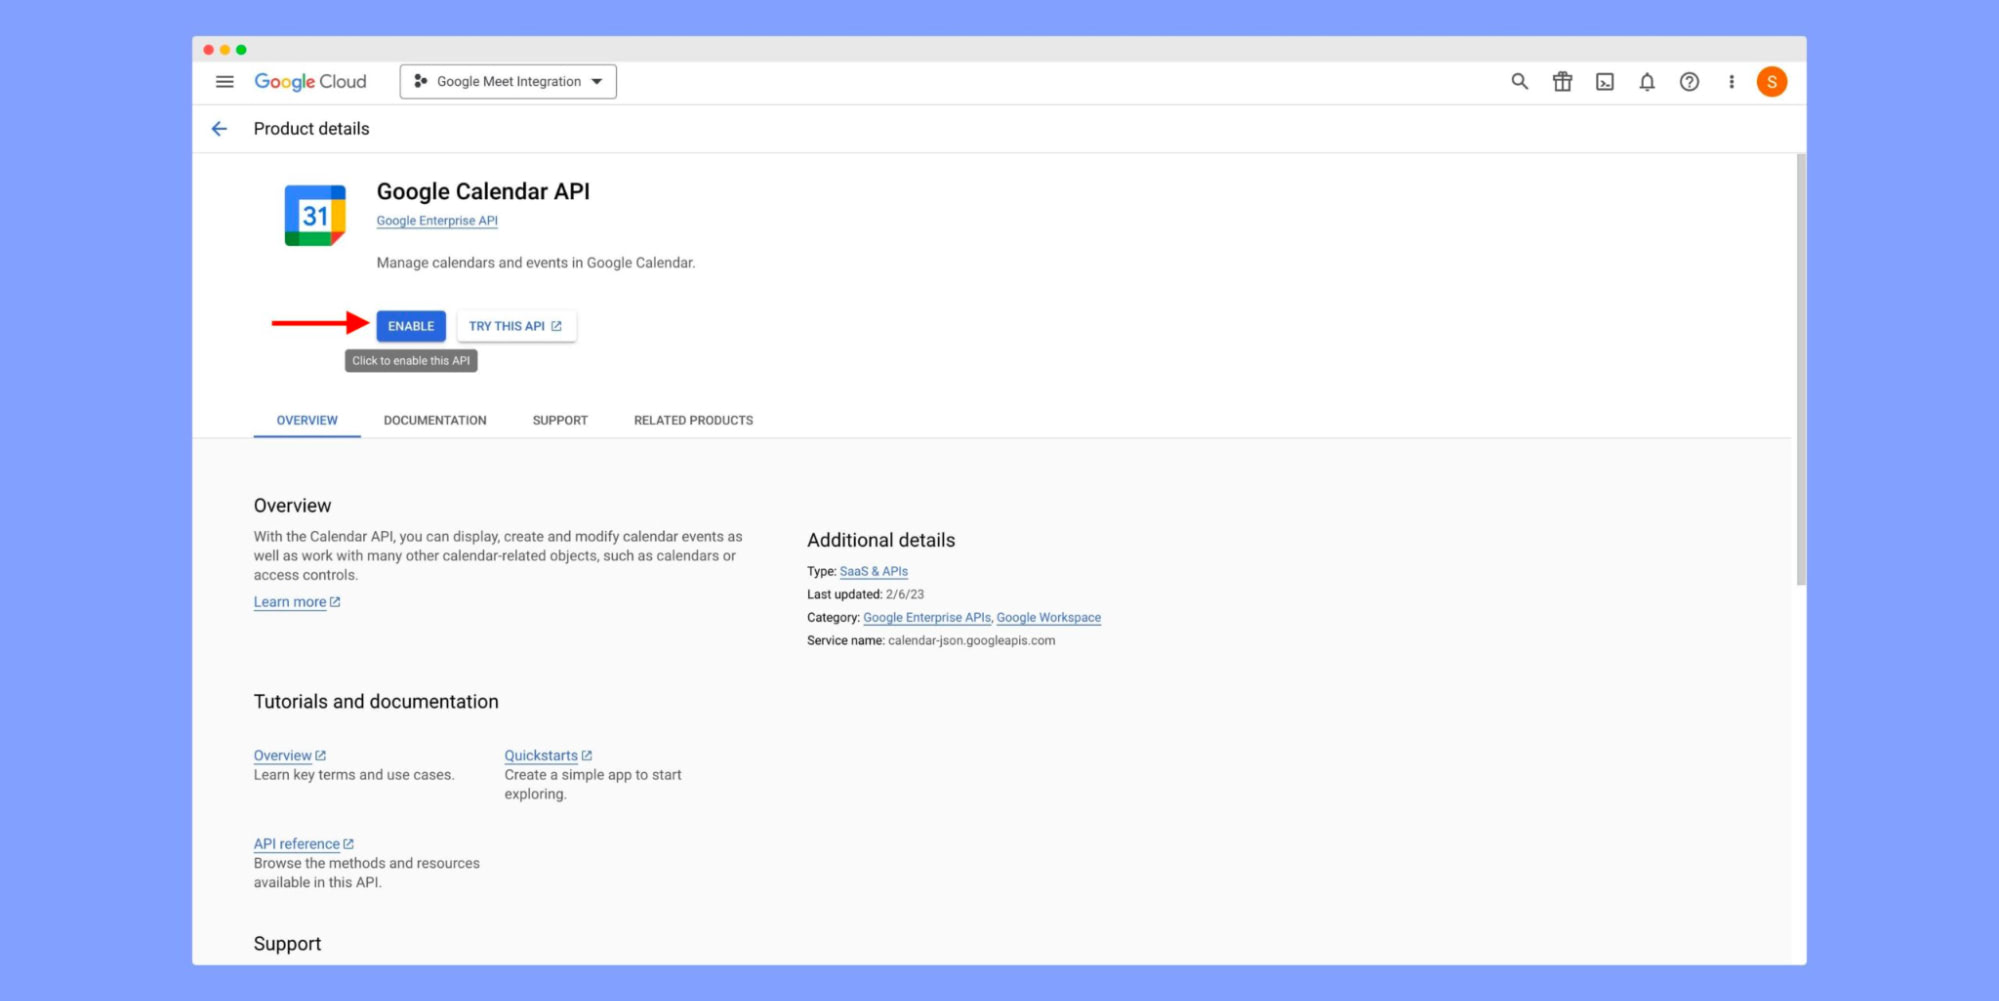
Click “Enable” to activate Google Calendar API for this project.
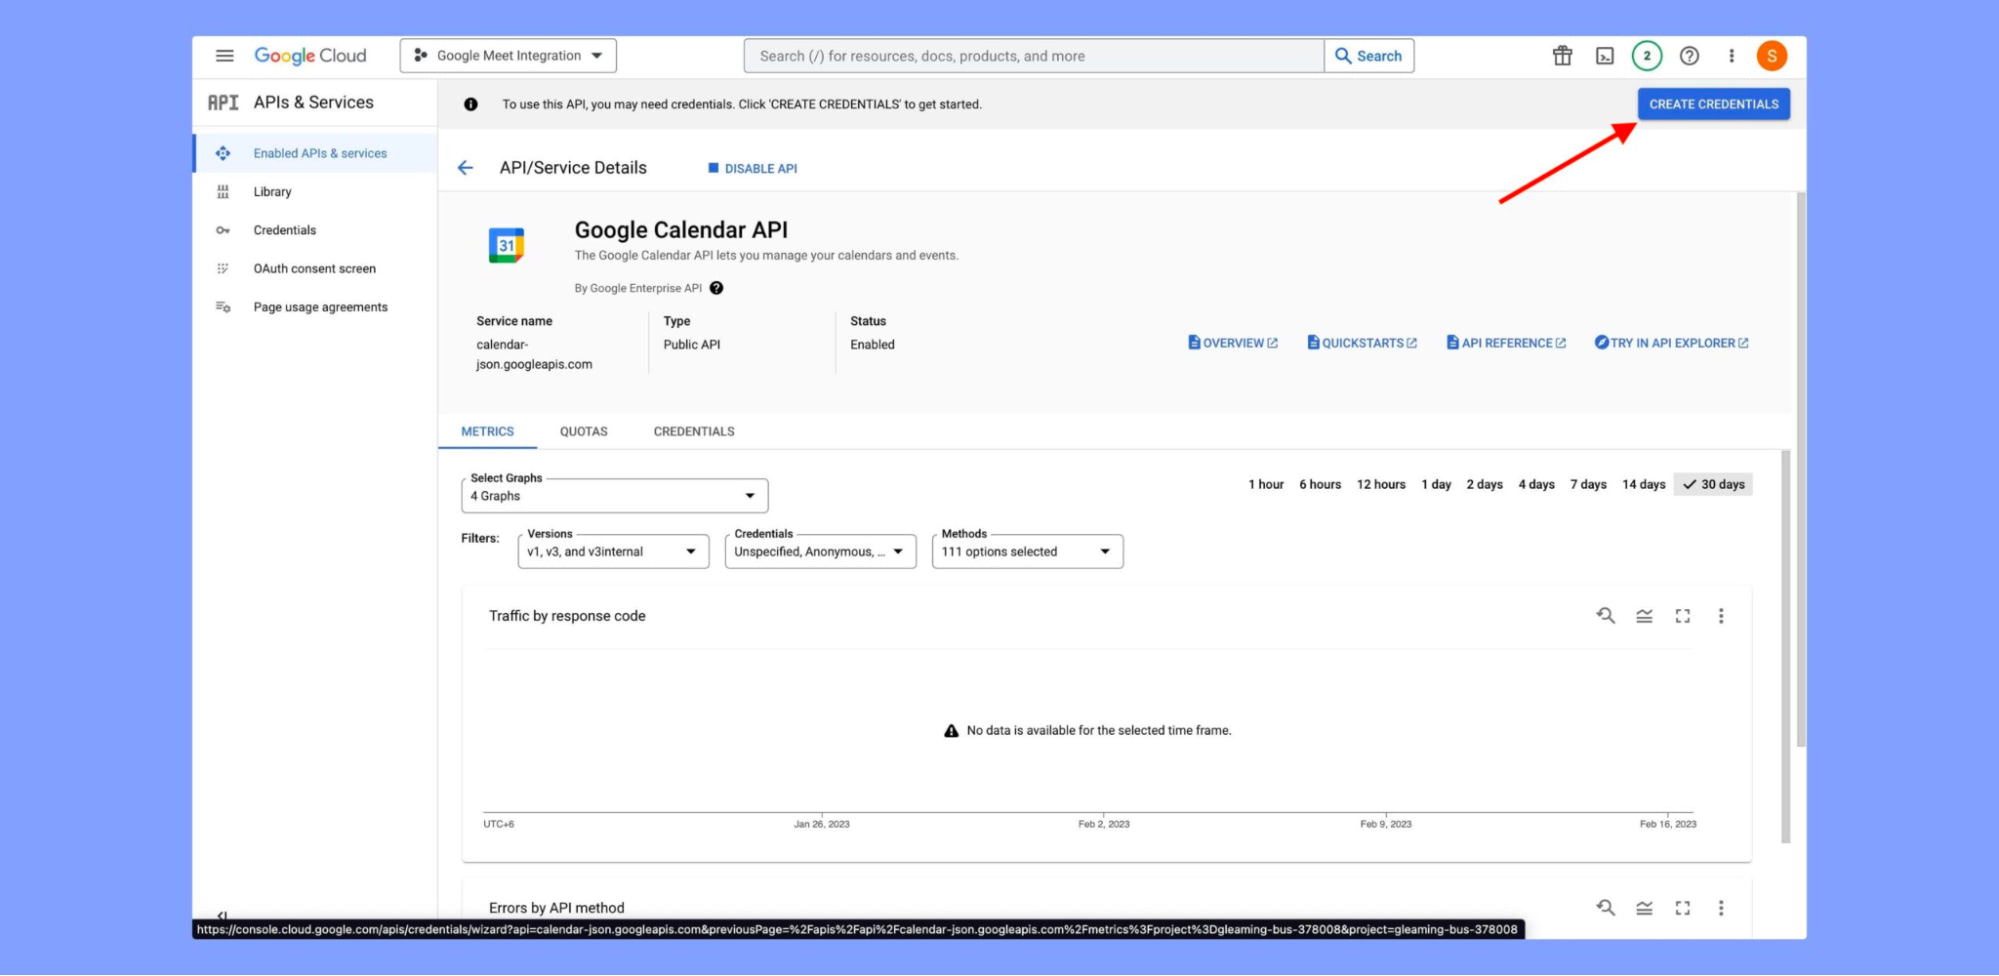
Next, go to the Google Calendar API dashboard and look for the “Create Credentials” button. Click on it to proceed.
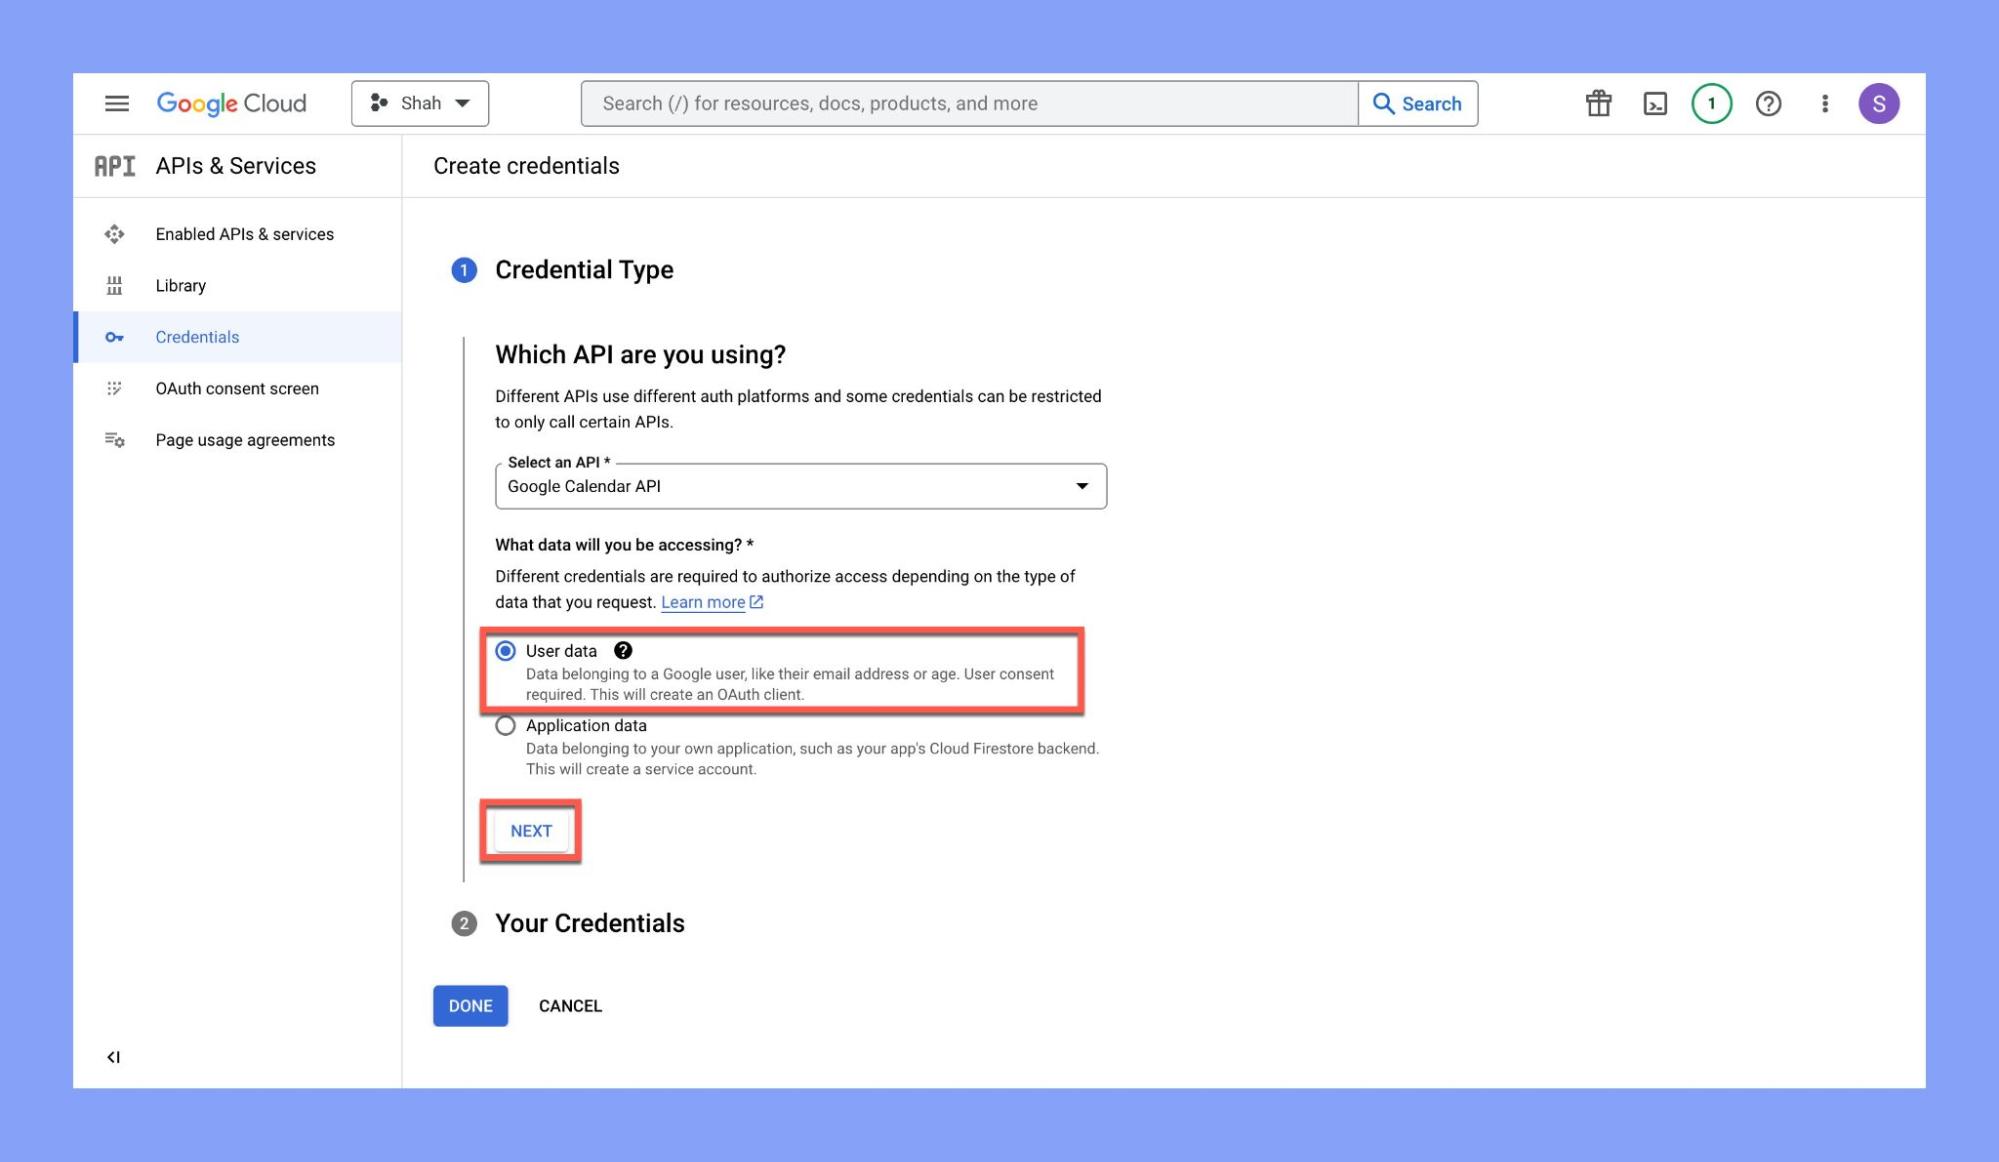
In the “Create Credential” menu, select “User data” and then click “Next”.
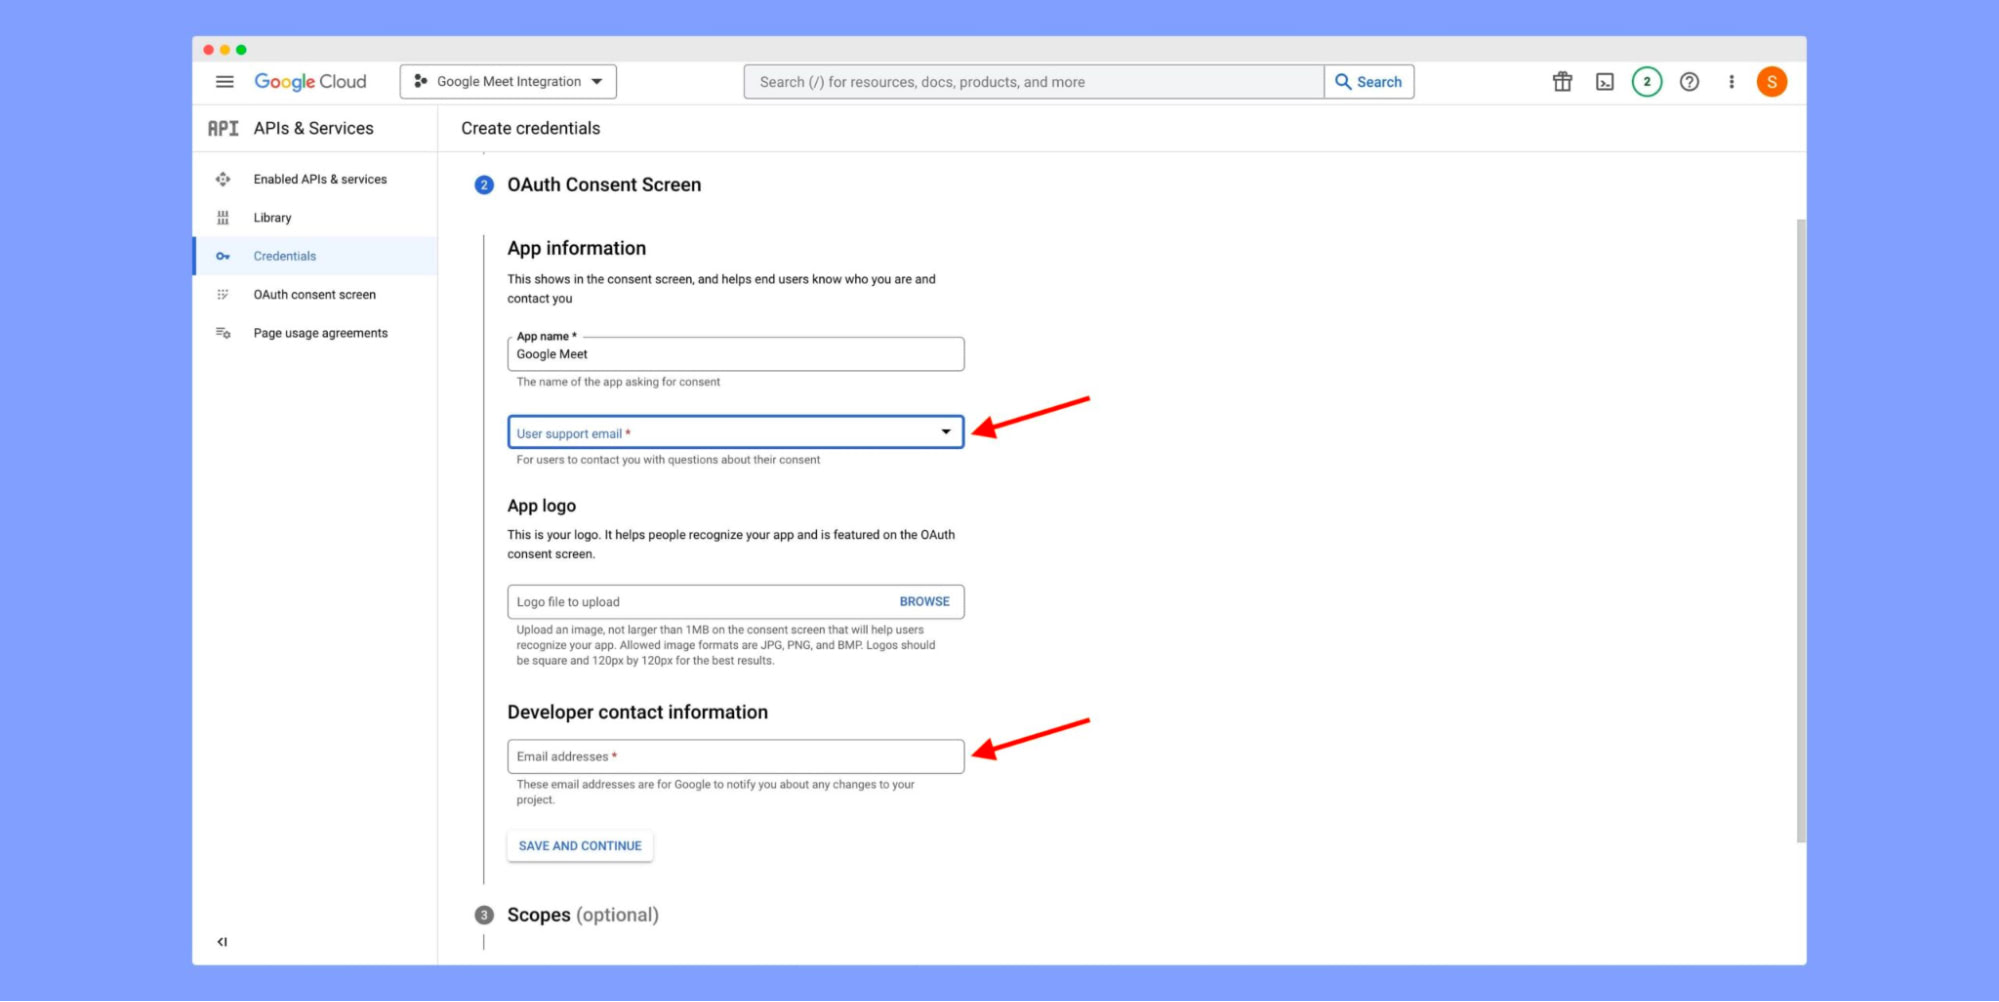
Now, in the “OAuth Consent Screen” section, name your app and add your “User support email” and “Developer Contact email.”
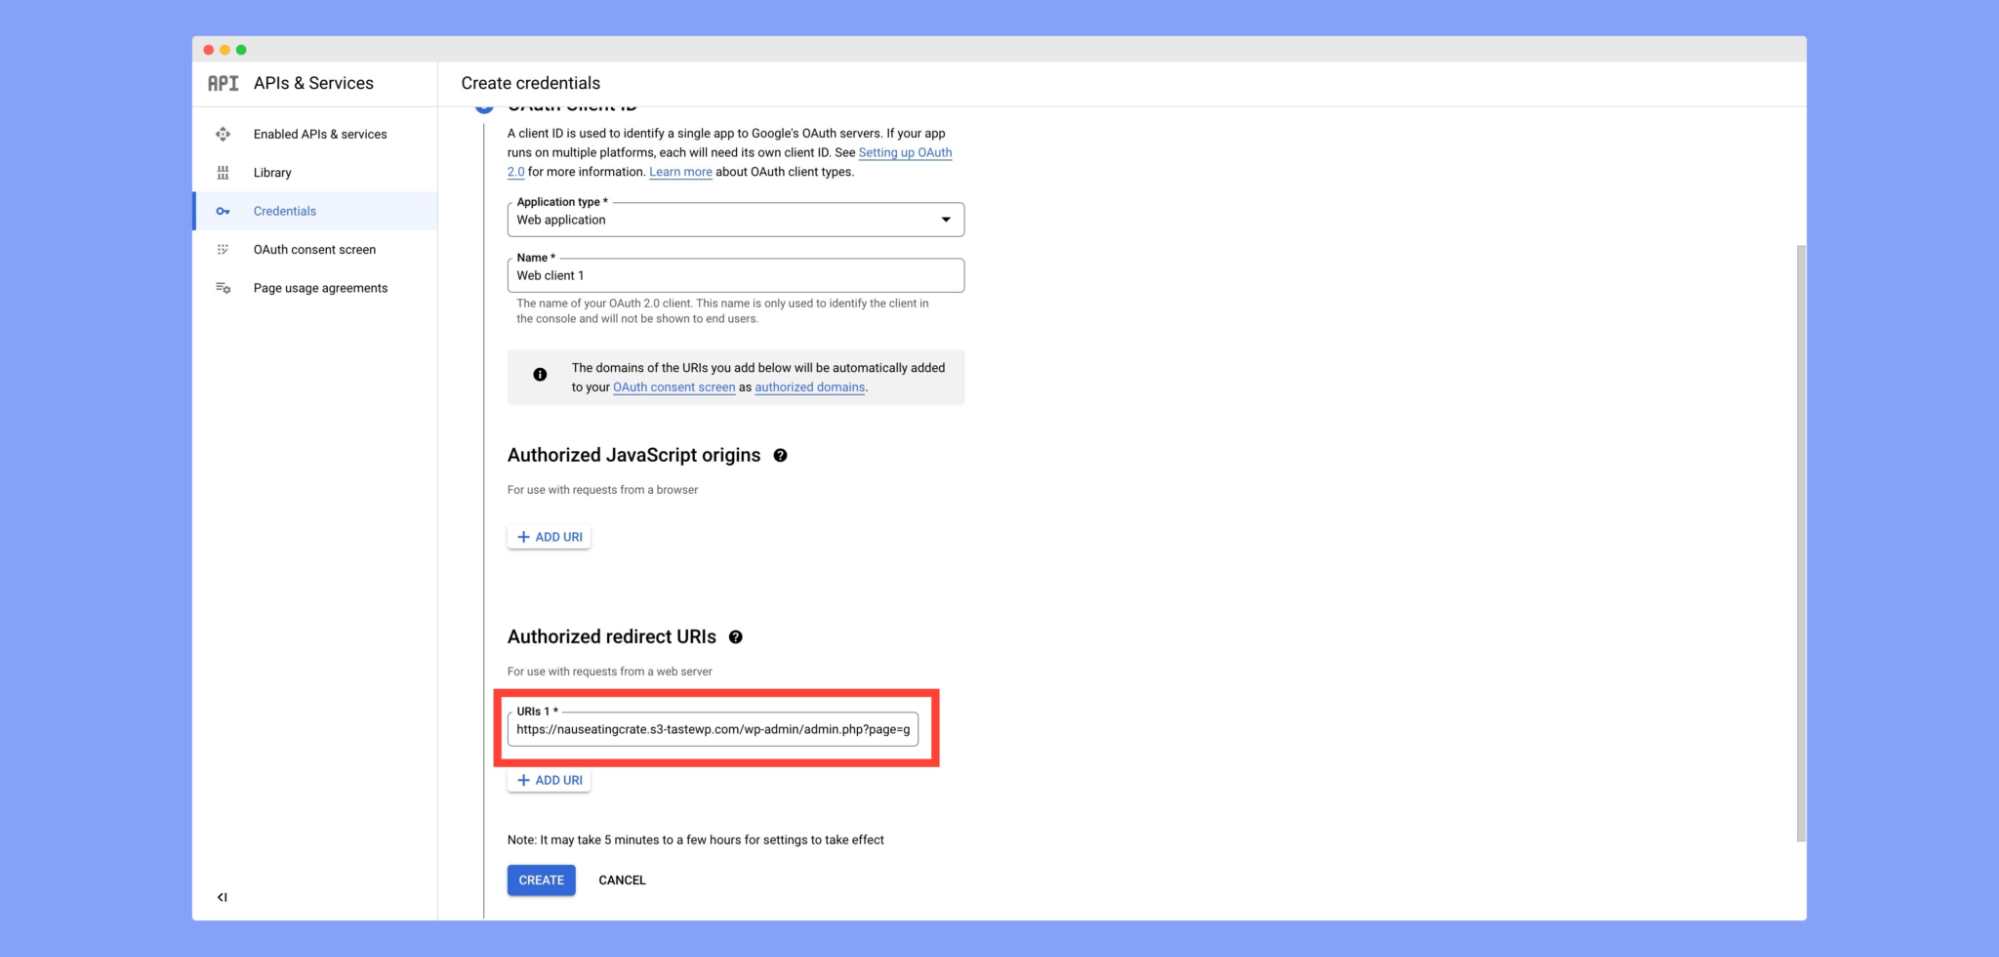
- Select “Web application” as your application type, and then we need an “Authorized redirect URI”.
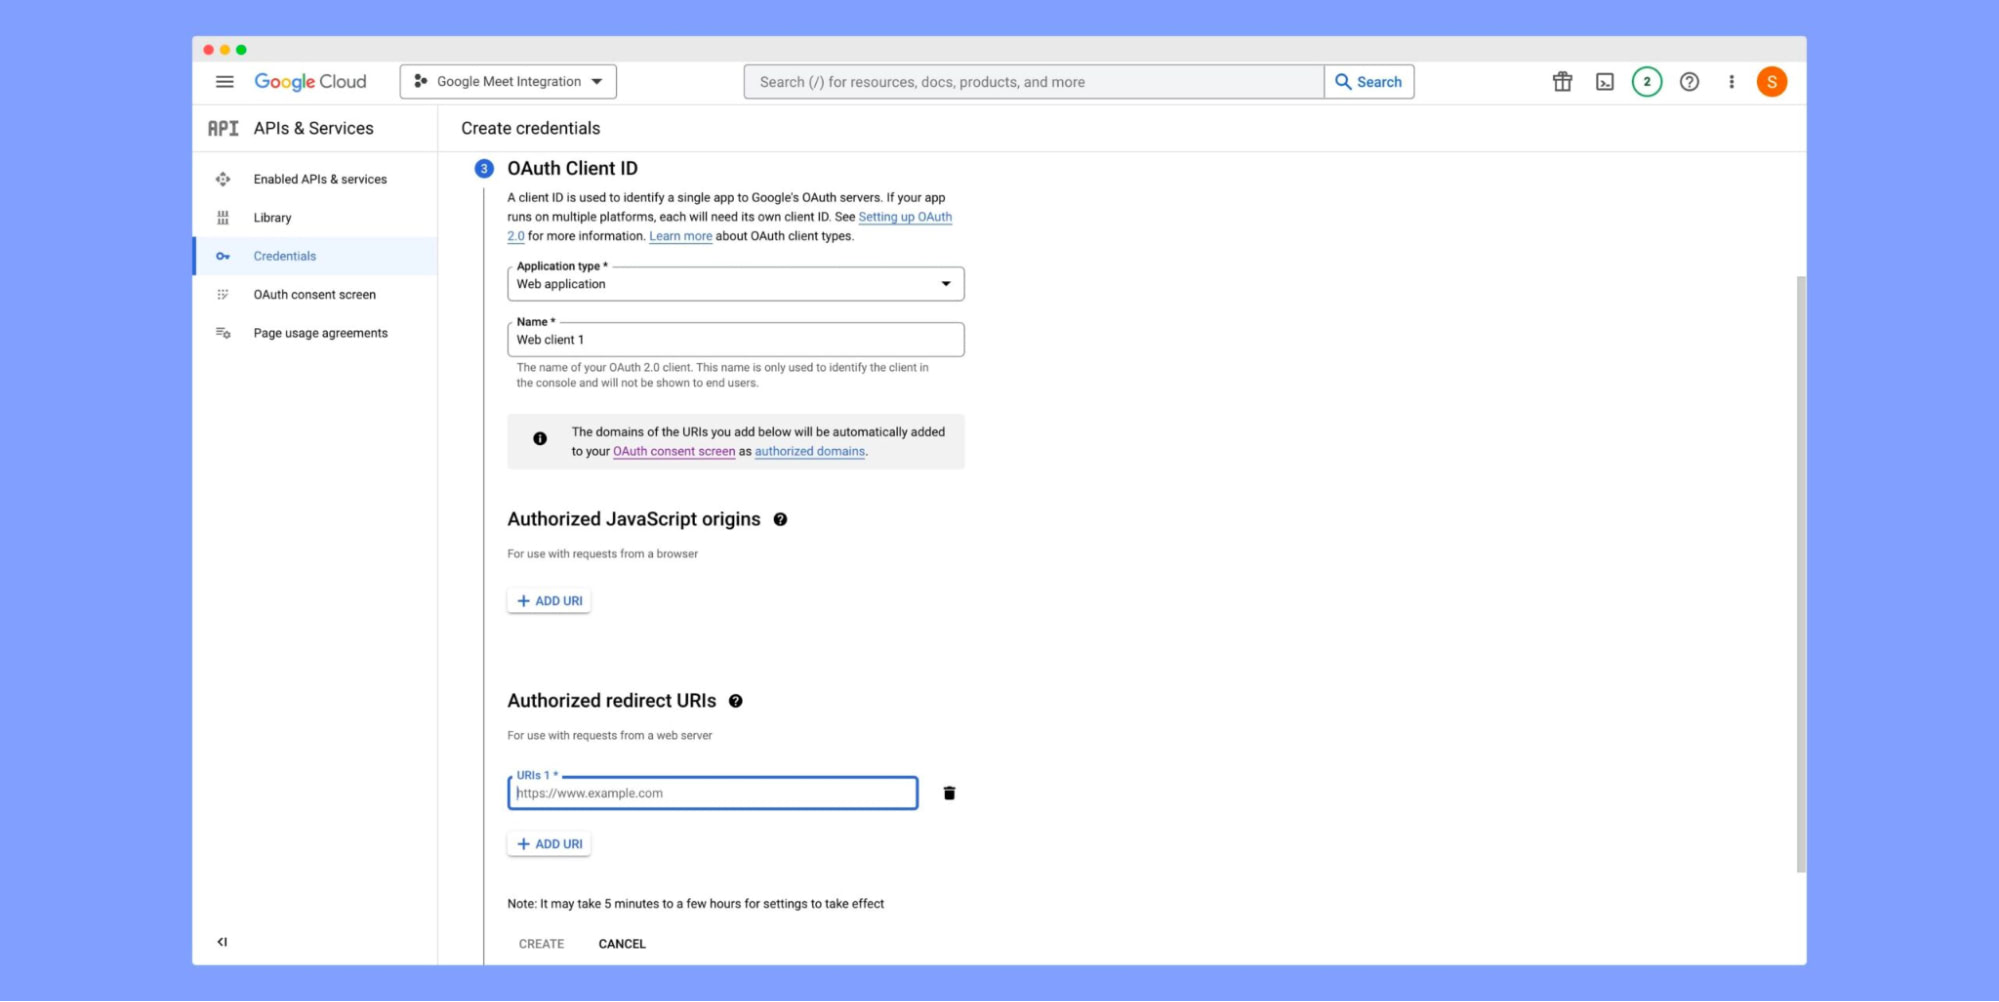
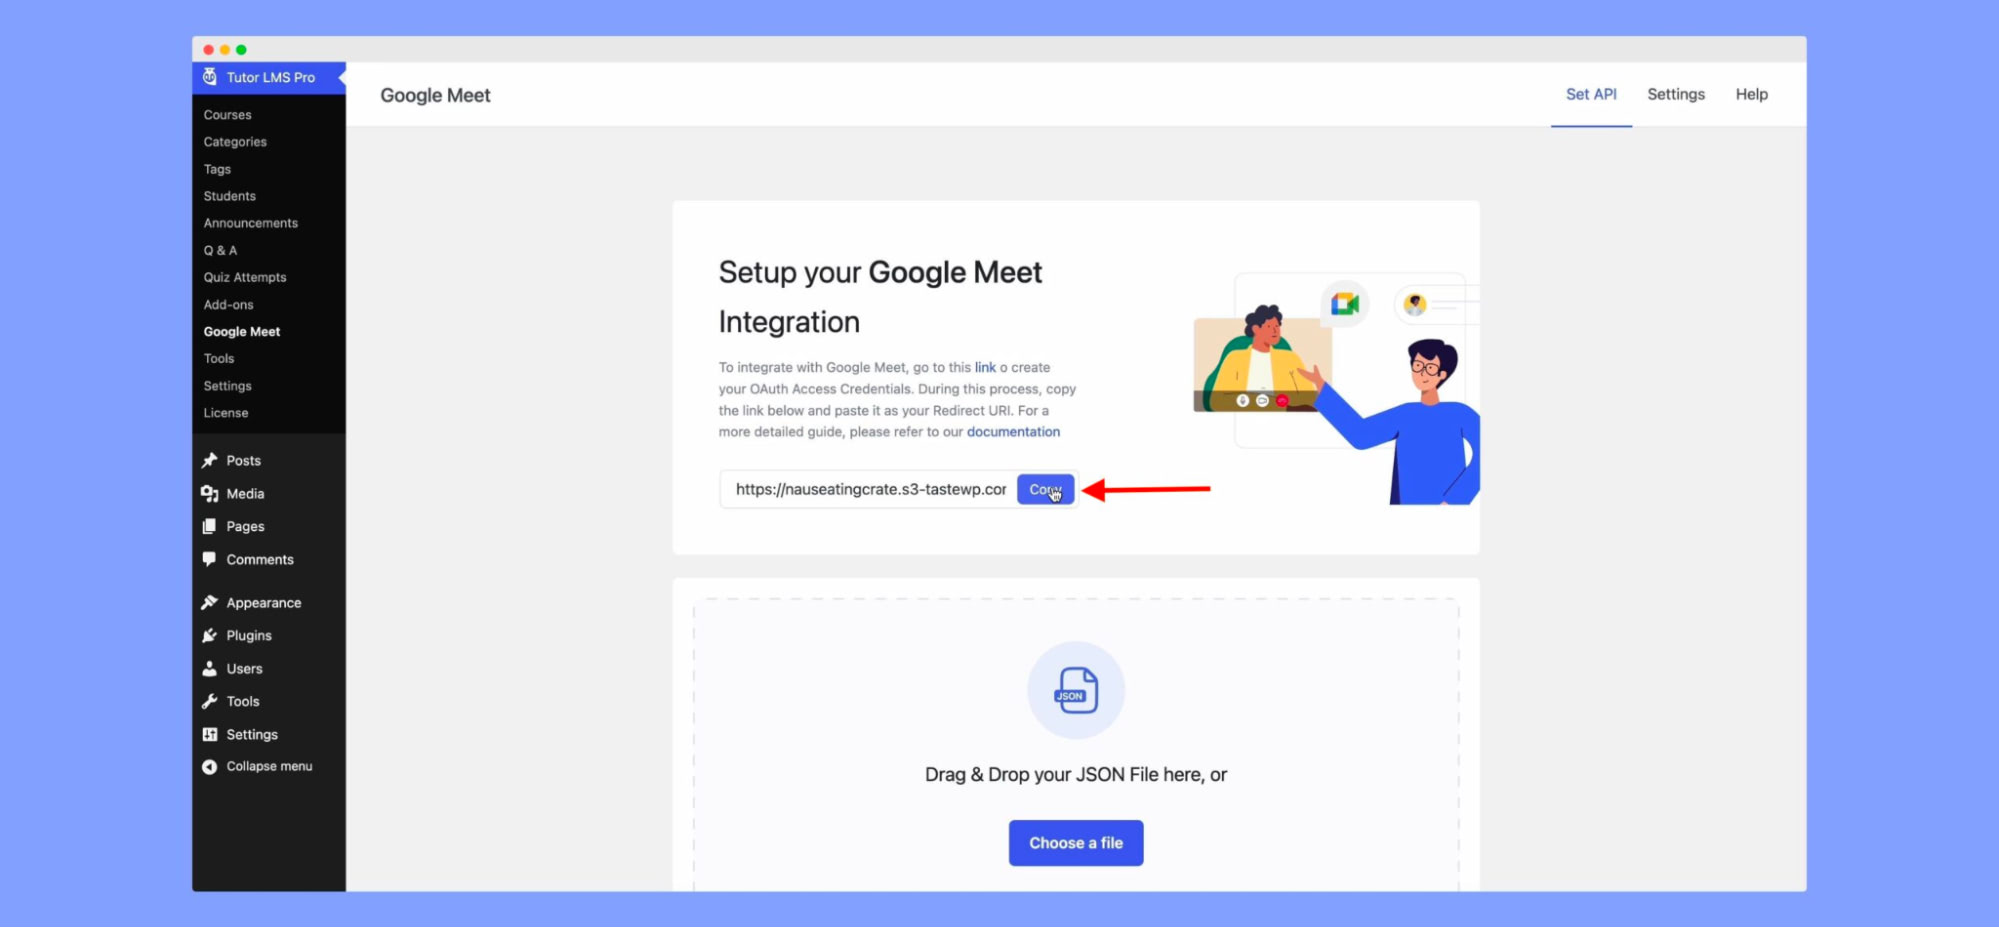
To get your “Authorized redirect URI” go back to your WordPress admin backend and navigate to Tutor LMS > Google Meet > Set API tab. Copy the link and return to the Google developer console.
Paste this link in the “Authorized redirect URIs” section in the Google developer console and hit “Save“.
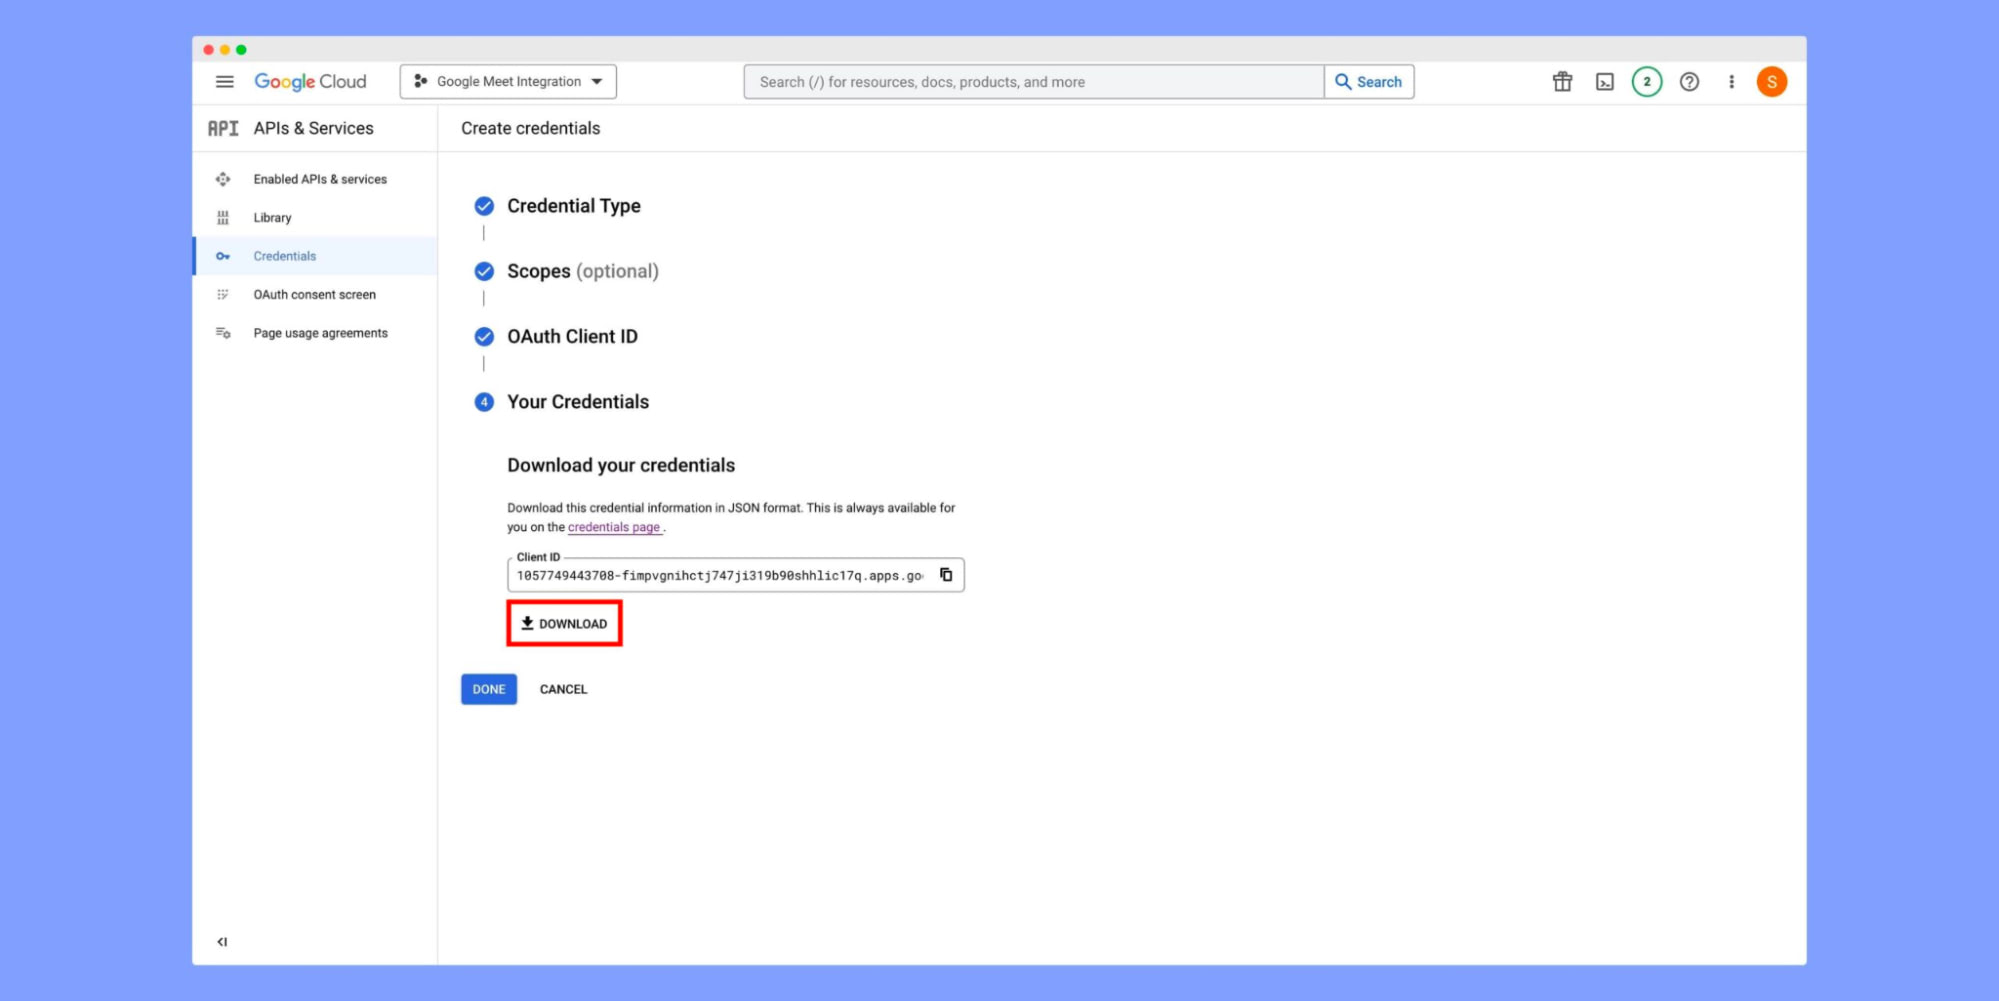
After creating the credentials, you can then download the JSON file from the credentials dashboard. Simply click on the download icon to continue.
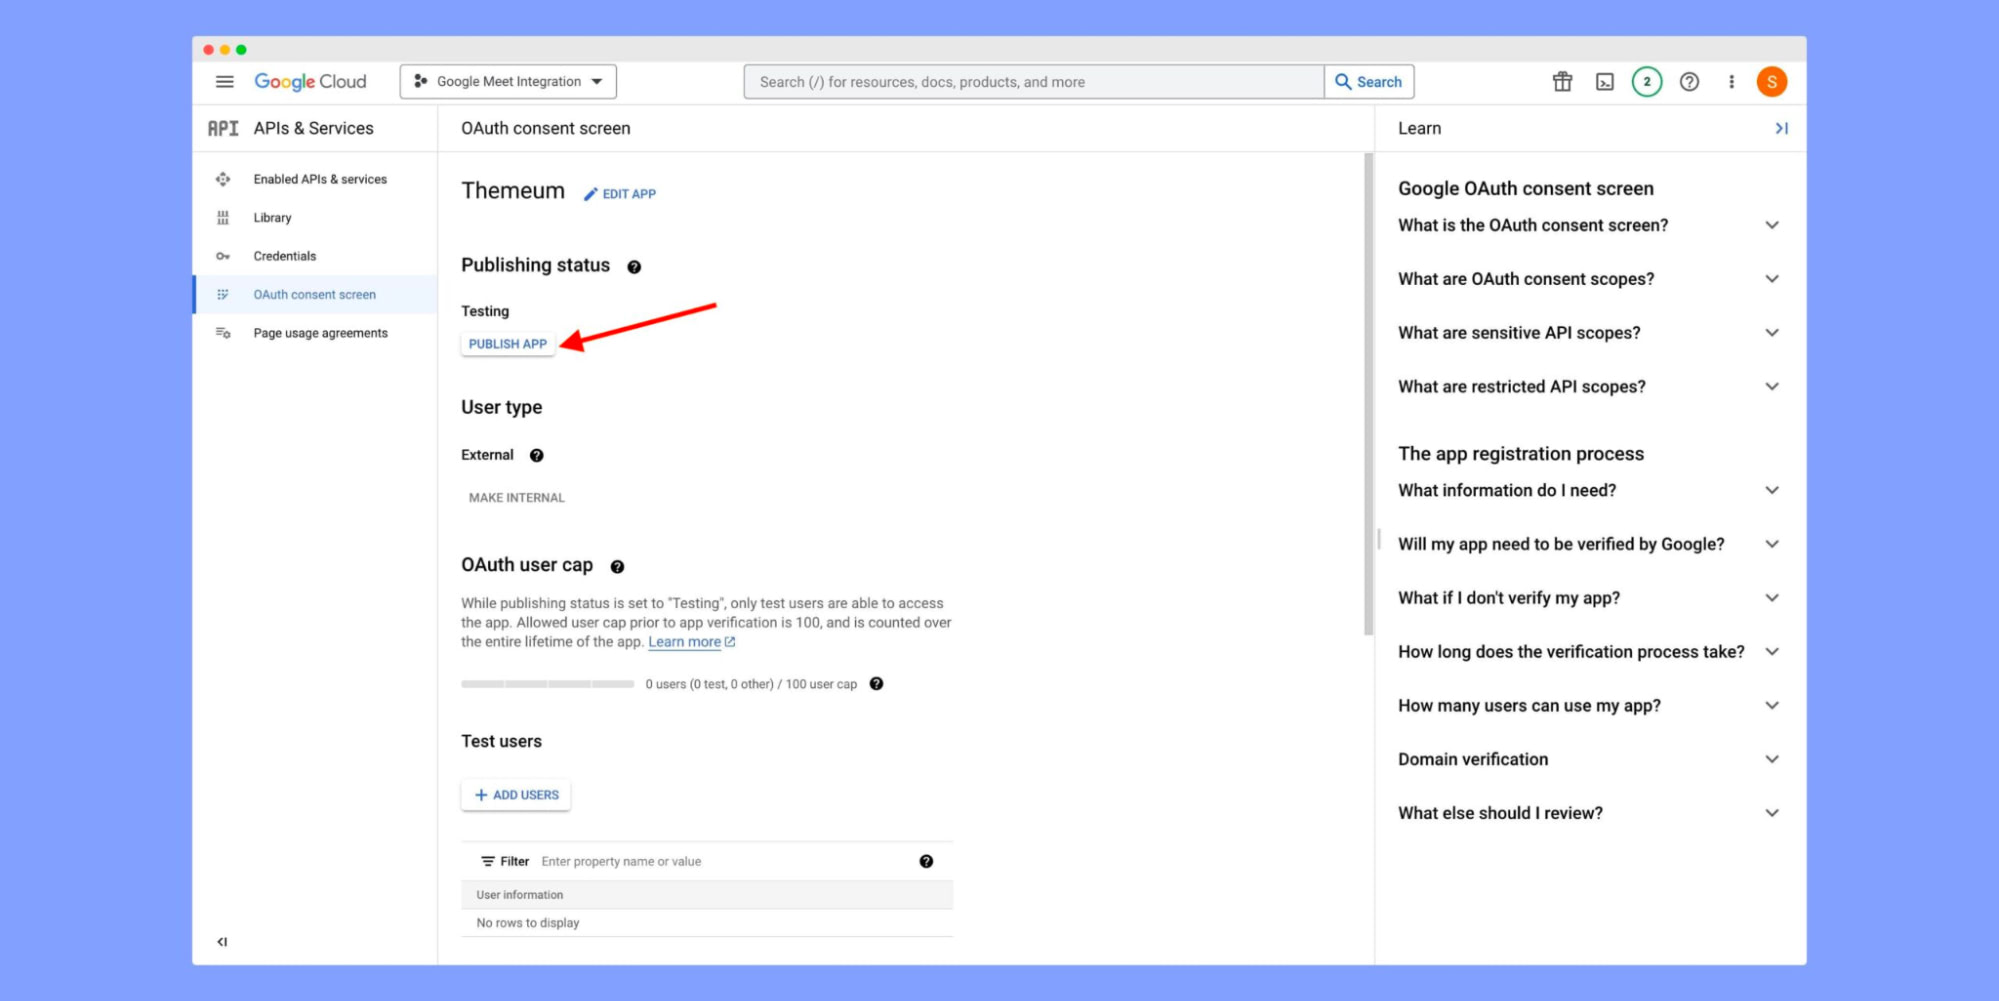
Finally, click on the “OAuth consent screen” tab and then click “Publish App” to publish your app.
Step 4: Connect to Google Meet
After you have access to your JSON file, you can now connect Tutor LMS to Google Meet. Connecting to Google Meet is very simple. Just follow these steps:
From the backend of your WordPress site, go to Tutor LMS > Google Meet.
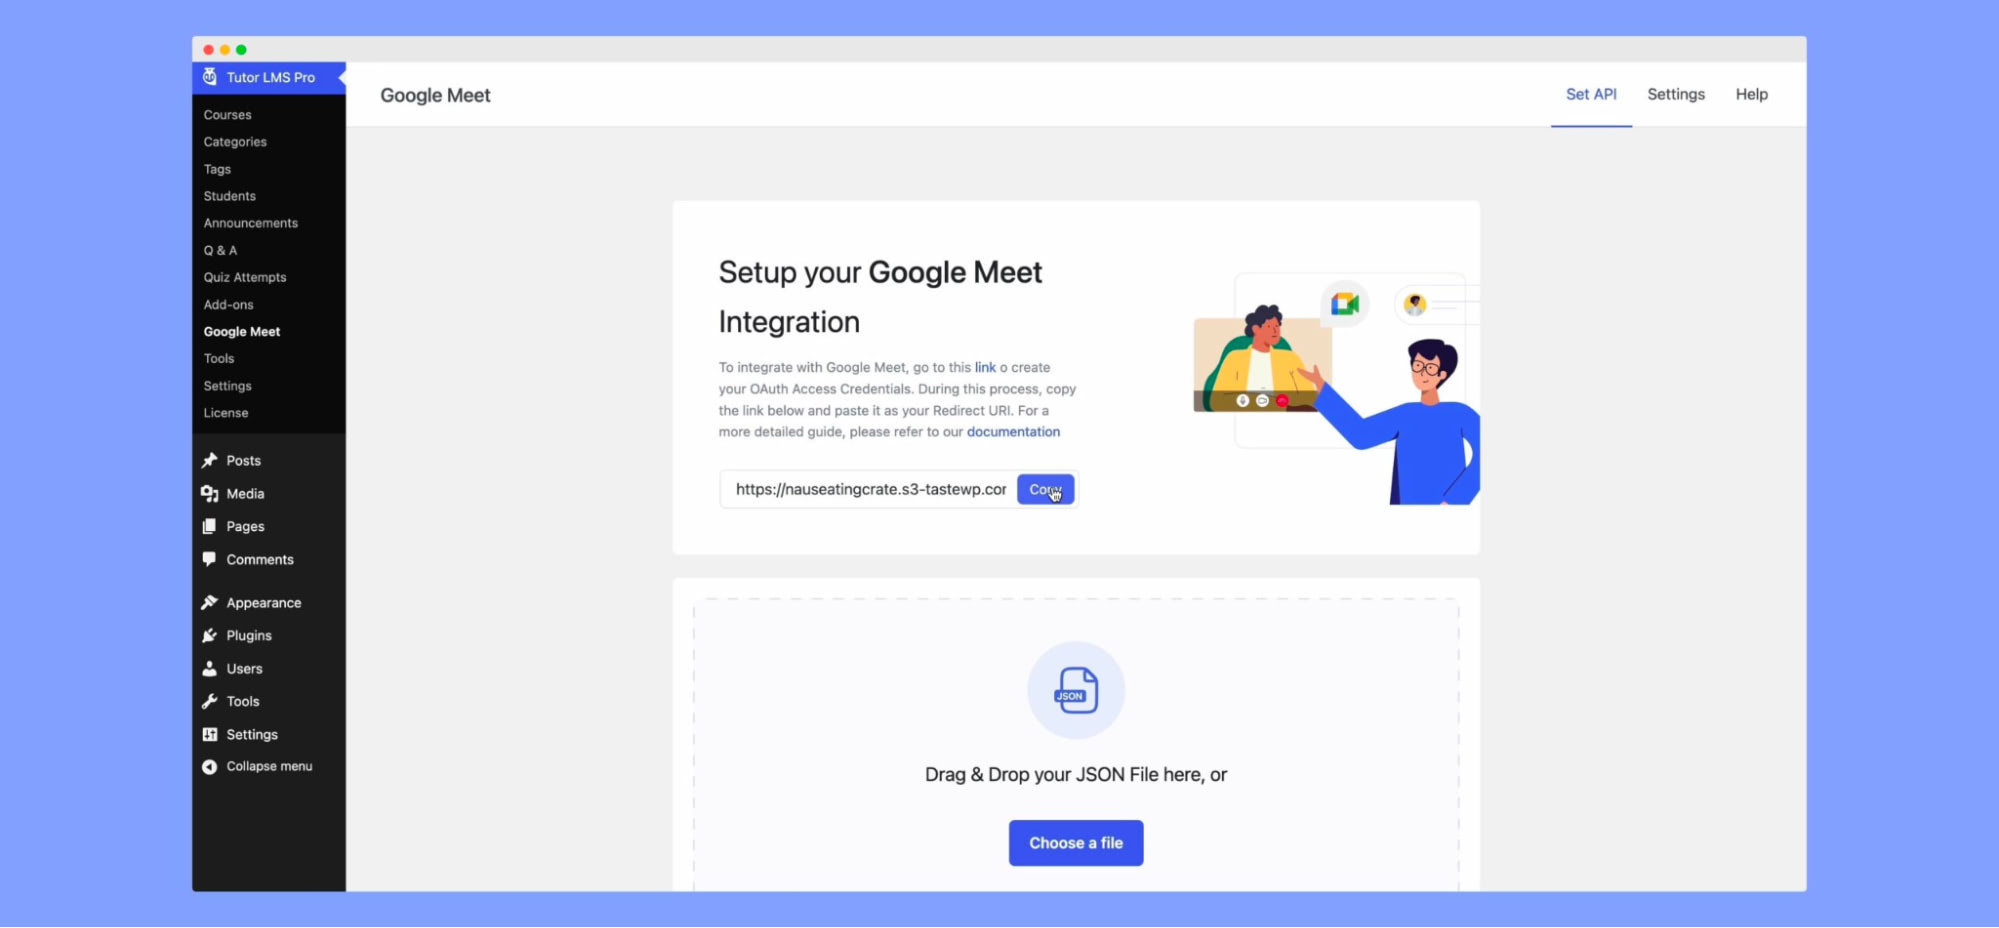
Upload your JSON file by clicking on the “Choose a file” button or dragging and dropping the JSON file in the highlighted box.
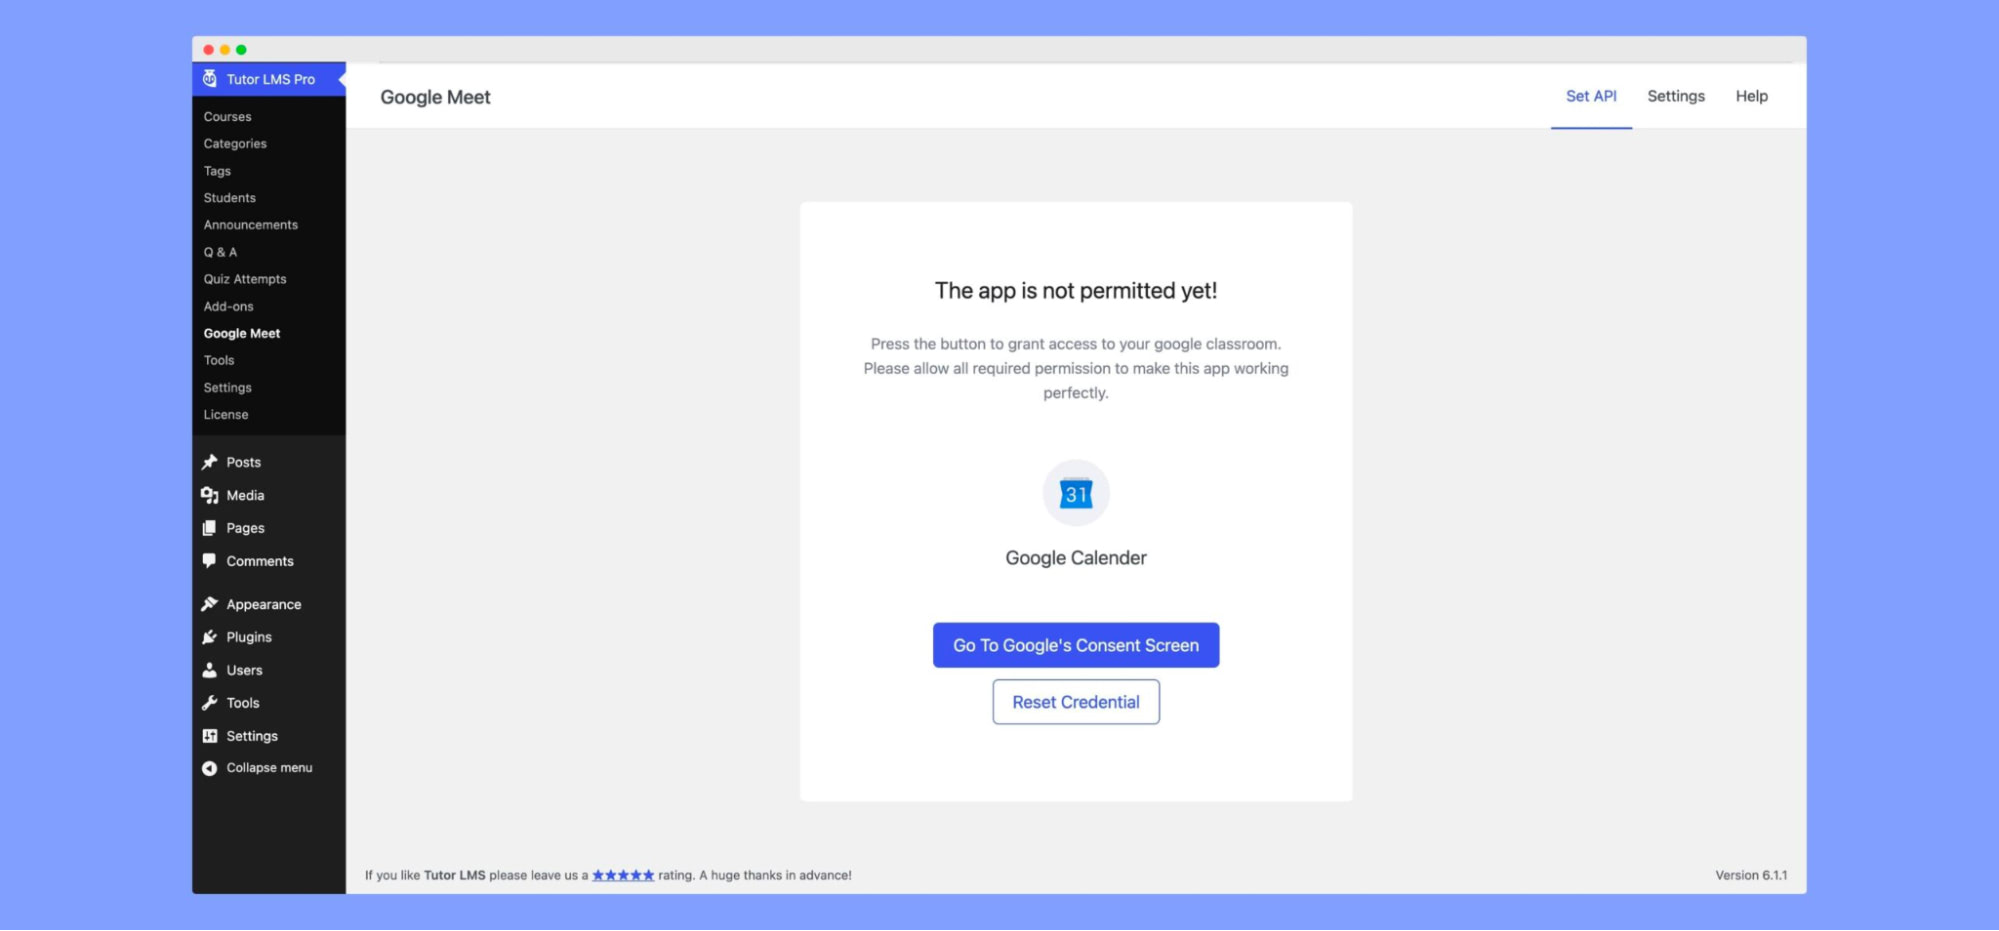
Once uploaded, it will authenticate your website with the API credentials. Authenticate your website with the API credentials by clicking on the “Go To Google’s Consent Screen” button.
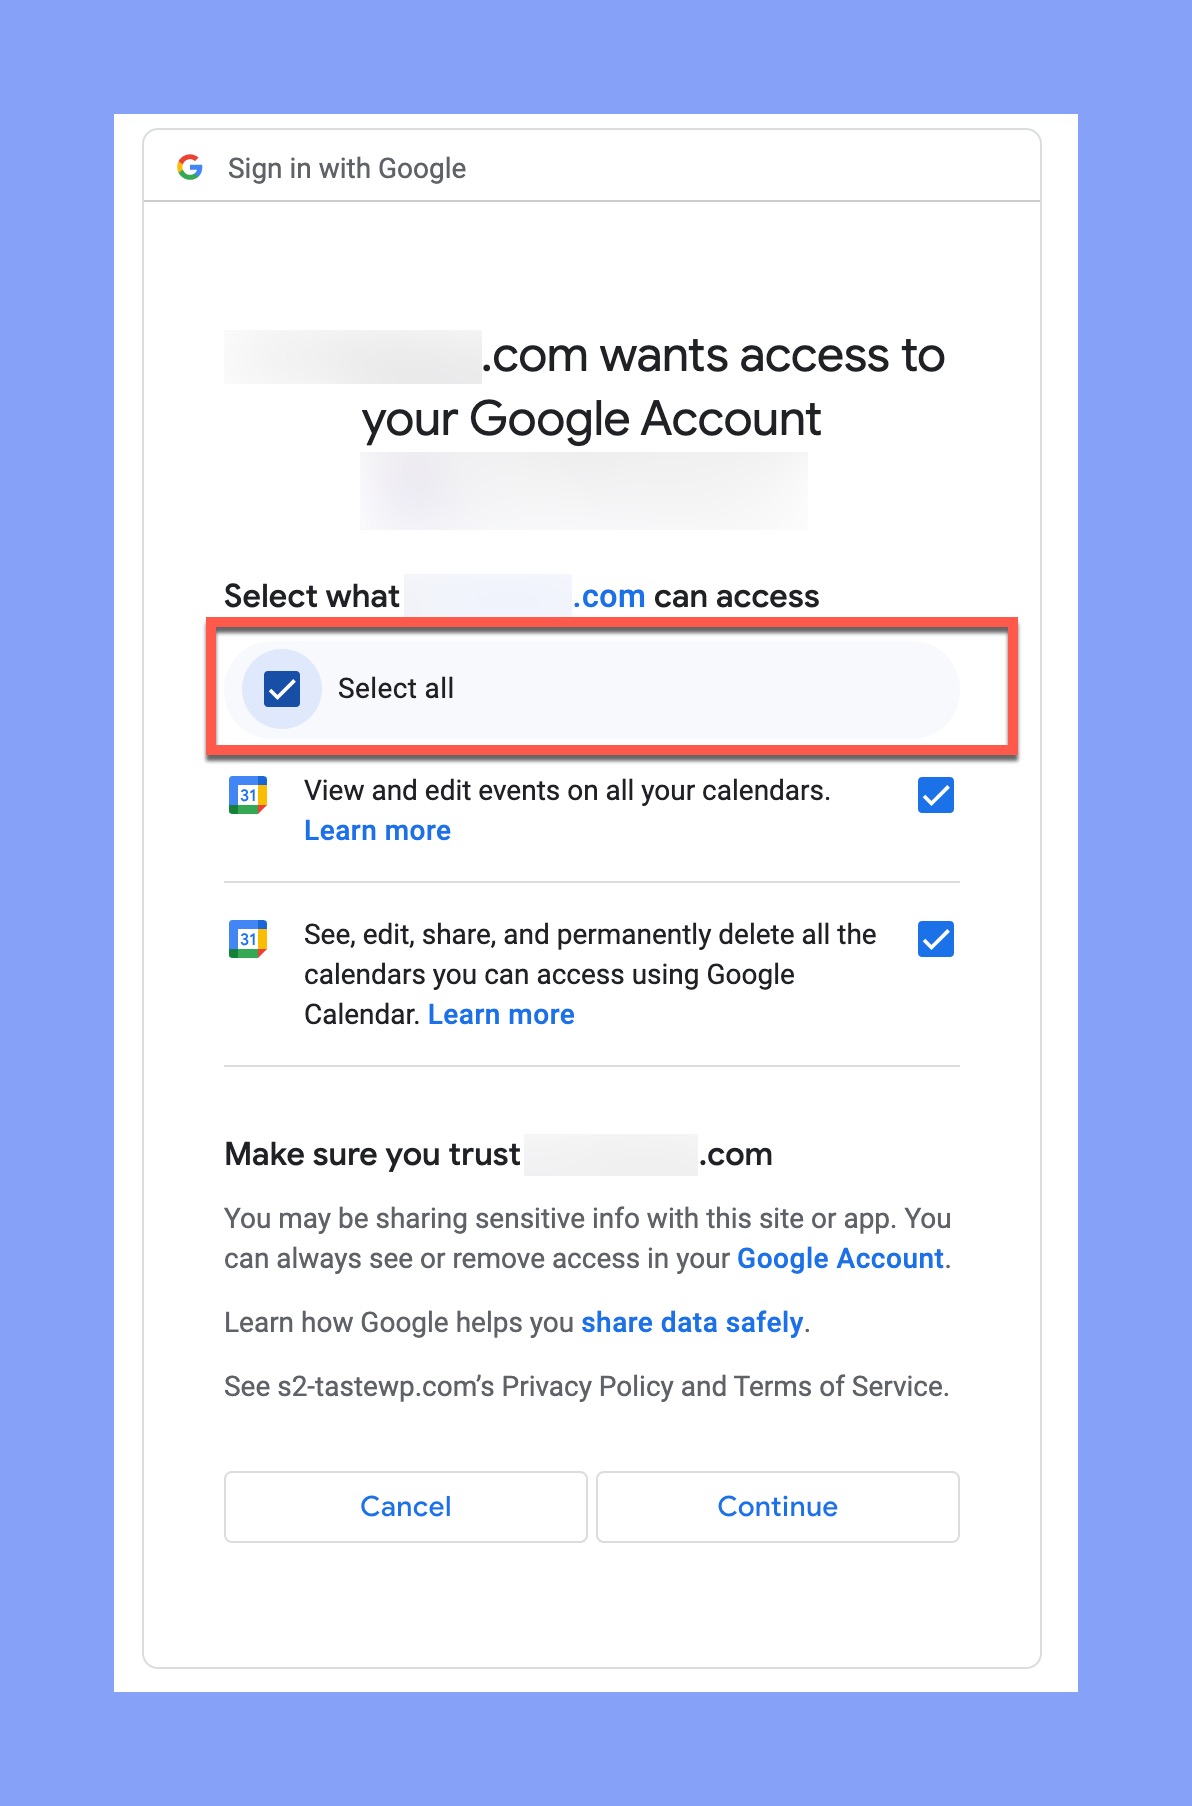
Finally, you will see Google’s access control page. Choose “Select all” to allow all the permissions you want to have Tutor LMS set up with Google Meet.
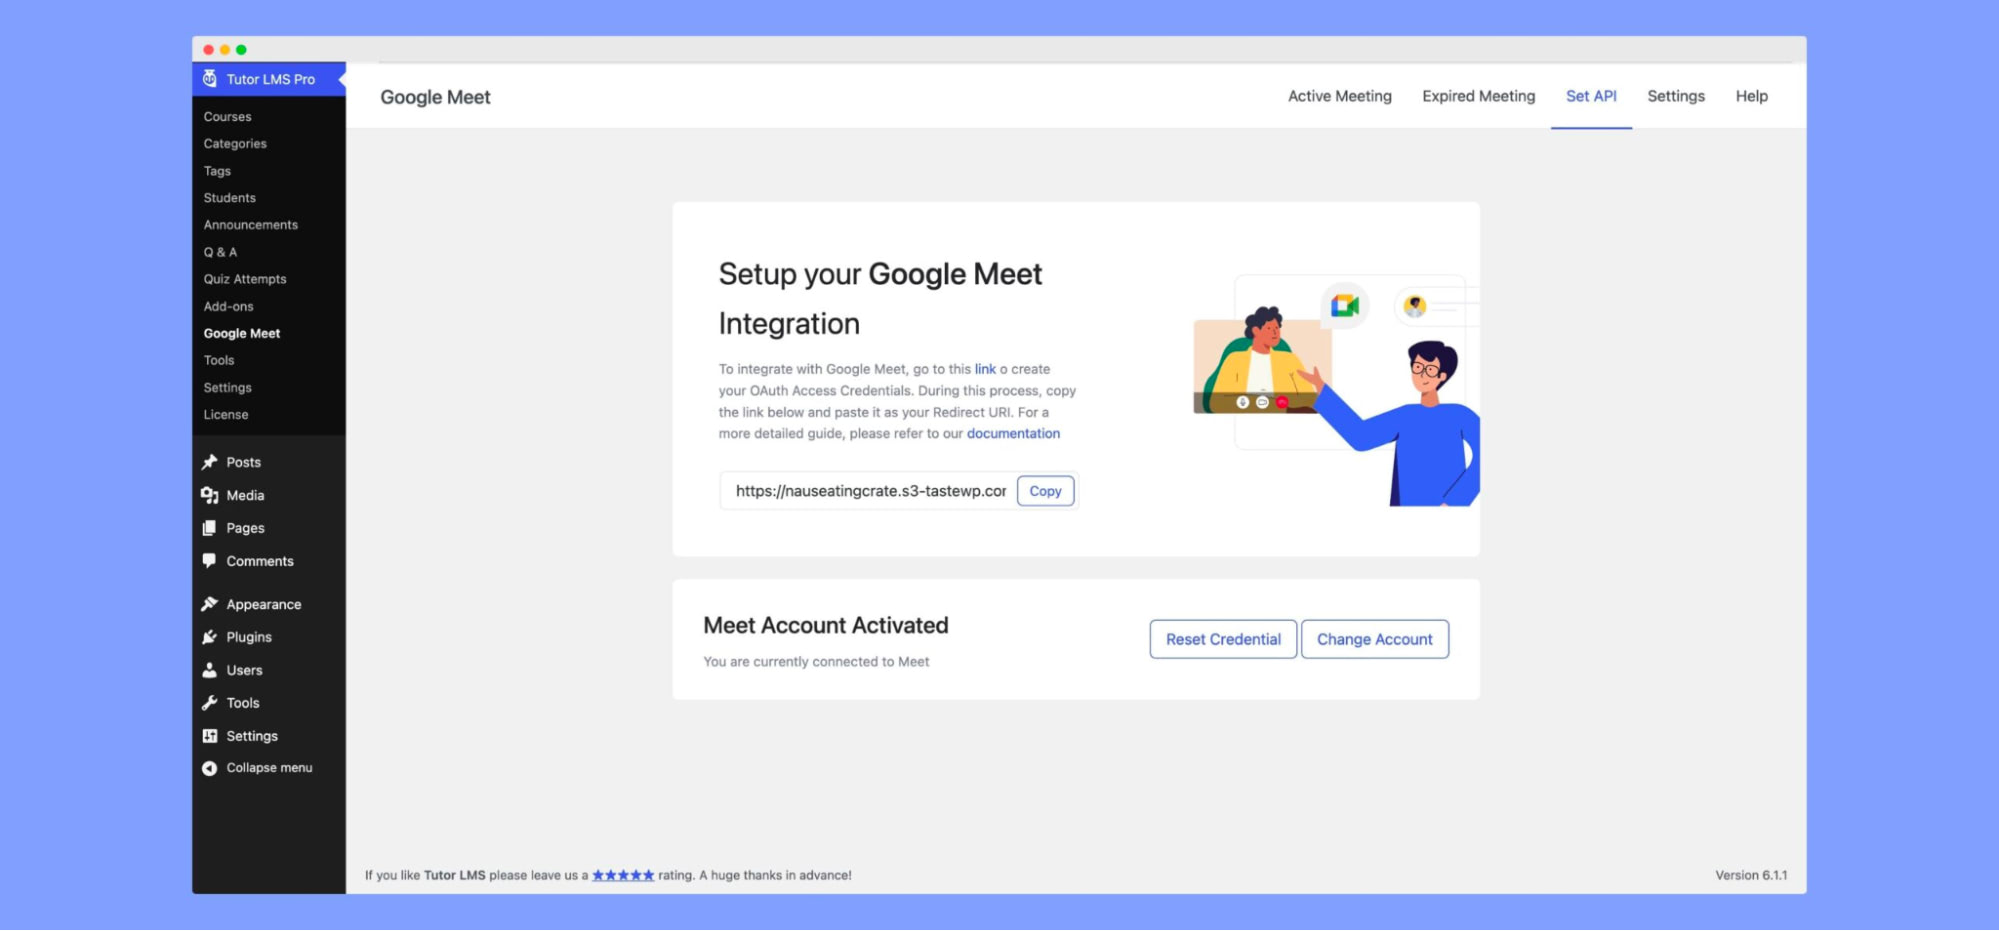
Thats it! You are done with the integration setup. With this integration, you can now create meetings and enjoy a more interactive way of learning. If you wish to change anything and use a different JSON file, click on the “Reset Credentials” button.
Creating and Managing Meetings with Google Meet Integration for Tutor LMS Pro
Now that you’ve mastered the setup process, it’s time to take your online collaboration skills to the next level. In this section, we’ll show you exactly how to create and manage meetings using this powerful tool. So, let’s dive in and discover how you can effortlessly set up and join meetings using Google Meet Integration for Tutor LMS Pro.
How To Create A Meeting
To create a meeting, follow these simple steps:
Option 1: When you’re creating a lesson for a course in Tutor LMS, you can also create a meeting specifically for that lesson. Just head over to the topics section, and you’ll find an option to create a meeting.
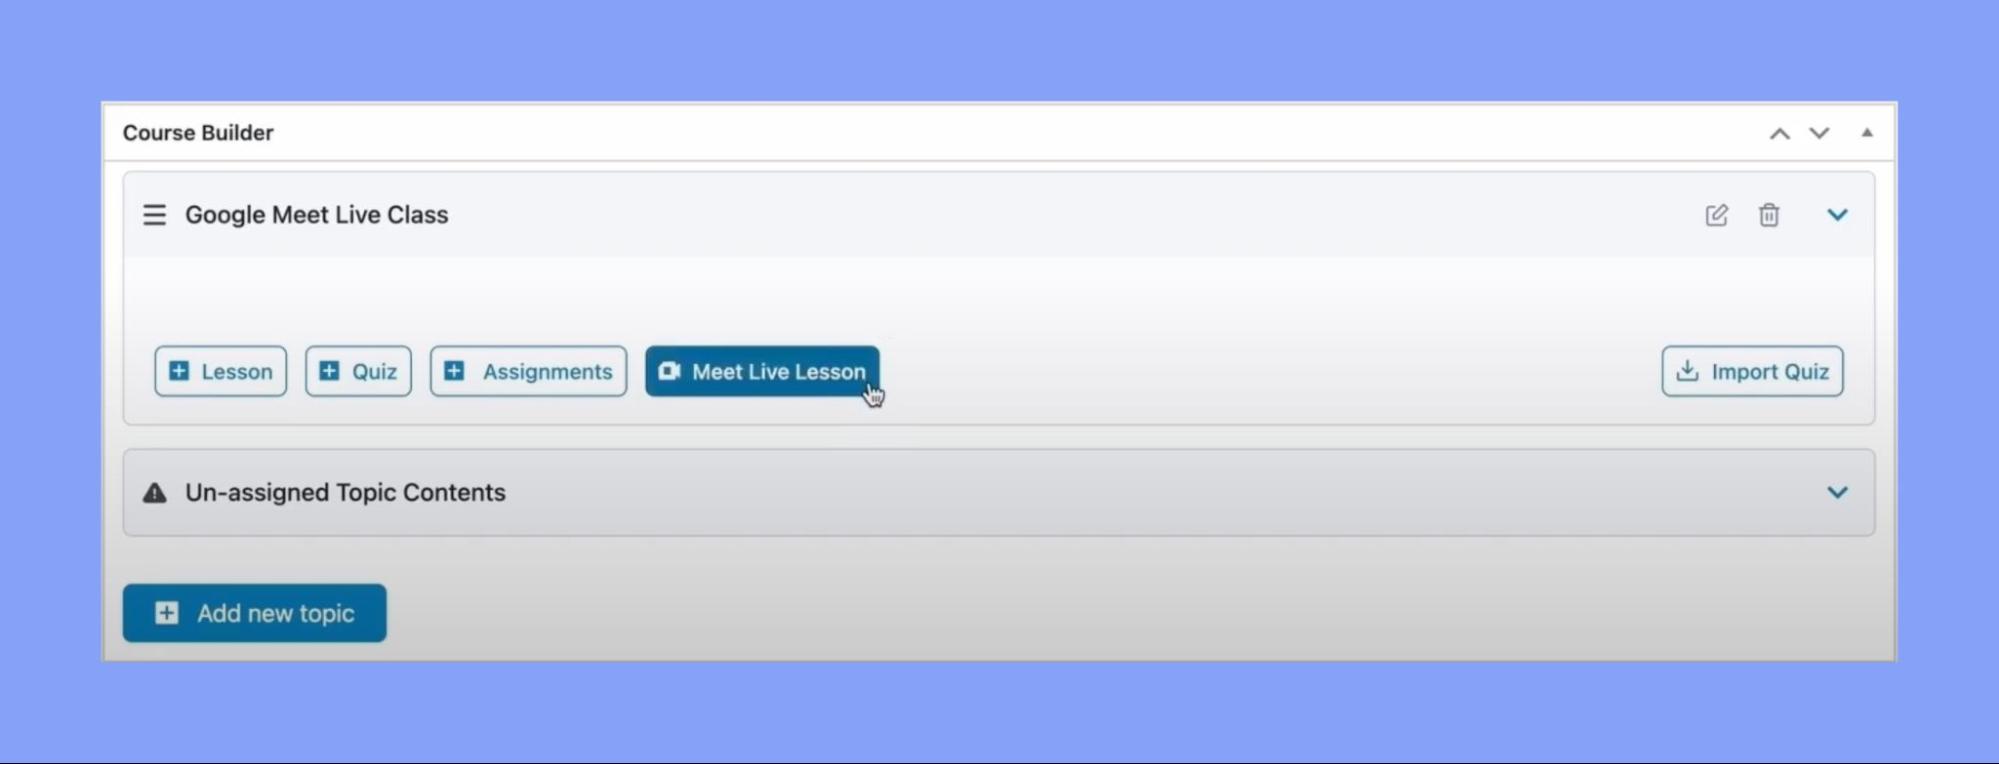
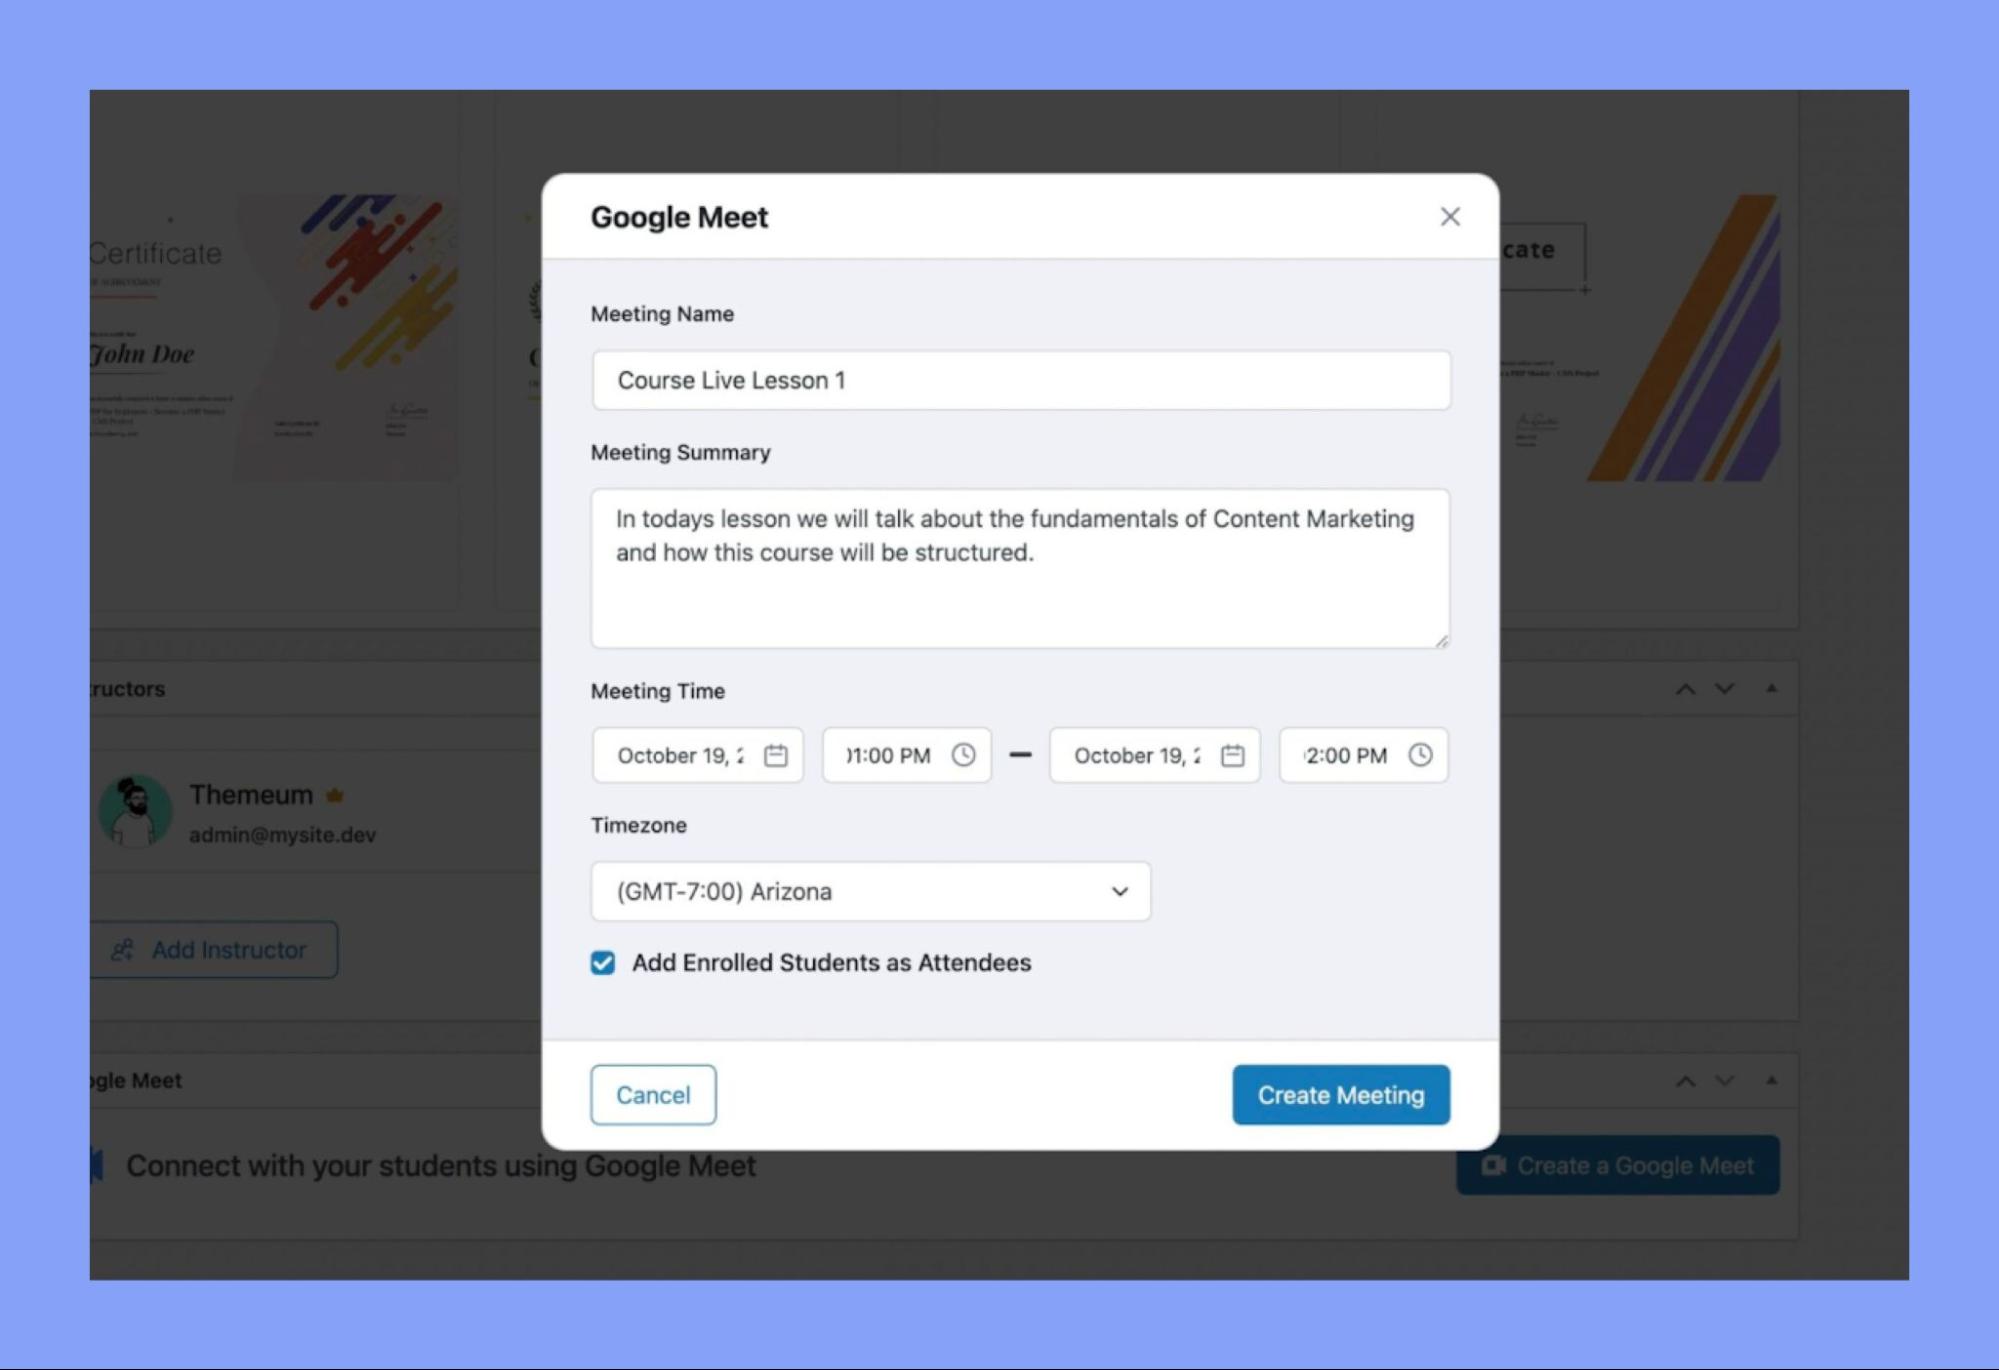
Option 2: Another way to create a meeting is by using the Google Meet section in the Tutor LMS course builder. Just look for the “Create a Google Meet” button, give it a click, and a popup window will appear.

In the popup window, you can customize the details of your meeting. It’s like tailoring the meeting to fit your needs perfectly.
Managing Your Google Meet Integration Settings in a Snap!
Once you’ve created a meeting, it’s important to know how to manage it effectively. Here are some handy tips:
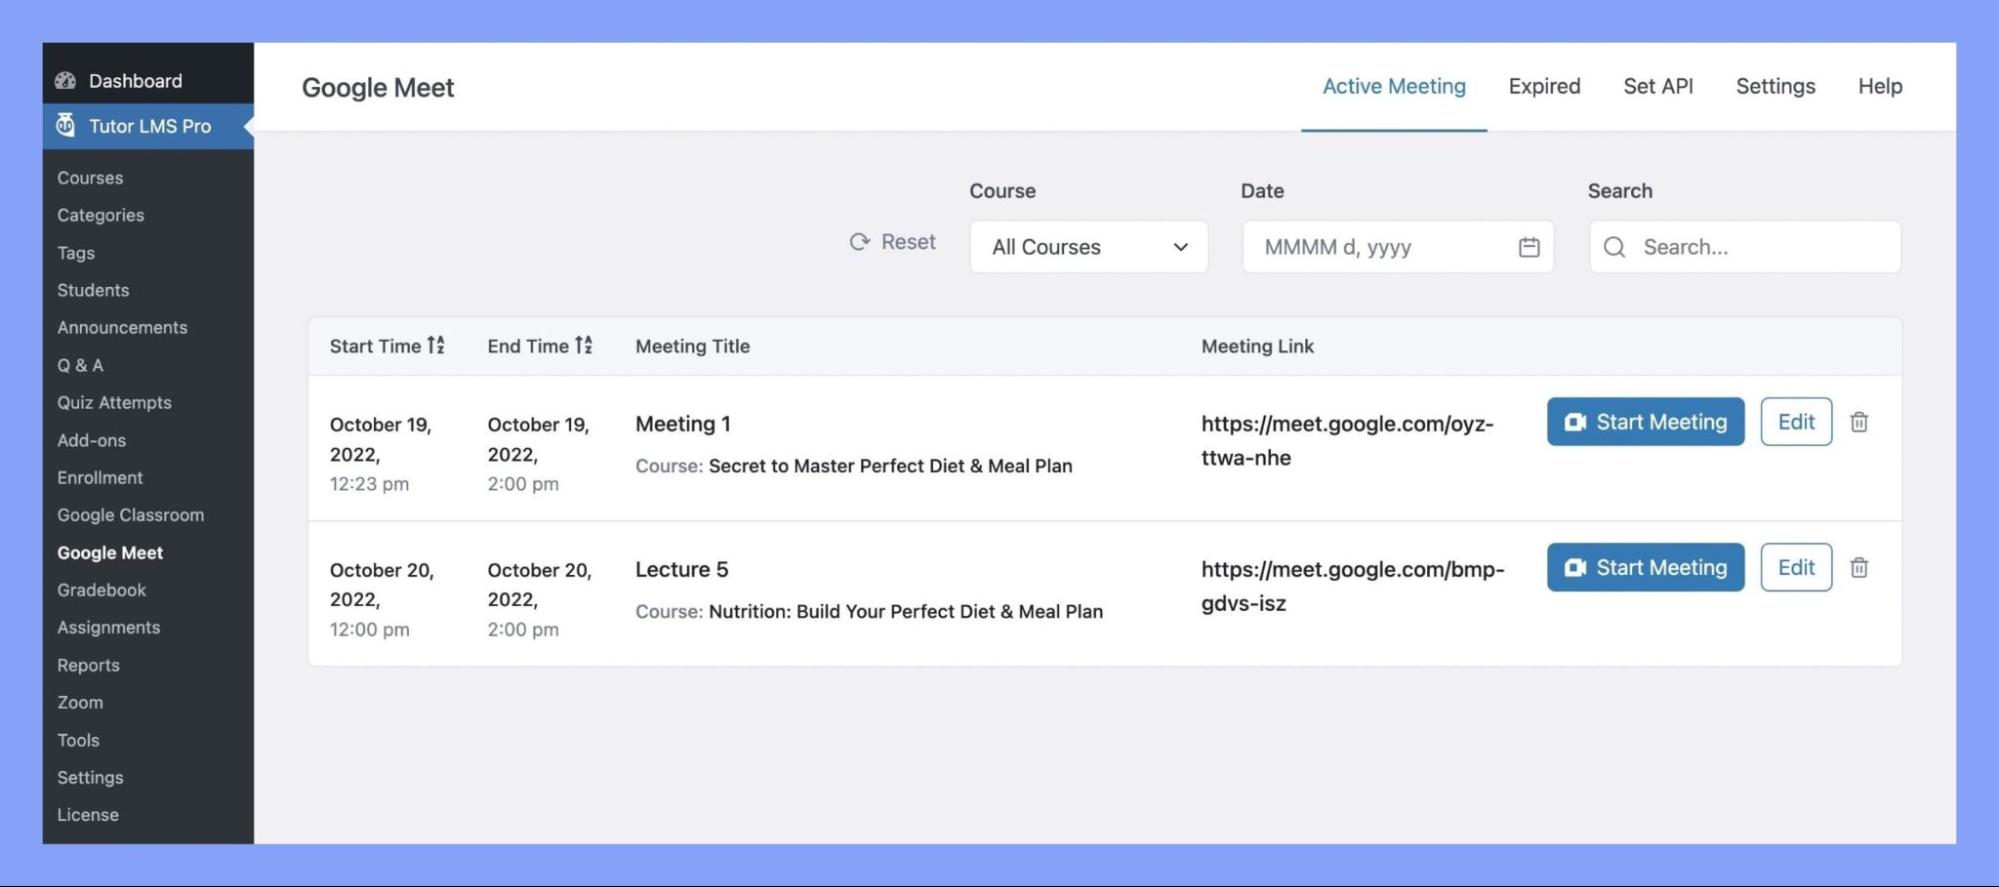
- Keep track of your meetings: By heading over to the Tutor LMS > Google Meet > Active Meetings section, you can see a list of all your active meetings. This makes it easy to stay organized and double-check the details of each meeting.
- Make changes when needed: Accidentally set the wrong date or time for your meeting? No worries! With Tutor LMS, you can easily make changes or edits to your active meetings. Just find the meeting you want to modify, click on it, and make the necessary adjustments.
- Stay on top of notifications: To make sure everyone remembers your meeting and shows up on time, you can set up reminder emails. In the Google Meet Integration settings, you’ll find an option to choose how much time in advance participants should receive a reminder.
- Customize your meeting settings: In the Integration settings, you have the power to personalize various aspects of your meetings. Want your meetings to be automatically set as private or public? You can decide the default status for your events. You can even choose your preferred method of receiving updates about new events, such as through email. It’s like having a customized meeting experience tailored just for you!
Wrapping Up!
Setting up Google Meet integration allows you to seamlessly conduct online classes and meetings through your Tutor LMS Pro platform. With its user-friendly settings and seamless meeting management features, you’ll be able to connect with your peers and teachers like never before. It’s an excellent tool to enrich remote learning experiences. So, don’t hesitate! Embrace the power of Google Meet integration for Tutor LMS and unlock a whole new level of productivity and connection.
We hope you found this article helpful! If you did, we would absolutely love to hear from you. Don’t forget to leave us a comment below, and stay tuned for more exciting articles and tips in the future.
Start Using Tutor LMS Today
Ready to take your online courses to new heights? Download Tutor LMS now and enjoy a journey of eLearning excellence.
