Ever spent hours crafting the perfect online course, only to watch potential students stumble during the enrollment process? It’s frustrating, right? You’ve poured your heart into creating valuable content, but if the enrollment process is a hassle, you could be missing out on eager learners.
A smooth, user-friendly enrollment process is crucial for turning curious visitors into enthusiastic students. After all, according to the Baymard Institute, 70% of shoppers abandon their online carts due to a complex or lengthy checkout process. The same principle applies to online courses. If it takes too much time or effort to sign up, you’ll lose potential students before they even get a taste of your amazing content.
That’s where Tutor LMS comes in. This powerful WordPress learning management system (LMS) plugin not only simplifies course creation but also offers tools to streamline your enrollment process.
In this guide, we’ll walk you through the steps to create an effortless enrollment process that maximizes conversions. By the end, you’ll be armed with the knowledge and tools to make enrolling in your online courses a breeze. Ready to transform your course enrollment from a roadblock to a red carpet? Let’s get started!
Get to Know Your Audience: The Foundation of Effortless Enrollment
Creating a personalized enrollment experience starts with understanding your students. By getting to know their needs and preferences, you can design a process that attracts more learners and keeps them engaged. Here’s how:
- Dive into Student Research: Conduct surveys, focus groups, or one-on-one interviews with current or potential students. Ask about their learning goals, what they look for in an enrollment process and any obstacles they’ve encountered.
- Analyze User Behavior: Track how students navigate your website or enrollment platform. Identify pain points and areas for improvement by seeing where they drop off.
- Create a Student-Centric Experience: Use the insights gathered to design an enrollment process that aligns with your student’s expectations, needs, and preferences. This will lead to increased signups, higher satisfaction, and improved retention.
Now that you have a deeper understanding of your student’s needs, let’s dive into the practical steps of simplifying your enrollment process.
How to Simplify the Enrollment Process
Signing up for an online class should be simple and hassle-free. But a lot of enrollment systems are confusing and frustrating. This can make students quit before even starting the course. To avoid this, you need a straightforward signup process. It should be easy to understand and follow.
The key is creating an enrollment process that is user-friendly. Remove anything complicated that could overwhelm students. Streamline each step so it’s effortless to complete. When the process is clear and simple, students can enroll without obstacles. Here’s how to create user-friendly enrollment so your students don’t get frustrated:
Step 1: Browse and Select a Course (Easy Navigation)
The first step in the enrollment process is browsing and selecting a course. This may seem straightforward, but it can be challenging for students who are unsure which course to take or where to find relevant courses.
The design and layout play a crucial role in creating a user-friendly enrollment experience on your LMS website. With Tutor LMS, you can customize your site’s layout, color scheme, and various other design elements to ensure that your courses are presented in a visually appealing and organized manner.
To get started, navigate to “Tutor LMS>Settings>Design.”
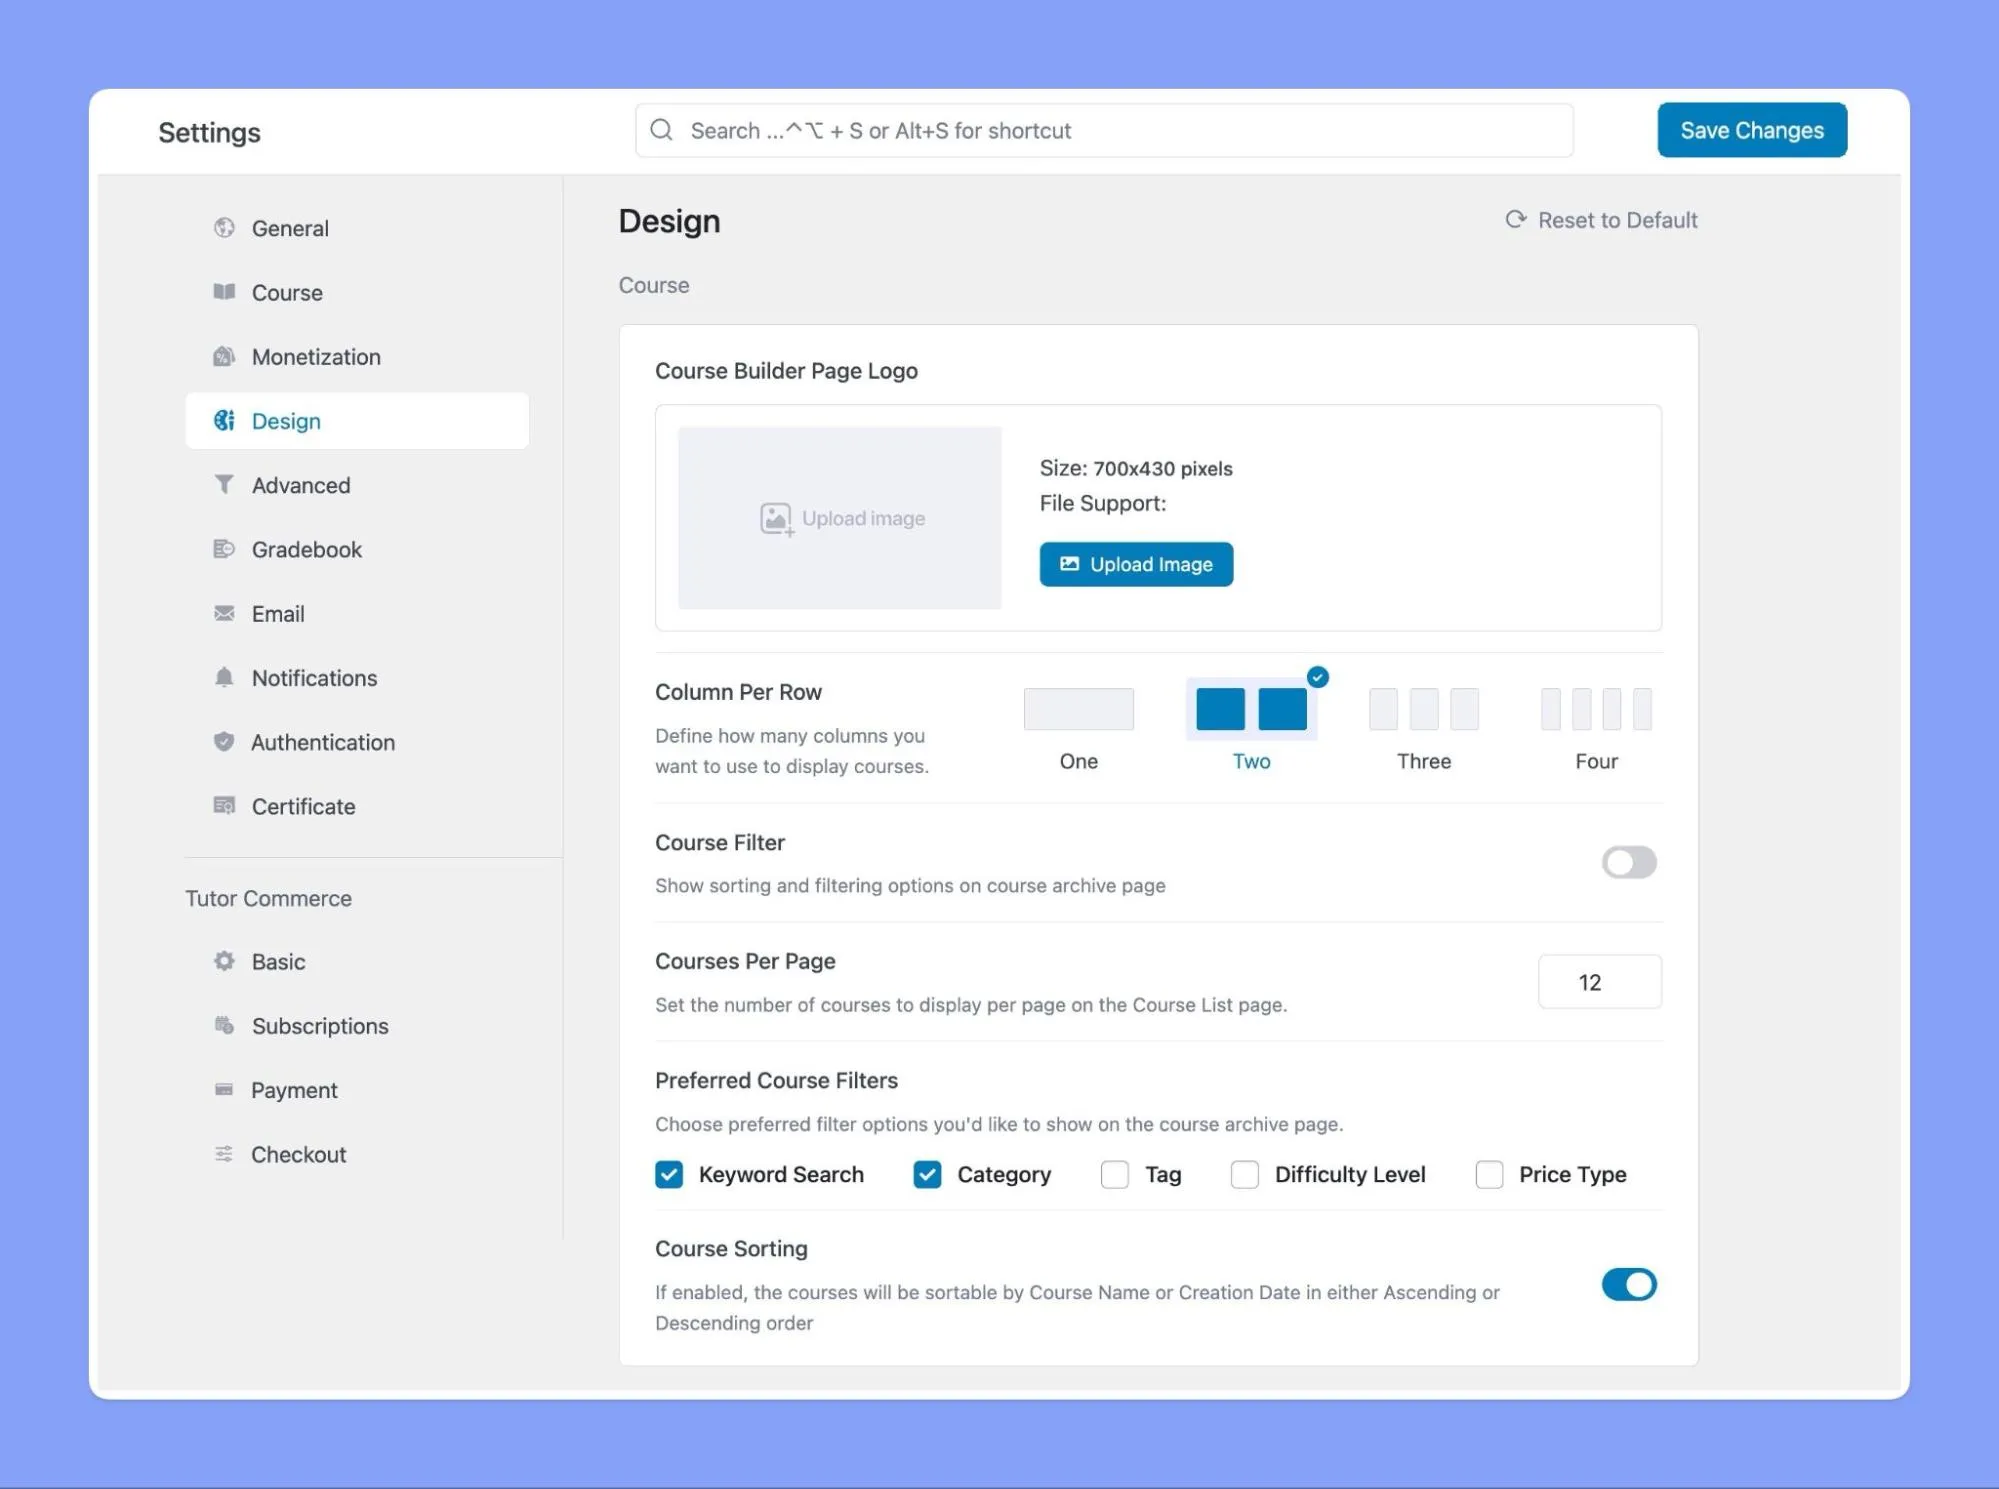
Tutor LMS provides a range of design and layout settings that can help you organize your courses and make it easy for learners to find and select the courses they need. So let’s take a look at settings you can optimize:
- Column Per Row: One of the key design settings is the “Column Per Row” option. You can specify how many columns to display courses on the Course Archive Page. This makes it easier for learners to quickly scan and find the courses they need.
- Course Filter: Another important design setting is the “Course Filter” option, which allows you to show sorting and filtering options on the “Course Archive Page”. This can help learners narrow down their search and find the courses they need based on specific criteria, such as Category, Difficulty level, Keyword, Tag, and Price.
- Other Tweaks: In addition to the design settings already mentioned, Tutor LMS has other ways to customize your site’s look and feel. You can tweak the layouts for your course pages, teacher profiles, and student profiles. And to cater to a global audience, Tutor LMS integrates with WPML for multilingual websites, making your courses accessible to learners in their preferred language.
Choosing the right layouts and designs can make your site more engaging and easier to use for students. This helps guide them to find and select the perfect courses.
Some other customization ideas:
- Make your course pages visually appealing with banners, videos, and graphics. Keep things well-organized.
- Teacher profiles should highlight qualifications, and teaching methods to help match students.
- Allow course previews so students can try before enrolling.
Take advantage of Tutor LMS customization to create a personalized, user-friendly site. This makes the enrollment process smooth for learners.
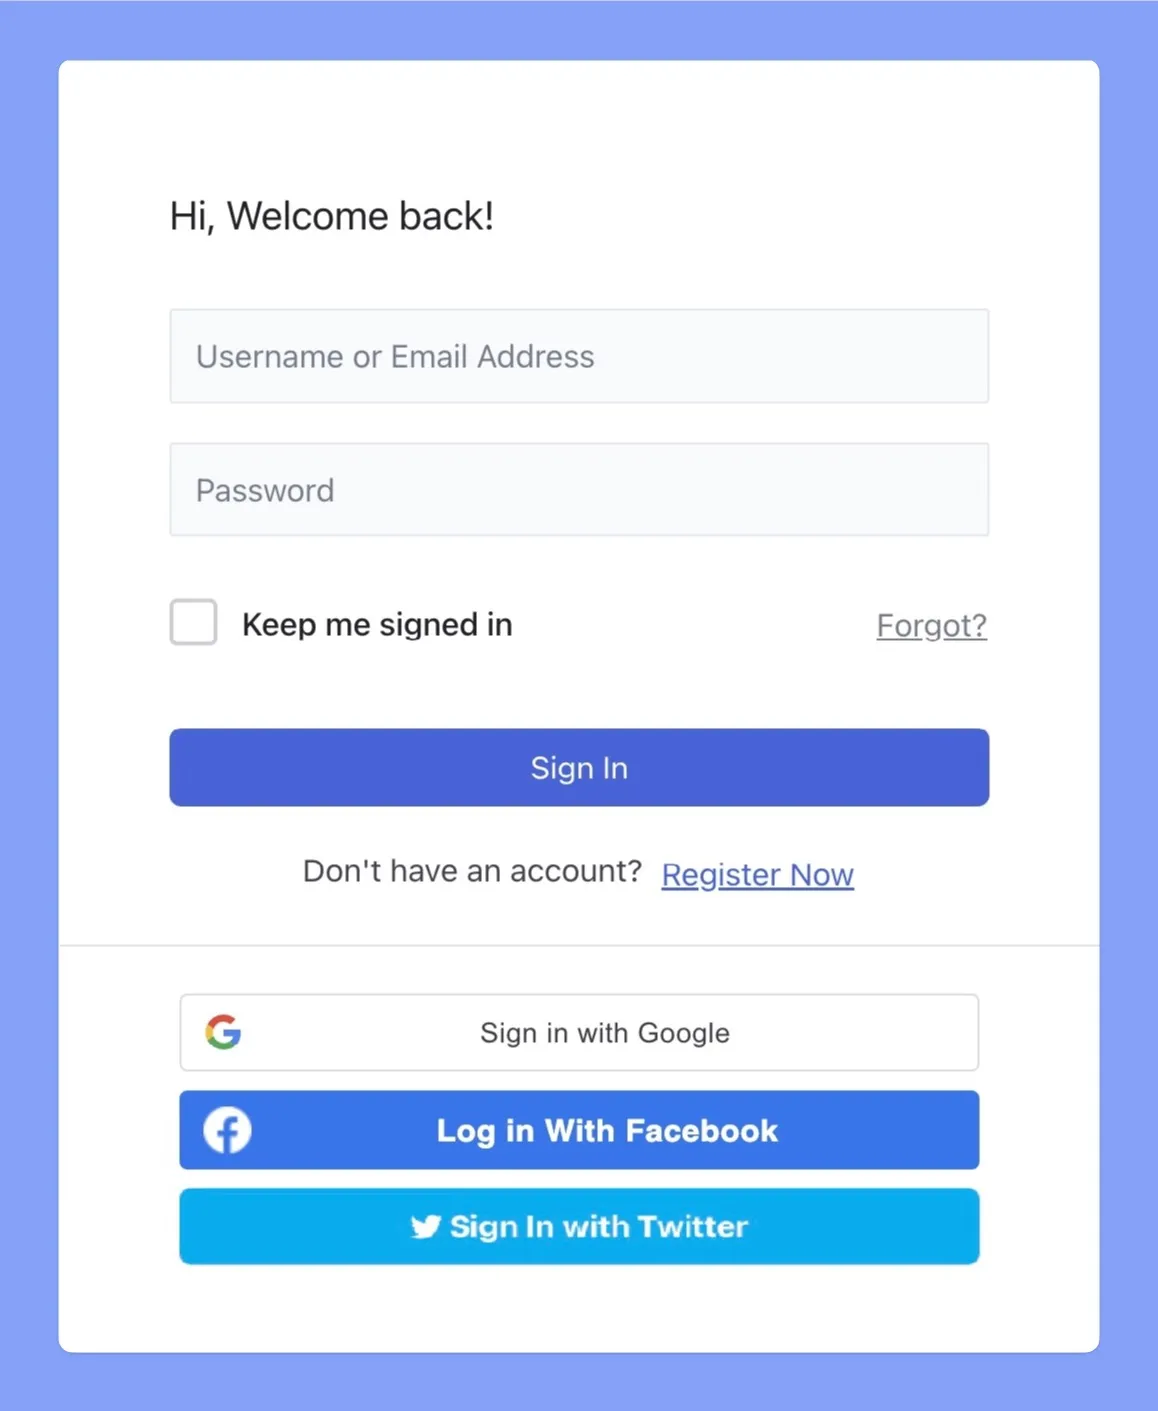
Step 2: Create an Account or Sign In (Hassle-Free Registration)
After selecting a course, students need to make a new account or sign in if they have one already. This step can be frustrating if the registration process is lengthy or if students have trouble remembering their login credentials.
To make it easier:
- Offer social media login options like Facebook or Google. No new passwords to remember!
- Only ask for essential info on the registration form.
- Allow password resets right on the login page. Don’t make students hunt for the option.
- Send confirmation emails with login details and clear next steps to help students stay on track.
- Consider using Single Sign-On if linking multiple systems.
- Ensure your login page is mobile-friendly. Many students enroll on phones.
- Enable guest checkout to let students enroll without creating an account, reducing friction in the process.
Smooth, simple account creation is key. Avoid registration roadblocks that discourage learners from signing up.
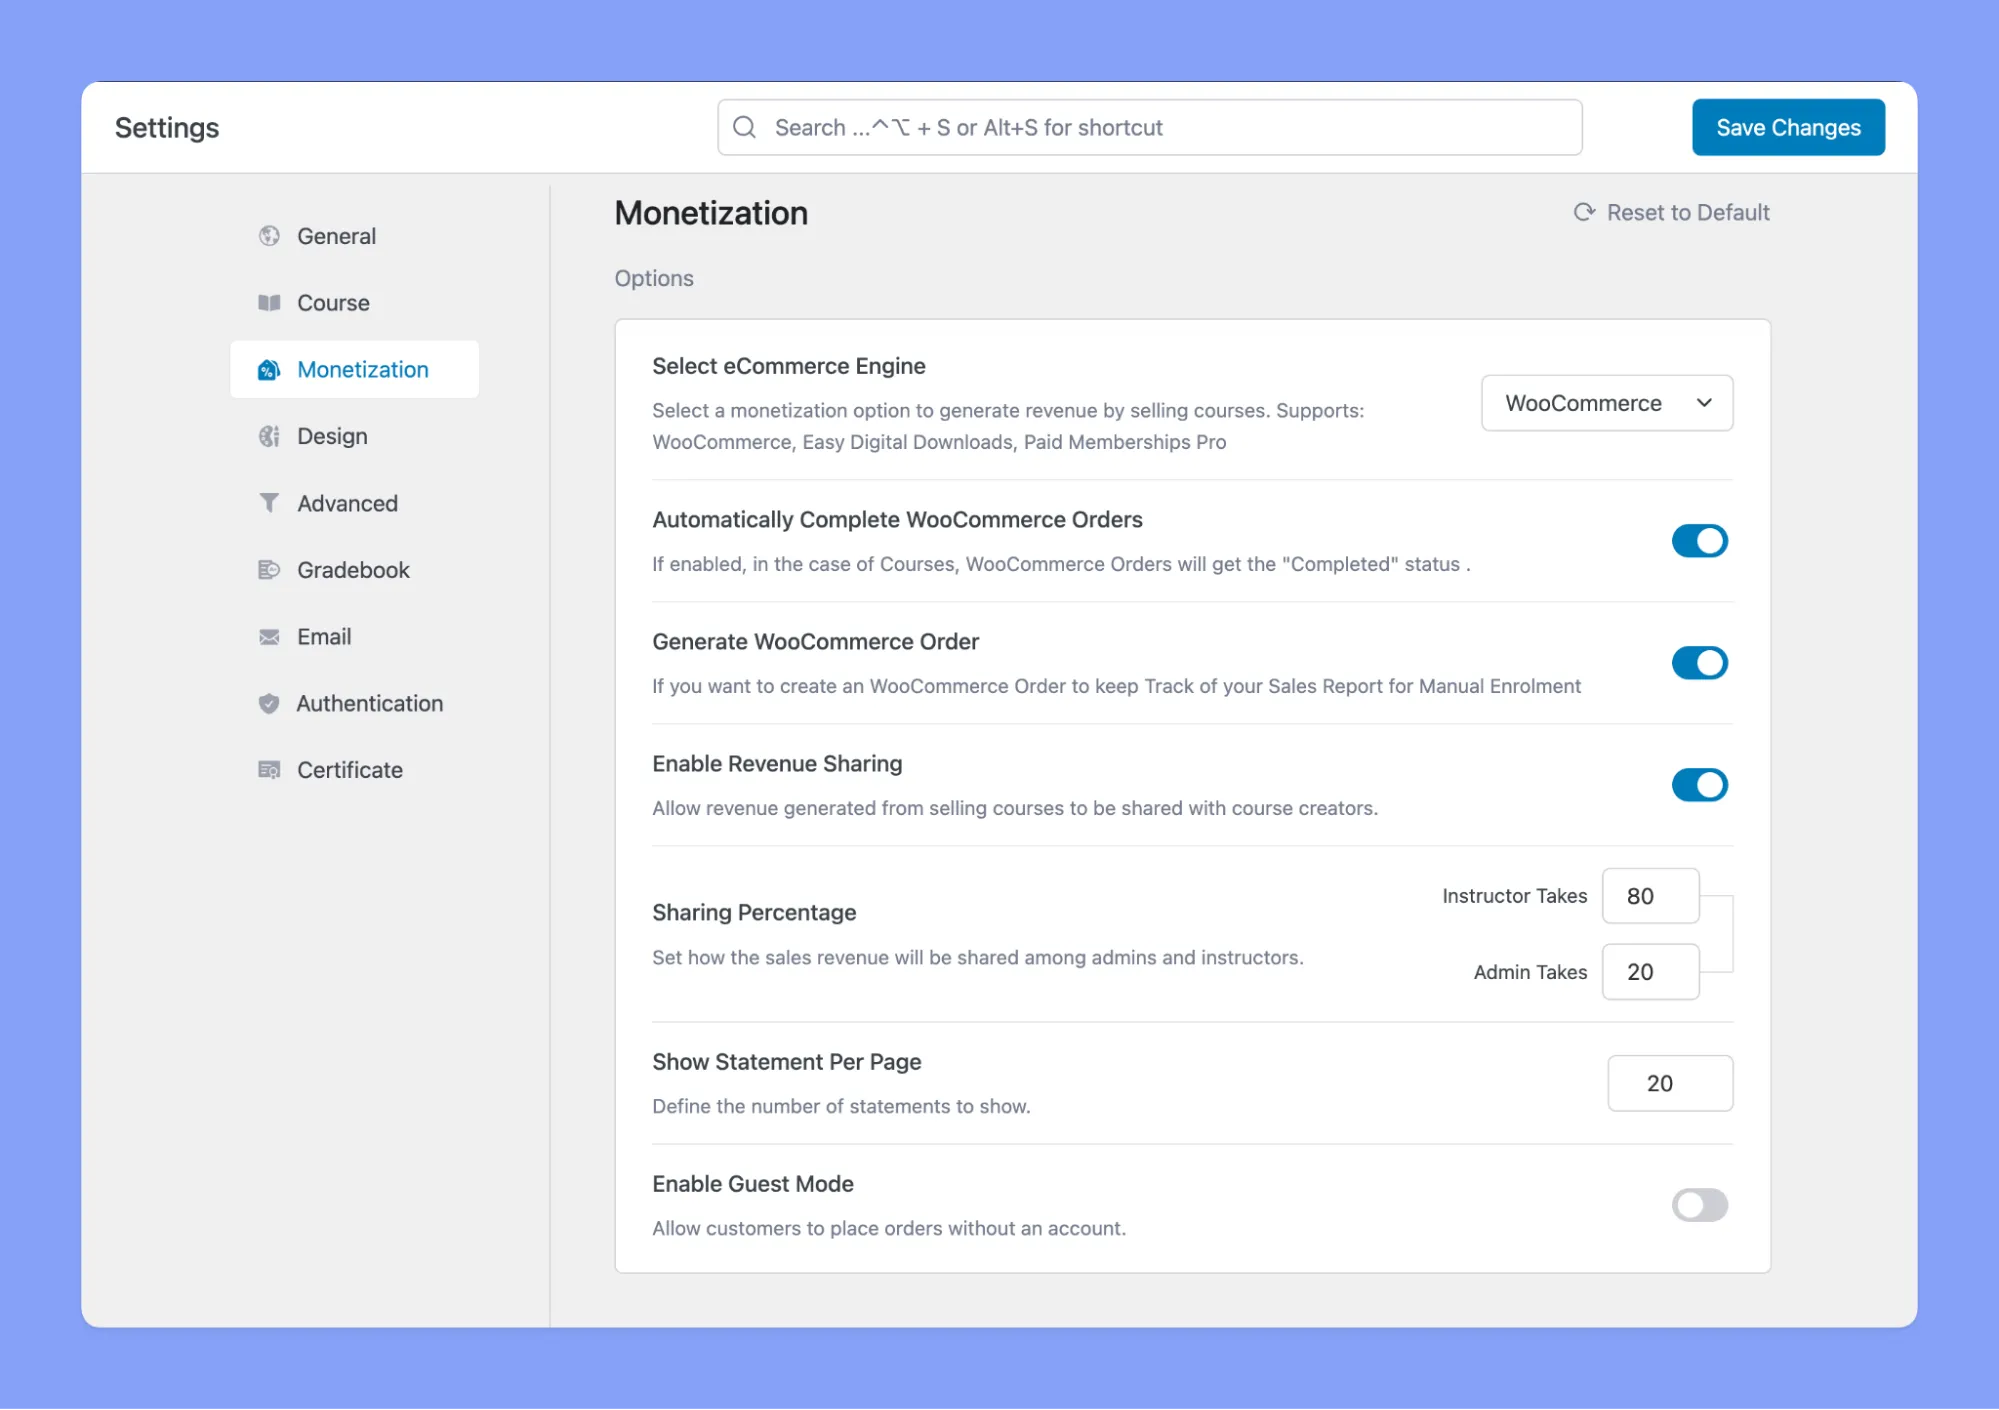
Step 3: Enter Payment Info (Secure and Convenient)
For paid courses, students need to provide payment details to finish enrolling. This can worry some students if they’re concerned about security or accessibility.
Entering payment info can be sensitive. Minimize stress by ensuring affordability, security, and support. Remove financial roadblocks to keep enrollment numbers high.
To make the payment process smooth:
- Offer multiple payment options – credit card, PayPal, etc. Provide flexibility.
- Use a secure, trustworthy payment system to ensure student info is safe.
- Consider payment plans or financial aid to make courses accessible.
- Send payment confirmations and receipts to keep students informed.
Tutor LMS shines here, offering a simple payment system that builds student confidence. It seamlessly integrates with popular eCommerce platforms like WooCommerce and others, ensuring smoother, more secure transactions.
Step 4: Access the course (Instant Gratification)
After completing the enrollment process, students should be able to access their courses immediately. However, this step can be challenging if students are not familiar with the learning management system or have trouble finding the course materials.
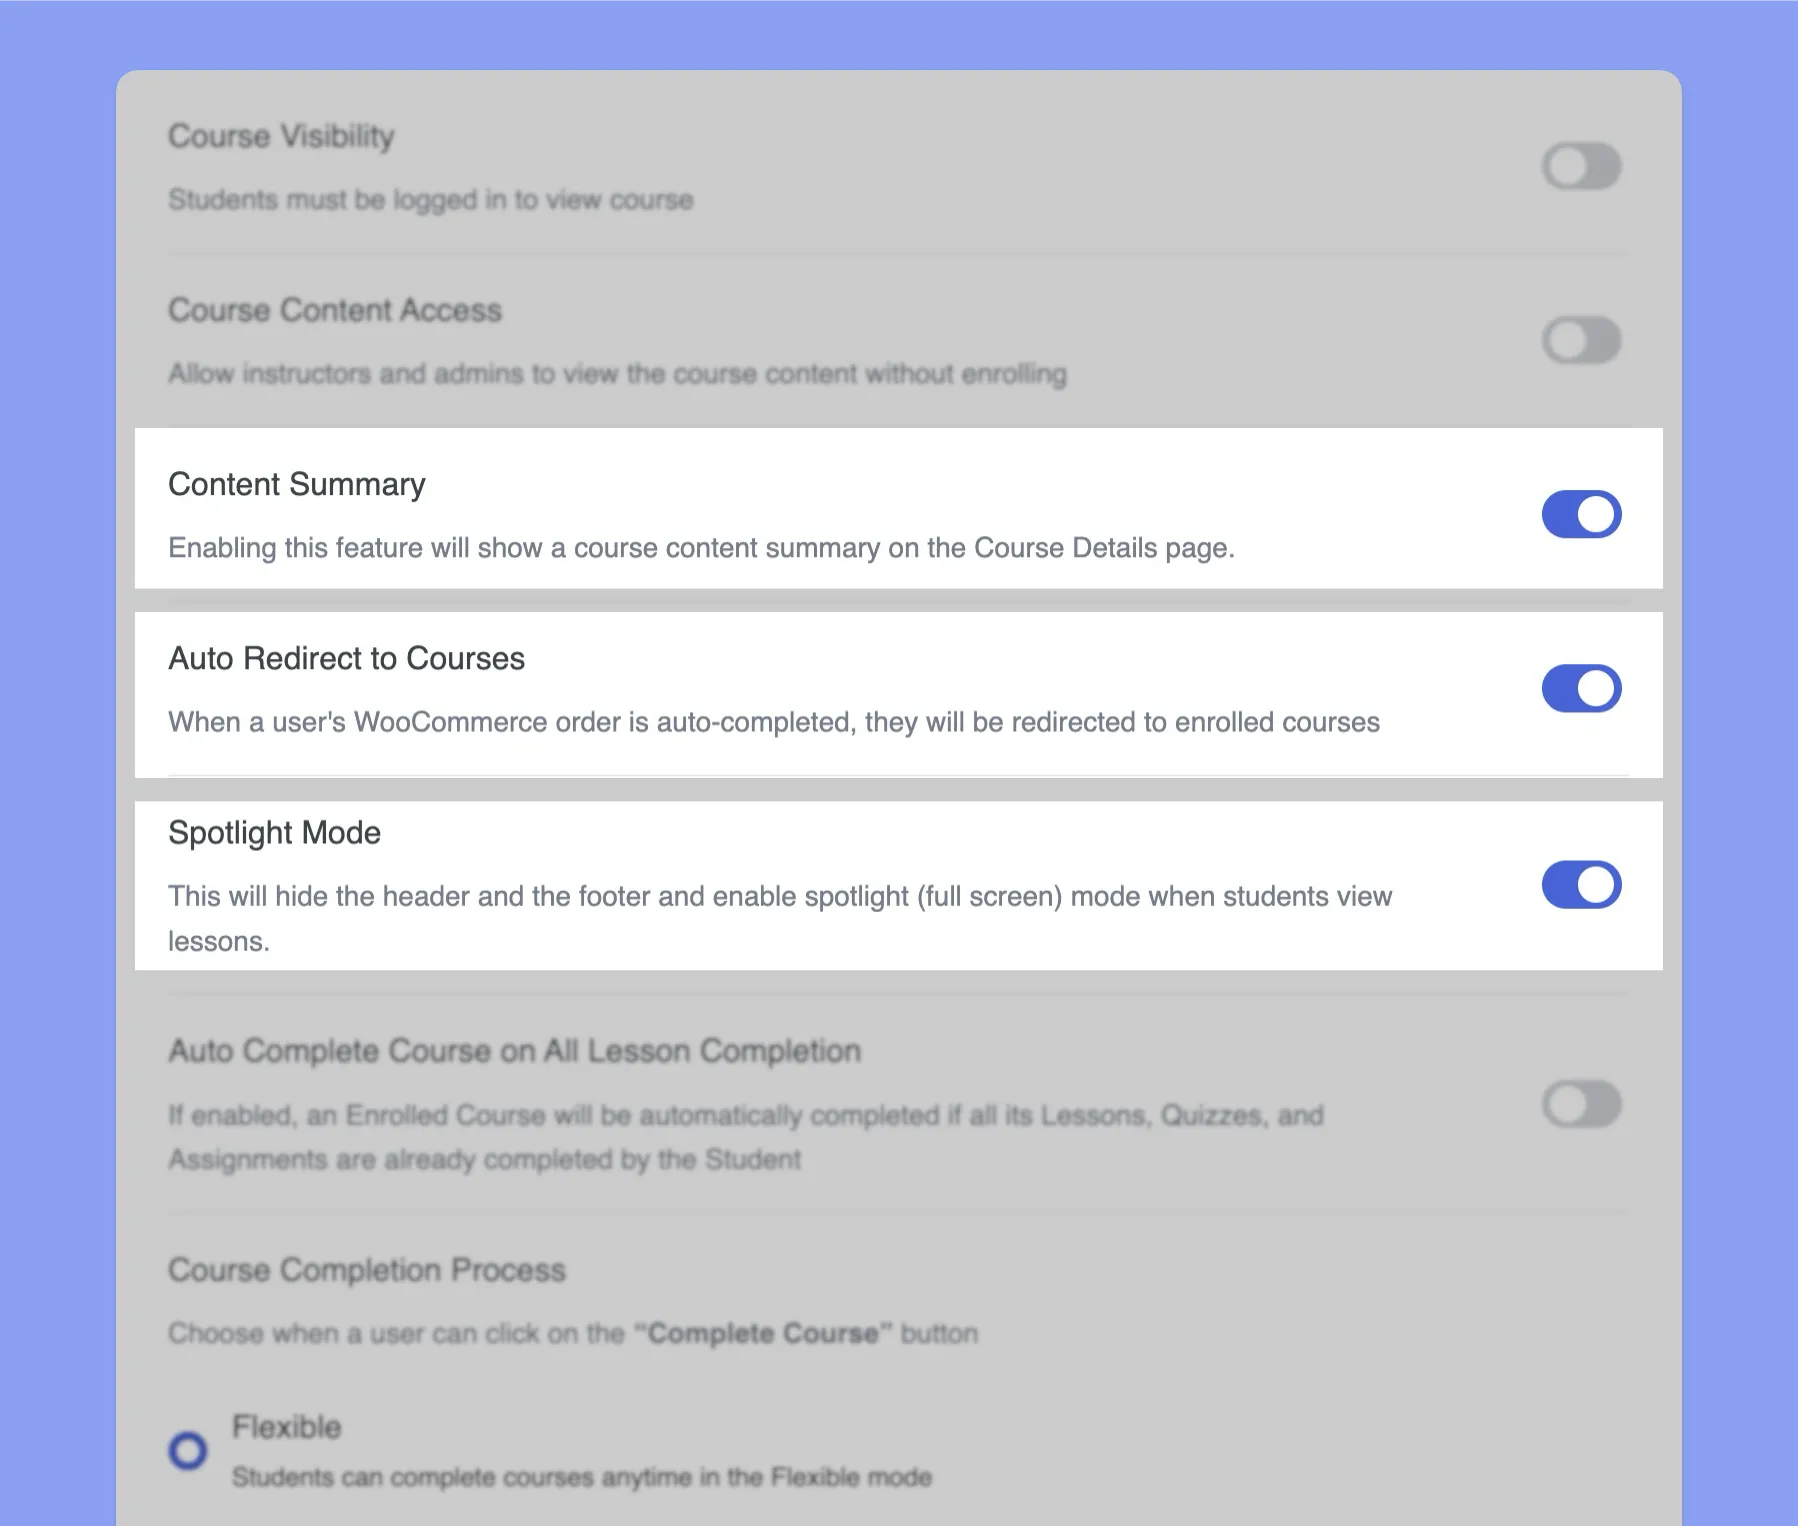
With Tutor LMS, there’s no waiting around! After enrollment, your students get instant access to their course. Here’s how Tutor LMS makes it easy for them to dive in:
- Content Summary: Don’t overwhelm new students with too much info. They’ll see a helpful course summary first, with an option to “Read More” if they want the full details.
- Auto Redirect: No more searching! As soon as they finish payment, students are automatically taken straight to their course.
- Spotlight Mode: Let students focus on learning, not distractions. This mode hides the website header and footer, giving them a clean, full-screen view of the course content.
Other ideas to also consider:
- Include direct course links in enrollment confirmation emails.
- Show step-by-step instructions for navigating the LMS.
- Enable course sampling before enrolling so students know what to expect.
- Check course pages for broken links or missing materials.
Addressing Additional Pain Points
Even though you’ve taken steps to create an efficient enrollment process, it’s possible that students might still encounter some bumps in the road. From unclear instructions to pesky pop-ups, there are a variety of pain points that could hamper the process. But don’t fret! Here are some additional tips to make your enrollment process even more user-friendly:
- First, slim down your forms to the essentials. Too many fields can be overwhelming and confusing.
- Second, keep your language crystal clear and to the point. Avoid using jargon or complex terminology that could confuse potential students.
- Third, consider providing visual aids or examples to help clarify any tricky steps in the process.
- And lastly, cut out any unnecessary distractions that could derail your students from completing the enrollment process, such as annoying pop-ups or advertisements.
By taking these suggestions on board and streamlining your enrollment process, you’ll create a more student-centric experience. This will make it simple for learners to quickly and effortlessly enroll in your top-notch Tutor LMS courses.
The End
And that wraps up our guide to creating a smooth, frustration-free enrollment process with Tutor LMS! The key takeaways are to focus on understanding your students’ needs, customize your site for an optimal user experience, and streamline each enrollment step. By following this student-centered approach, you can boost enrollment rates, satisfaction, and course completion. Students will feel engaged and excited to start learning from the moment they sign up.
We hope these tips help you develop an enrollment process that works for your learners. Remember to continually gather feedback and fine-tune things as needed. Keep it effortless, and enrollment will happen naturally.
Let us know if you have any other questions! We’re always happy to help fellow educators succeed with Tutor LMS. Now go empower your students to learn without limits or hurdles.

Start Using Tutor LMS Today
Ready to take your online courses to new heights? Download Tutor LMS now and enjoy a journey of eLearning excellence.