Incorporating membership features into a website offers various advantages. When you limit access to your website through membership, you can create content that’s only available to members. It’ll give you more control over your content. This approach also allows you to attract valuable leads for your quality content. So, if you charge a subscription fee, it’ll generate a handsome revenue.
But then again you have to face the hard-knock challenge of audience retention. To maintain engagement, you need to consistently come up with special plans and exclusive offers. If you’re interested in expanding the diversity of your membership site and making it a profitable venture, you might find success by incorporating eLearning. If you’re unsure about how to proceed and manage your LMS site, there’s no need to worry. Today, we’re here to explain how you can seamlessly integrate an LMS into your membership site.
So without further ado, let’s jump into today’s article below:
Checklist of a Complete LMS Platform
If you’re serious about bringing the best outcome then you should bring systematic, interactive, and user-friendly features to your platform. Let’s have a sneak peek of a regular feature of an LMS website below:
- Student enrolment
- Creating courses
- Quizzes
- Assignments
- Live online classes
- Monetization
- Gradebook
- Gamification
- Certification
- And a top-notch plan
Now, let’s have a look at the detailed process of setting up LMS on your website:
How to Create an eLearning Website & Add Membership Access
Okay, first things first. eLearning has already turned into a profitable sector. If you’ve decided to dip your feet in this area without starting from scratch, we would suggest you try Tutor LMS. From creating courses to tracking student progress, and presenting certificates, it contains everything in a nutshell. And the best part? It doesn’t require you to apply any coding, and even a beginner in WordPress can create, and run the full operation without a hitch.
Step 1: Install Tutor LMS
Installing the Free Version

This would be the first step in creating your LMS website. To begin the process you need to install Tutor LMS first. For this, go to your WordPress site Dashboard and search Tutor LMS. Then install the Tutor LMS plugin and activate it.
Installing the Pro version

To get the pro version of Tutor LMS, visit the Themeum product page. Then purchase the Tutor LMS pro plugin. Once you have purchased the plugin, you can download it from the Download page. Download the Tutor LMS Pro zip file and follow the instruction below.
- Go to your WordPress site Dashboard
- Navigate to Plugins > Add New
- On the top, right beside the “Add Plugins” you’ll see an “Upload Plugin” button, click on it.
- Upload the Tutor LMS Pro plugin and update it.
Step 2. Add Online Courses

When you are done with the installation part, it’s time to add online courses. For this, go back to Tutor LMS, select Courses, and Add New. After this, give a title to your course to the Add Title section and upload course material in the paragraph. At the end of the paragraph section, you’ll see the Course Setting feature.
Complete the procedure as per your requirements. Also, you can define the set of prerequisites that students need to complete before enrolling in your course. For the best result, we would recommend you to take help from Tutor LMS course builder which makes everything super handy for you with its drag & drop feature. You can check the Tutor LMS Demo to know more!
Step 4. You can Monetize Your Courses
This is where your previous experience in running a membership site will come in handy. Since you’re already an expert in creating and maintaining a membership website, you should be familiar with the ins and outs. To see the in-depth monetization integration in Tutor LMS check the tutorial here.
There are 4 eCommerce engine options in Tutor LMS that allow you to do membership models:
- EDD
- Paid Membership Pro
- WooCommerce Subscriptions
- Restrict Content Pro
WooCommerce integration
WooCommerce is a widely used payment platform. As a secure and user-friendly means, it has been accepted worldwide among its users. Also, you can integrate multiple payment gateways along with it seamlessly.
Easy Digital Downloads (EDD)
If you do not prefer to implement WooCommerce payment along with your course you can try Easy Digital Downloads (EDD). With its different extensions and integrations, it lets you collect credit card payments, handle recurring transactions, take advantage of affiliates, etc.
Paid Membership Pro
Paid Memberships Pro lets you enable membership and subscription options along with advanced payment setting features. You can follow our Paid Membership Pro documentation to learn more about this integration.
Restrict Content Pro
Restrict Content Pro is a great option for any membership site with all supporting features. Enabling this you can restrict content exclusively to paid-up users of your website.Also, with multiple payment gateways, subscription options, and detailed reporting it manages everything seamlessly.
Step 5. Set The Access Plan
Setting an access plan will enable you to manage your platform in an organized manner while keeping everything under control. Today, we will be showing you the setting access plan using the Paid Membership Pro plugin.
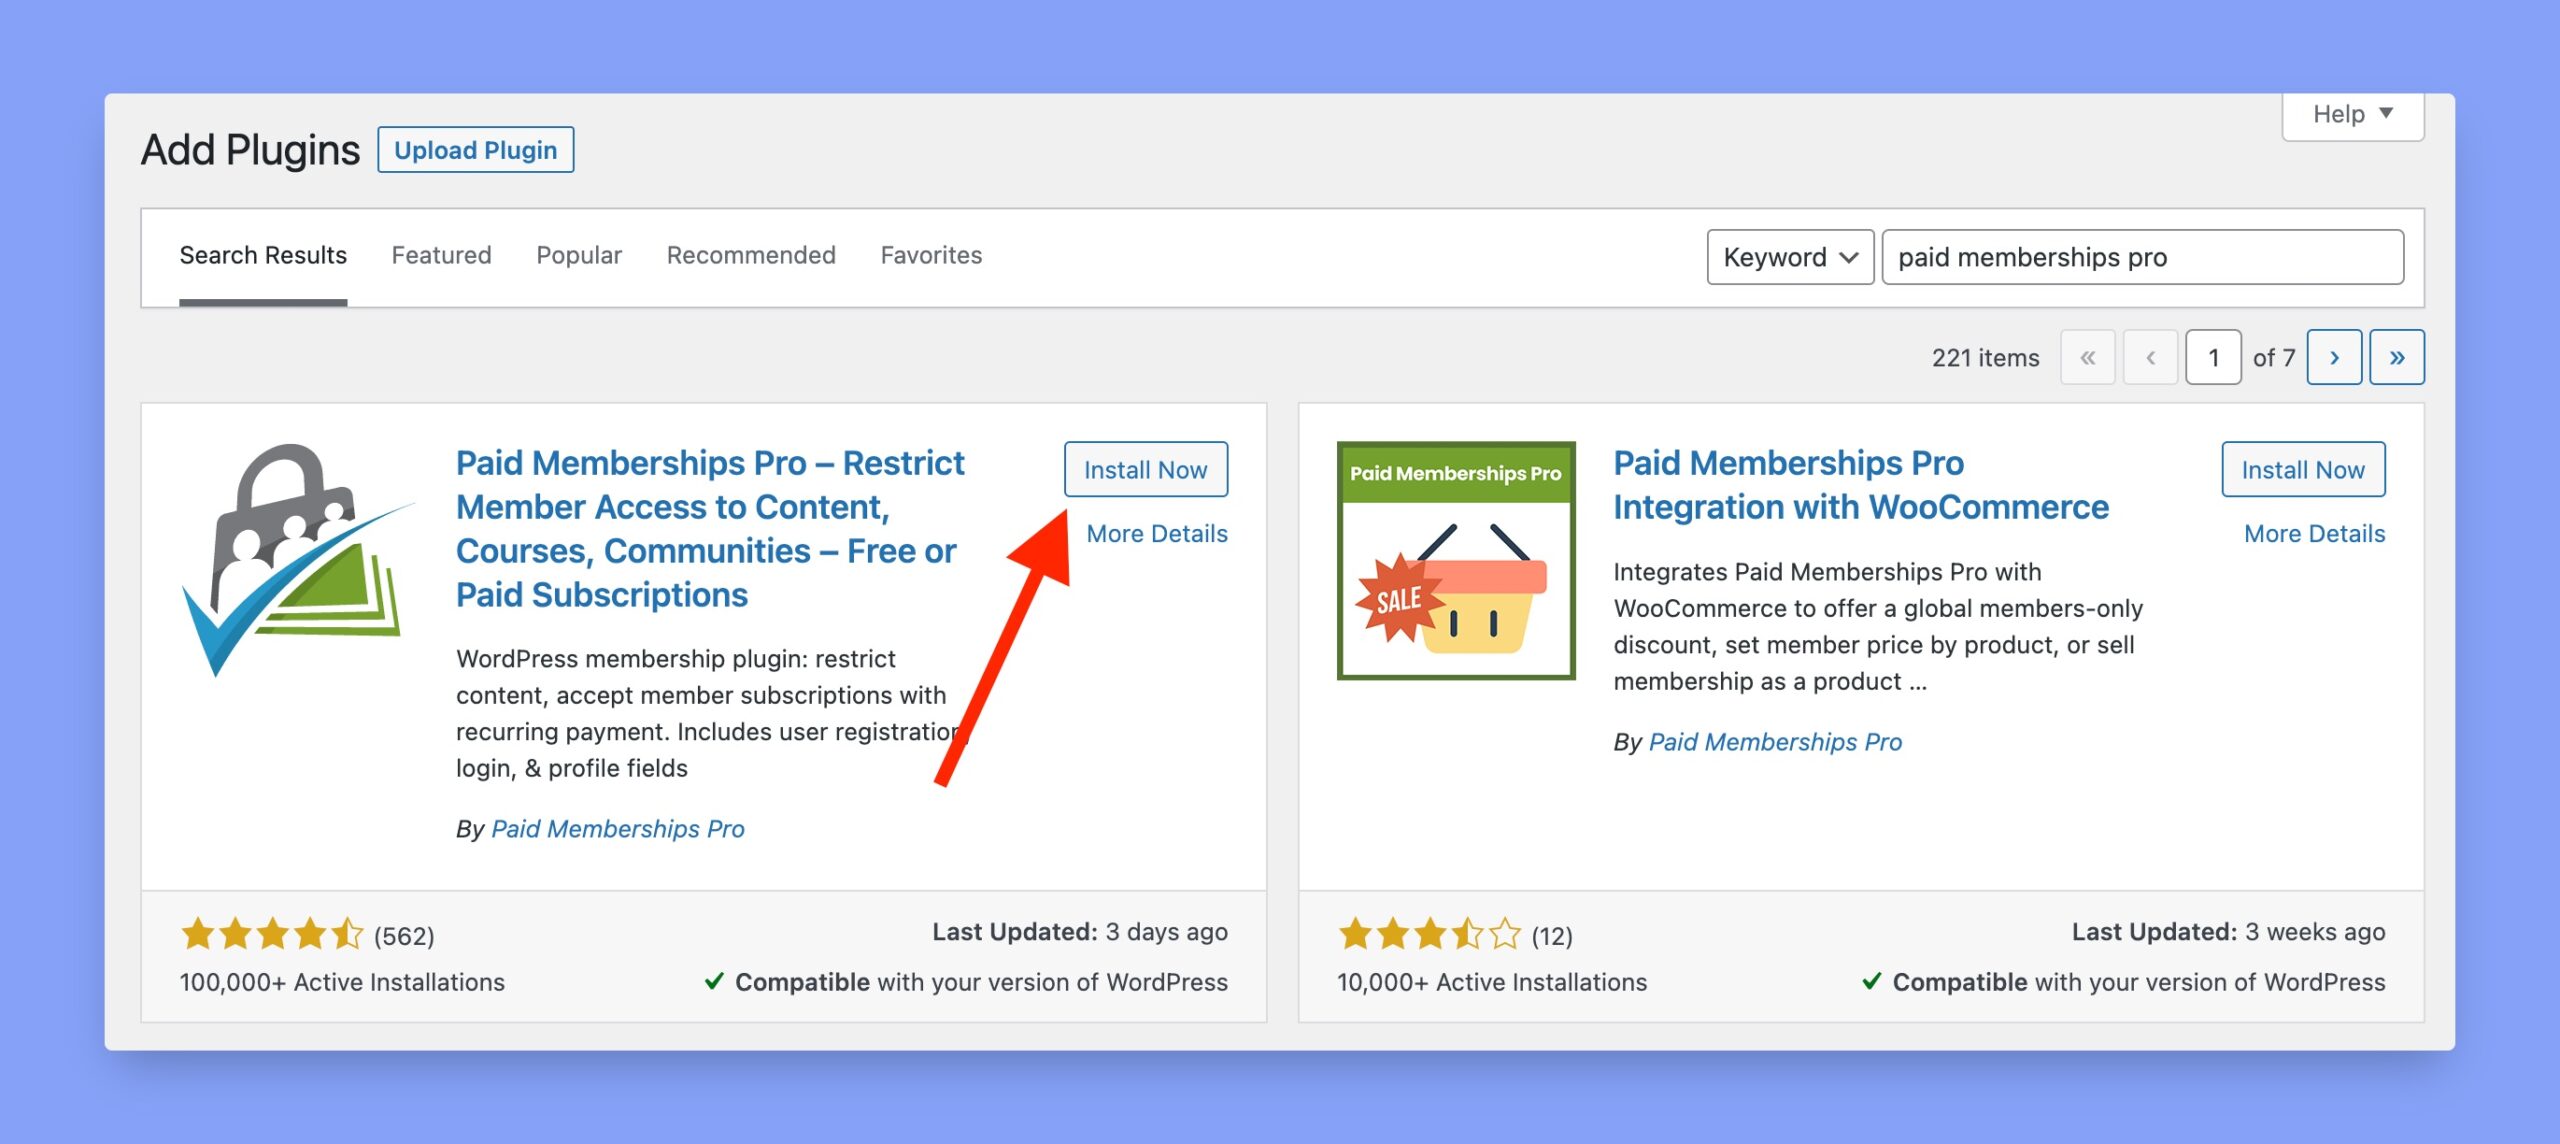
To begin the process, navigate to the plugin section from your Dashboard. When the new page appears, type Paid Membership Pro in the search field and hit enter. You’ll see the plugin in the search results. Now install and activate the plugin.
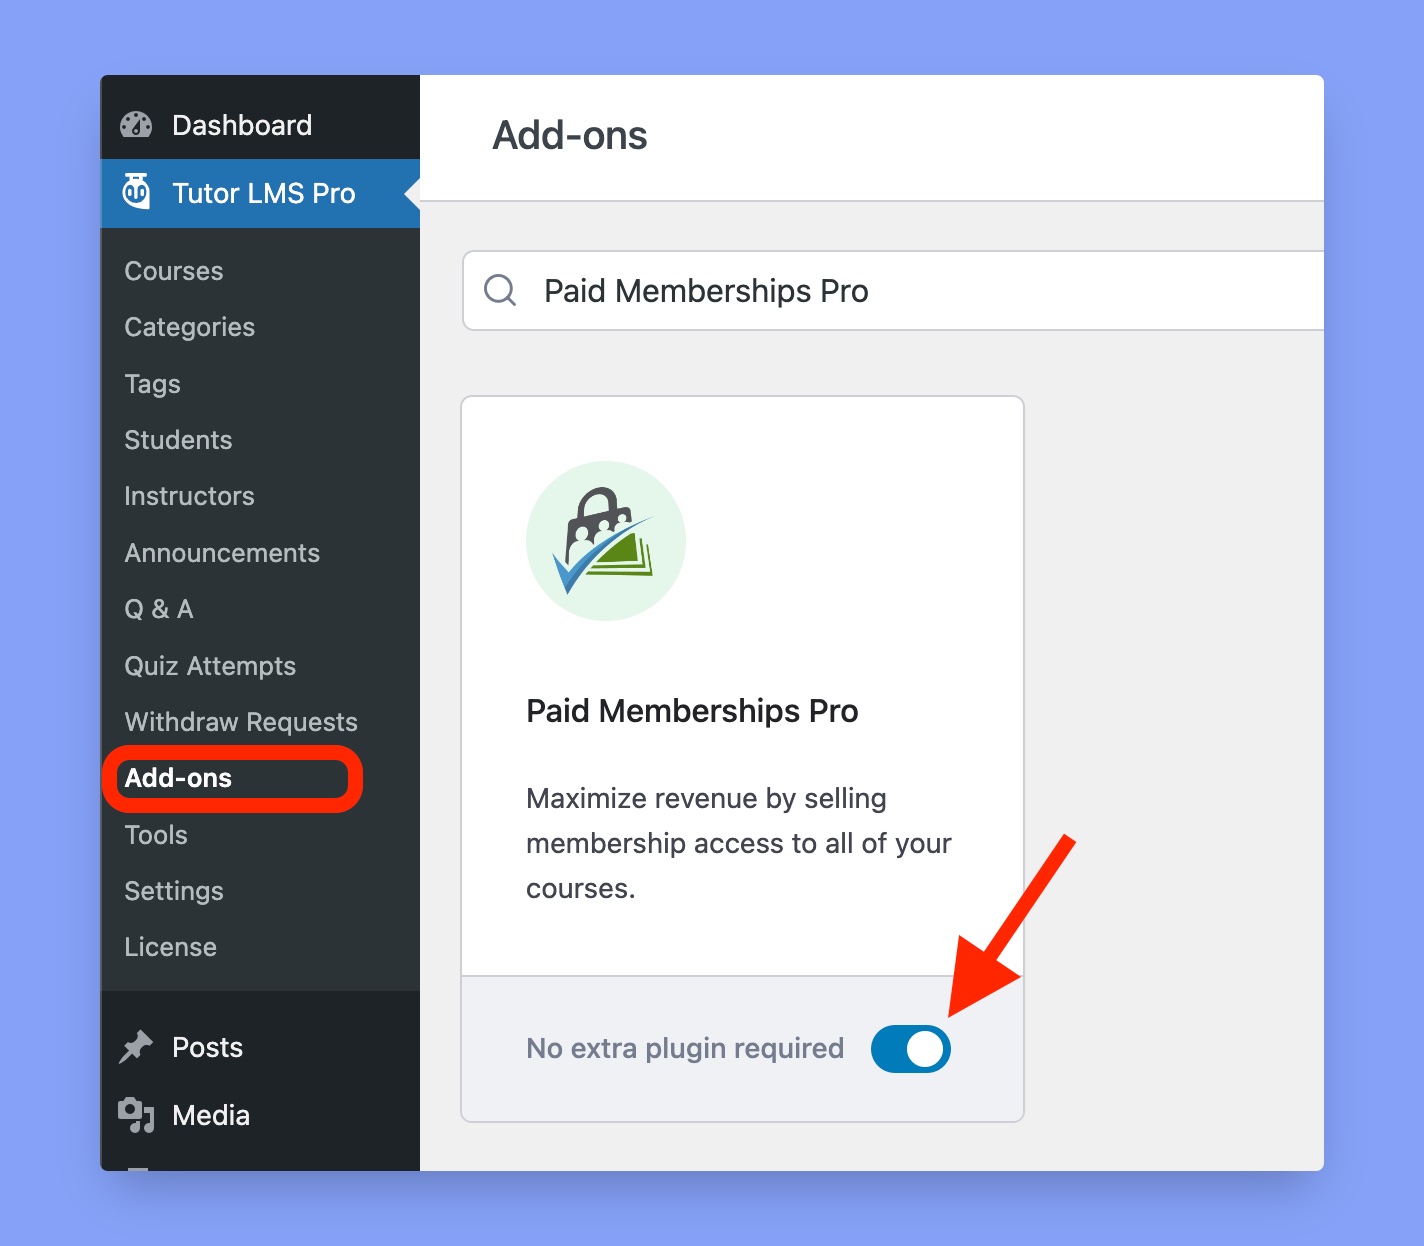
Then you have to activate the Paid Membership Pro plugin. To do so, go to Tutor LMS Pro > Add-ons and search for the Paid Memberships Pro addon. Then enable the addon using the toggle switch beside that.
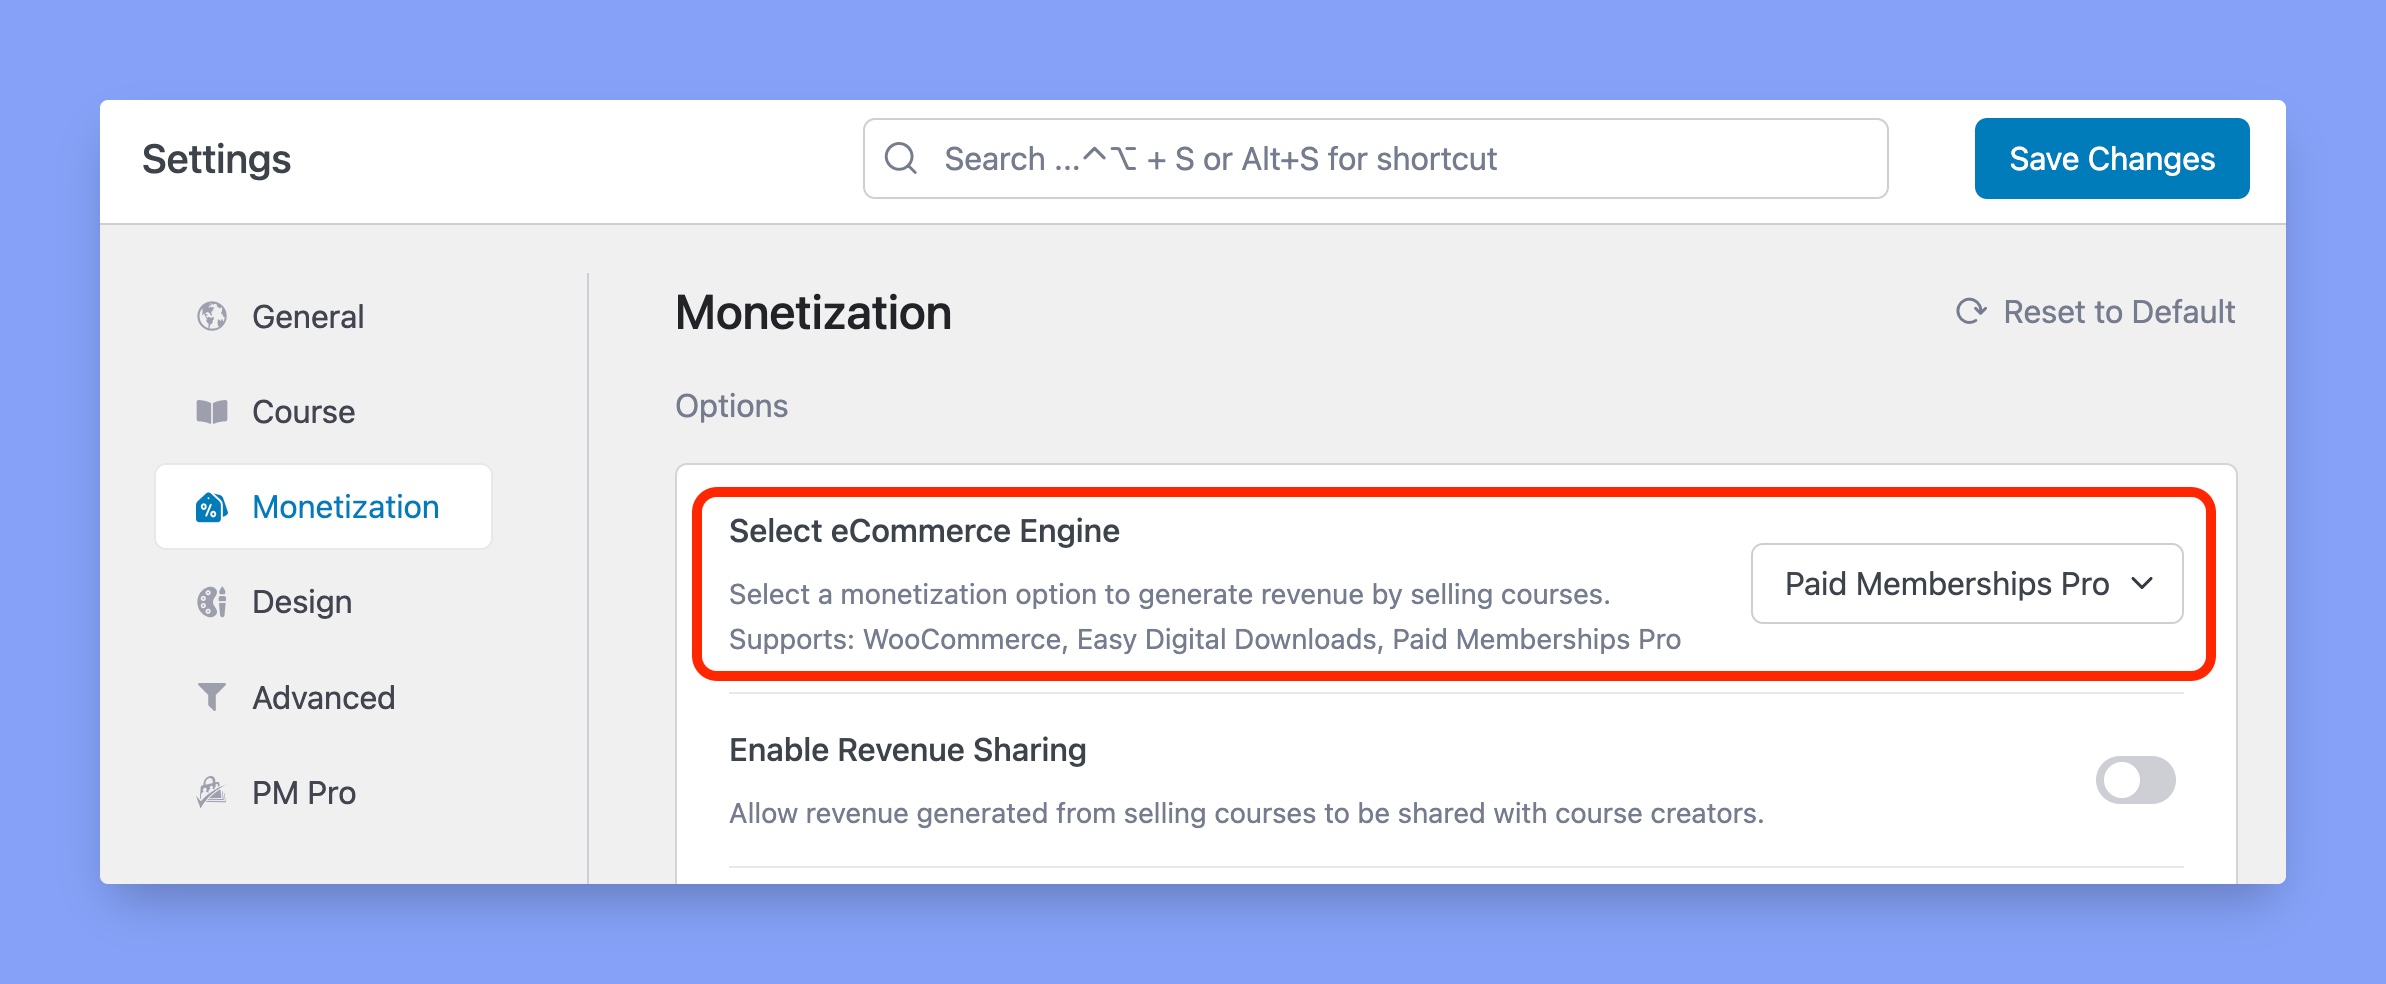
Once you install the Paid Membership Pro, you need to enable it by navigating to Tutor LMS Pro > Settings > Monetization.
Step 6. Adding New Membership Level
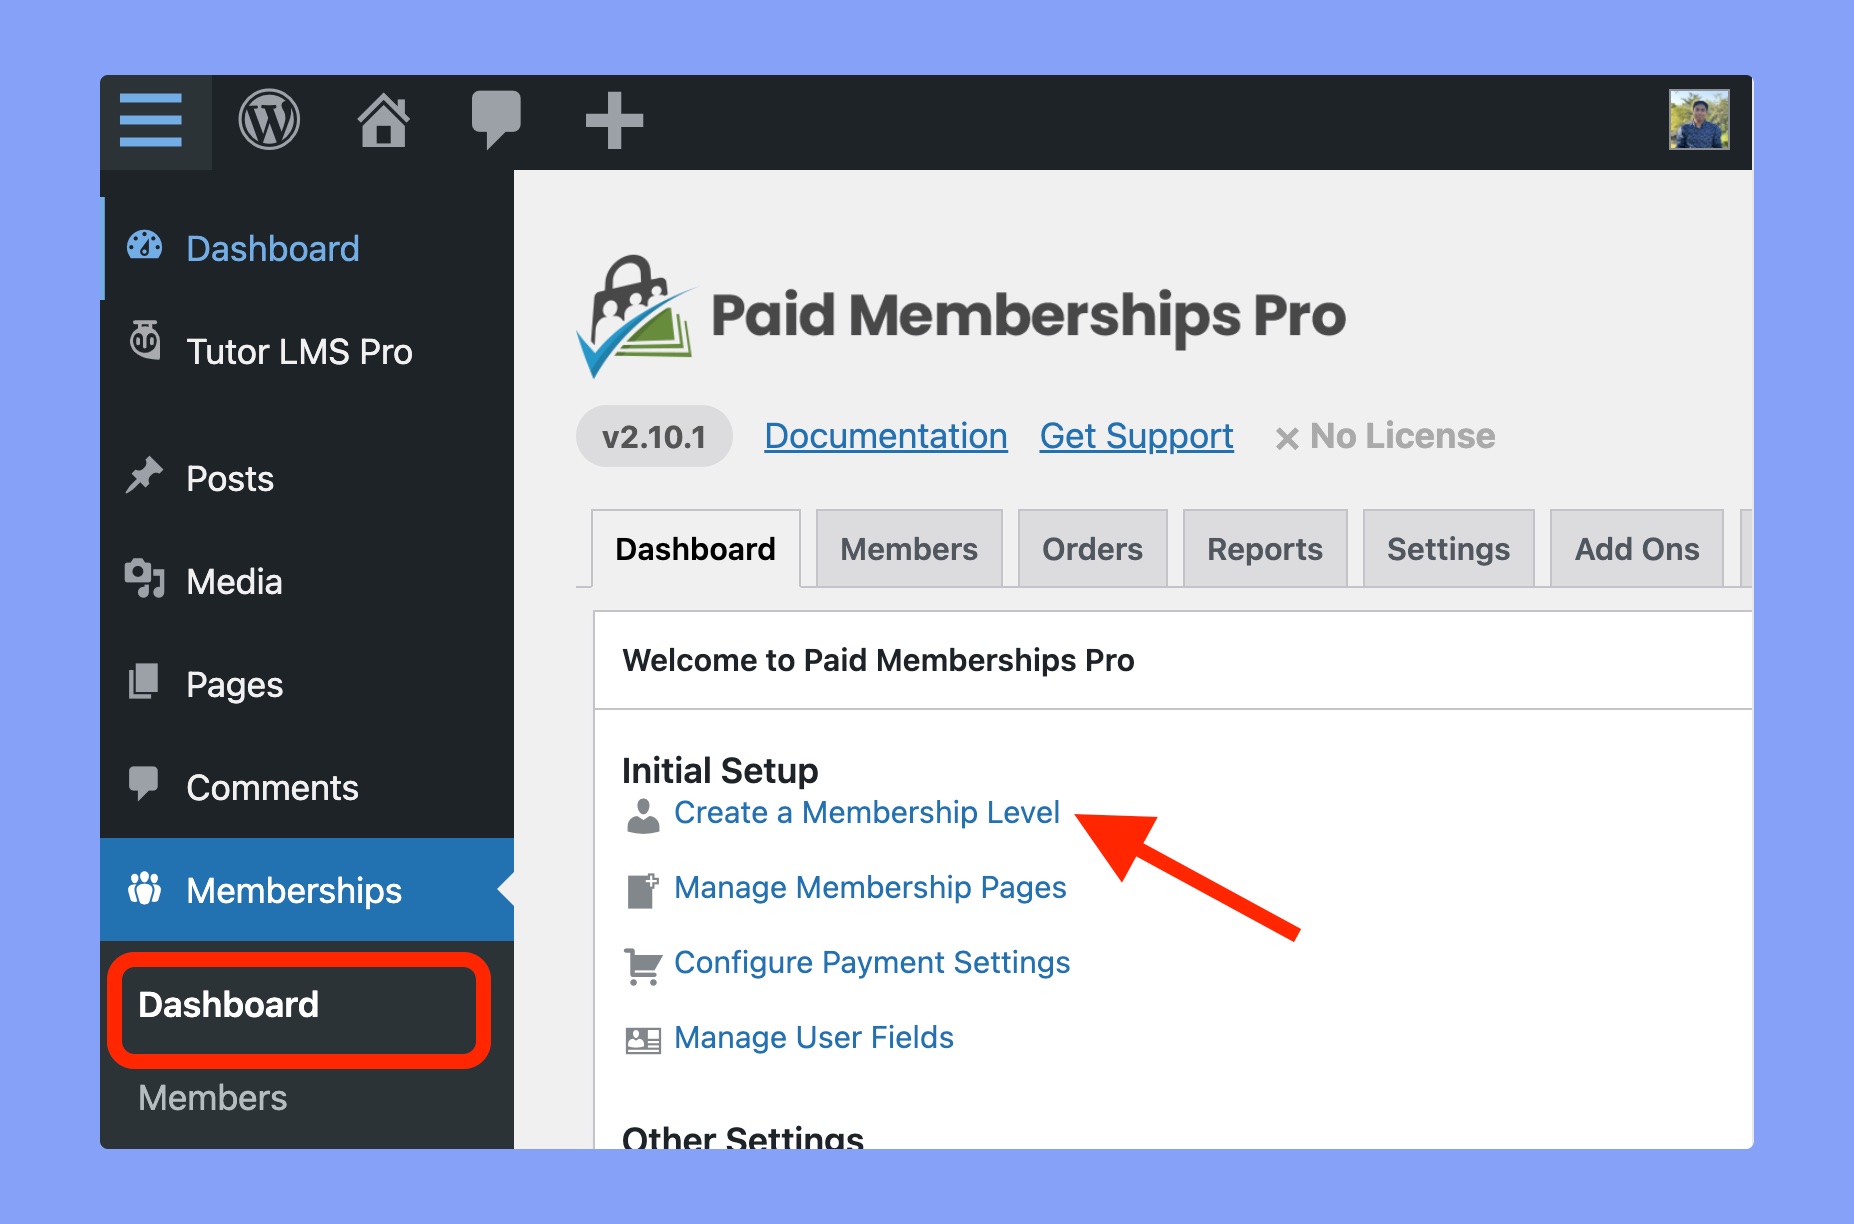
For adding new membership go to the Dashboard part of the Paid Membership Pro and click Create a membership level.
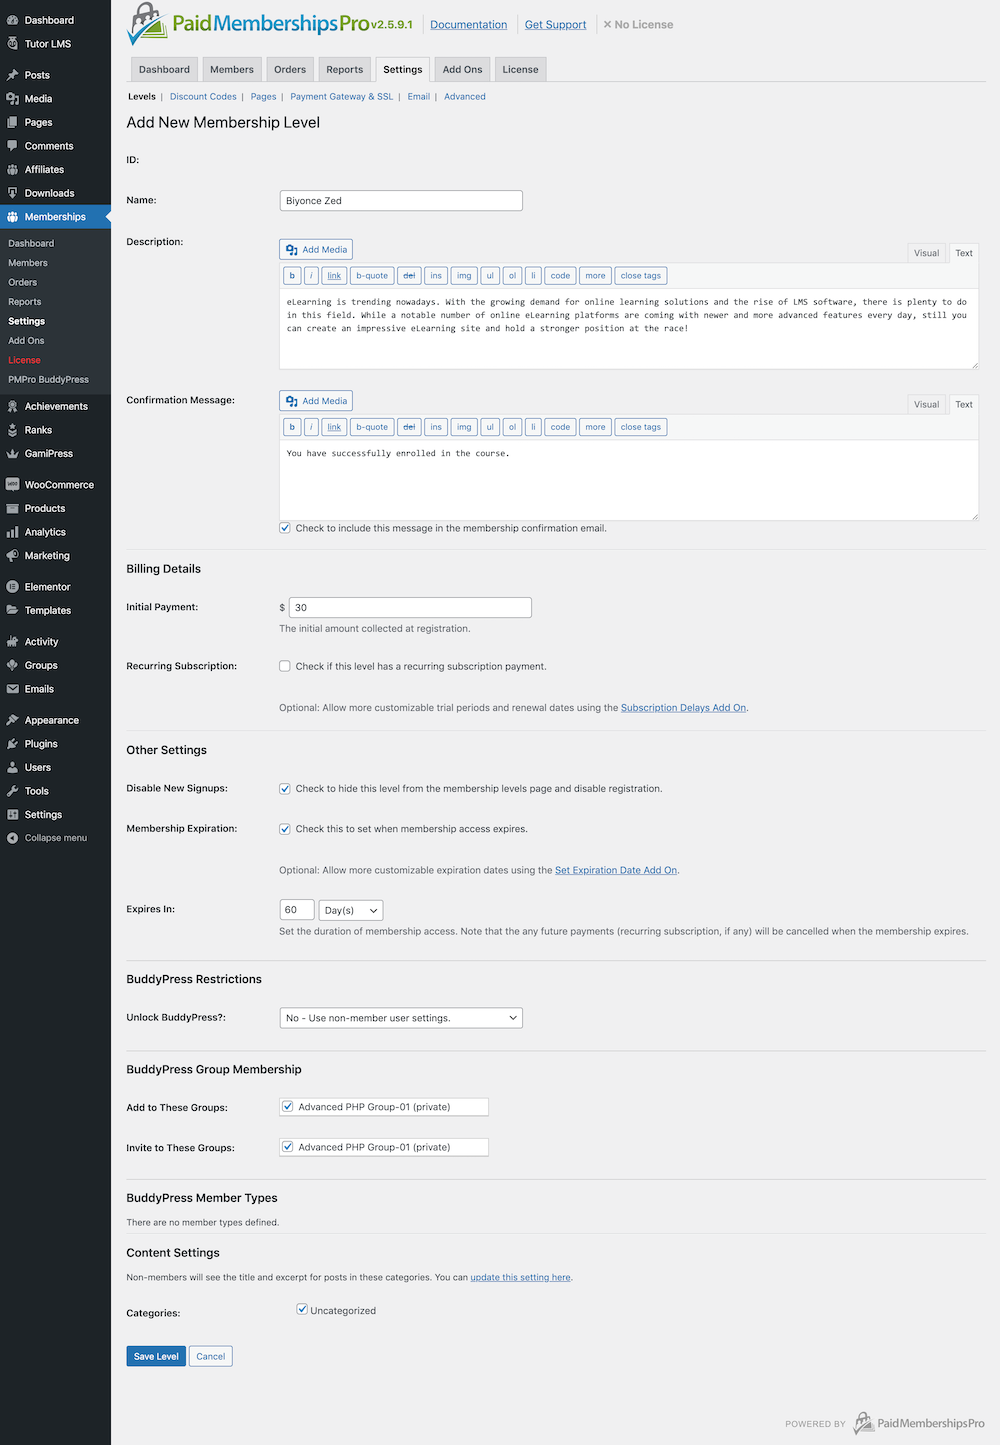
Once you redirect to the membership detailed page, fill up each of the fields, and don’t forget to save your settings. Follow the same process for adding membership level each of the times you require so.
Step 7. Do The Necessary Setting Parts
This is the most important part of your eLearning site. From page setting to select payment to apply discount code, you can do all by following one-click easy setup procedure for all.
Setting Pages
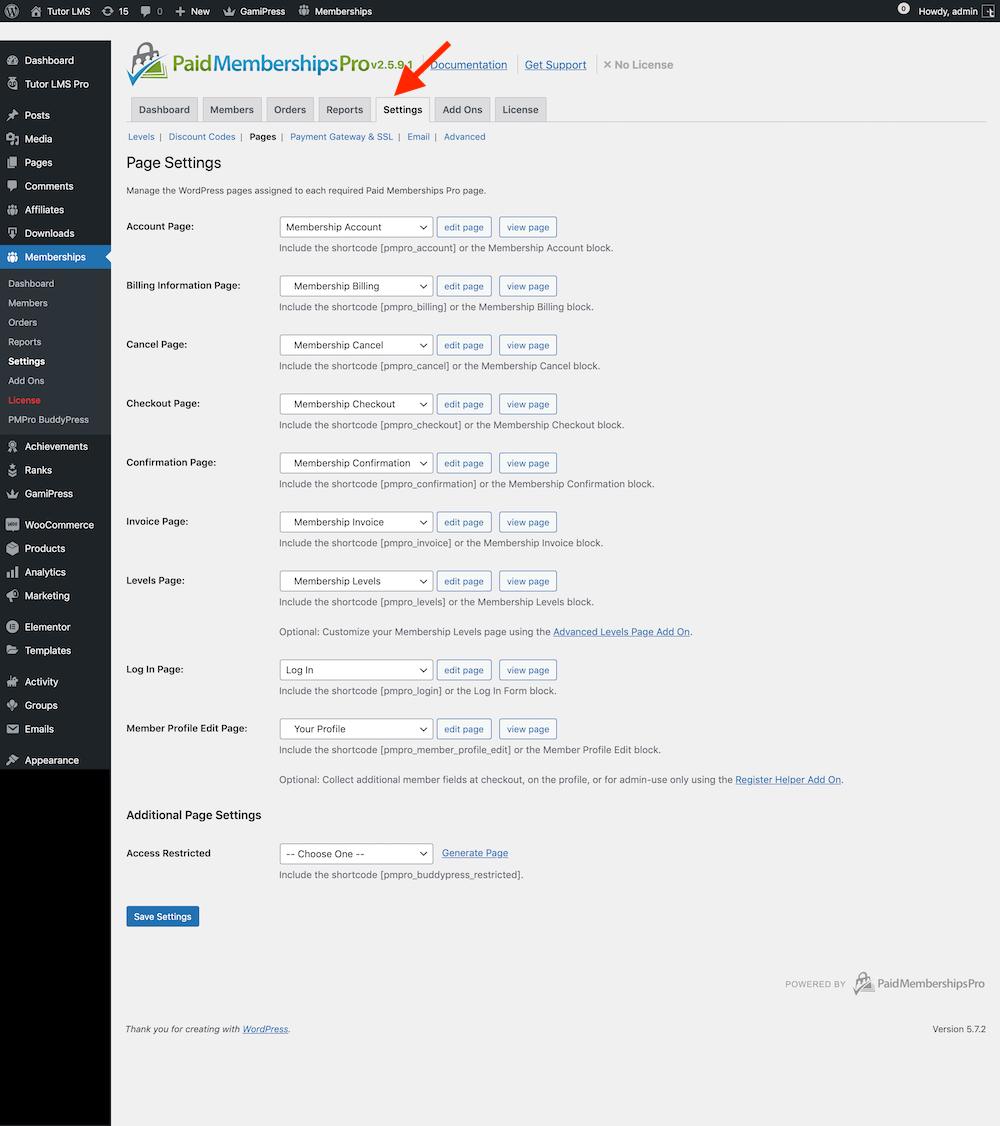
You can personalize each of the page settings including advanced admin control here by following Memberships > Setting > Pages.
Payment Gateway & SSL Settings
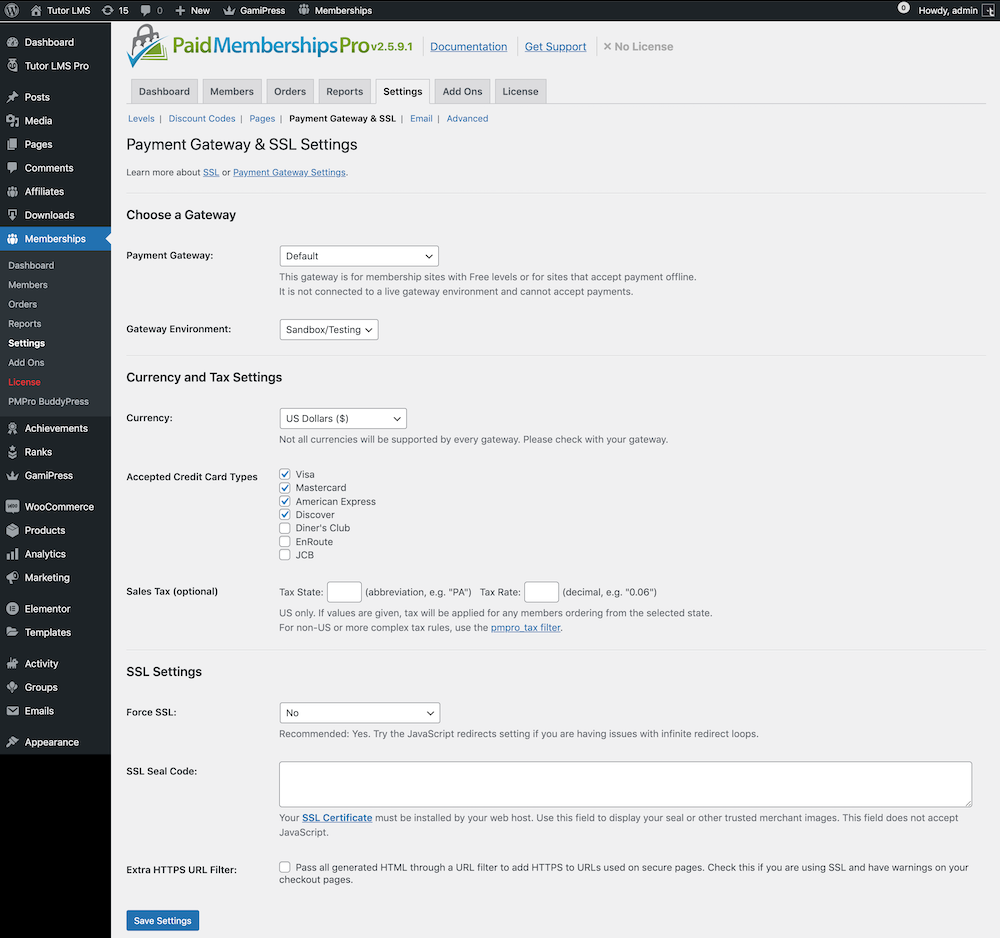
Paid Membership Pro offers a secure, and complete online transaction. You will get several transaction systems with it including PayPal, Stripe, and credit card payment. Also, there are options for setting different currencies along with advanced SSL security features. In order to add payment navigate to Memberships > Setting > Payment Gateway & SSL and after that complete and save your settings.
Offering Discount with Payment
Offering discounts is a great way to draw in potential learners’ interest. To ease the job the Paid Membership Pro plugin keeps everything handy for the users.
Auto-Generated Discount Codes
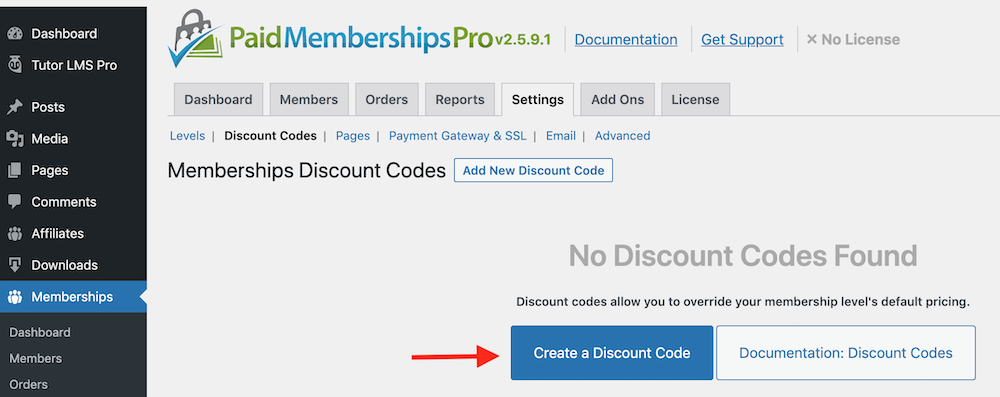
Paid Membership Pro offers you auto-generated discount codes. You can easily generate or even customize your code as you like by simply by clicking the Add New Discount Code button from the Settings > Discount Codes > Add New Discount Code.
Adding New Discount Code
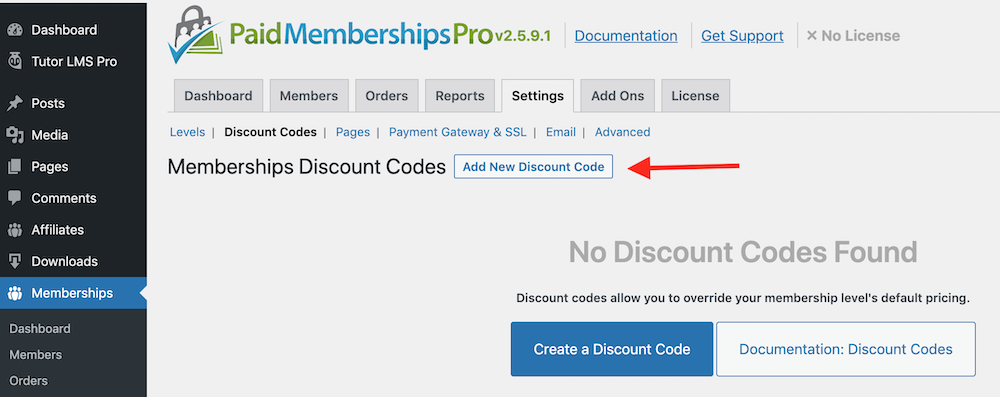
To apply a discount offer with your payment go to the Setting section of Membership Pro and hit the Discount code.
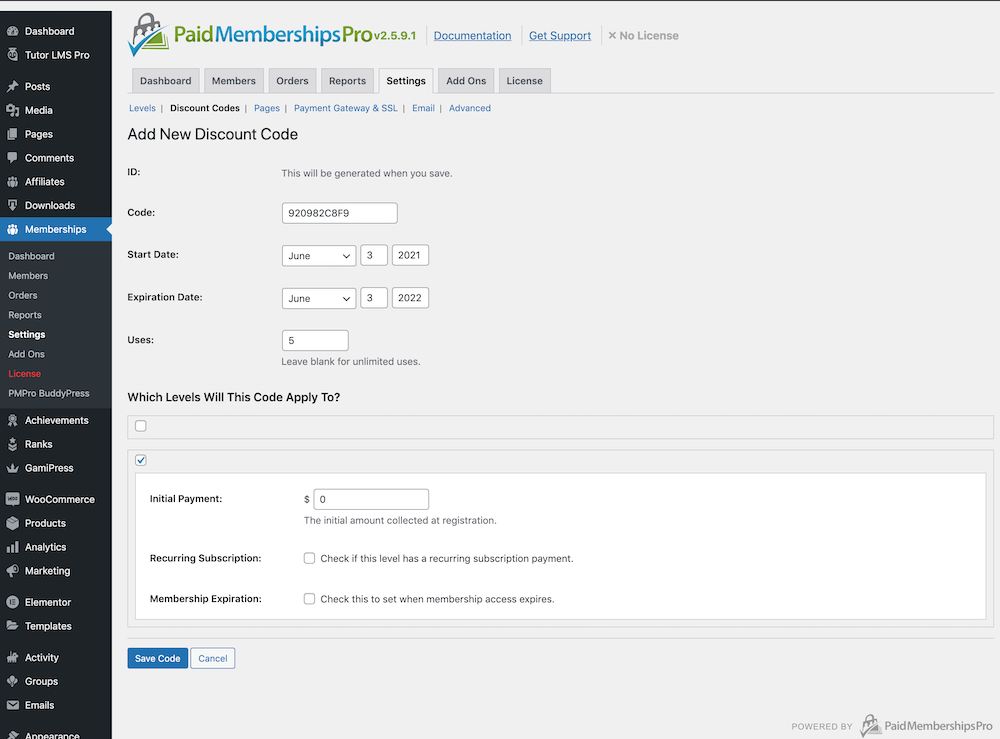
Soon, a new page containing detailed context about the discount settings will appear. Fill each of the fields and at the end hit save code. Finally, you will be able to complete the discount setting part successfully.
Once you’ve setup everything, you can check the membership plans in your course section. Here’s a preview of membership plan.
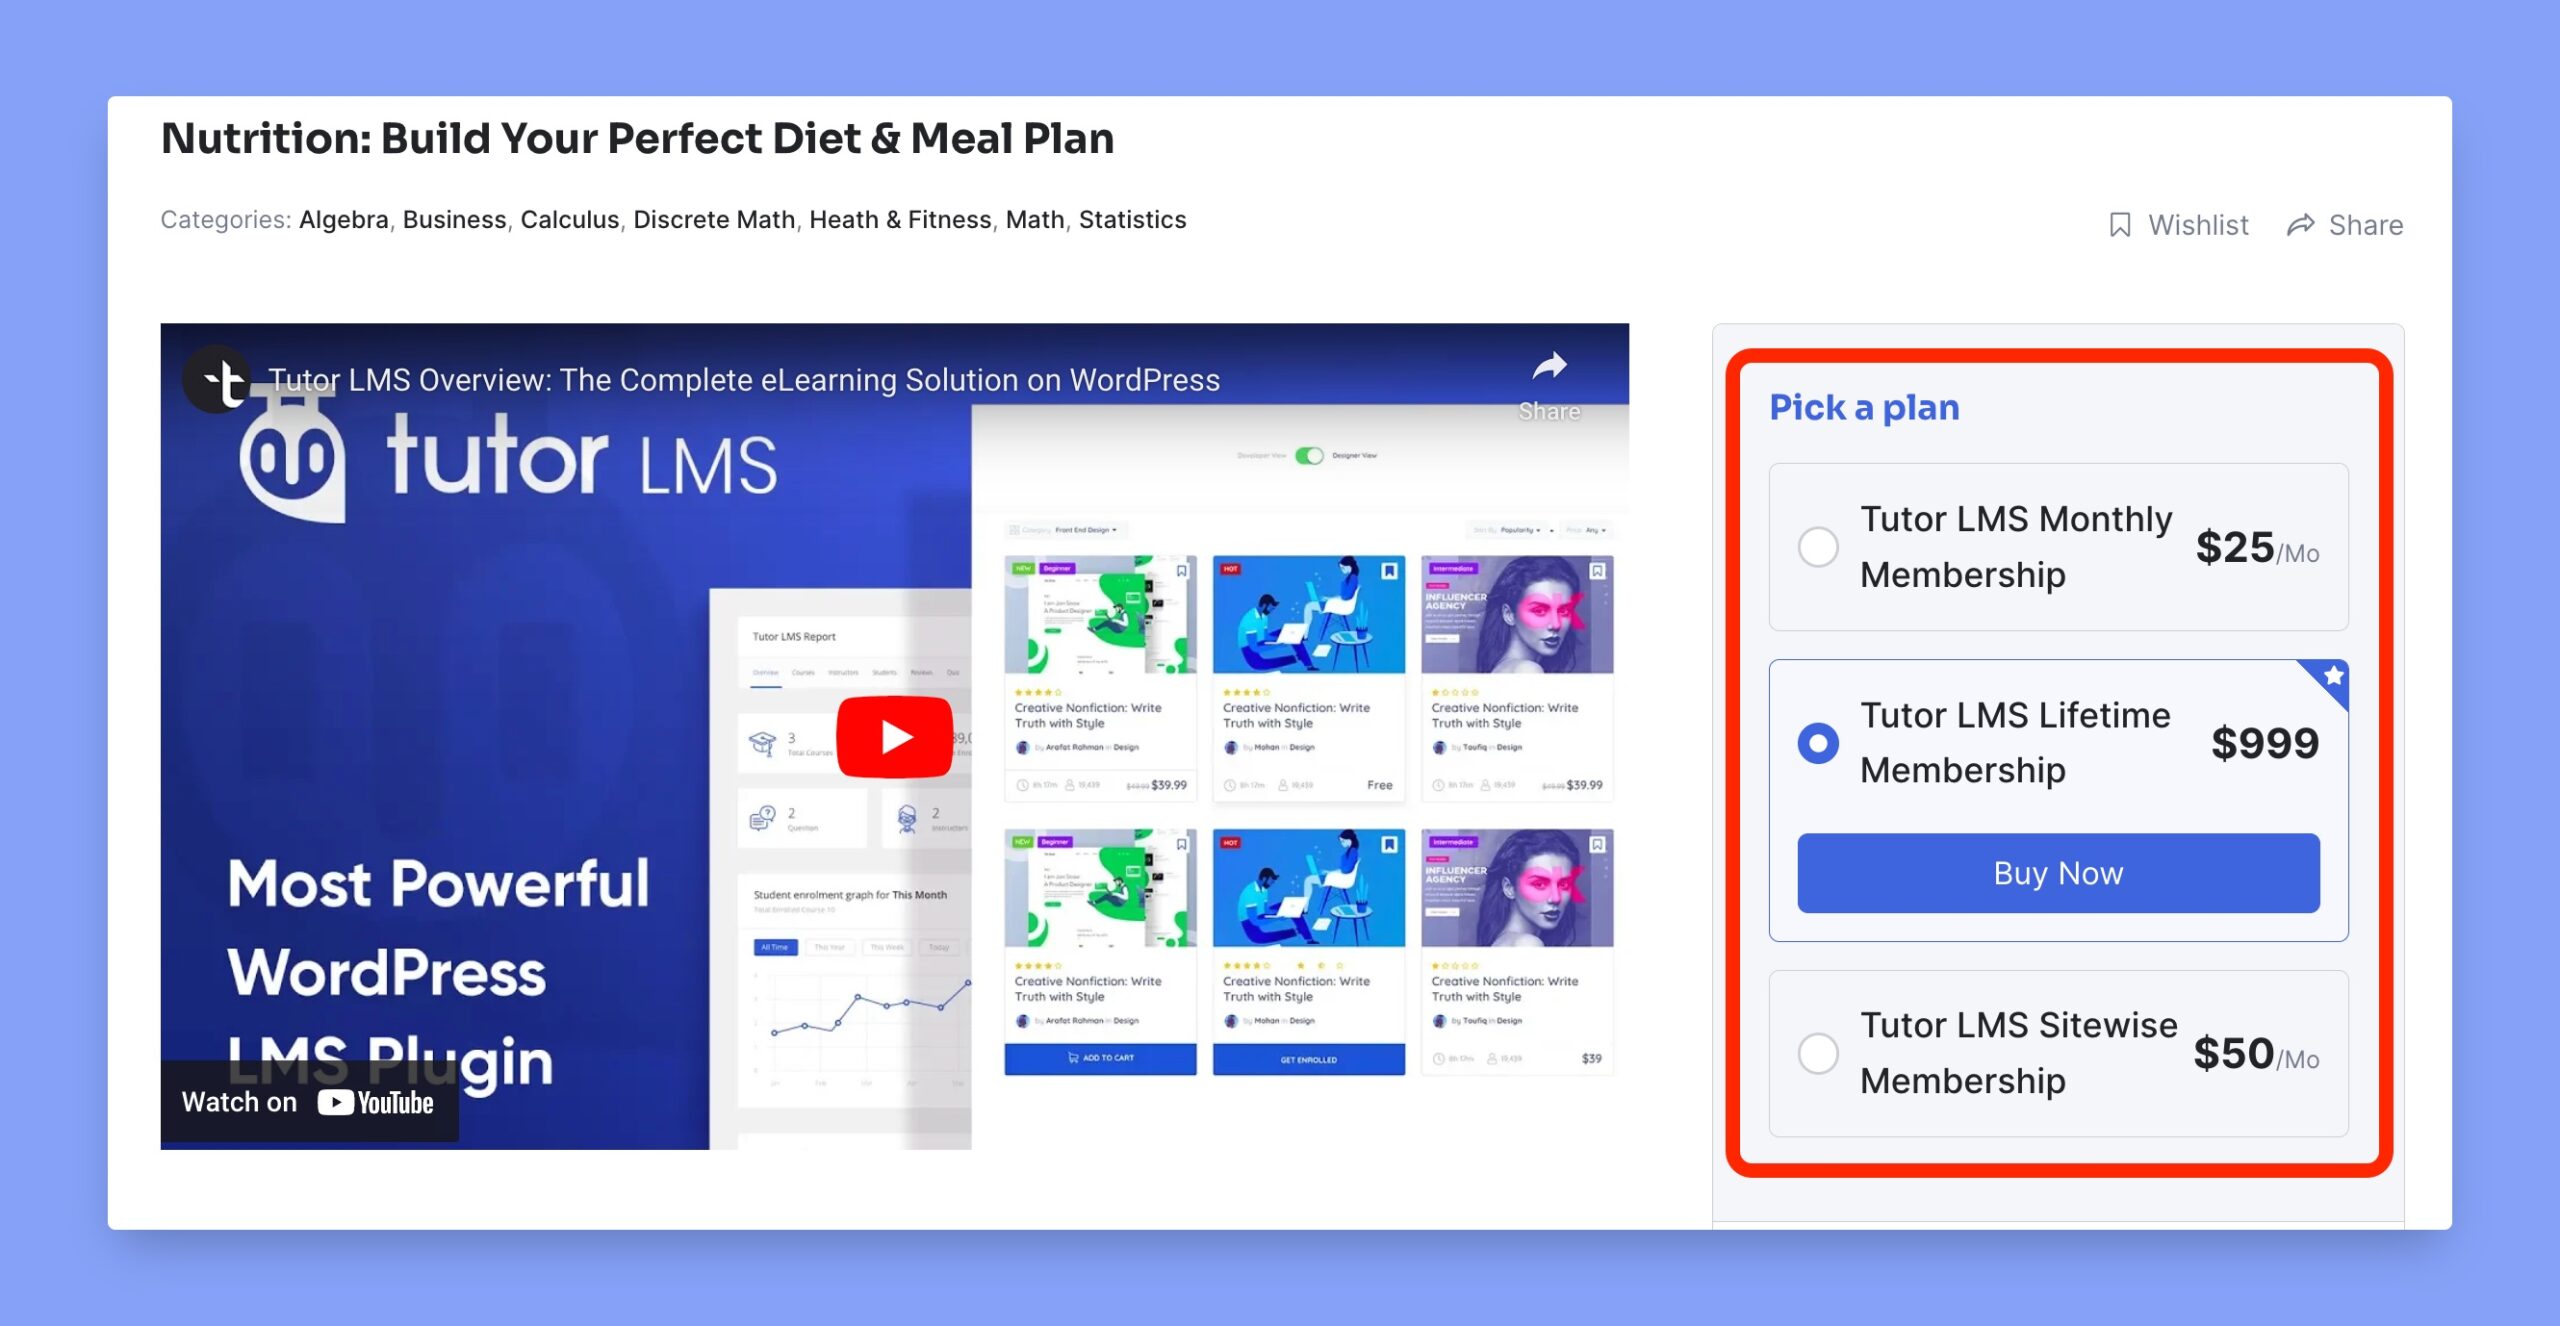
That’s how you can turn your membership website into an eLearning hub. However, if you need any help with that, you may follow our Paid Membership Pro documentation.
More to Do with Tutor LMS Addons
We’ve discussed the process of creating a primary level eLearning website so far. But if you want to step ahead and make your website more enriched there is scope for it too. Upgrading to the Tutor LMS Pro version will let you unlock all the updates, numerous addons, and many other advanced features. Here we have listed some of the addons to let you give an overall idea about Tutor LMS advanced features.
- 10 types of Quiz
- Assignments Addons
- BuddyPress integration
- Centralized monetization settings
- Certificate download and public URL
- Content Drip
- Content Security
- Course Review and Rating system
- Detailed Reports & Analytics
- Email Addons
- Frontend Course Builder
- Gamipress Supported
- Gradebook
- Gutenberg compatibility
- Sales commission and fees option
- Students Certificate
- Unlimited Courses Creation
- WooCommerce
- WP Fusion
- Yoast SEO
- Zoom Integration
- Elementor Integration etc.
There are Themes Too
To enhance the appeal of your website and make it more feature-rich there are options to apply Themes also. These ready themes are designed to make your website building procedure easier. Anyone without any technical coding skills can try implementing these themes on their LMS website with ease.
Wrapping Up
For those who were seeking a less stressful and down-to-earth solution for creating an eLearning website in their existing membership site we hope you’ll find this article helpful. However, if you get stuck on any part of the implementing process of your eLearning website or have any questions regarding Tutor LMS you are always welcome to us with your query or valuable suggestions.
Start Using Tutor LMS Today
Ready to take your online courses to new heights? Download Tutor LMS now and enjoy a journey of eLearning excellence.
