How to Set Up Guest Checkout in Tutor LMS: A Step-by-Step Guide
Did you know that the average cart abandonment rate hovers around a staggering 70.19% (Baymard Institute, 2024)? That means that for every 100 potential students ready to invest in your online courses, approximately 70 leave without completing the purchase process. That’s a lot of lost revenue and missed opportunities! One of the biggest culprits? A complicated or lengthy checkout process.
Guest checkout directly addresses this issue. By allowing unregistered users to make a course purchase without forcing them to create an account first, you remove a major hurdle and create a much smoother path to purchase. Tutor LMS makes implementing guest purchase remarkably easy, offering both a built-in native solution and seamless integration with popular eCommerce platforms like WooCommerce. We’ll show you both methods.
Why Guest Checkout Matters for Course Creators
Every click in your checkout process creates an opportunity for potential students to reconsider their purchase. While many factors contribute to cart abandonment, a significant portion is directly related to required account creation. In fact, research from the Baymard Institute shows that 19% of online shoppers abandon their carts specifically because “the site wanted me to create an account” as their reason for leaving.
So, how can guest checkout transform your Tutor LMS results?
- Slash Purchase Friction: New students can jump straight into purchasing your course without filling out a lengthy registration form. This reduced friction is crucial, especially for mobile users or those on the fence. Less effort equals higher conversion rates.
- Capitalize on Impulse Purchases: Many learners are ready to buy immediately upon discovering your course. Guest checkout allows them to act on that impulse, securing the sale before they get distracted.
- Cater to All Learners: Some students prefer a “try before you buy” approach or are hesitant to create accounts everywhere. Guest checkout makes your courses accessible to this wider audience, boosting your potential online course sales.
Ready to implement and get more students? let’s dive in!
The Easiest Way: Tutor LMS Native Guest Checkout
Looking for the absolute quickest and easiest way to enable guest purchase for your Tutor LMS courses? Look no further than Tutor LMS’s own native monetization system! This built-in feature eliminates the need for any extra plugins and integrates seamlessly with your existing setup.
Why Choose the Native Method?
- Simplicity at its Finest: The setup process couldn’t be more straightforward. No complex configurations or plugin juggling.
- Seamless Tutor LMS Integration: Because it’s built-in, you’re guaranteed a smooth, optimized experience that works perfectly with all other Tutor LMS features.
- Zero Extra Cost: The native monetization system, including guest purchase, is included with Tutor LMS – no need to purchase additional plugins.
Here’s how to activate it:
Step 1: Access Monetization Settings
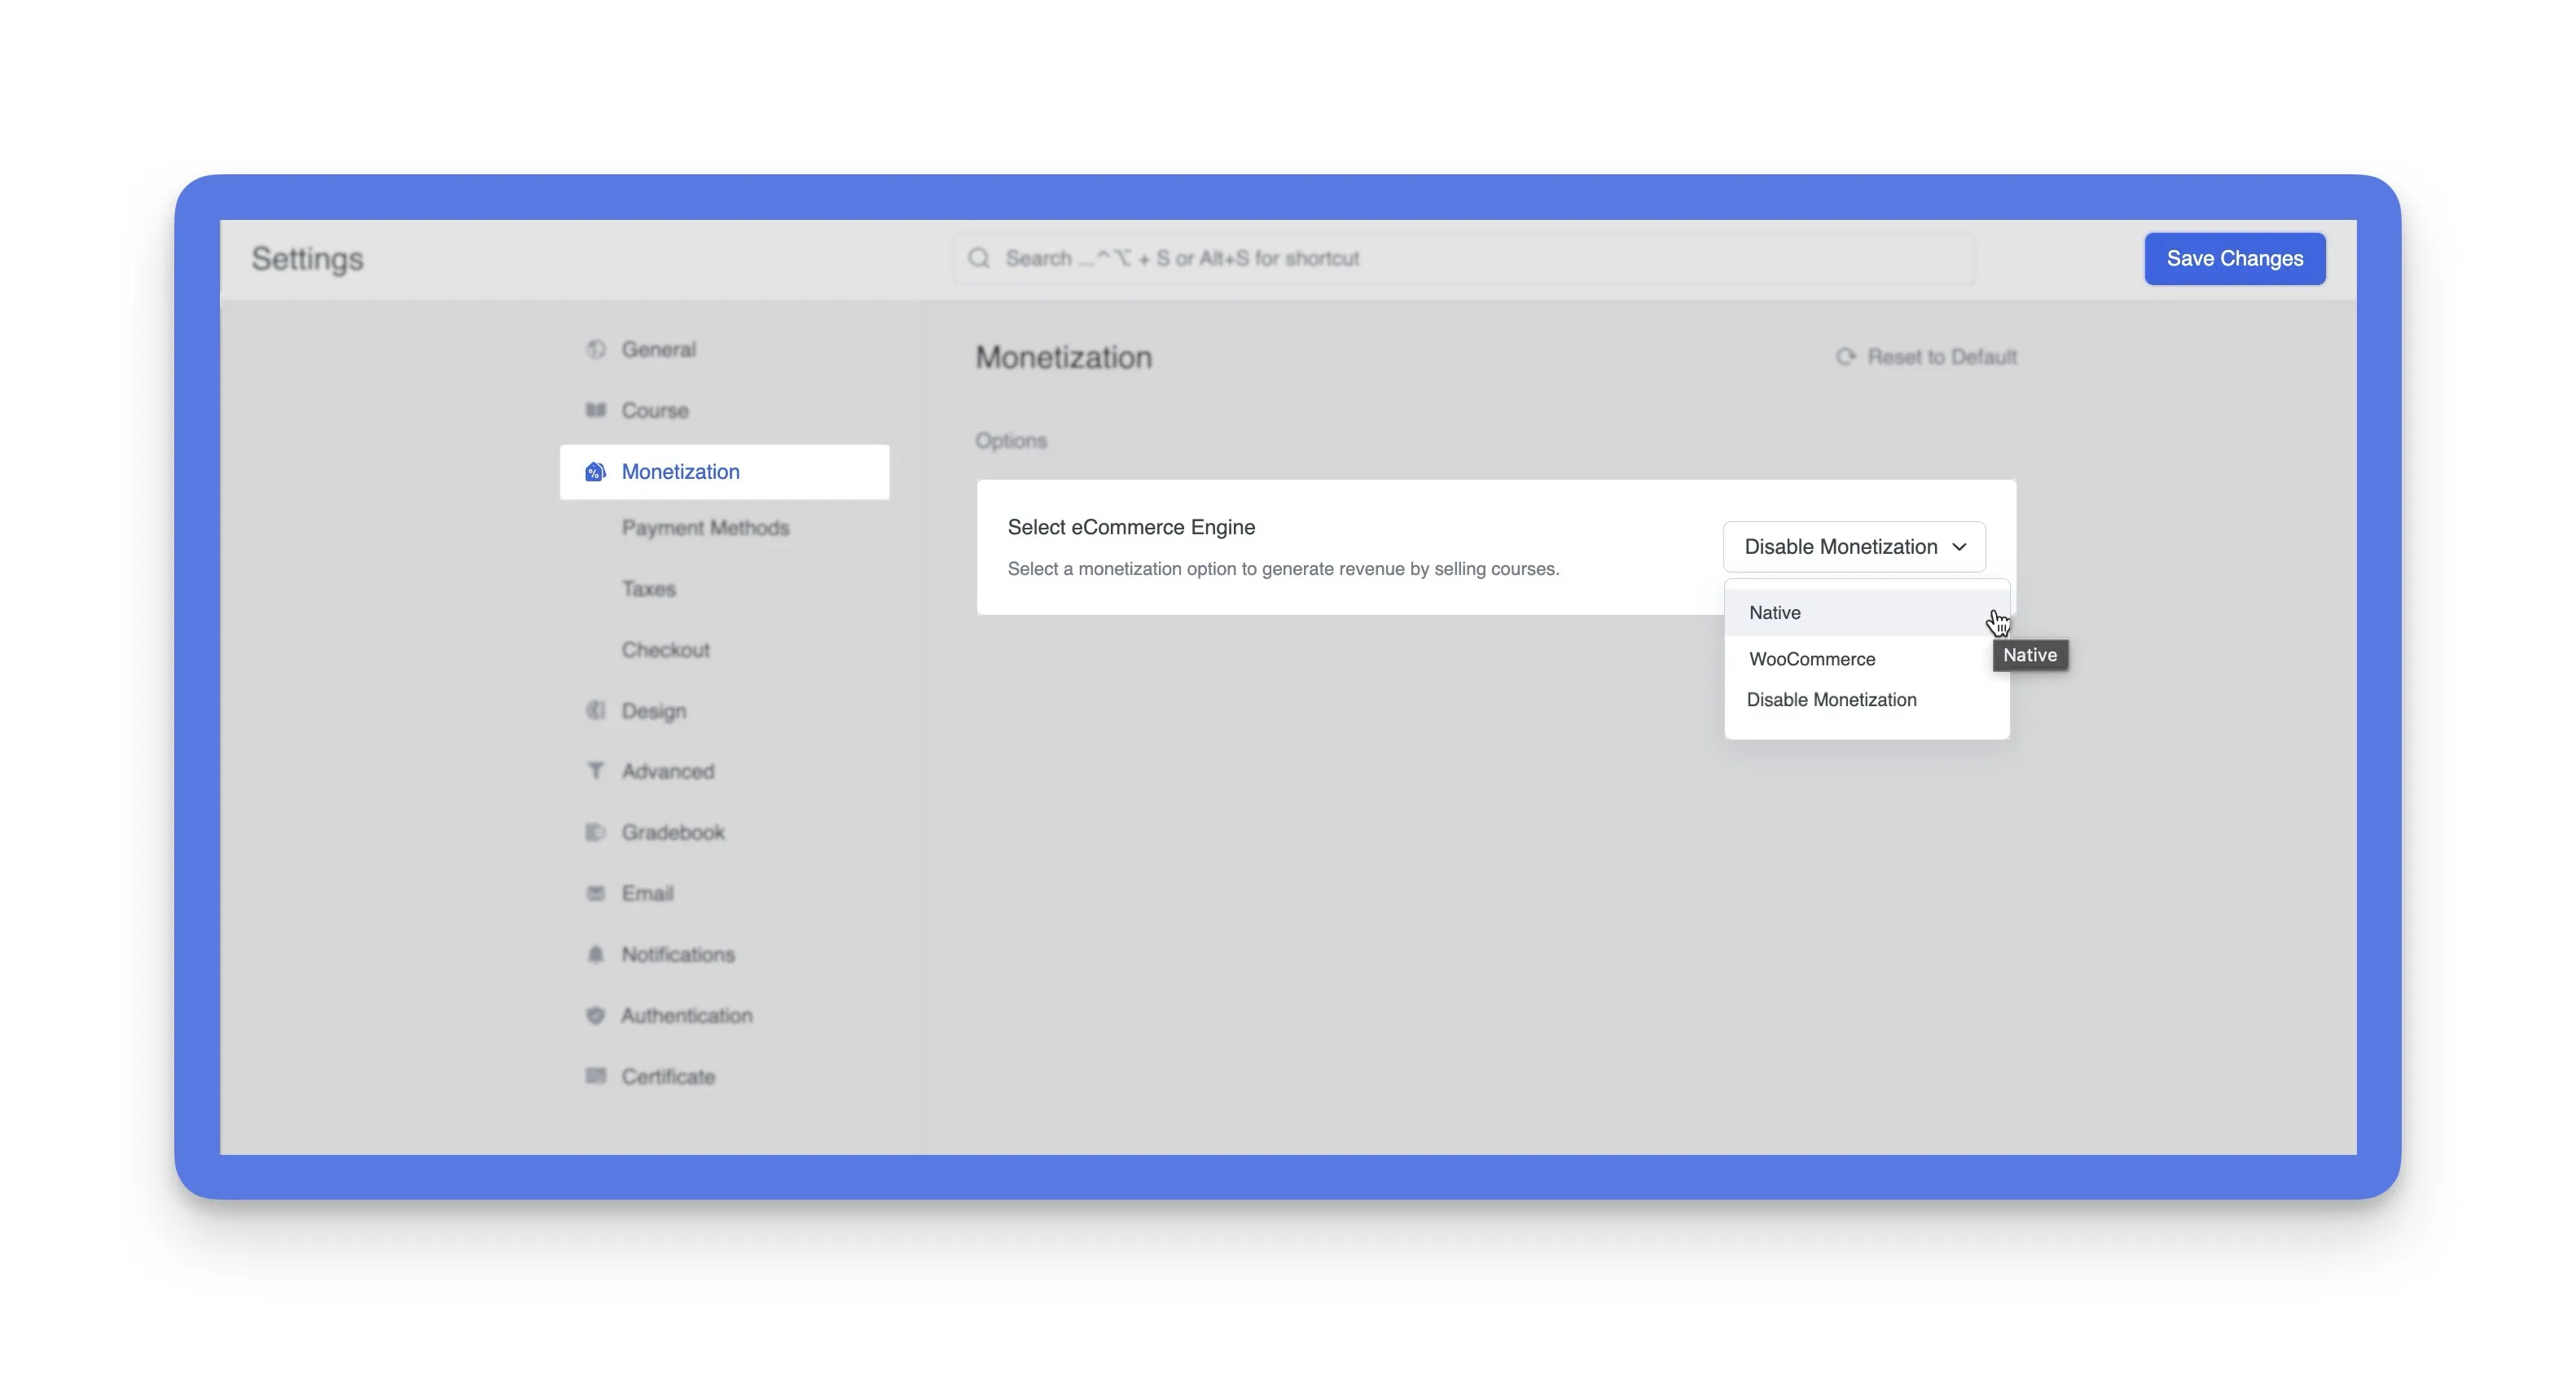
Navigate to your WordPress dashboard. From there, go to Tutor LMS Pro > Settings > Monetization.
Step 2: Select the Native eCommerce Engine
You’ll see a dropdown menu labeled “Select eCommerce Engine.” Choose Native from the list. This tells Tutor LMS to handle payments and checkout directly, without relying on external plugins. Click Save Changes.
Step 3: Enable Guest Checkout
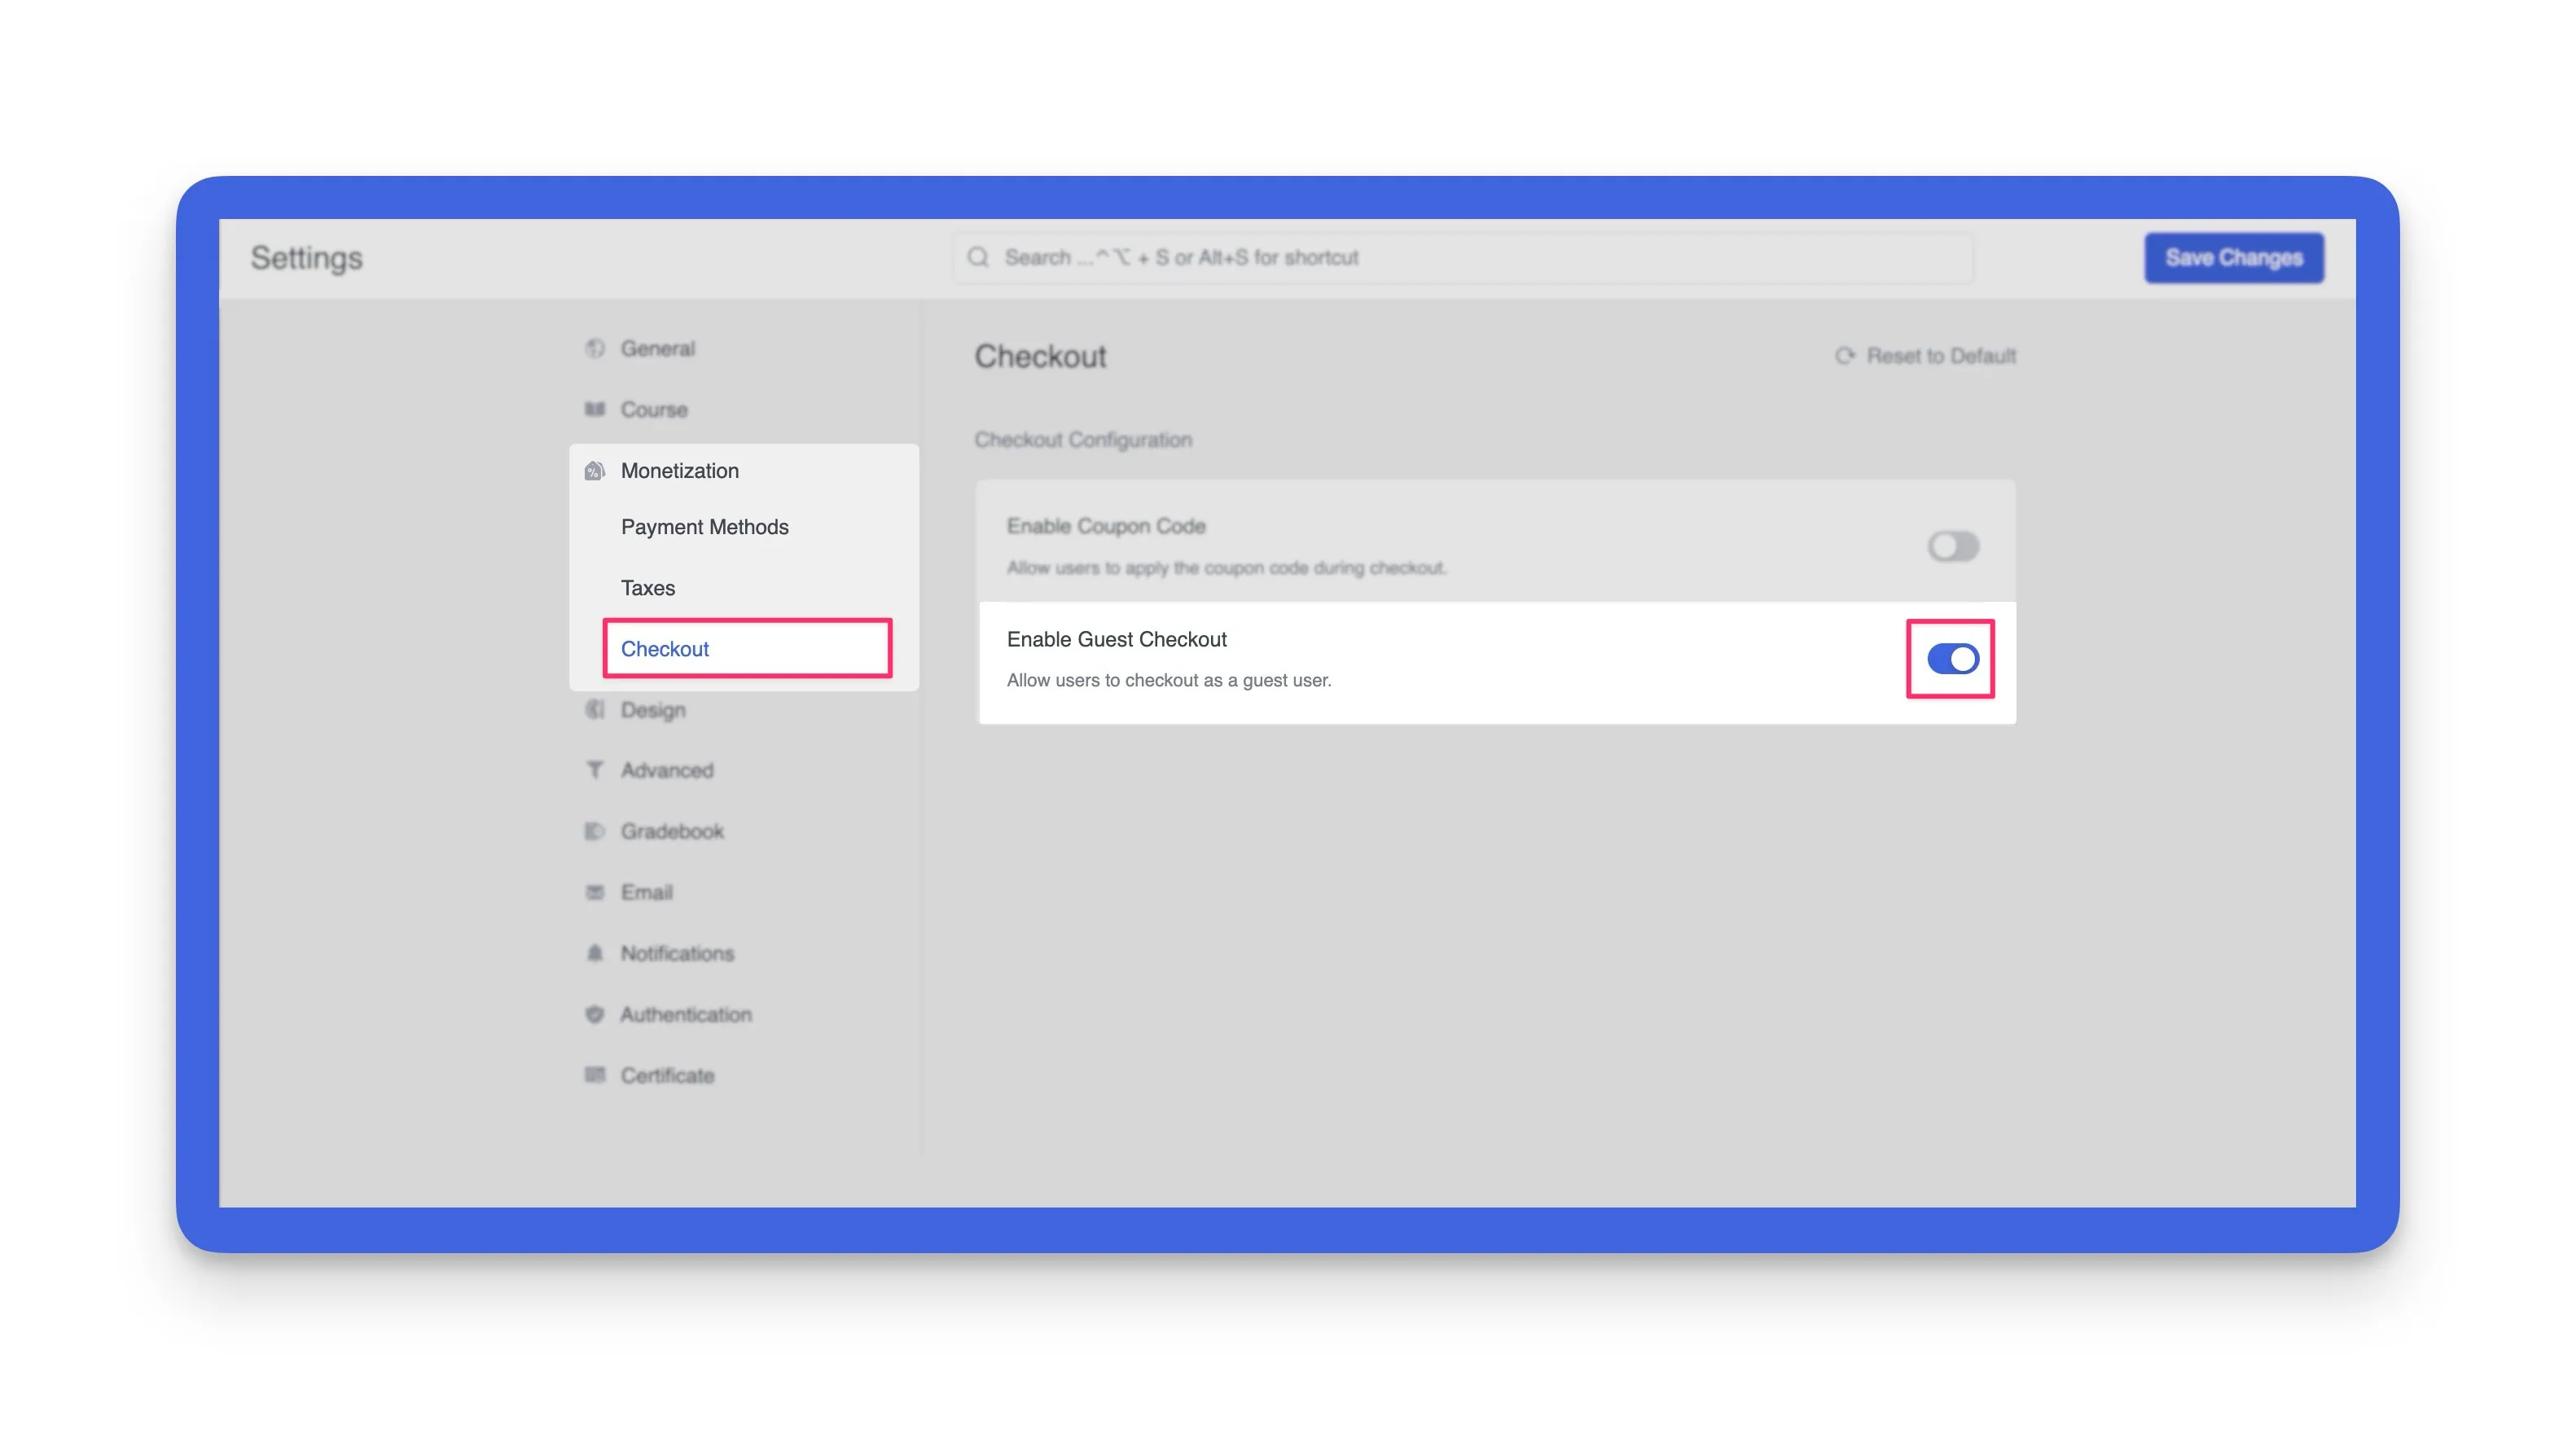
Now, stay in the Monetization settings, you will find a new tab called, Checkout. Simply toggle the “Enable Guest Checkout” option to the “on” position. Make sure to click Save Changes to apply the setting.
Step 4: Enable Direct “Buy Now” for Instant Purchases (Optional, but Powerful!)
Want to take that streamlined checkout process one step further? Tutor LMS also offers a “Buy Now” button feature that allows students to bypass the cart entirely and go straight to checkout – even as a guest! This is perfect for capturing those impulse purchases and providing the absolute fastest path to enrollment.
To enable this feature:
- Go to the Tutor LMS Pro > Settings.
- Find the “Checkout” Tab option and click it.
- You will have to make sure to enable the “Enable Guest Checkout“.
- Then toggle the ‘Enable “Buy Now” Button’
By combining the “Buy Now” button with guest checkout, you’re creating the ultimate frictionless purchase process. You’re removing every possible obstacle between a student’s initial interest and their enrollment in your course.

Expanding Your Options: Guest Checkout with WooCommerce and More
While Tutor LMS’s native monetization offers the simplest path to guest checkout, you might prefer a different platform for your eCommerce needs. Tutor LMS integrates seamlessly with several popular eCommerce plugins, including WooCommerce, Easy Digital Downloads, Paid Memberships Pro, Restrict Content Pro, and others. This gives you the power to choose the solution that best fits your specific needs. In this section, we’ll walk you through setting up guest checkout using WooCommerce.
Step 1: Install and Activate WooCommerce
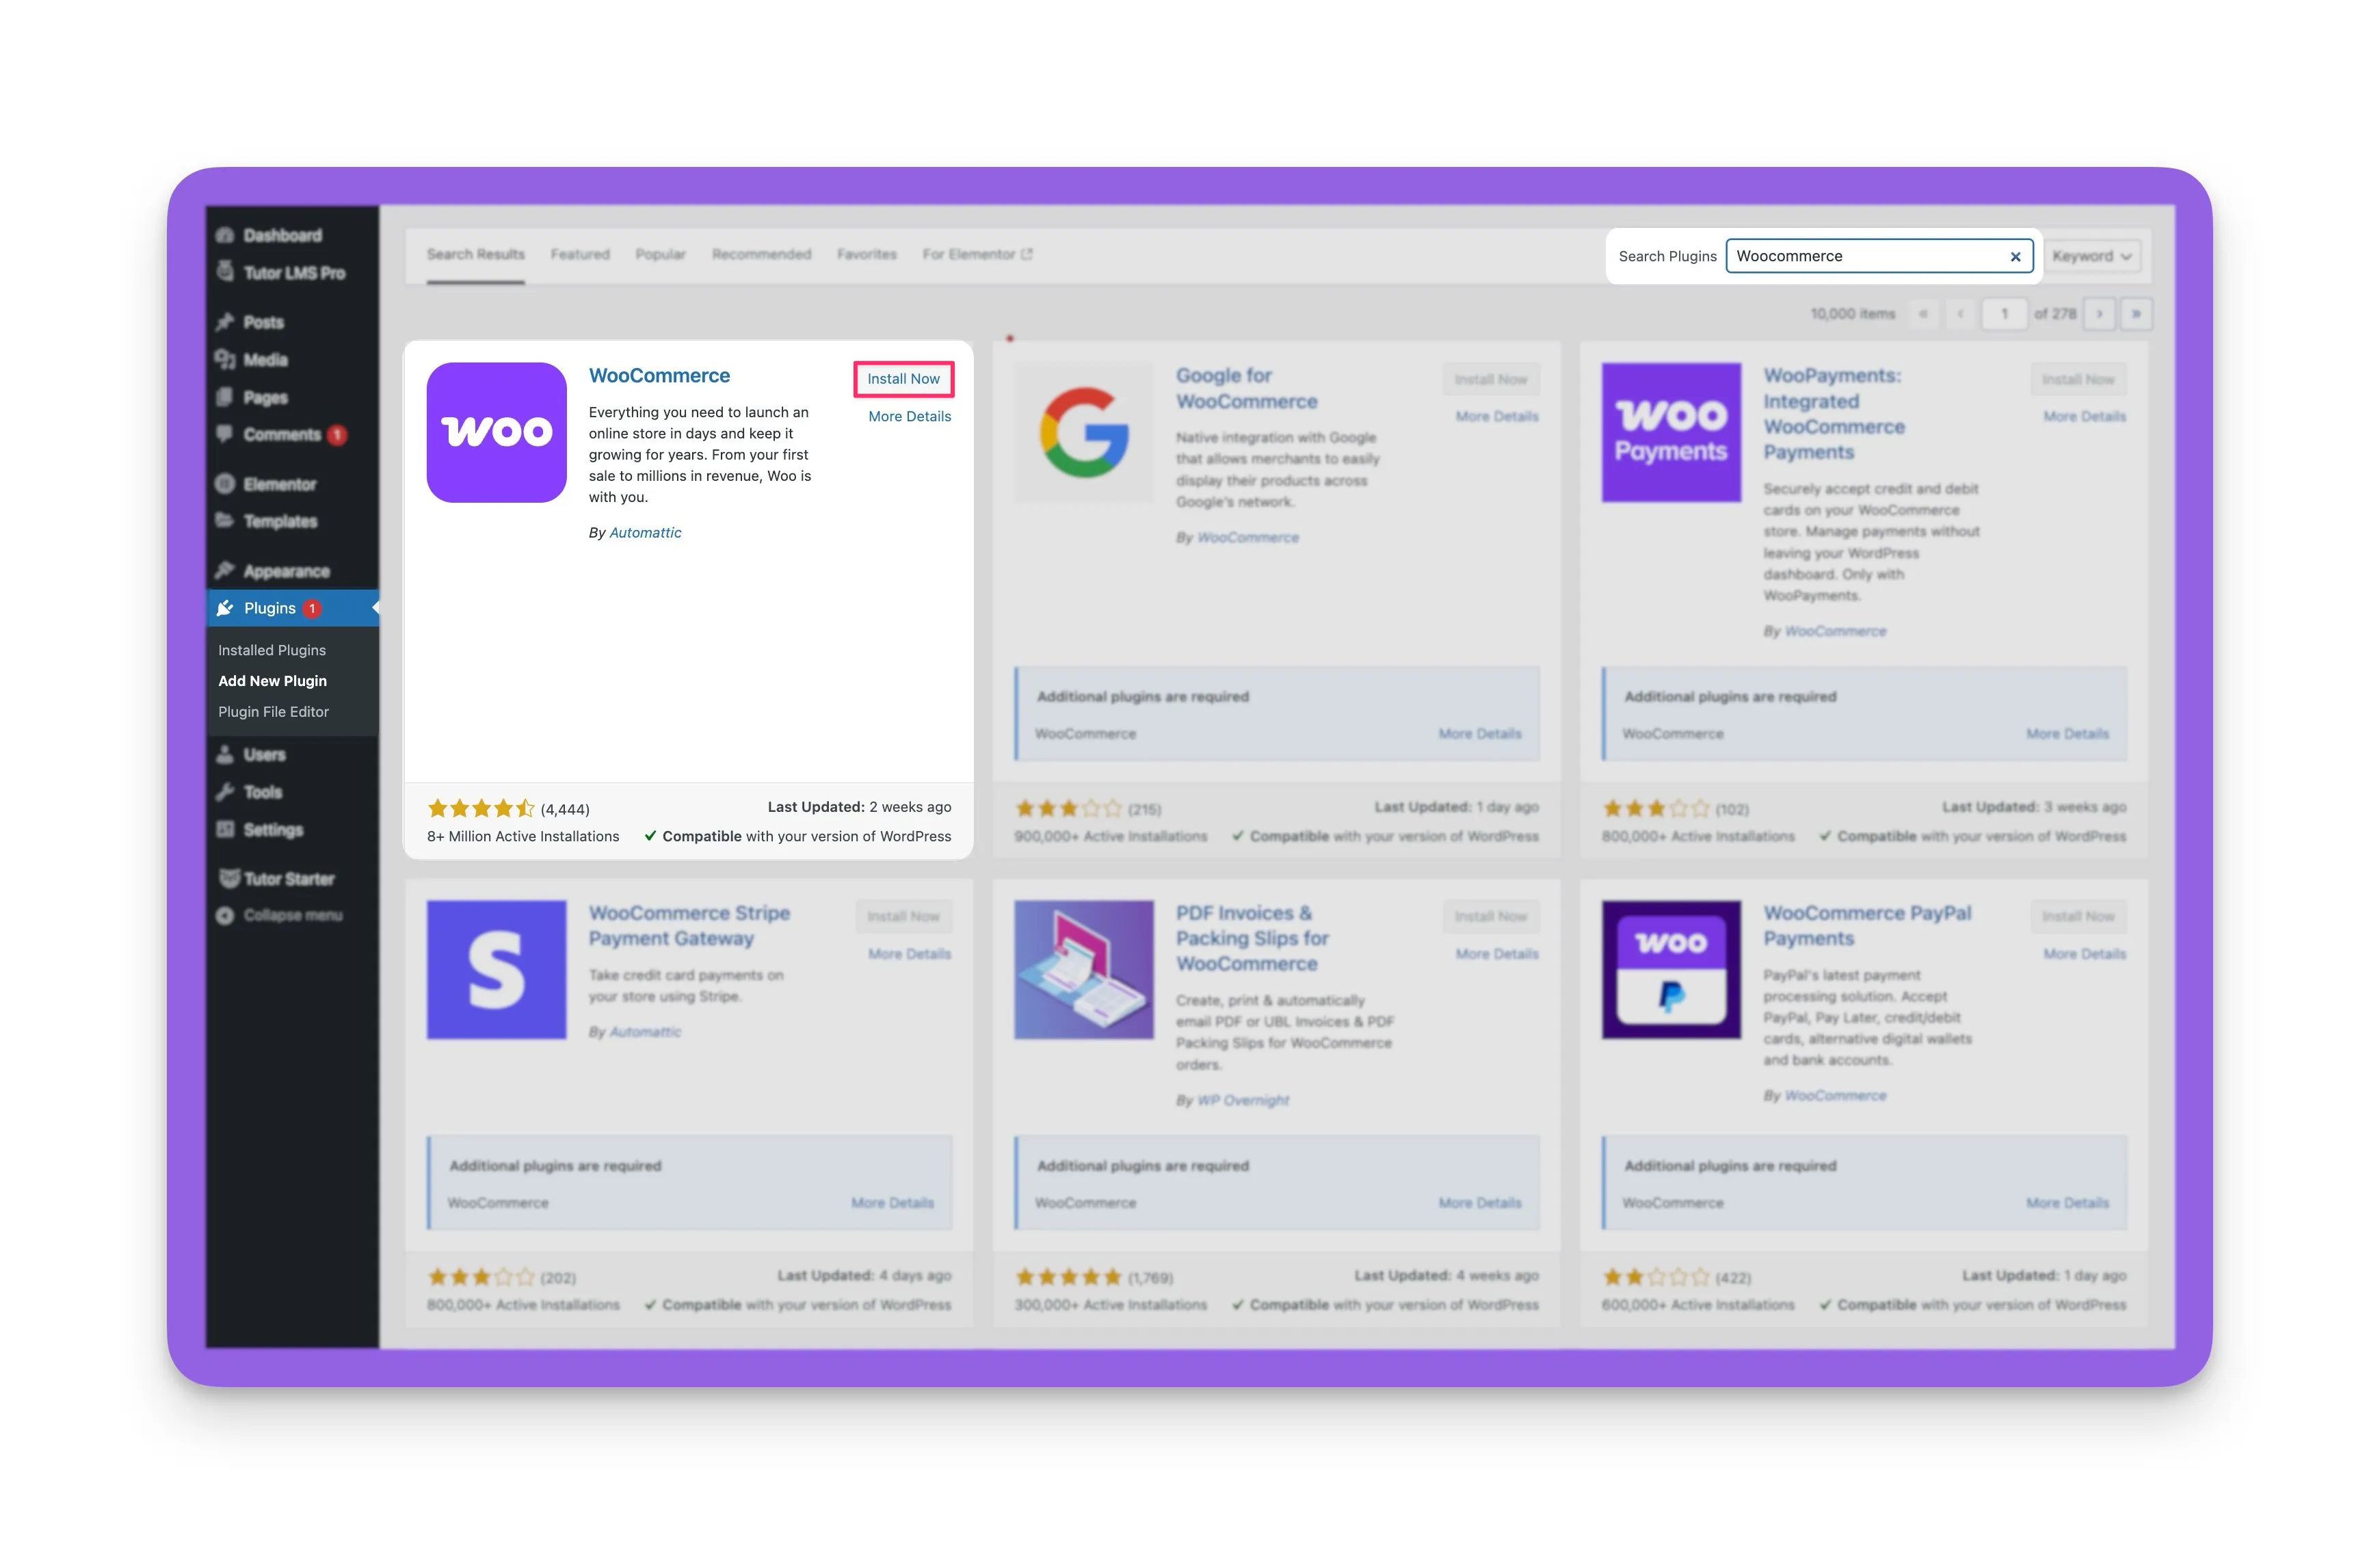
If you don’t have WooCommerce installed yet, head to your WordPress dashboard, go to Plugins > Add New, and search for “WooCommerce.” Click Install Now, and then Activate once the installation is complete.
Step 2: Enable Guest Mode in Tutor LMS
Just like with the native method, you need to enable guest mode within Tutor LMS. Go to Tutor LMS Pro > Settings > Monetization. This time, select “WooCommerce” as your “Select eCommerce Engine.” After saving your changes, you should then toggle the “Enable Guest Checkout”.

Step 3: Configure WooCommerce Settings
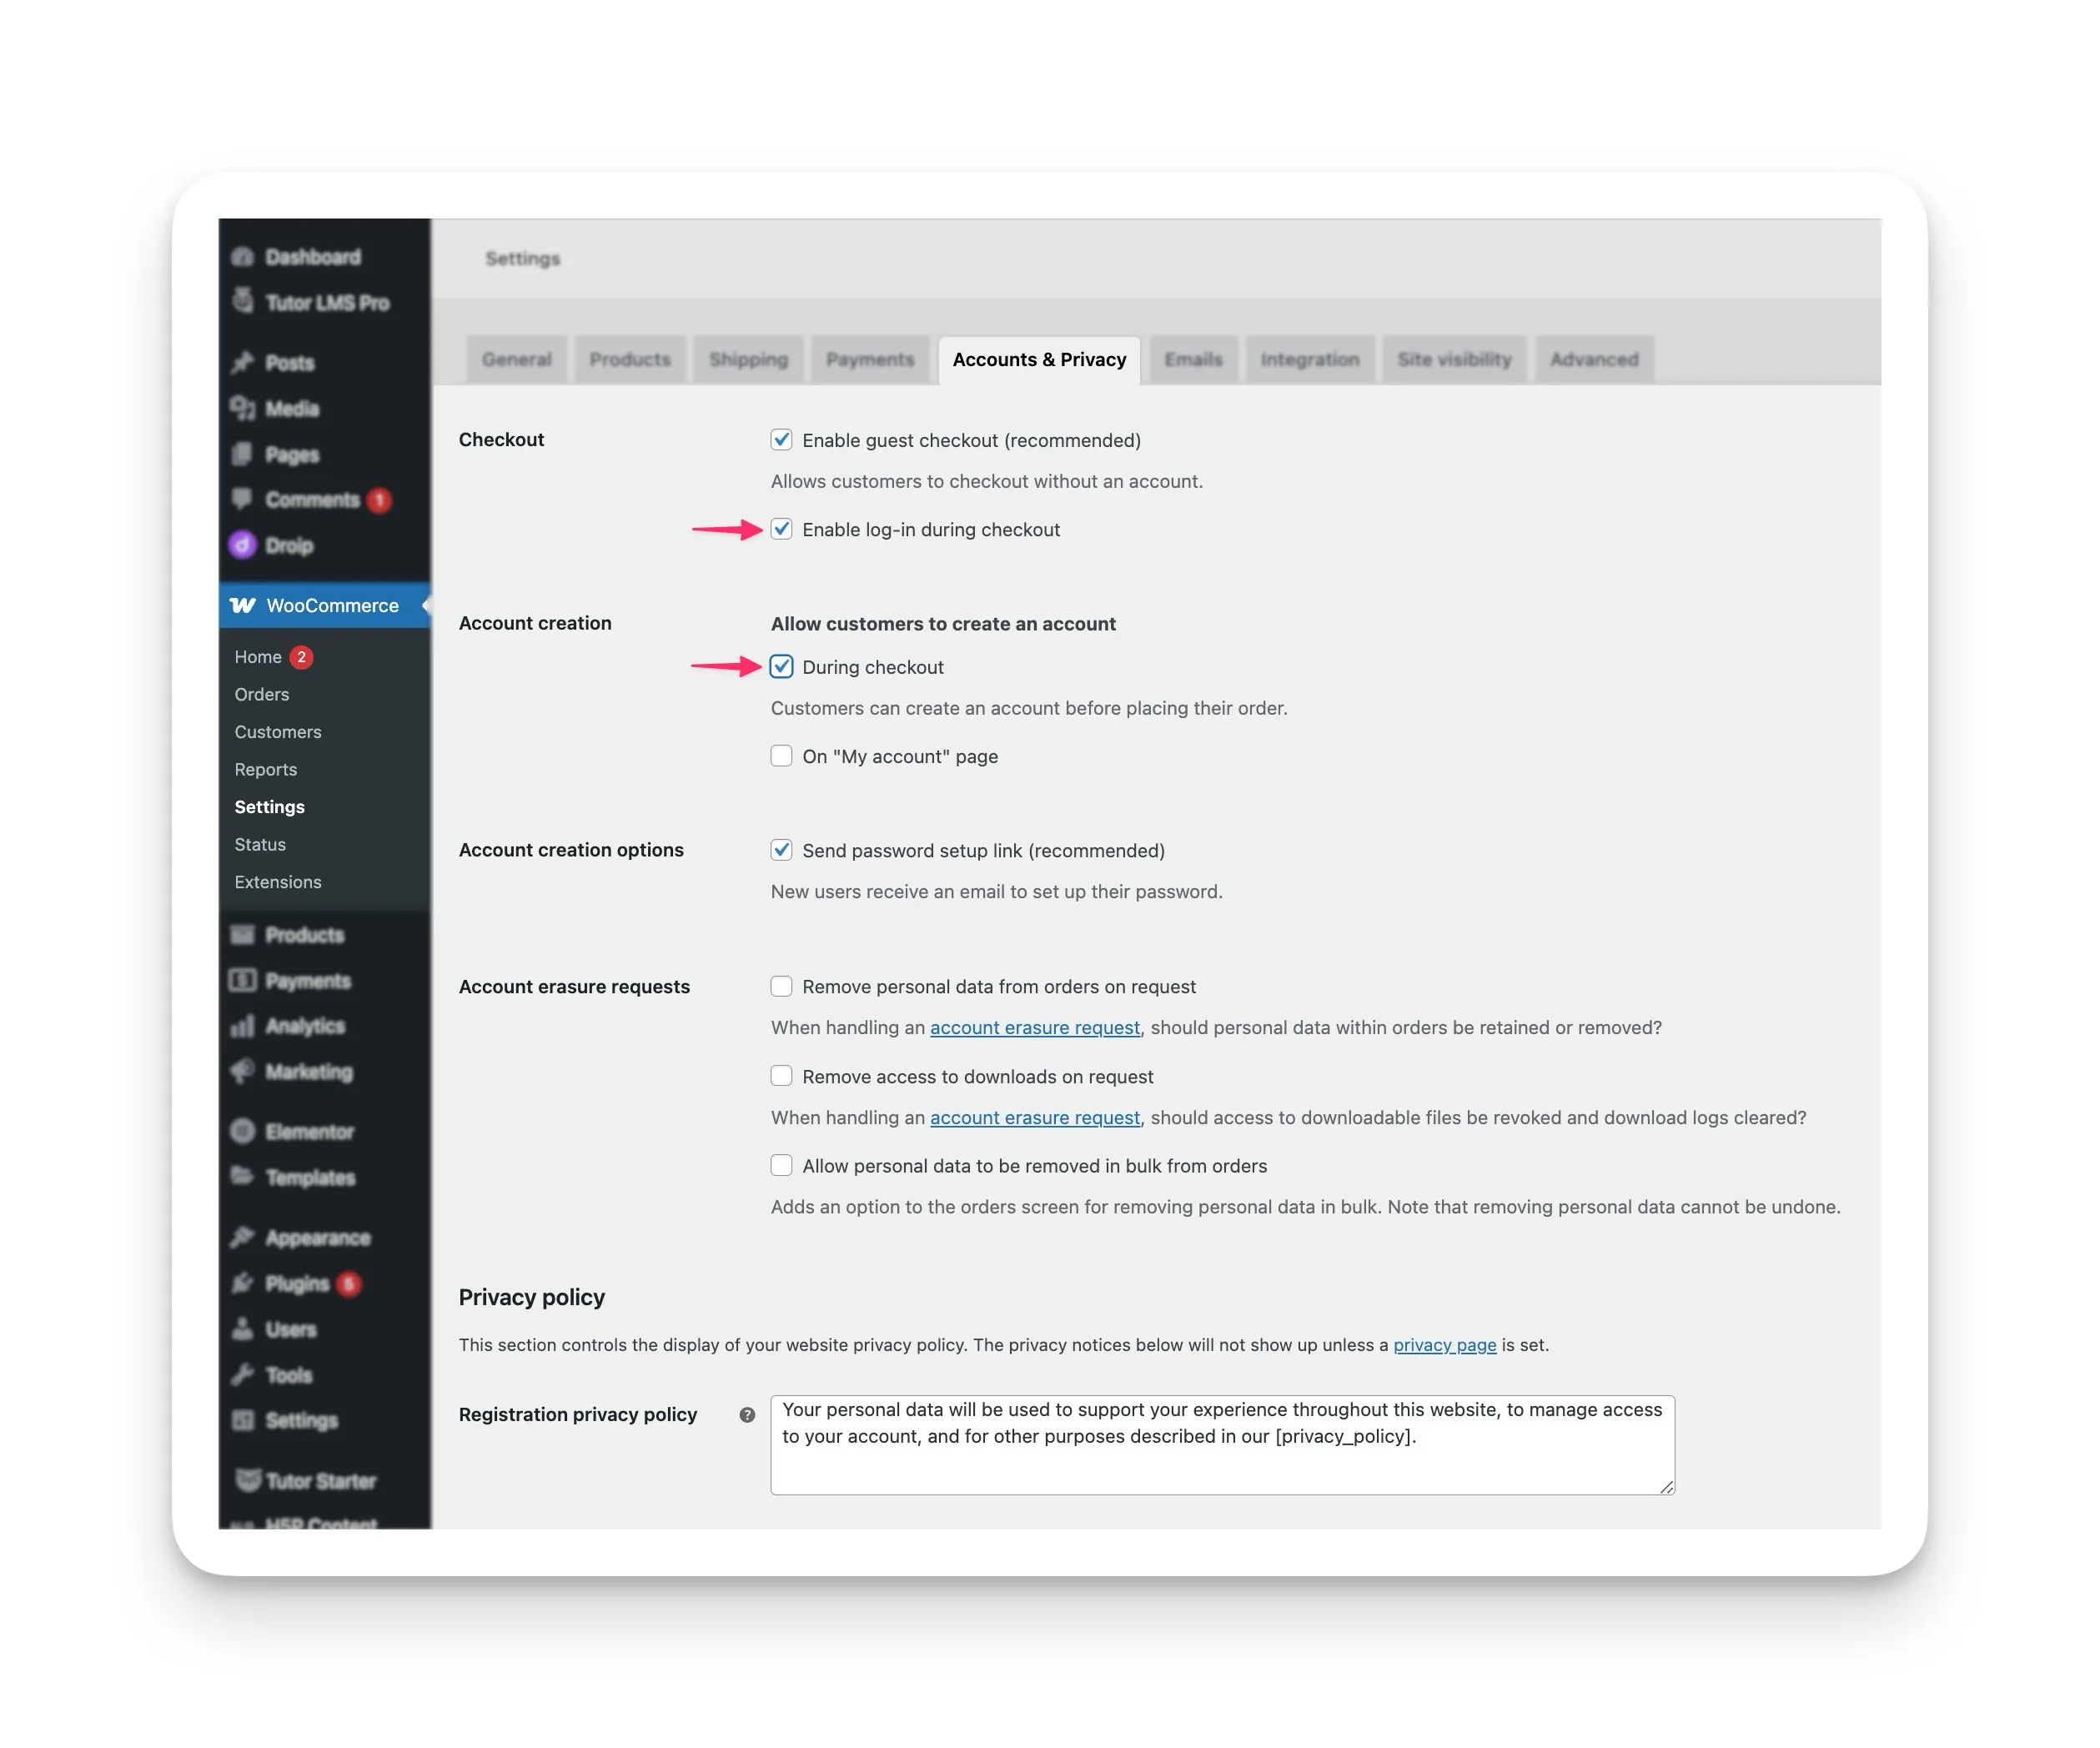
Now, let’s fine-tune WooCommerce for optimal guest checkout functionality. Navigate to WooCommerce > Settings > Accounts & Privacy. Make sure the following checkboxes are selected:
- Allow customers to checkout without an account: “ Enable log-in during checkout” (Enable)
- Allow customers to create an account: “During Checkout” (Enable)
Step 4: Set Up Add to Cart Behavior
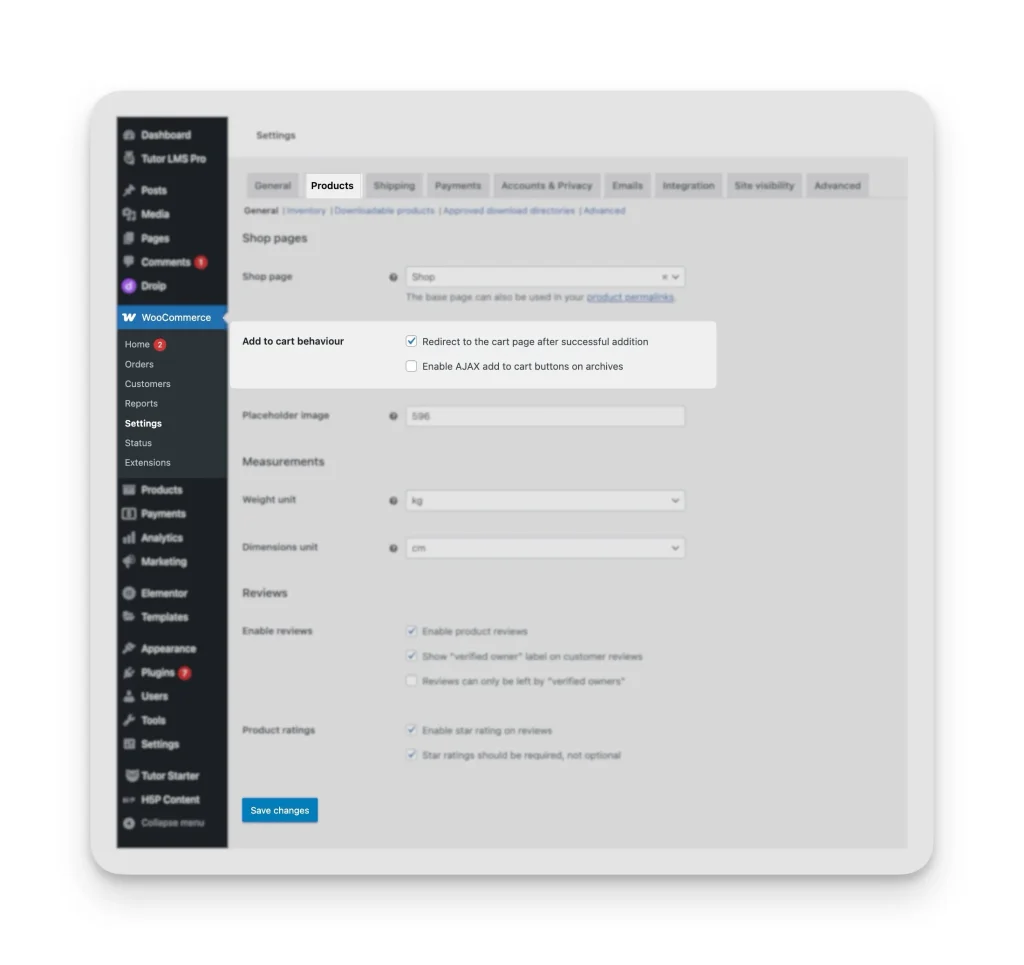
Finally, let’s ensure a smooth checkout process. Go to WooCommerce > Settings > Products. Within the “General” find the “Add to cart behavior” section:
- Redirect to the cart page after successful addition: (Enable)
- Enable AJAX add to cart buttons on archives: (Disable)
- Click Save changes.
While setting up guest checkout is generally straightforward, you might occasionally encounter minor hiccups. For a comprehensive guide to resolving common guest checkout problems, and for more detailed information on WooCommerce and other integrations, please refer to our detailed Tutor LMS documentation.
Conclusion
Guest checkout transforms your Tutor LMS platform into a learner-friendly hub where enrollment feels effortless. Whether you use the native “Buy Now” feature for simplicity or customize the experience with WooCommerce integration, the goal remains the same: reduce barriers and let your courses shine. By removing forced registrations, you’re not just streamlining purchases—you’re respecting your audience’s time and building trust.
Whether you choose the native method for its speed and simplicity, or WooCommerce for its extended functionality, the key is to take action. Start tracking your conversion rates before and after enabling guest checkout, and be prepared to see a positive impact.

Comments 6
Currently, we have modified the checkout to only require name, email, and phone number.
When checking out for the first time as a guest, the process works fine.
However, after logging out and checking out again as a guest using the same email, the previously purchased course disappears and the new course is also not enrolled, even though the payment is successful.
Does guest checkout work properly with custom checkout fields, or does it require using the classic checkout?
Your comment is awaiting moderation. Only you can see it until it is approved.
It would be nice to have the option to customize the request of billing address to the customer, because you don't even have a checkbox to accept the ToS and the Privacy Policy in your native checkout.
Your comment is awaiting moderation. Only you can see it until it is approved.
Thanks for your feedback! Tutor LMS's native eCommerce does include a ToS and Privacy Policy checkbox at checkout. You can see it in action here: https://prnt.sc/wwoispRtiOj1
This checkbox will appear as long as you've selected either the Privacy Policy or the Terms & Conditions page in the settings. Here's where to configure it: https://prnt.sc/4OQfgGezvCdm
Let us know if you need any help setting it up!
Your comment is awaiting moderation. Only you can see it until it is approved.
How will the customer enroll in the course if they don't have an account because they did a guest checkout?
Your comment is awaiting moderation. Only you can see it until it is approved.
An account will be automatically created using the email they enter during guest checkout.
They’ll get a password reset email right after purchasing the course. After setting the password, they can log in to your website and access the course content.
Your comment is awaiting moderation. Only you can see it until it is approved.
Hi Saiful
This is a very bad UX behaviour. It really drives me crazy. I cannot send a passwort resent email because it will be confusing my client!
Imagine yourself in that situation: you buy a product and then you receive a mail from WooCommerce asking you to reset your passwort although you never had set up a password. It is very unprofessional. There must be another work-around for this please.
Usually the case should be very simple:
1) Someone buys a course
2) He receives a mail for order confirmation which ask him to create now create a TutorLMS account
3) He logs in in his account and then he sees the course, he has bought previously. So there must be a synchronization between the mails put in during the checkout process and put in during account reaction on tutorLMS.
I kindly ask you wheter you can provide a solution for this. Right now it is very unprofessional
Your comment is awaiting moderation. Only you can see it until it is approved.
No comments yet. Be the first to share your thoughts.