
An LMS site has more to protect than just pages and posts. It handles learner accounts, course progress, quizzes, payments, and other sensitive data, making it an attractive target for attacks.
The challenge is that you can’t always tell which visitors are legitimate and which are looking for a way in. That’s where a Web Application Firewall (WAF) can help.
It acts as a security layer between your site and the internet, analyzing incoming traffic and blocking suspicious requests before they reach your WordPress site. Cloudflare WAF is one of the most popular options. But what exactly does it protect against, and how can it help secure a WordPress course platform?
Let’s take a closer look at how Cloudflare WAF works and how you can use it to protect your course site.
What is Cloudflare WAF
In short, Cloudflare WAF is basically a Web Application Firewall. It inspects HTTP/S requests at the edge, using managed and custom rules to identify and block malicious payloads before they can compromise your application.
It analyzes each request and decides whether to allow it, block it, or challenge it to verify that it’s not a bot. This happens before the request reaches your origin server, where WordPress is hosted. Malicious requests are stopped at Cloudflare, so your server doesn’t have to process them.
How Cloudflare WAF Protects a Course Site
Cloudflare WAF firewall checks every visitor before they reach your website. It reviews each incoming request and decides whether to let it through, block it, or challenge it to prove it’s not a bot.
Cloudflare runs this check at the network level, ahead of WordPress entirely. Two things carry most of the weight here:
- Managed rulesets: Every Cloudflare-connected site gets a free ruleset automatically, built to catch common attack patterns like SQL injection attempts and known exploit signatures, and it updates on its own as new threats appear.
- Rate limiting: Available on every Cloudflare plan now, including free ones, rate limiting slows down or blocks repeated requests hitting the same page, which matters most on login and checkout forms.
Earlier this year, this played out in a real way. A critical WordPress vulnerability was disclosed, serious enough that an attacker could run code on an affected site without logging in at all. Cloudflare had firewall rules live within hours, protecting every connected site while the official WordPress patch rolled out. Sites without a WAF in place just had to wait.
This is the part that matters most for a course platform. Your login pages, registration forms, and checkout pages are exactly the kind of pages bots target, simply because they offer something worth attacking, whether that’s account access or payment data.
None of this makes your site special. It puts you in the same category as thousands of other WordPress sites running logins and payments, all getting hit by the same generic automated attacks.
Native Security Features in Tutor LMS
Cloudflare WAF stops traffic before it reaches your course site. Tutor LMS picks up from there, handling what happens once someone is actually logged in and using your platform. This is where a lot of strong protection already exists, and it’s worth knowing what’s already covered before layering anything else on top.
- Two-factor authentication (2FA): A second verification step sits behind every password, so a stolen login alone isn’t enough to get in. Students and instructors confirm through email or another method before access is granted.
- Fraud protection: Honeypot fields and Google reCAPTCHA options are available to secure the Tutor LMS login form, the registration form, and the standard WordPress login, built to catch automated sign-in attempts.
- Active session limits: You can cap how many devices stay logged into a single account at once, useful for both security and account sharing between students.
- Email verification: New students confirm a real email address before they can access any course content, which keeps fake sign-ups out of the system.
- Copy protection and hotlink prevention: Protect course videos, lessons, images, and other eLearning content by utilizing the copy protection and hotlink prevention feature.
None of this overlaps with what a firewall does. Cloudflare WAF decides who reaches your site in the first place. Tutor LMS decides what a person can do once they’re already inside the WordPress eLearning course site. An eLearning platform genuinely needs both security on.
Setting Up Cloudflare WAF Through Ultimate Security
Cloudflare lets you manage WAF rules from its own dashboard, but it can be easier to handle the setup from WordPress. Ultimate Security connects your WordPress site with Cloudflare so you can configure the WAF rules without moving between two dashboards.
1. Enable the WAF
Start by opening the WAF settings in your Ultimate Security settings and turning on the WAF rules. This enables the rule setup and the WAF rules option.
2. Connect Your Cloudflare Account
The next step is to connect your Cloudflare account. You can use one of the available authentication methods, depending on how you prefer to manage your Cloudflare credentials.
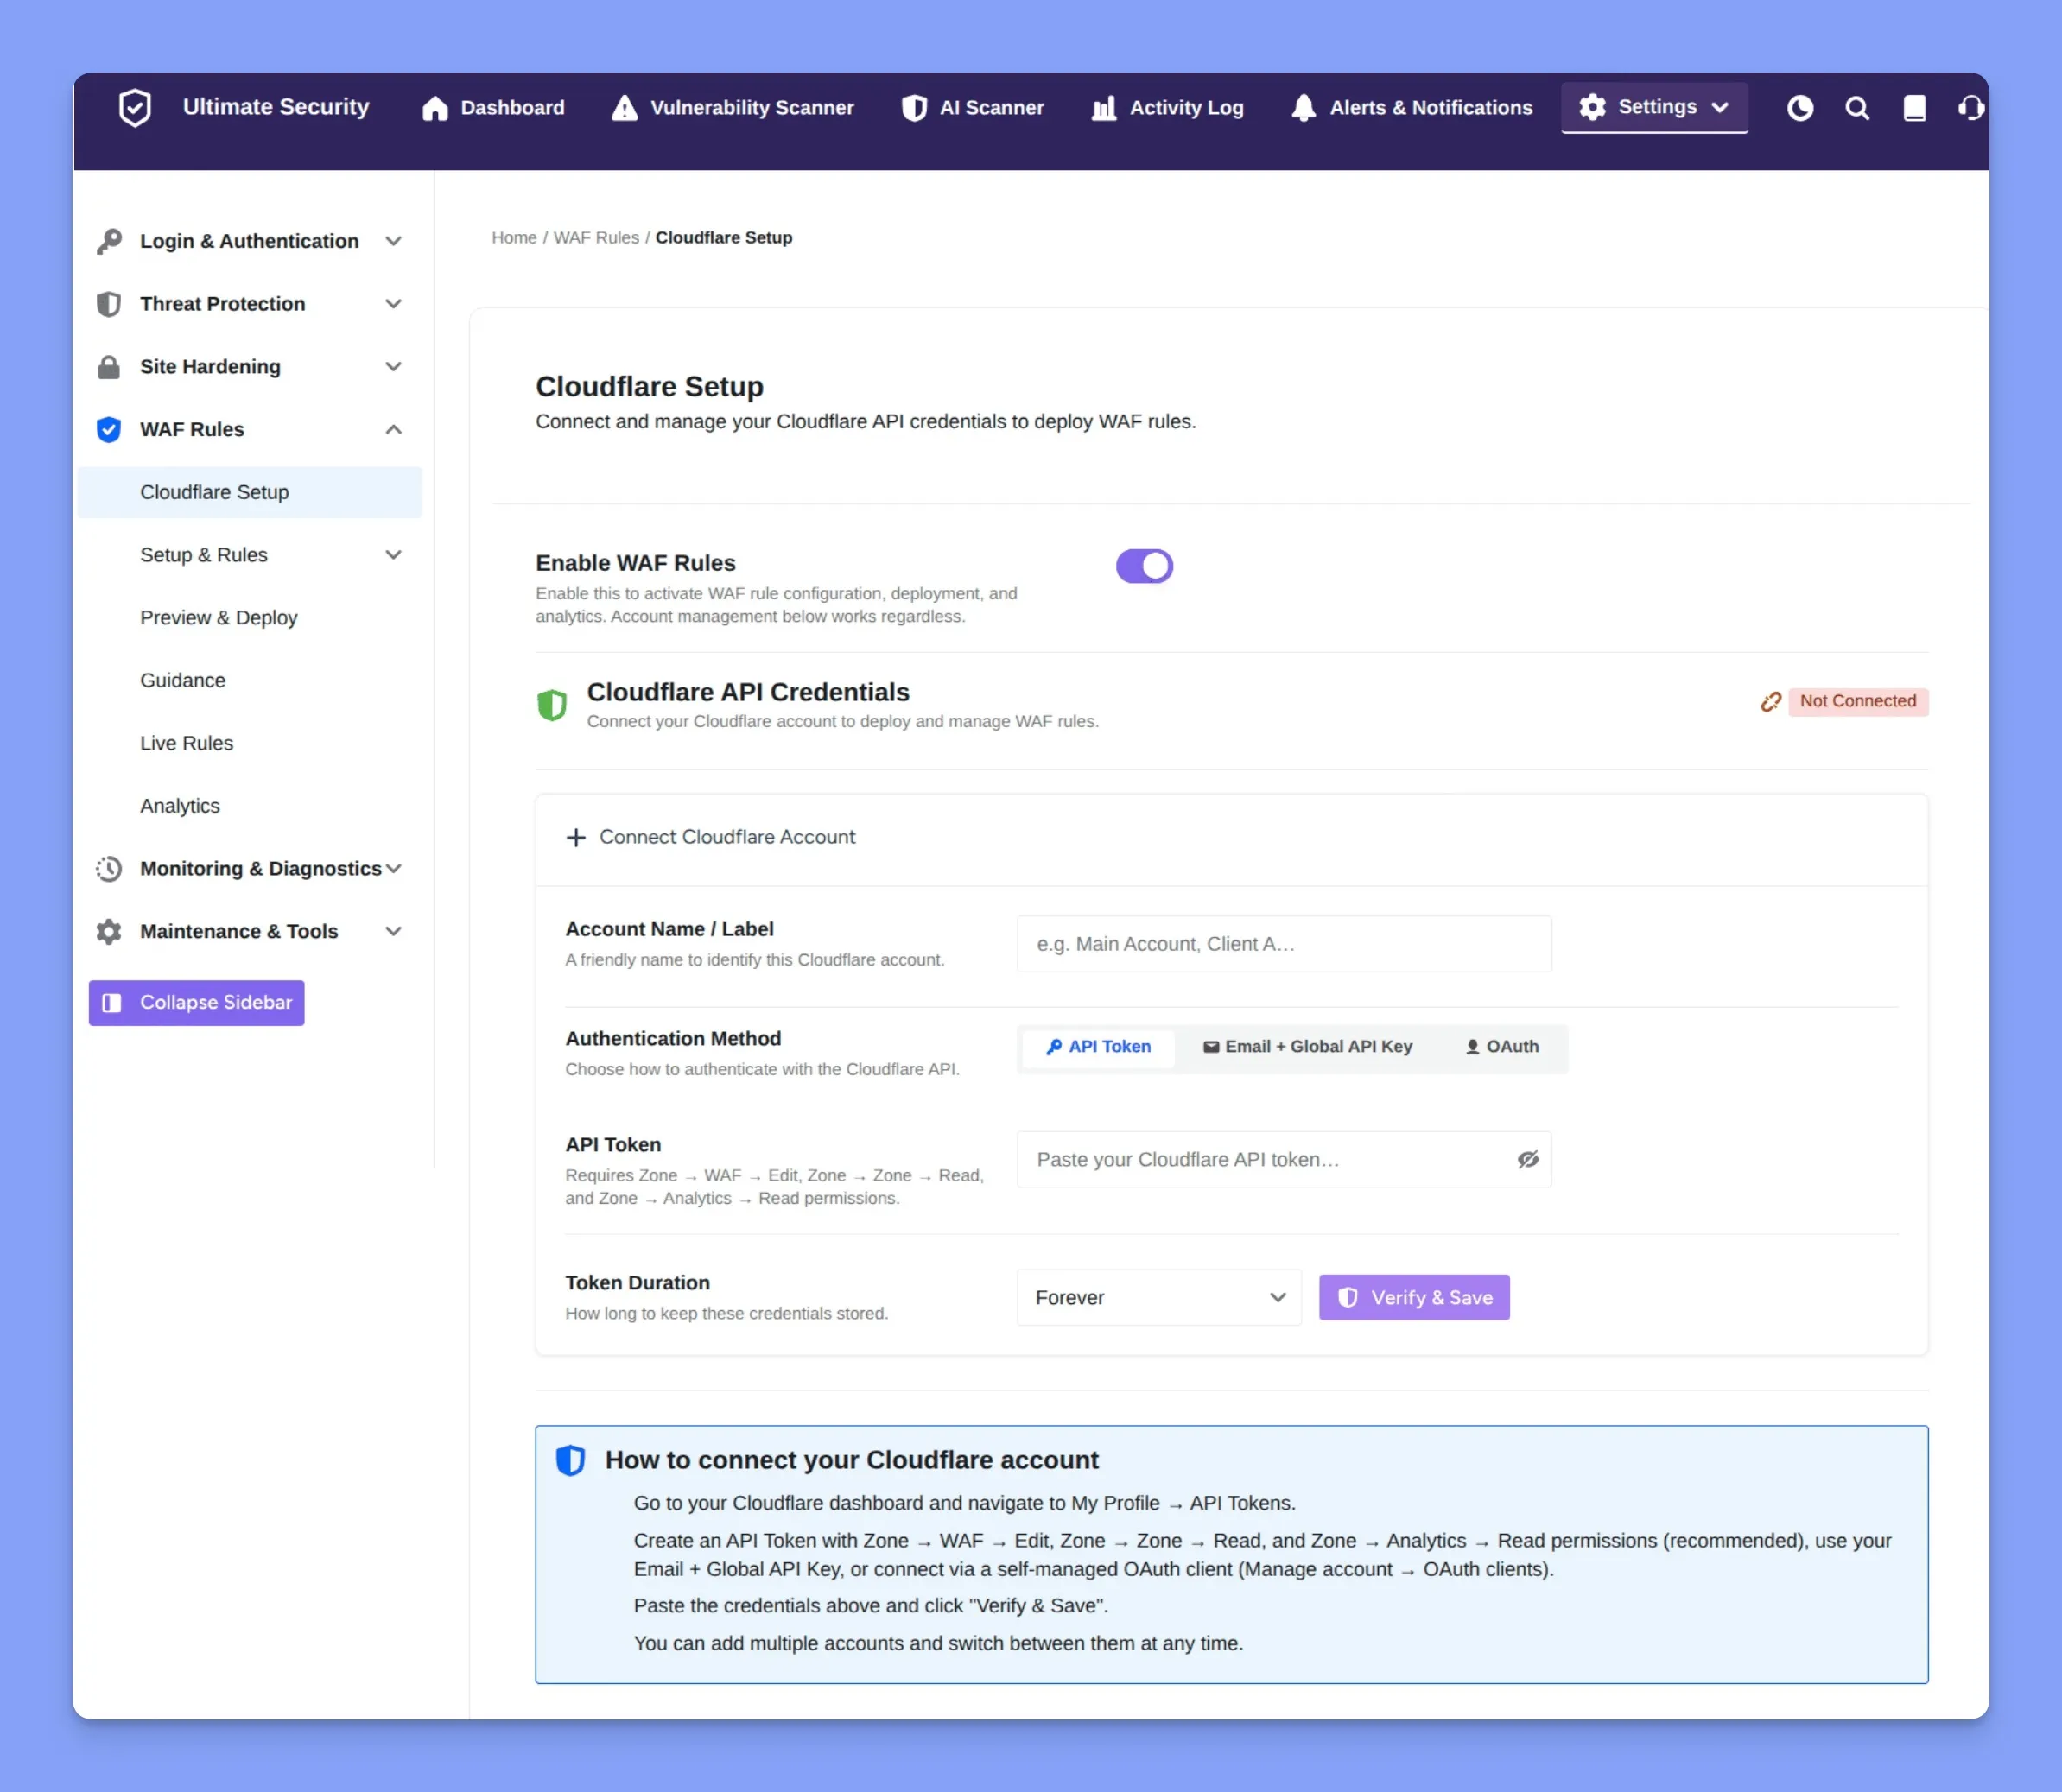
The connection options are:
- API Token: Create an API token in Cloudflare and enter it in the setup. This gives the connection the access it needs to manage the WAF rules.
- Global API Key: Use your Cloudflare account email and Global API Key to connect your account. This option uses your existing Cloudflare API credentials.
- OAuth: Connect your Cloudflare account through OAuth without entering your API credentials manually. You simply authorize the connection and allow the required access.
After entering the required details, verify the connection. If your Cloudflare account has more than one website, you’ll also need to choose the correct zone. A zone represents the website you want to protect.
3. Configure the WAF Rules
Once Cloudflare is connected, choose the WAF rules that fit your site. You don’t need to enable every option. Start with the types of traffic you want to control and adjust the settings based on your site’s needs.
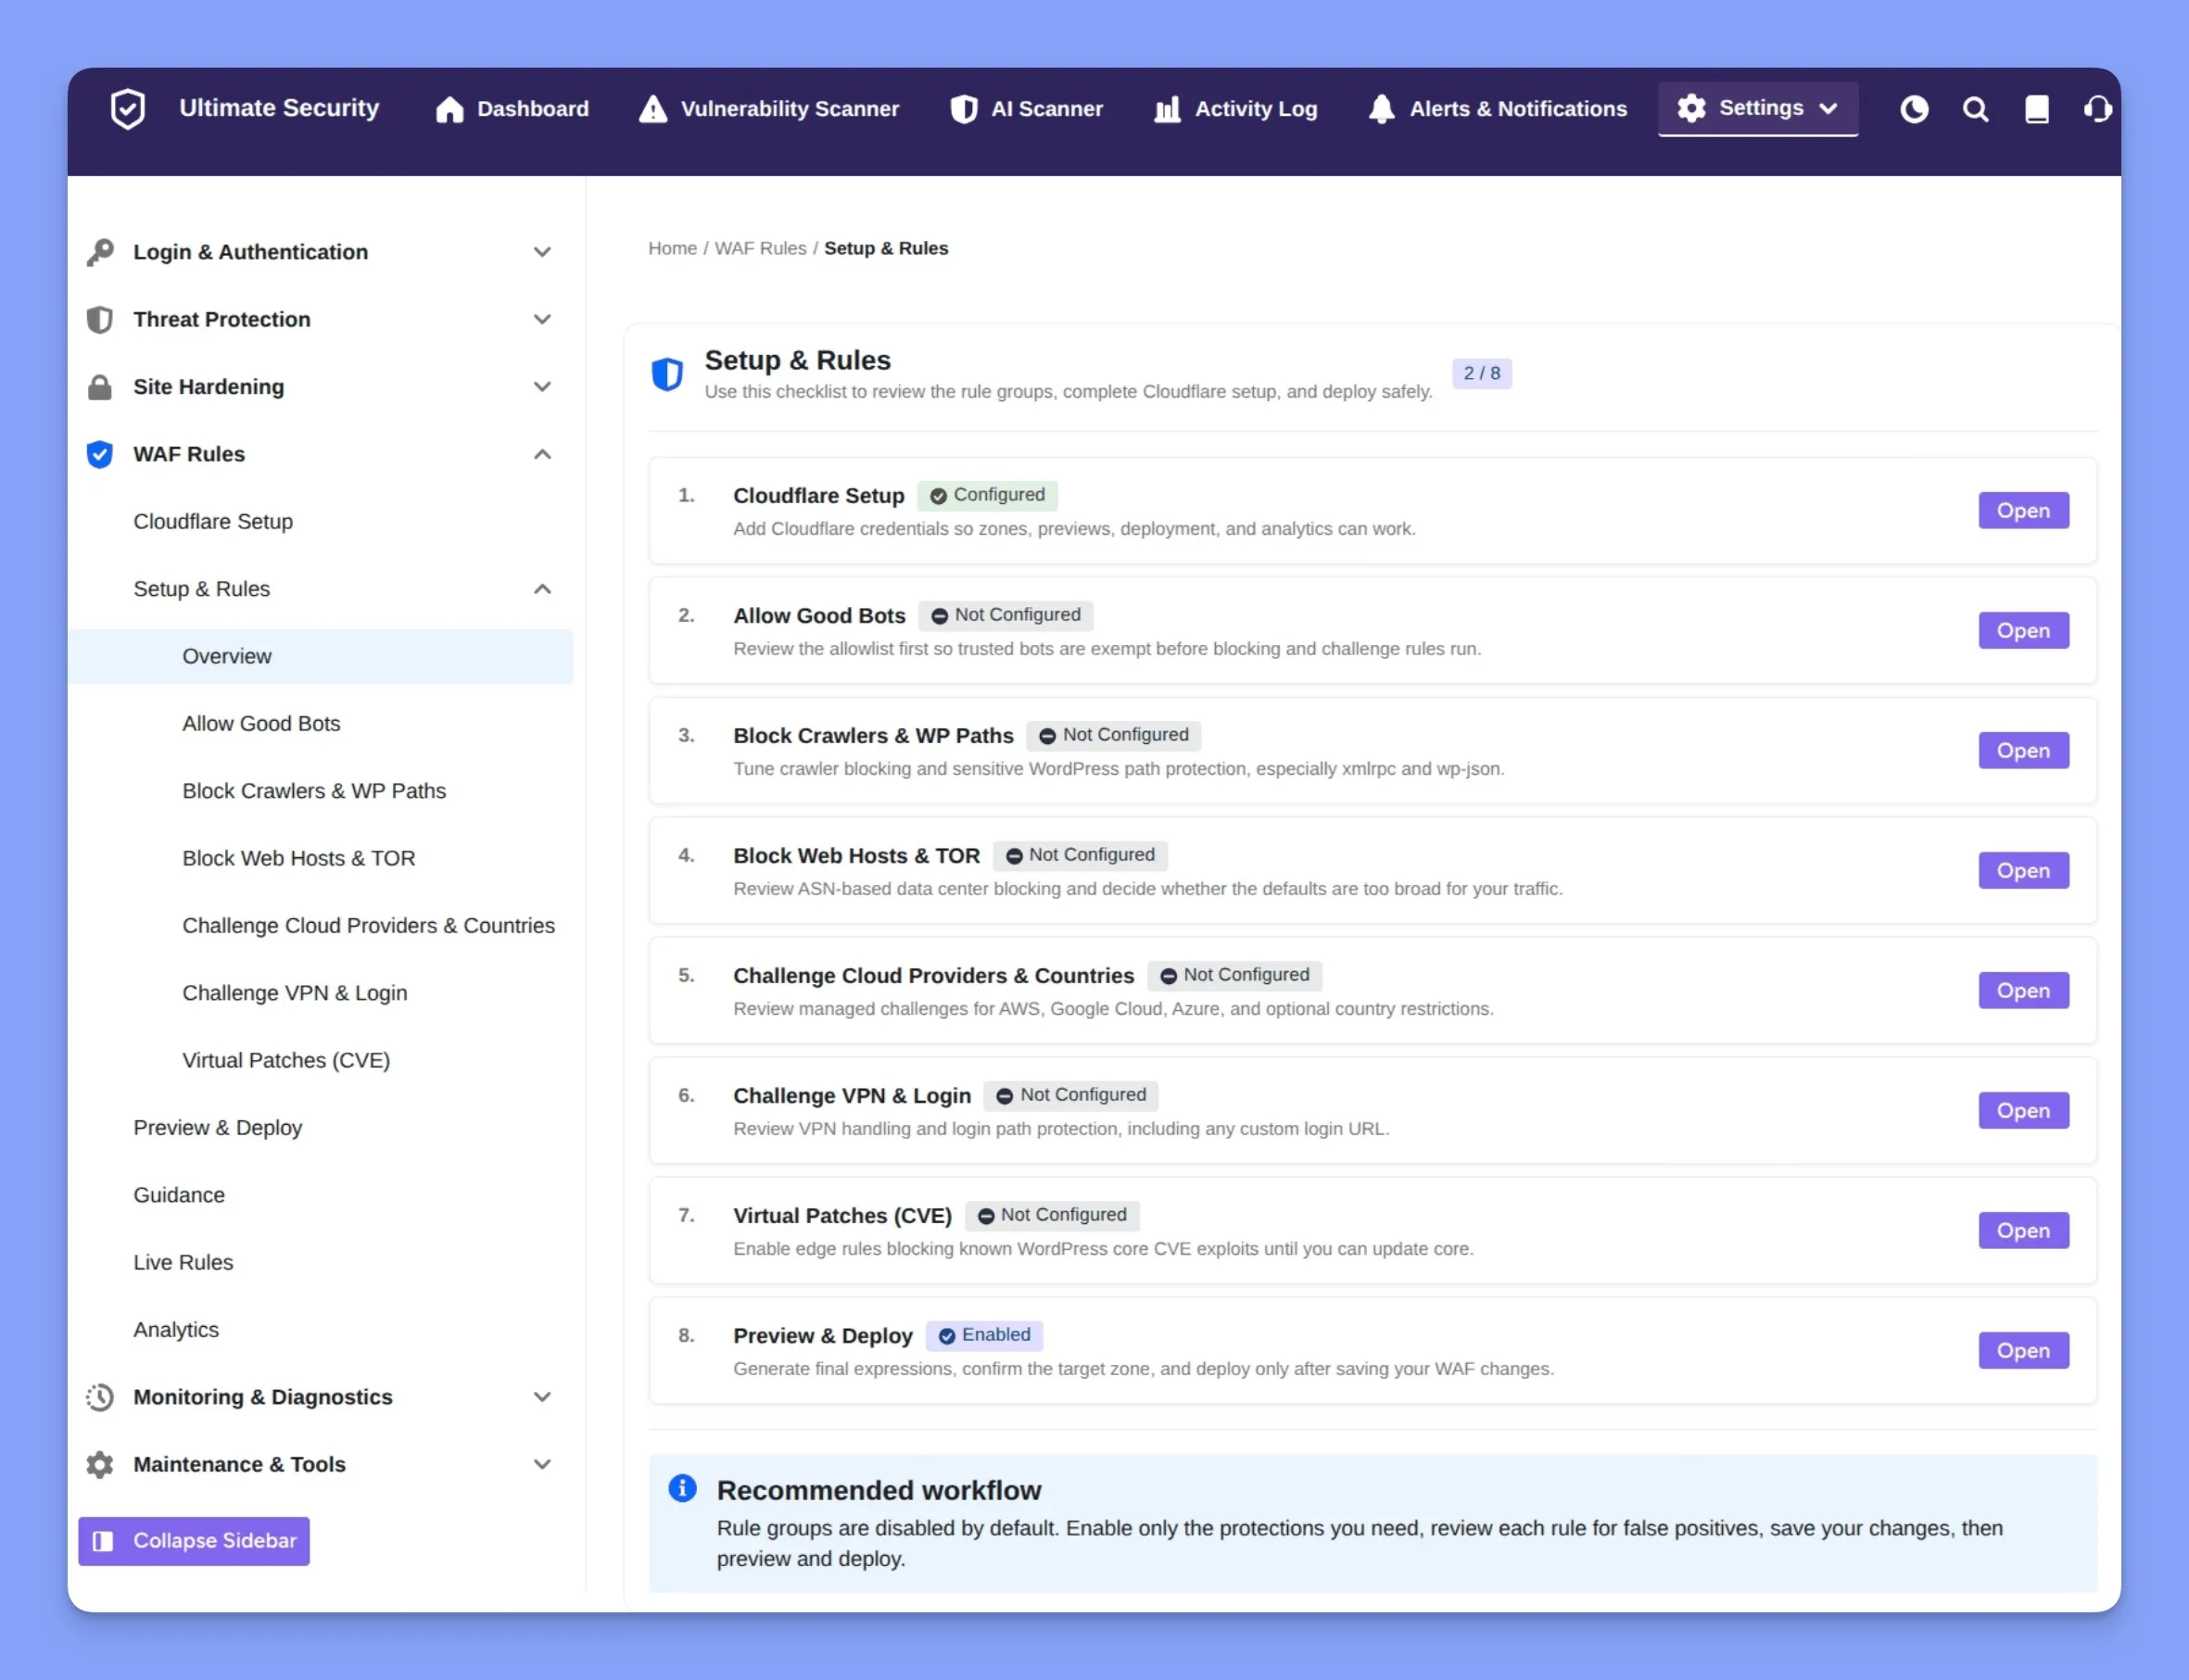
Available rules:
- Allow trusted bots such as search engines, monitoring services, and other legitimate tools.
- Block aggressive crawlers and suspicious WordPress paths that may use extra resources or target sensitive files.
- Block or challenge traffic from web hosting providers and TOR networks.
- Challenge traffic from large cloud providers or selected countries when those controls make sense for your audience.
- Challenge VPN traffic and protect the WordPress login page from automated login attempts.
It’s a good idea to configure trusted bots first. These rules allow services you need, such as search engines and monitoring tools, to access the site before other WAF rules are applied.
4. Review the Rules Before Deployment
Before making the rules active, use Preview Rules to check what will be created. The preview shows the rule expressions and the action assigned to each rule, such as Skip, Block, or Managed Challenge.
5. Select the Cloudflare Zone
If you manage several websites through the same Cloudflare account, select the domain you want to protect from the Zone Selector. Save your WAF settings before deploying them. The deployment uses the saved configuration to create the rules for that zone.
6. Deploy the Rules
Once you’ve checked the settings, click Deploy Rules. This sends the saved WAF configuration to Cloudflare and makes the rules active. The deployment only manages the rules created through the plugin. Any other Cloudflare rules you’ve created separately remain in place. If you need to remove these rules later, you can use Remove Plugin Rules.
Check the Active Rules
After deployment, check the Live Rules section. Select the Cloudflare zone and click Load Rules to see the rules that are currently active on Cloudflare. You can also use the WAF analytics to review traffic and security activity over periods such as the last 24 hours, 7 days, or 30 days.
For anyone who wants to walk through the full setup properly, there’s a full guide here: Cloudflare WAF setup documentation.
Wrapping Up
Cloudflare WAF for WordPress course sites handles the traffic reaching your platform before it ever touches WordPress. Ultimate Security gives you a way to manage that firewall directly from your dashboard, connecting to Cloudflare and letting you configure, preview, and deploy rules without leaving WordPress.
Tutor LMS already handles the login and content experience once someone’s already in, from two-factor authentication to content protection. Put the two together, and a course platform ends up genuinely covered, not held up by just one layer doing all the work. Neither one replaces the other, and neither is complicated to set up on its own.

Start Using Tutor LMS Today
Ready to take your online courses to new heights? Download Tutor LMS now and enjoy a journey of eLearning excellence.