Running an online academy means collecting personal data at every turn, from initial account registration to course checkout. Many course creators feel overwhelmed by privacy laws and either ignore them or install bulky third-party plugins that slow down their WordPress websites. Tutor LMS offers a lighter, built-in path. Its Legal Consents feature lets you build custom consent notices and maintain complete audit logs without writing a single line of code.
TL;DR: Tutor LMS Legal Consents is an admin-level feature that lets site owners create custom consent notices for registration, login, checkout, and instructor application pages, helping course creators respect learner privacy without installing extra plugins.
Why Legal Compliance Matters for Online Course Creators
Teaching online usually means teaching a global classroom, and privacy law follows your students home. Wherever they live, local rules can apply to you, even if your business is registered somewhere else entirely.
- GDPR (EU/UK): requires explicit opt-in before you collect personal data, plus proof of consent. Timestamps and IP logs prove where and when each box was ticked.
- CCPA / CPRA (California, USA): mandates clear disclosures about how you process data. The checkout page is where that disclosure usually happens, and Tutor LMS eCommerce handles it natively.
- PIPEDA (Canada) and LGPD (Brazil): require audit records you can produce on request.
A downloadable record of who accepted your consent forms, and when, is what turns “the student agreed” from a claim into evidence. Without it, a dispute comes down to your word against theirs.
What You Can Do With Legal Consents (Key Capabilities)
Tutor LMS simplifies compliance through a centralized administrative dashboard located at Tutor LMS Pro > Settings > Legal Consents. The same feature solves different problems at each page, and you decide exactly where each notice appears:
- Student registration: new learners agree to your terms the moment they create an account.
- Login page: returning users see updated policies every time they sign in.
- Course checkout: buyers confirm refund policies and payment terms before the purchase completes.
- Instructor registration: instructors sign off on content ownership and revenue sharing before they join your teaching team.
The message editor supports merge tags like {login} and {checkout}, plus direct links to any published WordPress page, including your Privacy Policy or Terms of Service.
Once the message is written, three collection methods control how firmly it’s enforced:
| Consent Method | How It Works | Ideal Use Case |
|---|---|---|
| Mandatory Checkbox | Requires a deliberate click before submission | Strict GDPR opt-in and legal terms |
| Optional Checkbox | Lets users submit without ticking | Marketing communications and newsletters |
| Display Text Only | Shows informational text, no checkbox | General disclaimers and notices |
Every acceptance is logged automatically, capturing the timestamp, IP address, source page, and browser user agent, for both students and instructors. Those records stay ready to view or export as a CSV whenever a Data Subject Access Request (DSAR) comes in.
How to Set Up Custom Legal Consent Forms in Tutor LMS (Step-by-Step)
Building your first consent form takes a few minutes, start to finish. The entire configuration process happens in one central dashboard.
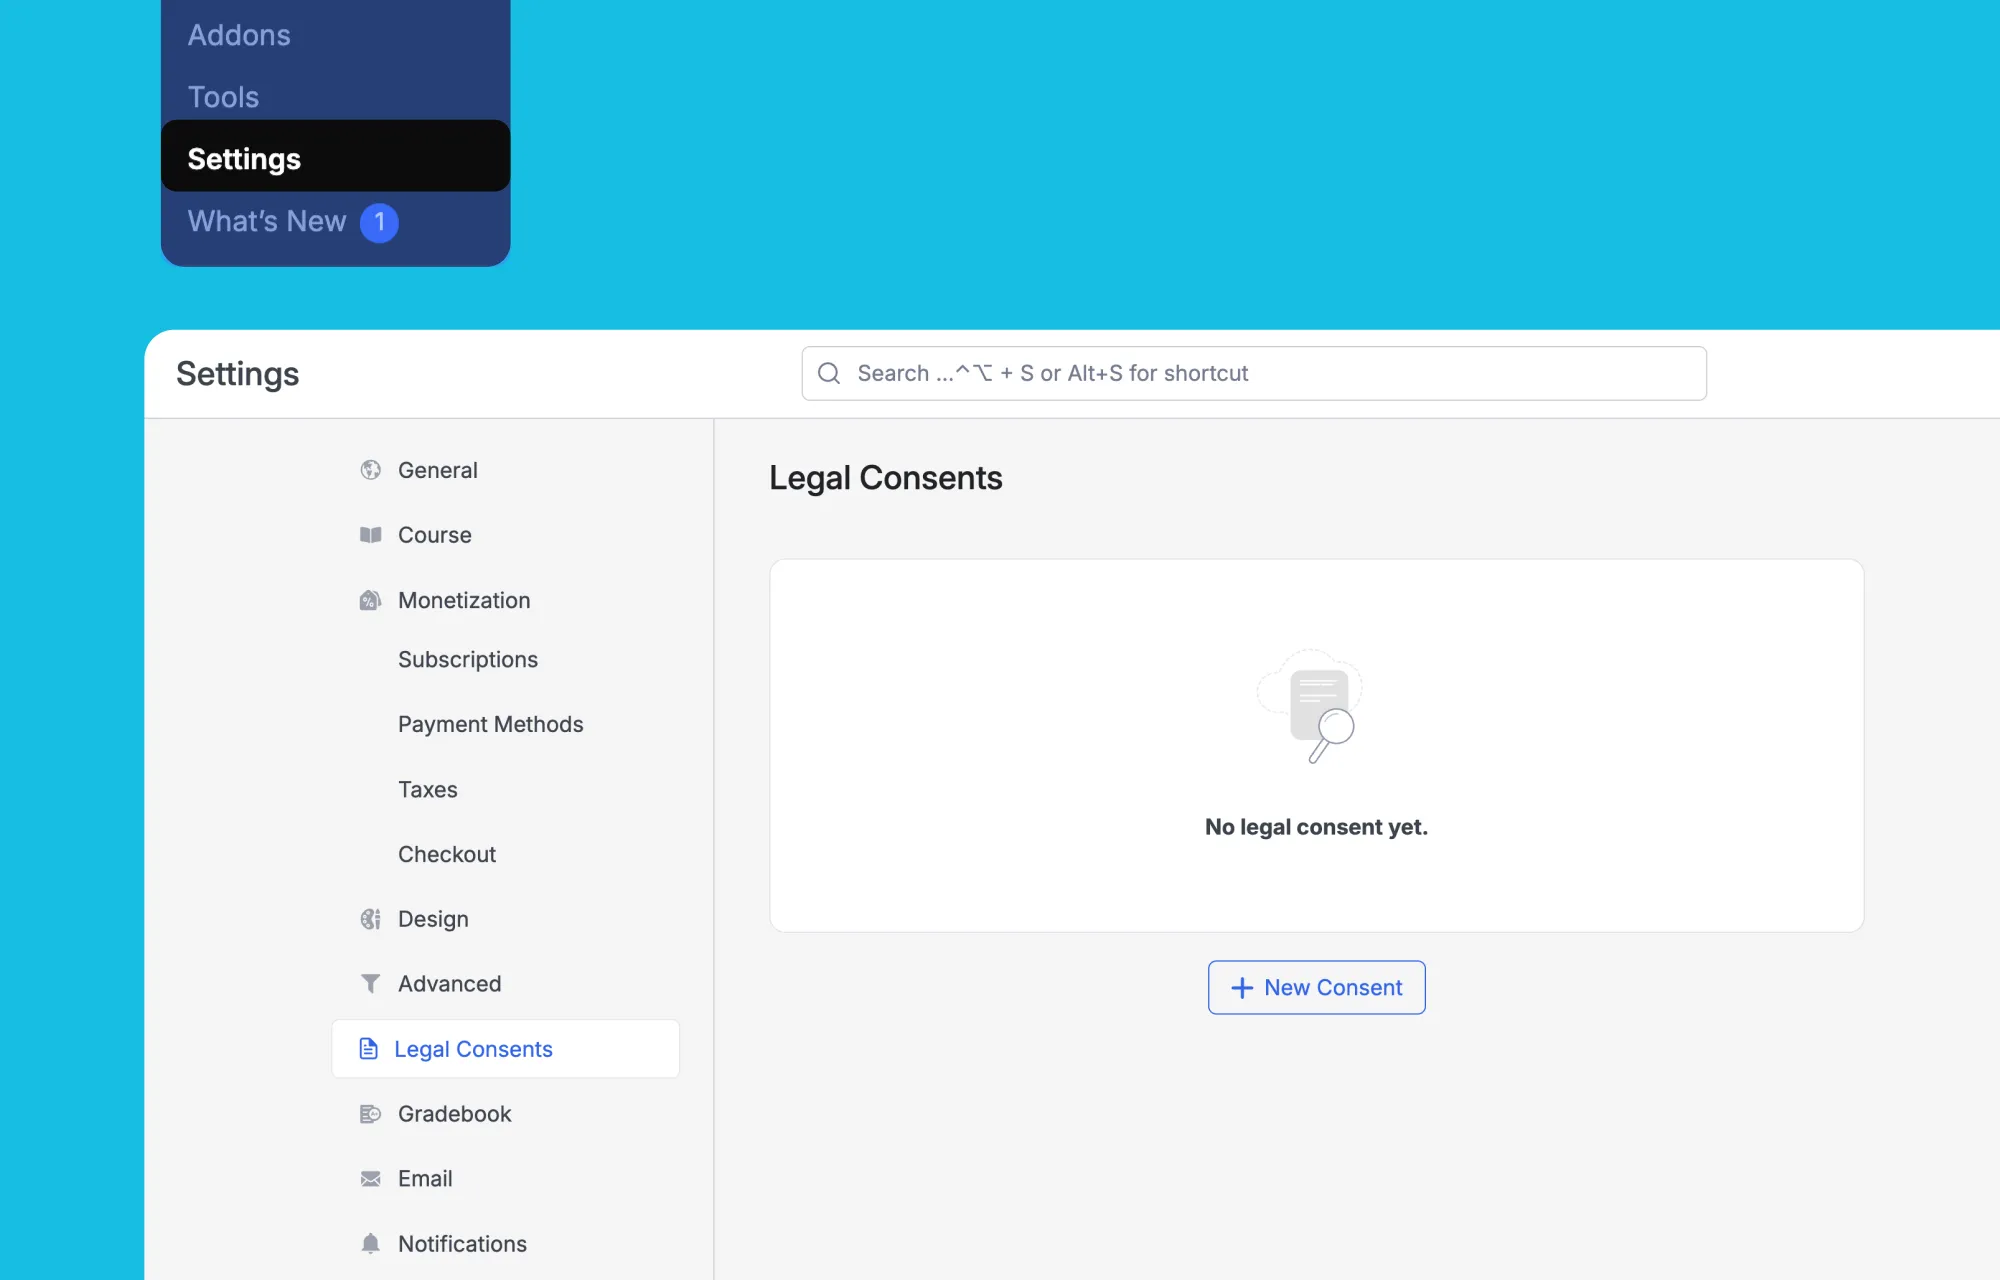
Step 1: Access the settings
Go to Legal Consents under Tutor LMS Pro’s settings menu. Existing consents appear as collapsible cards; click + New Consent to start a fresh one.
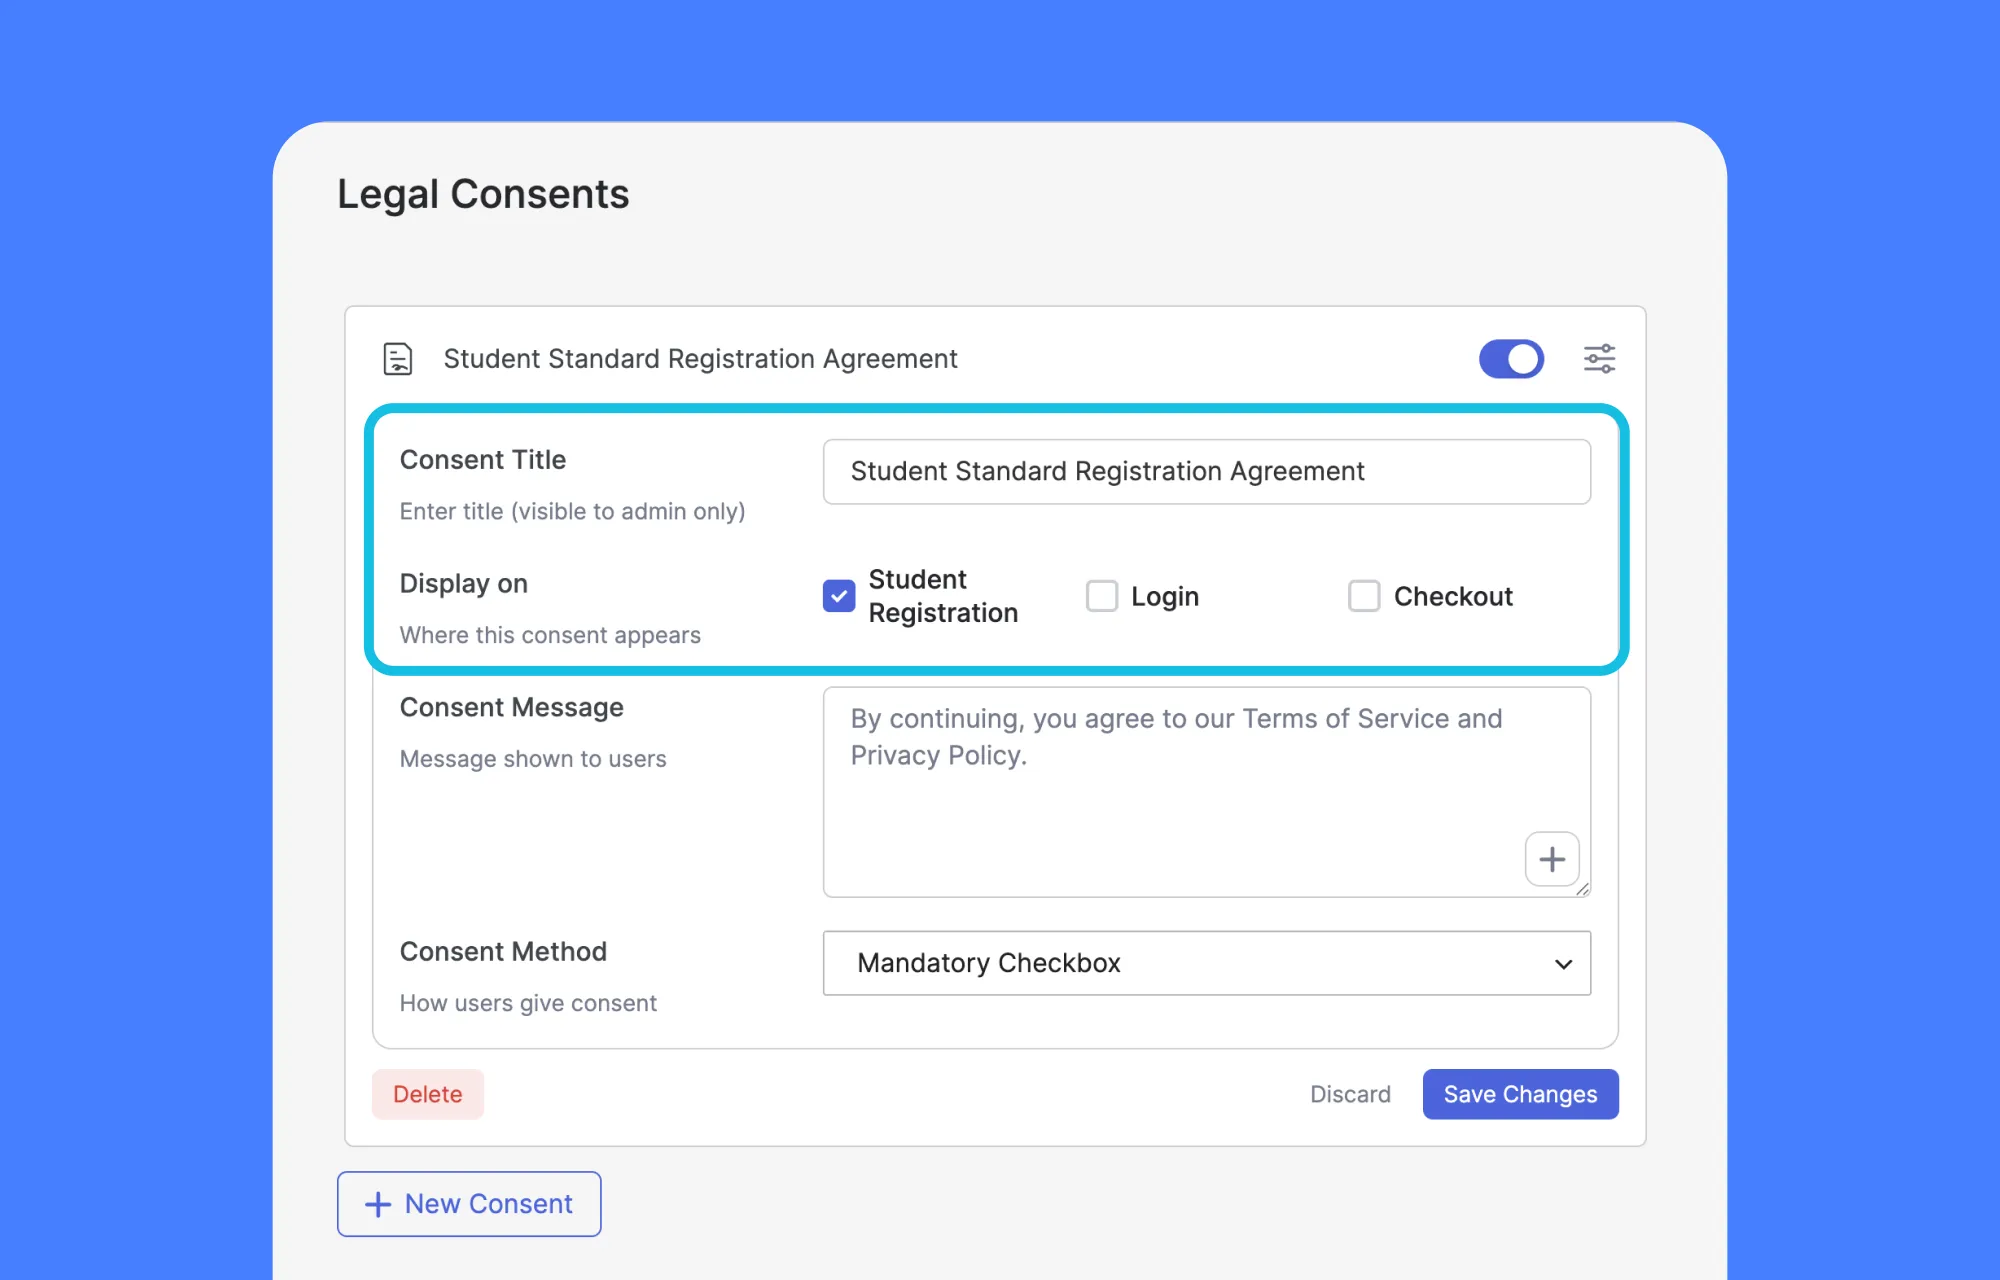
Step 2: Assign a title and touchpoints
The Consent Title is an internal label only, so something like “Terms of Service, Checkout” keeps your list easy to scan. Tick any combination of the four consent Display on locations.
Step 3: Write the notice and insert links
The Consent Message is what users actually read, so short, plain sentences work best.
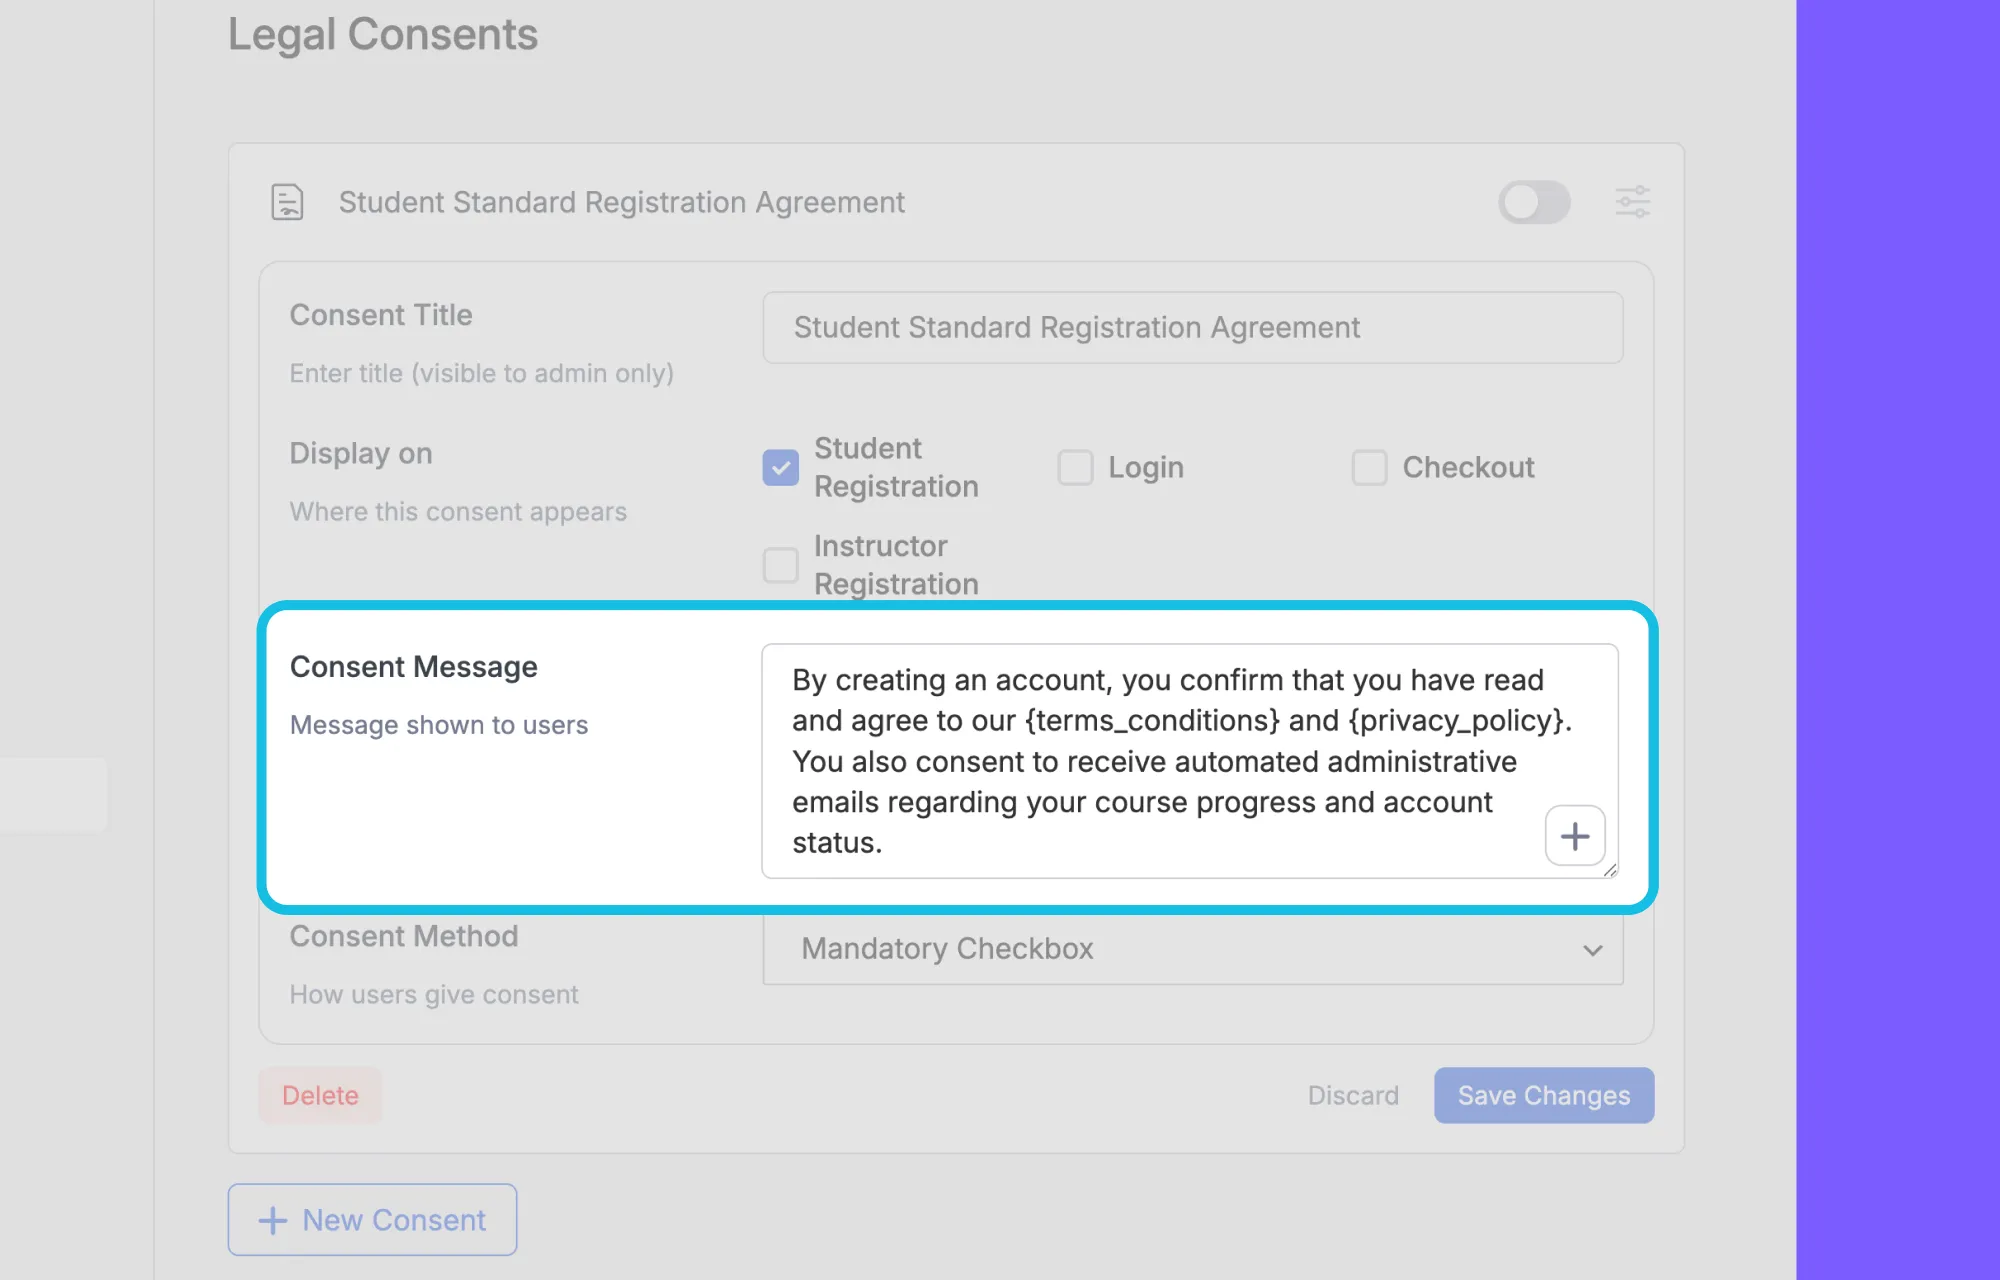
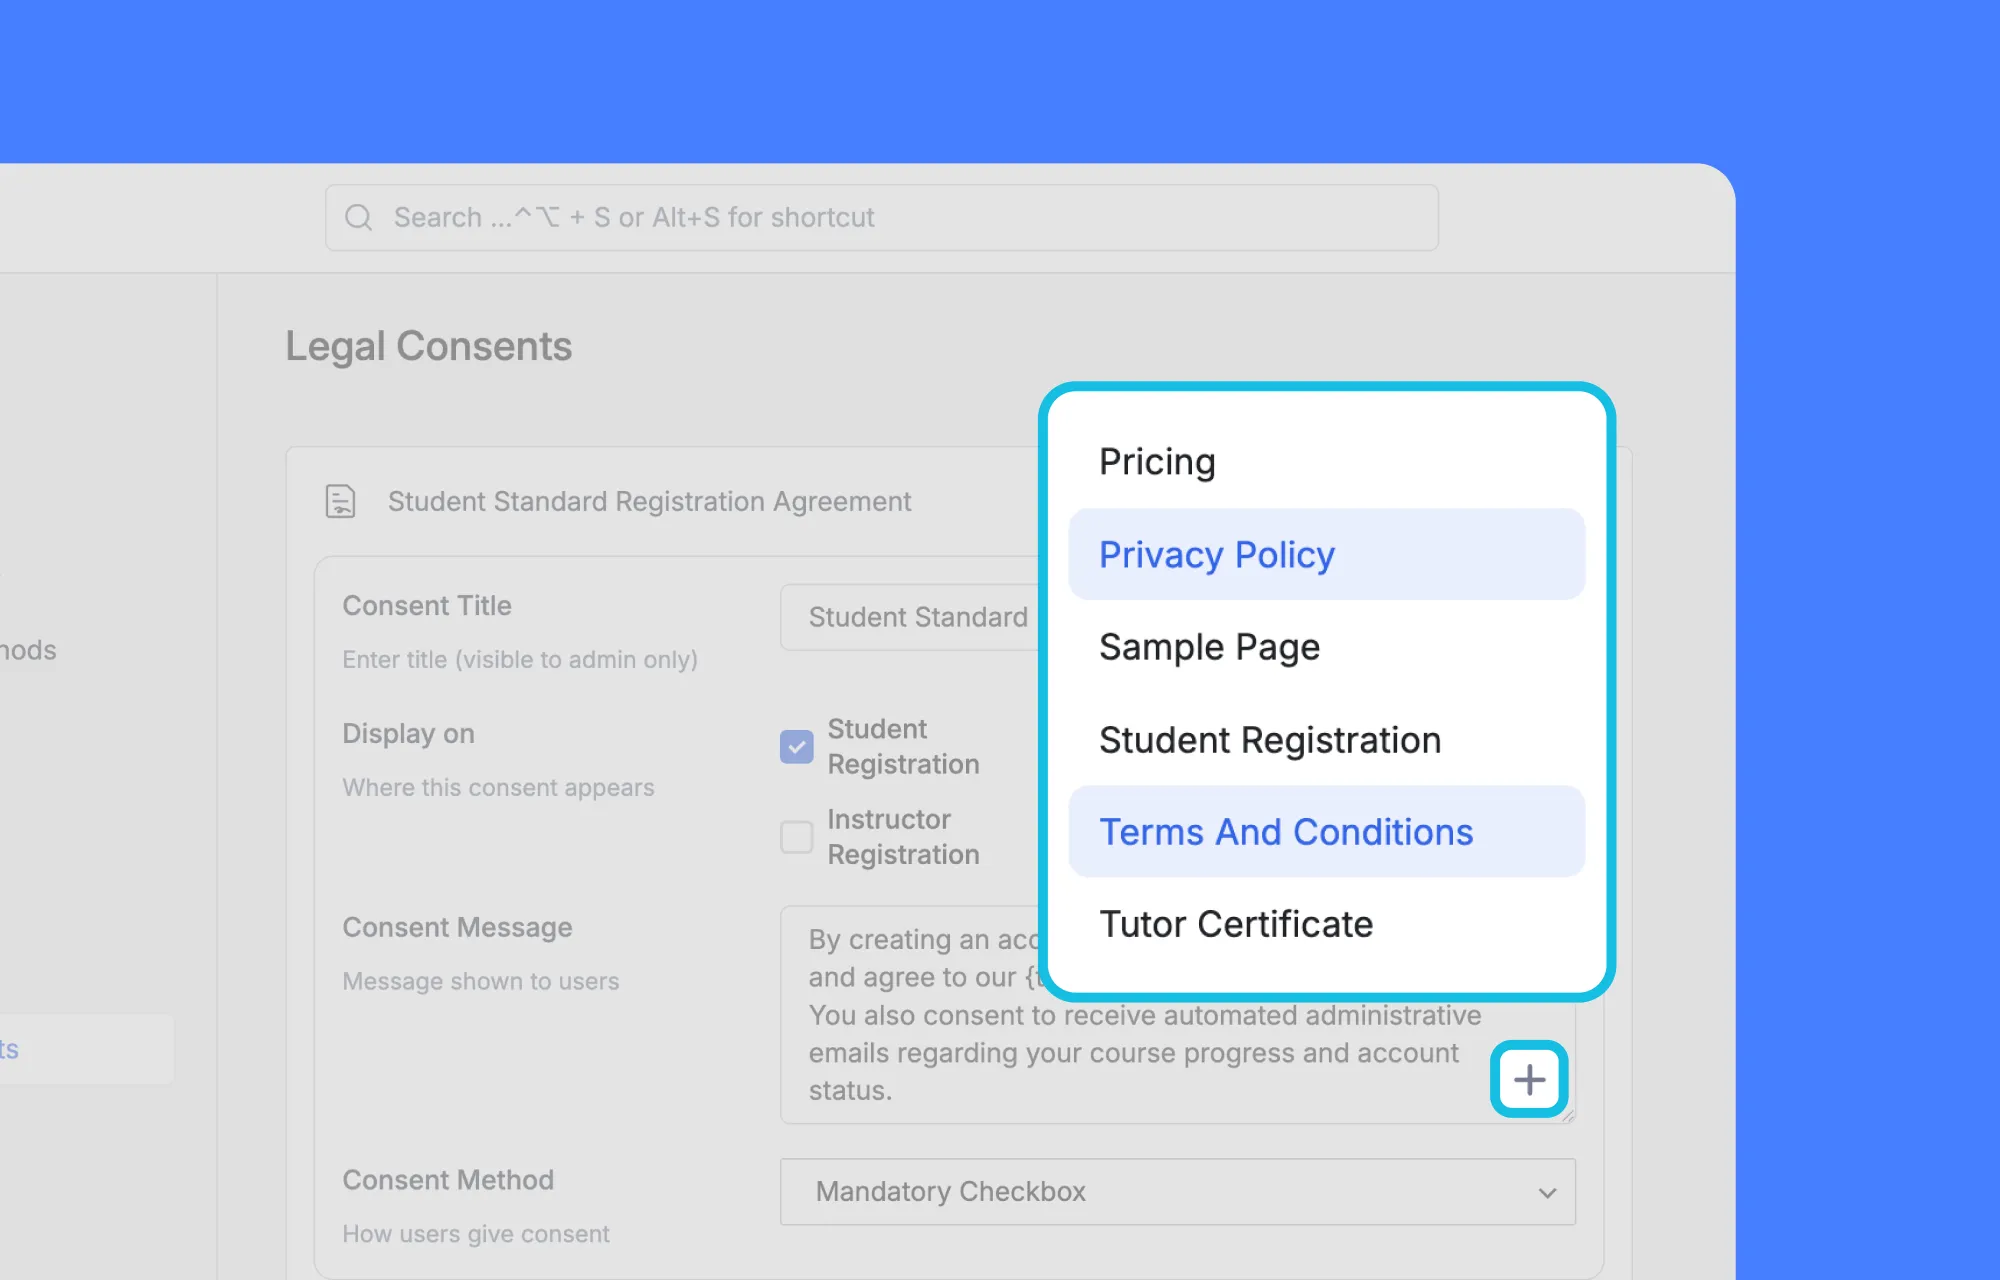
The + button opens a dropdown of your WordPress pages. When you choose Privacy Policy or Terms of Service, the appropriate merge tag appears in the message as a clickable link.
Step 4: Choose the collection method
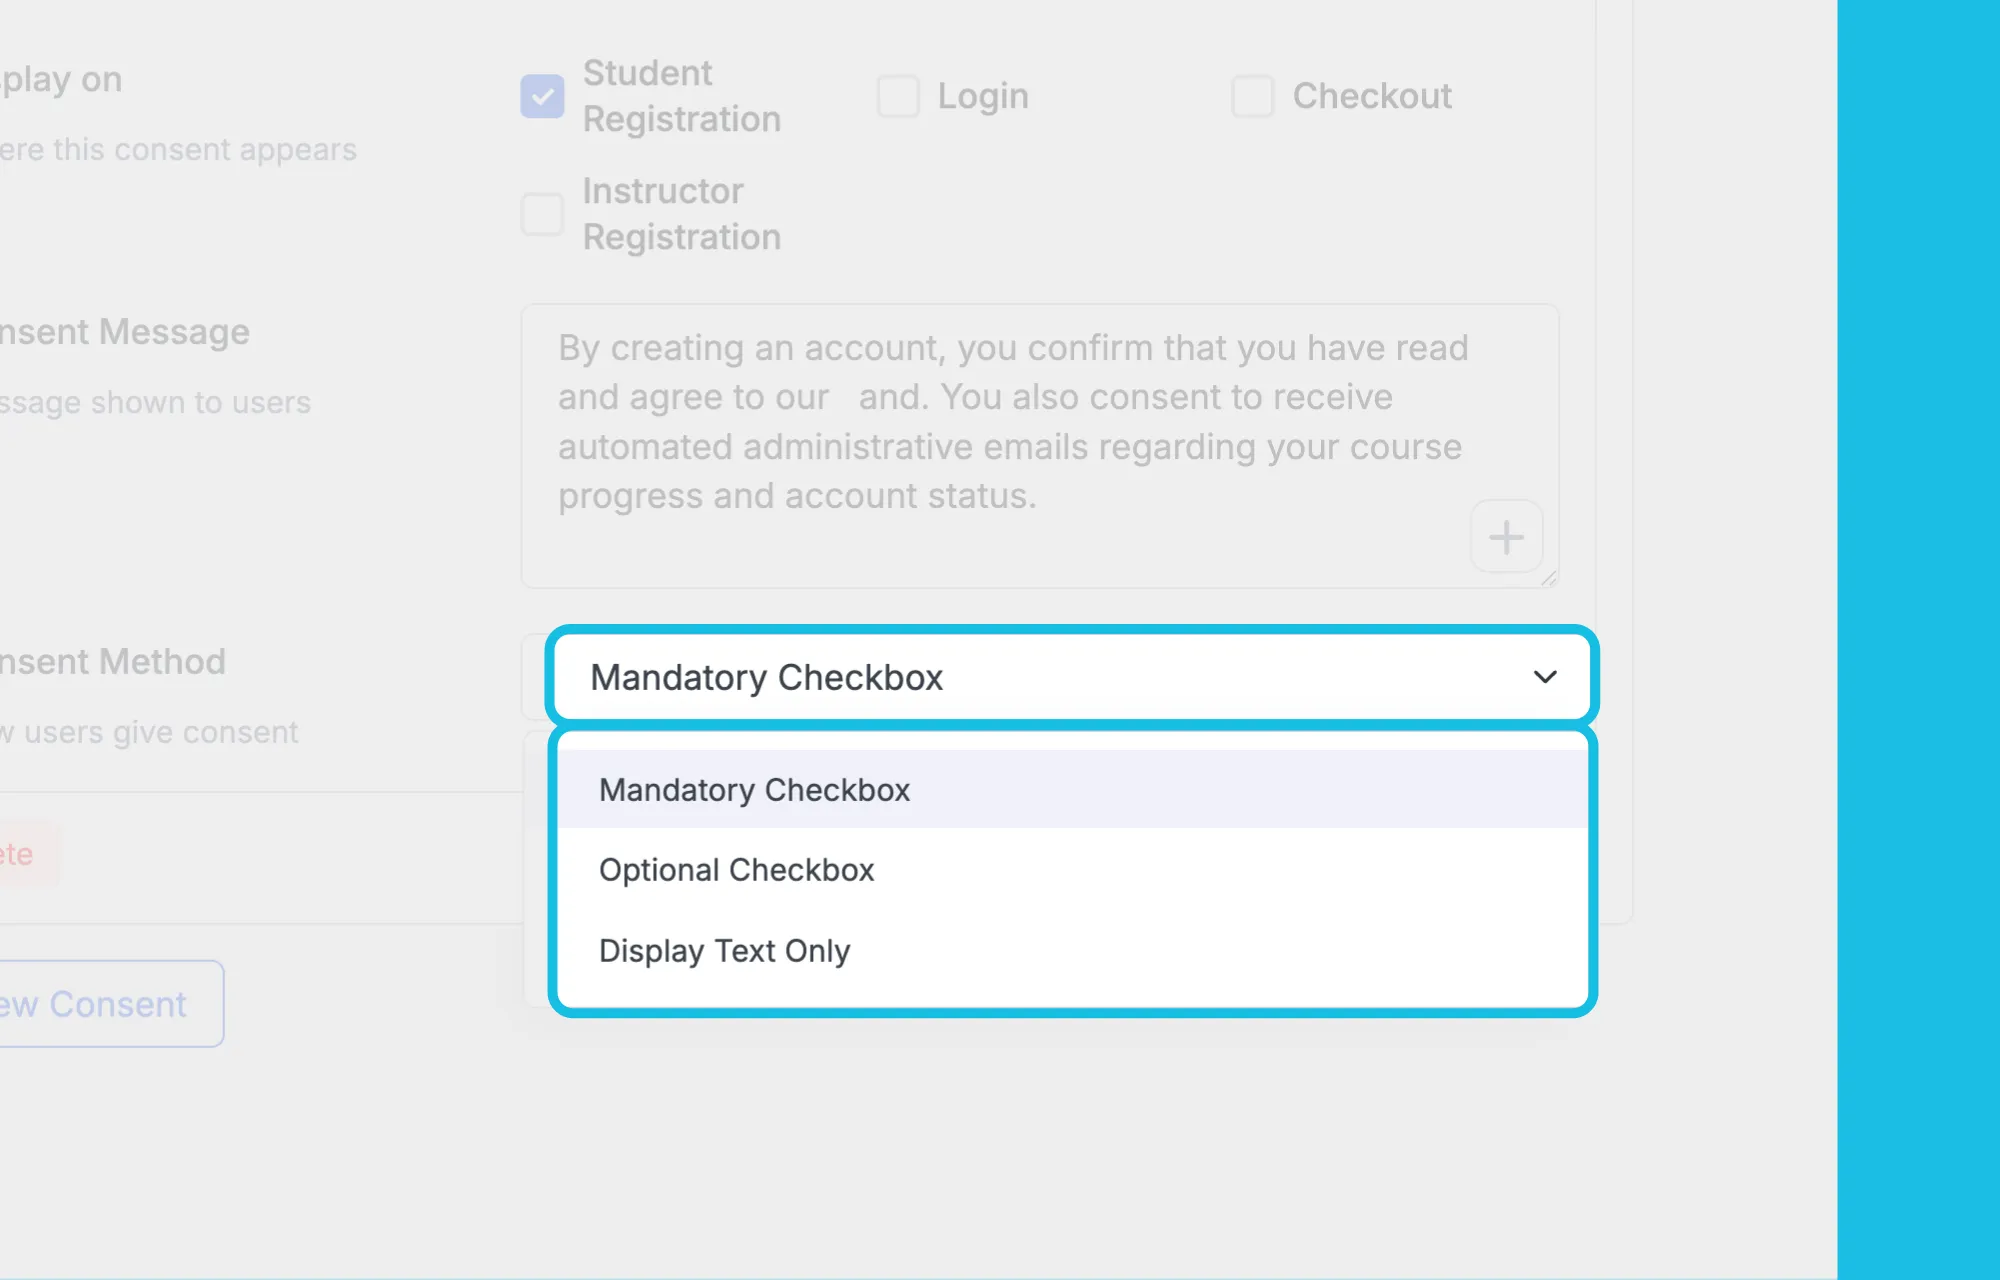
Choosing an option from the Consent Method dropdown sets how strictly the form enforces agreement. For instance, you can assign a Mandatory Checkbox for binding terms, an Optional Checkbox for marketing, or Display Text Only for simple disclaimers.
Step 5: Saving and Managing Consent Rules
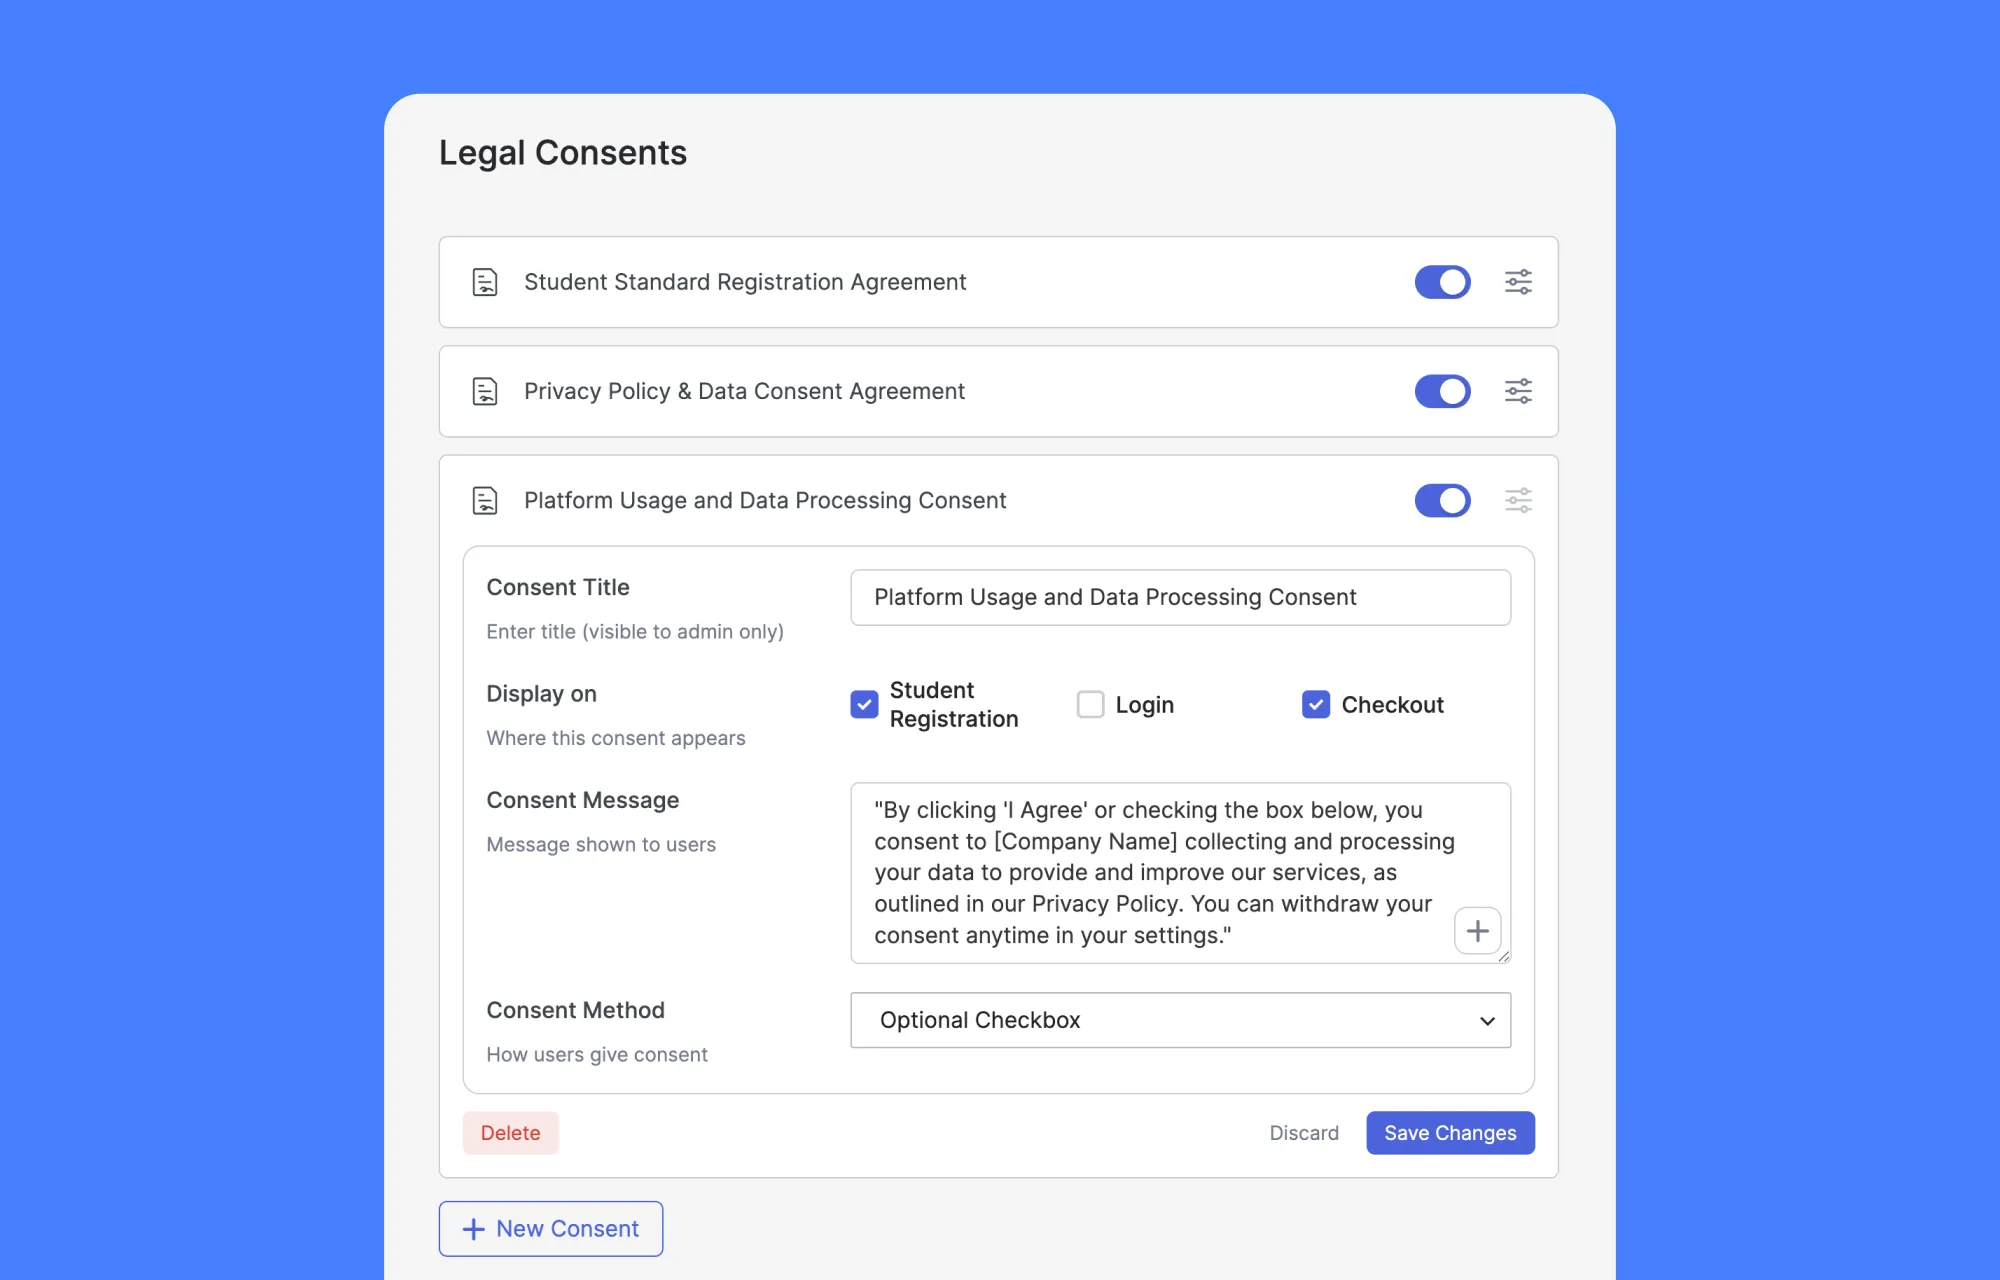
Selecting Save Changes activates the rule instantly across your site. You can toggle active rules on or off at any time without erasing historical consent records.
Note: This guide covers the essentials to get you started. For a complete walkthrough of every field, setting, and option, the dedicated Tutor LMS Legal Consents documentation has the full details.
How Consent Forms Appear on the Front End
Active consent rules appear automatically at your assigned display locations without requiring template edits or shortcodes. Learners see your customized notice message directly on the registration, login, or checkout form.
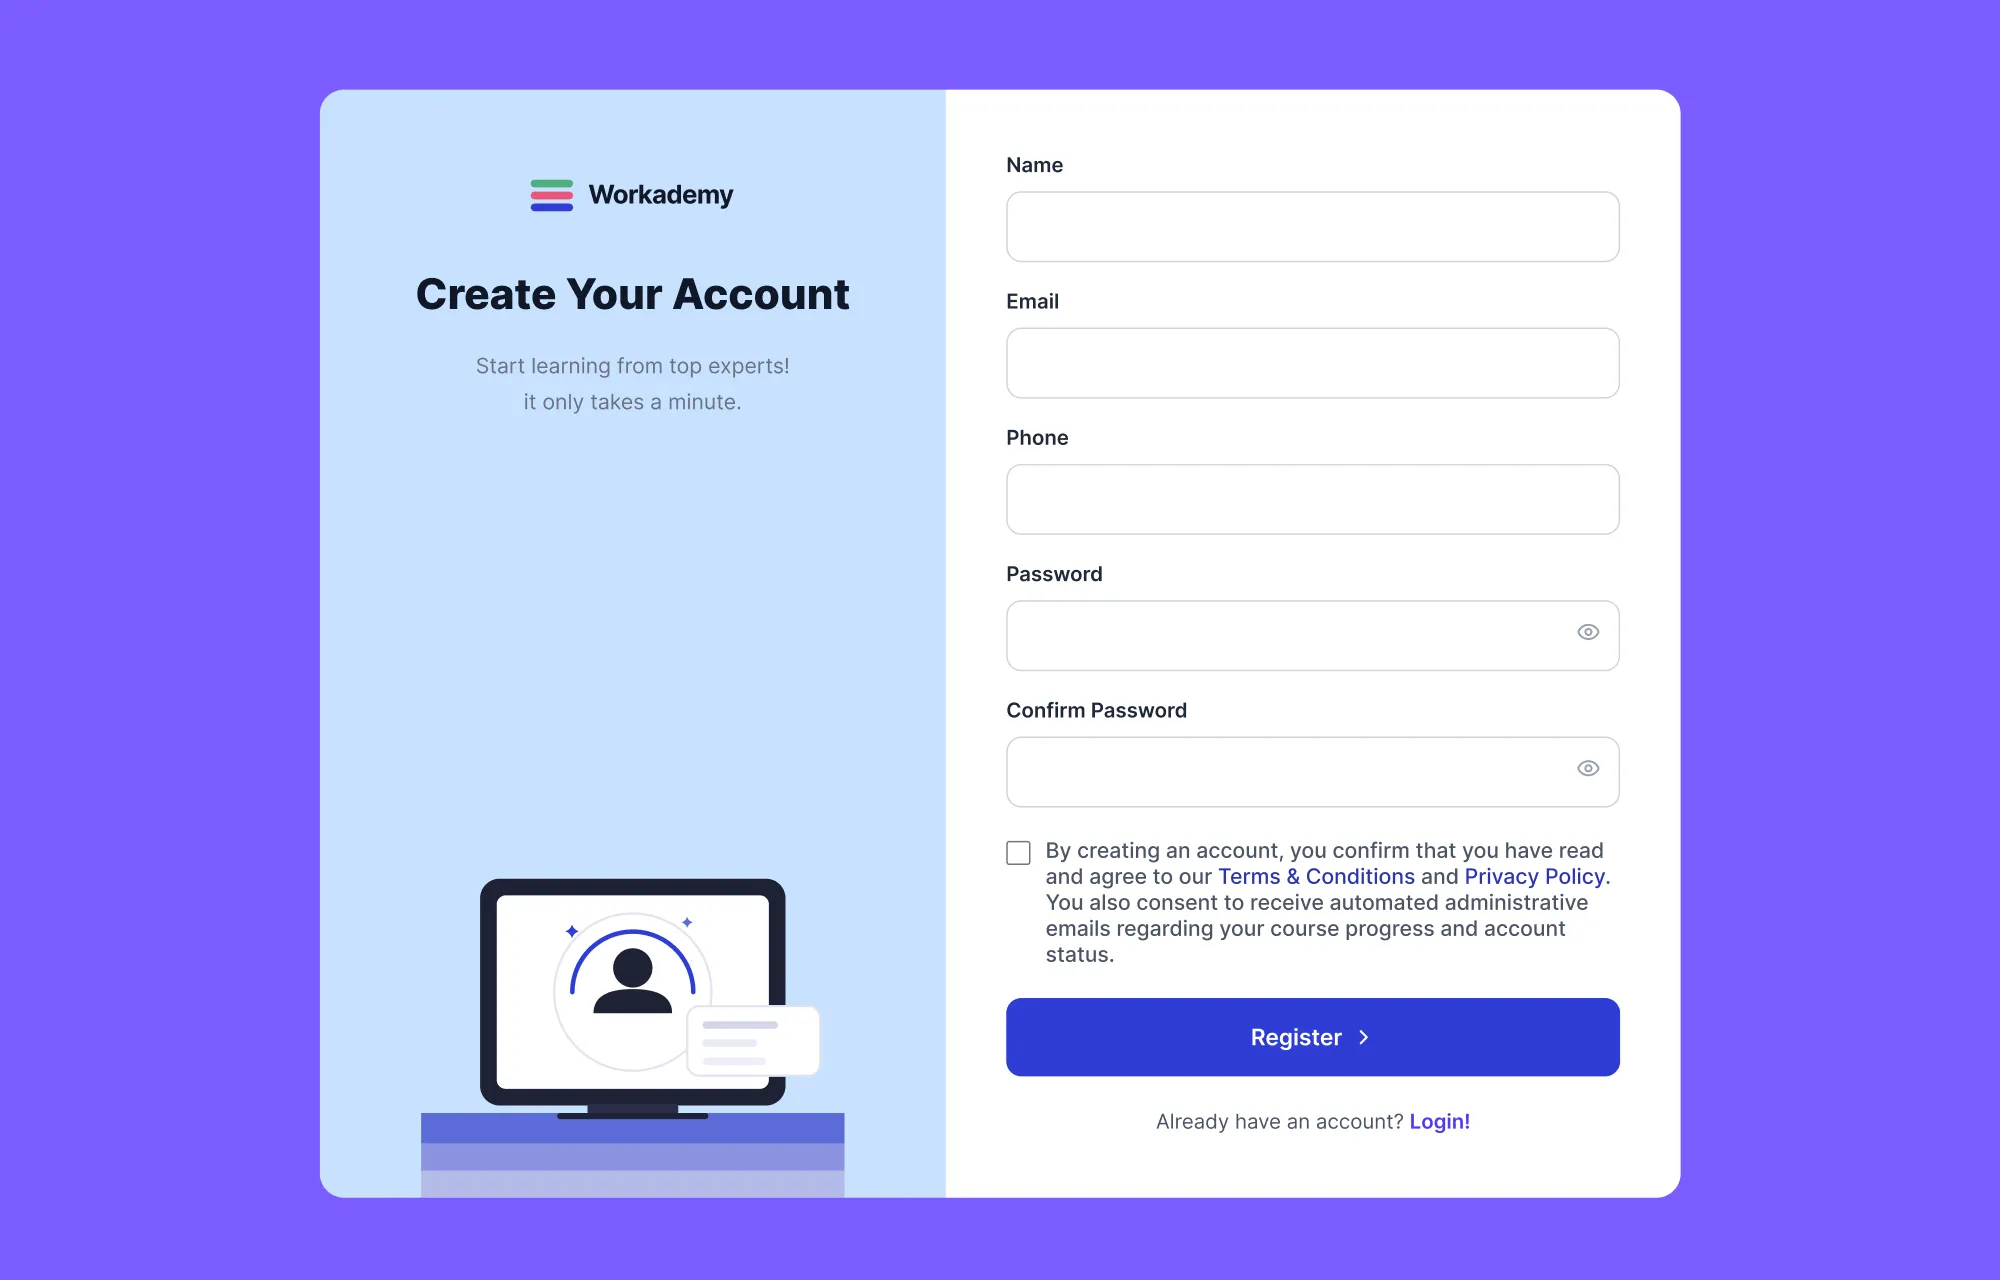
When you select the Mandatory Checkbox method, a clean checkbox sits directly above the submit button. The form blocks submission until the student actively ticks the box, ensuring that every accepted agreement is deliberate and defensible.
How to Access, Audit, and Download Consent Logs in Tutor LMS
Capturing consent is only valuable if you can produce evidence when needed. Tutor LMS keeps your compliance records easily accessible across three locations:
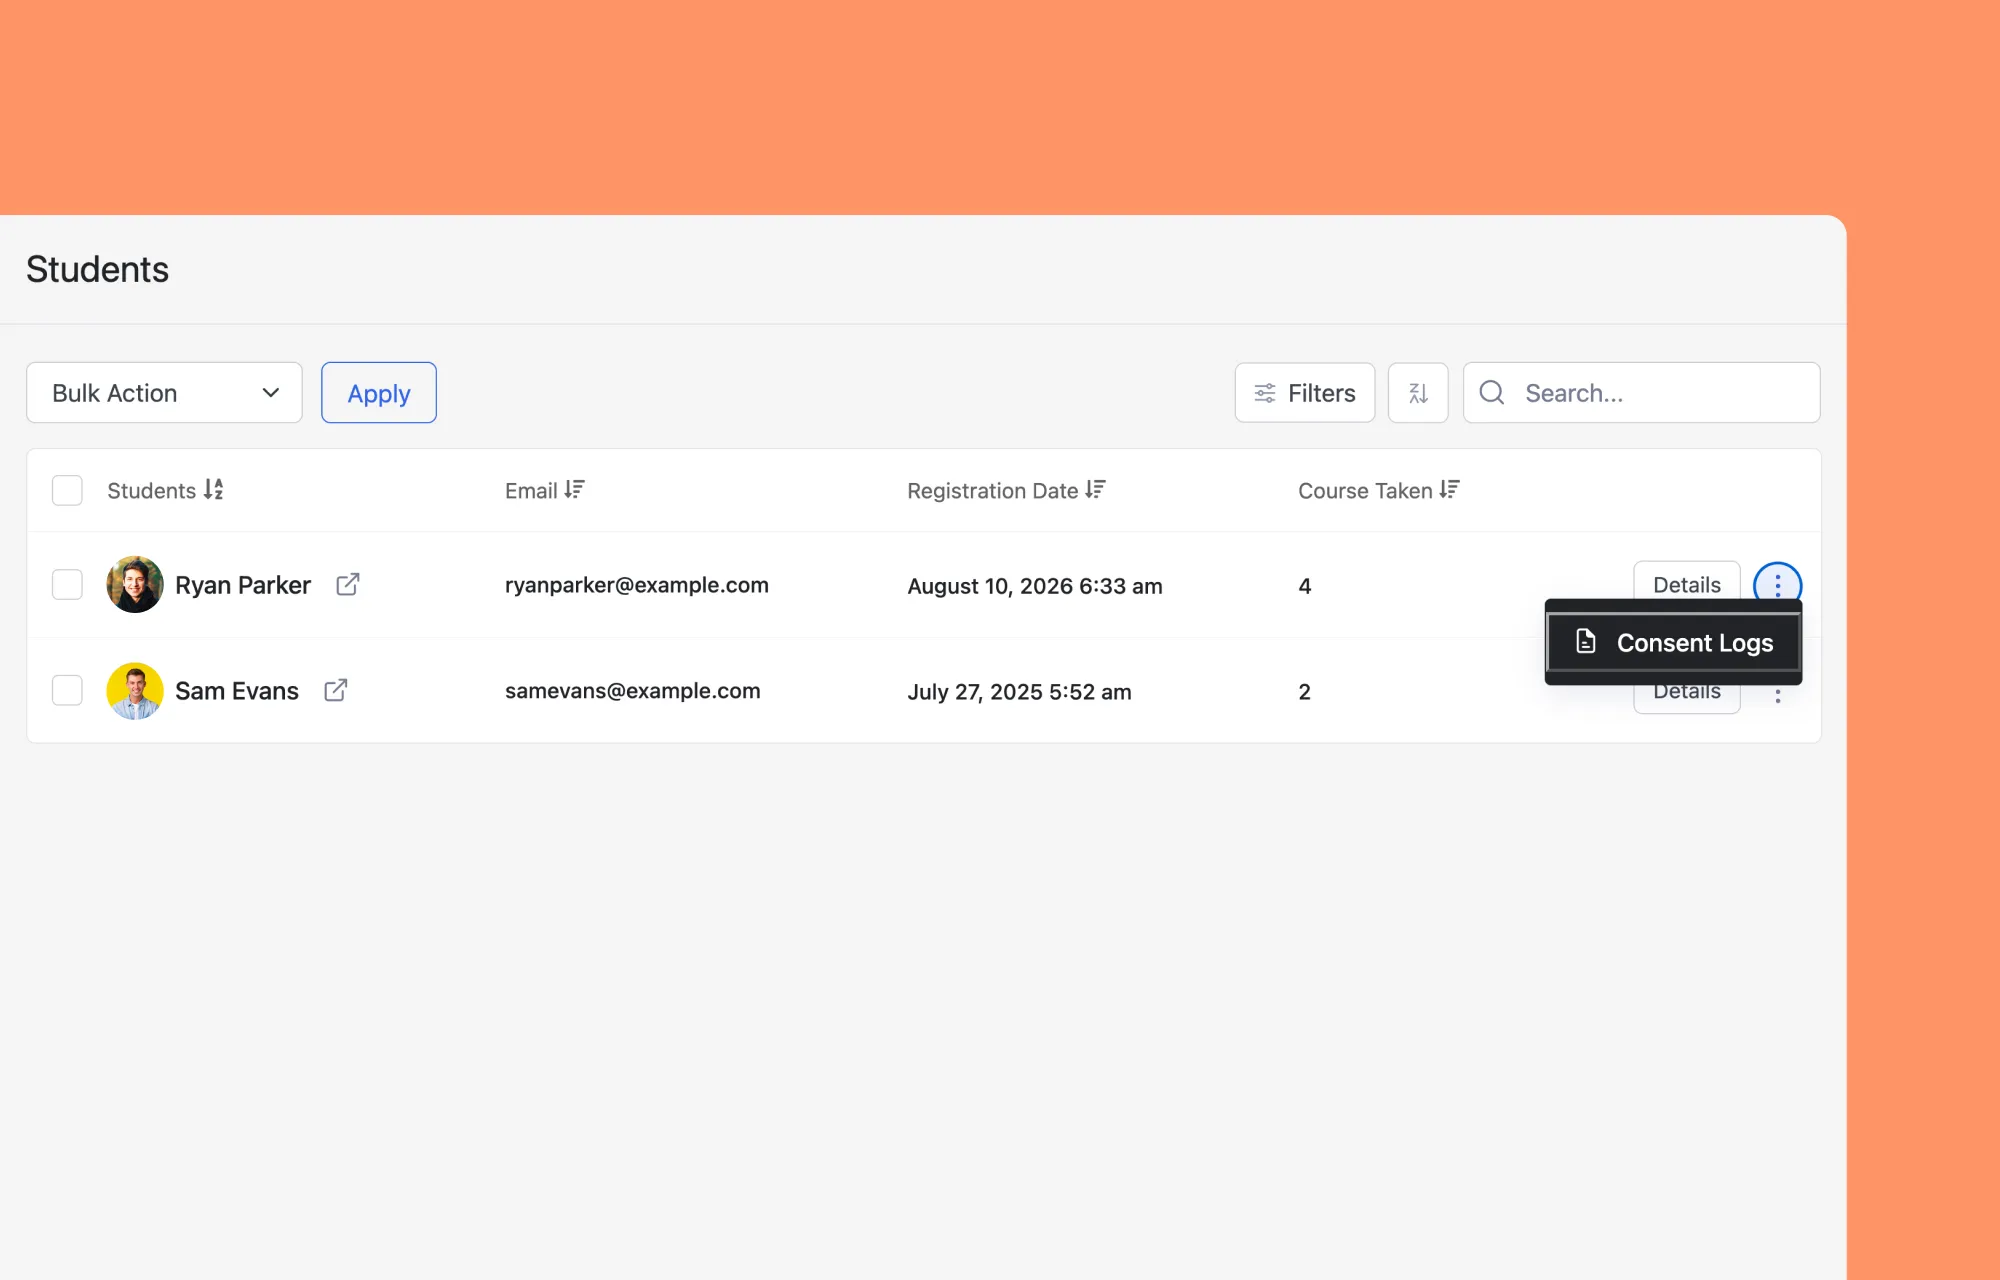
- Tutor LMS Pro > Students: Selecting the three-dot (⋮) action menu beside any student account opens the Consent Logs popup.
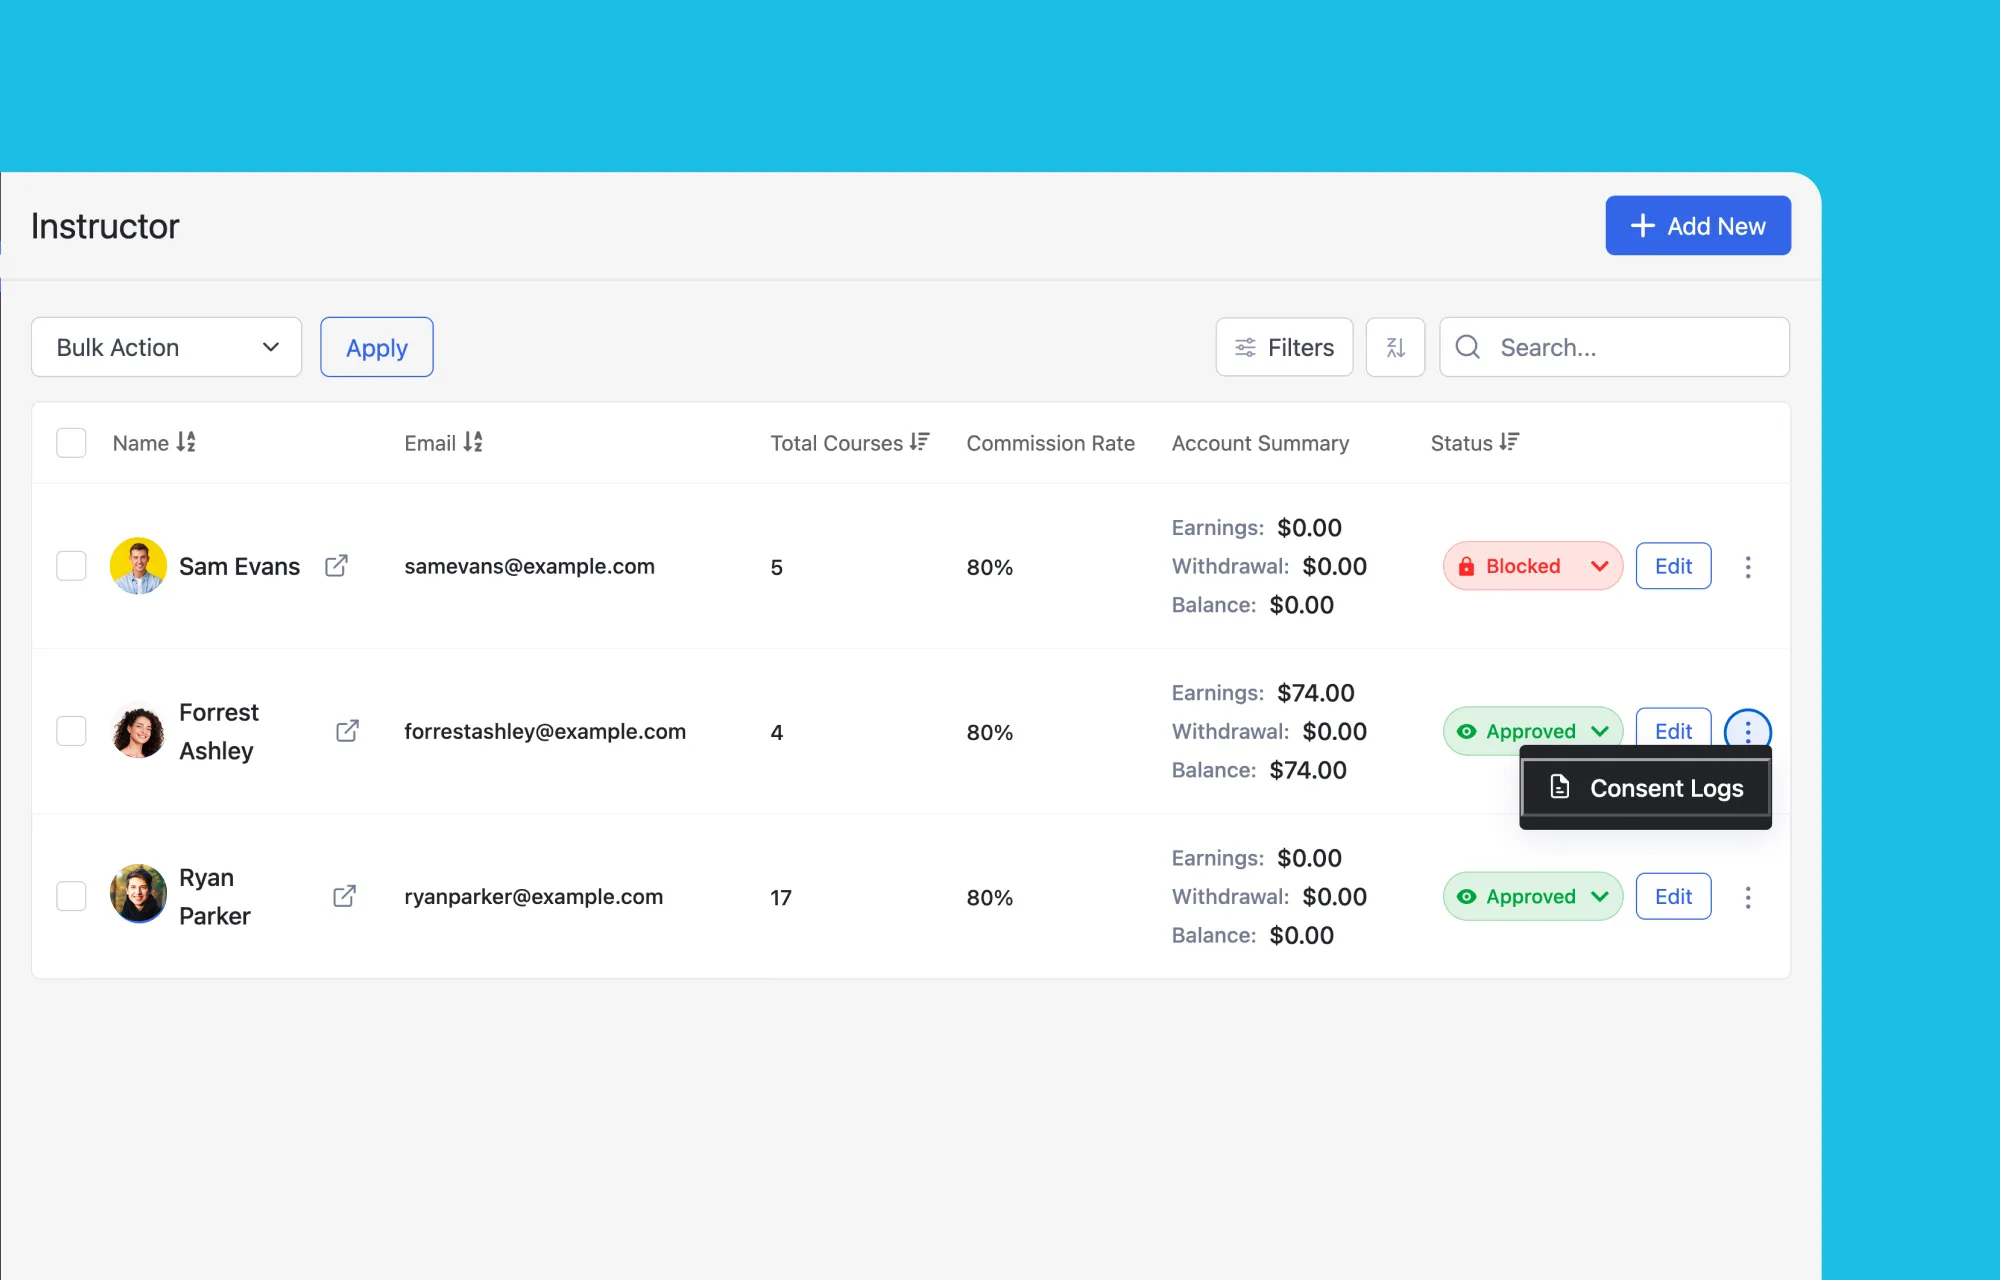
- Tutor LMS Pro > Instructors: Opening the three-dot (⋮) menu on any instructor profile provides direct access to their consent history.
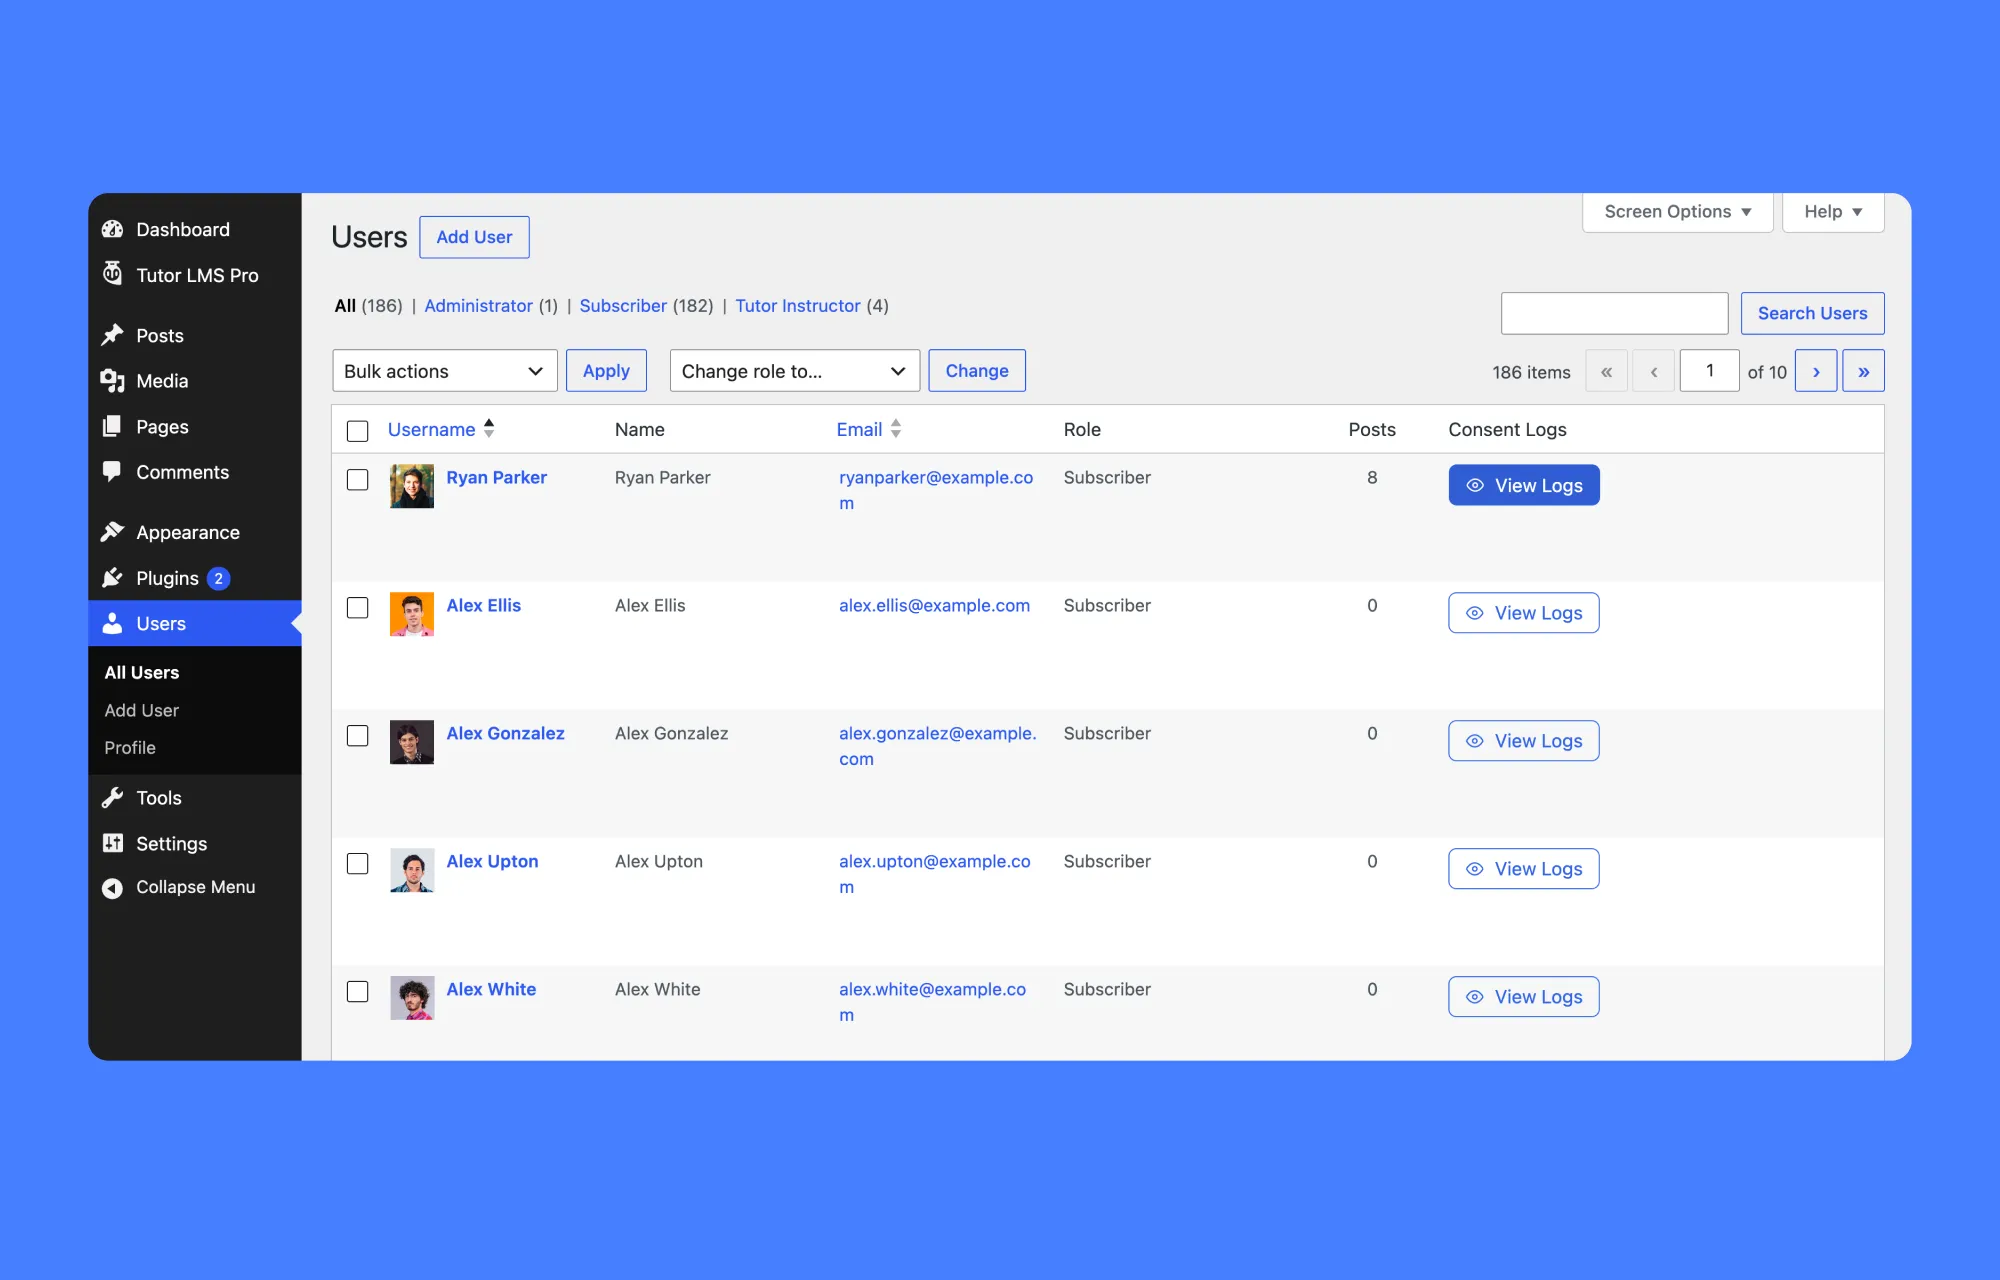
- WordPress Admin > Users: The standard Users table gets a dedicated Consent Logs column, with a View Logs button for any account.
Once the modal opens, it lays out everything you’d need for a legal review:
- Consent Name and Source Touchpoint: Displays the accepted consent title alongside the submission origin, such as login or checkout.
- Timestamp and IP Address: Shows the exact acceptance date, relative time, and user IP address.
- User Agent and Account Metadata: Captures browser details, device strings, and account creation dates.
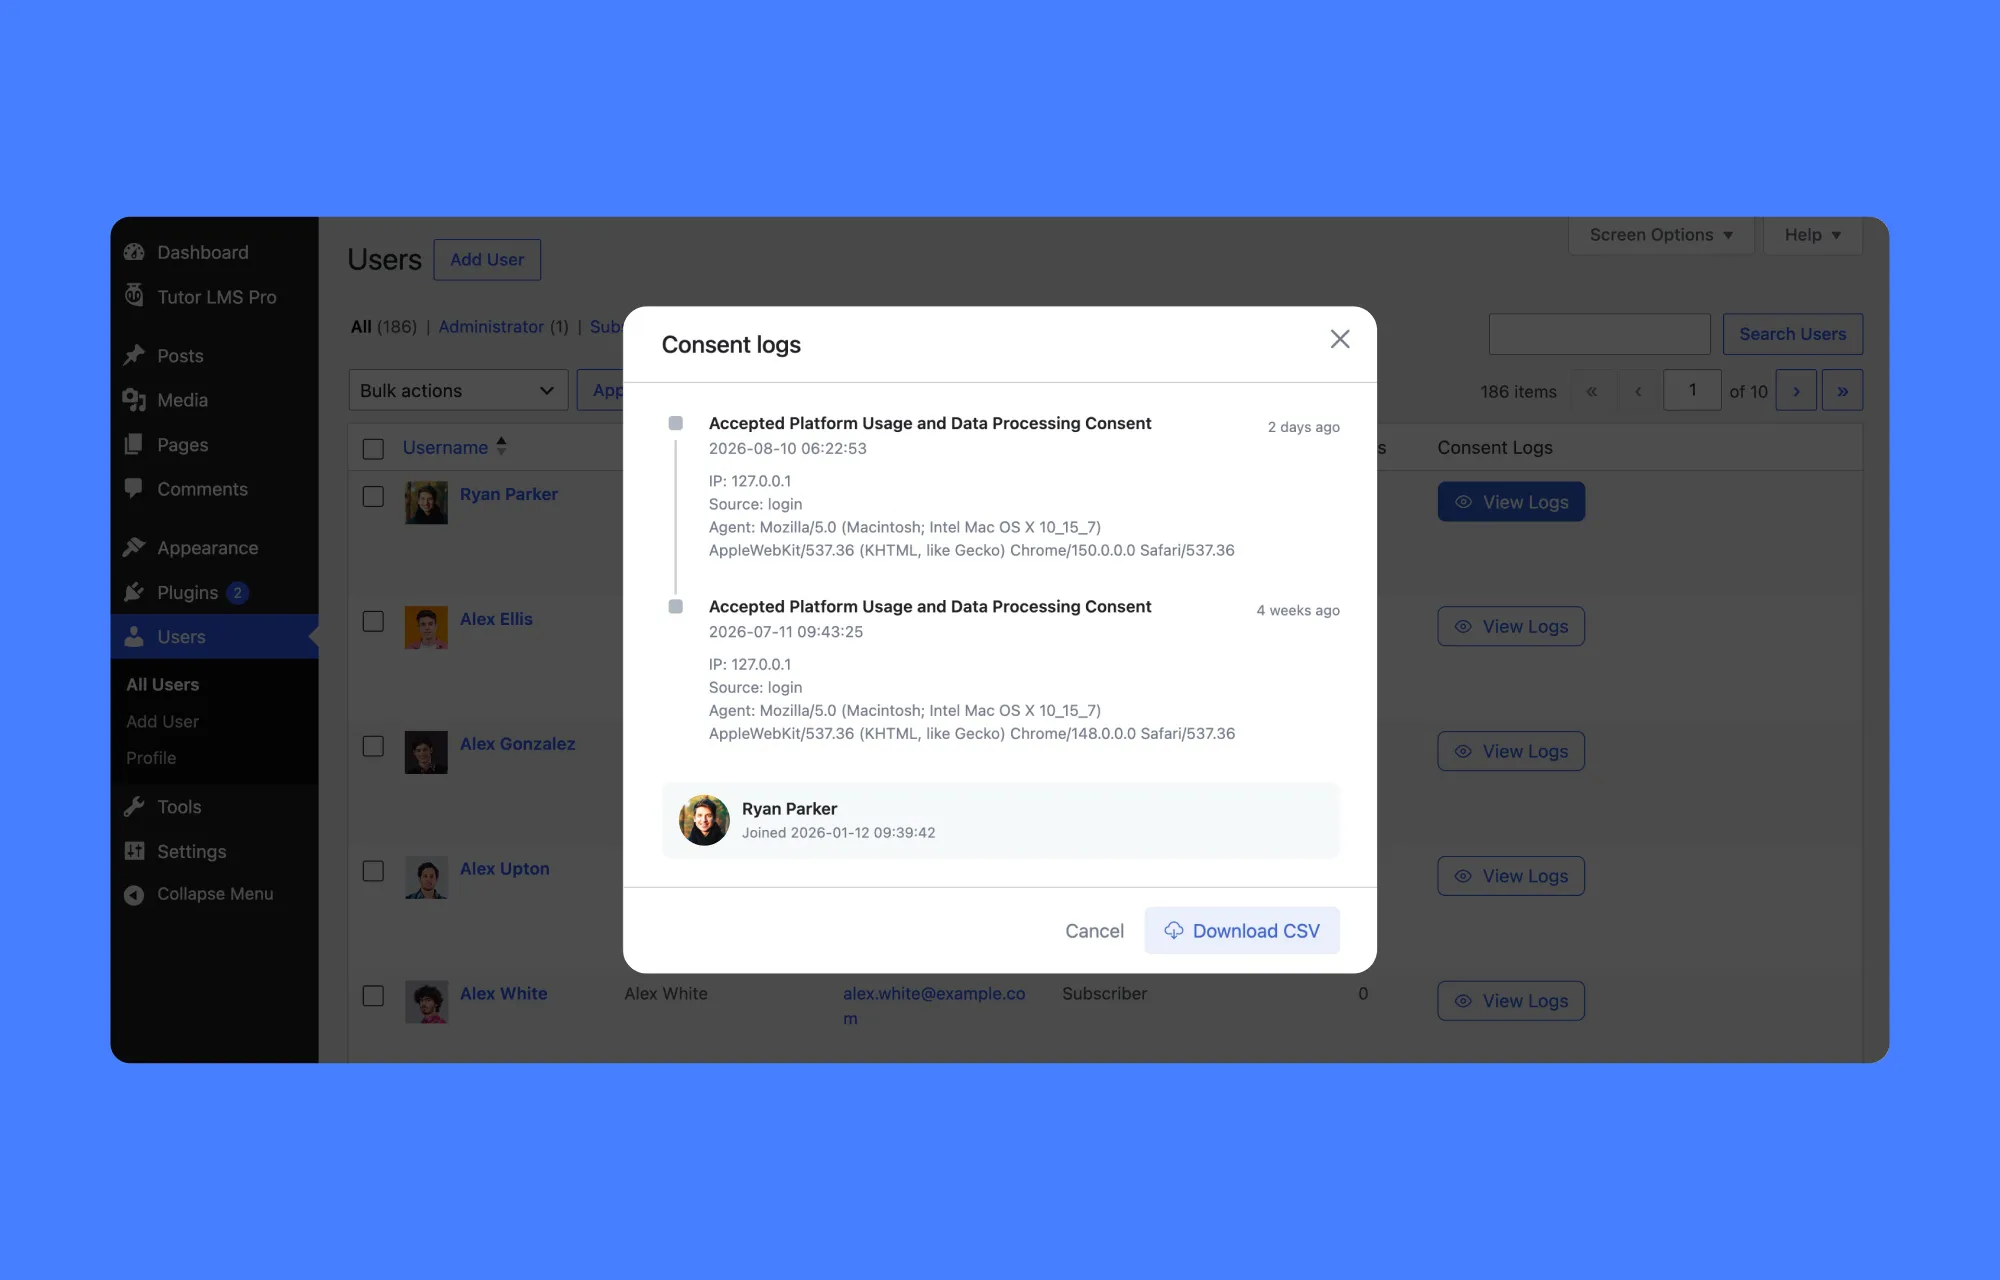
The Download CSV button below the records turns all of this into a spreadsheet for legal reviews or Data Subject Access Requests. You answer regulators with documented facts instead of promises. With evidence this easy to produce, the only question is how to design consent notices that learners will actually read and accept.
Best Practices for Consent Forms
A few habits keep your consents solid under GDPR and easy for learners to actually read:
- Mandatory boxes remain unticked by default: Legal agreements deserve the strictest method, and freely given consent starts unchecked.
- Plain language and dynamic links: Short messages in simple English read best, and merge tags link the full policy pages instead of pasting legal text into the form.
- Keep marketing separate from terms: Newsletter signups need their own optional checkbox. Bundling marketing consent into a terms agreement can make both consents invalid under GDPR.
- Version your consents when policies change: When you update a policy, the old consent no longer covers the new text. A version in the title, such as “Terms of Service v3, Checkout”, lets you request fresh consent and prove which version a learner accepted.
- Toggle off Consents instead of deleting: Pausing a consent keeps its history intact; rebuilding one from scratch leaves a gap in the record.
- Regular log exports: CSV exports of your consent logs keep audit evidence ready for any regulator or data subject request.
- Test it before launch: Run through registration and checkout on a test account to confirm the checkbox blocks submission and the acceptance lands in the log.
- Translate notices for multilingual audiences: Consent given in a language a learner can’t read isn’t informed consent.
None of these steps is complicated on its own. Together, they turn Legal Consents from a settings page into a quiet safety net for your academy.
The Bottom Line
Legal consent might look like paperwork, but it is really a trust signal. The feature places your notices, records every acceptance, and keeps the proof one click away. You can start with one consent on the checkout page, test it, and expand from there. Your learners will notice the care, and your compliance position will be stronger for it.
Frequently Asked Questions
No, this feature requires Tutor LMS Pro.
Admins can view consent logs under Tutor LMS Pro > Students, Tutor LMS Pro > Instructors, or Users > All Users.
Yes, selecting the Download CSV button inside any user Consent Log modal exports full records with timestamps, IP addresses, and touchpoints.
It provides the necessary tools for GDPR compliance, but full legal compliance also depends on your privacy policy and data practices.
Yes, each notice is independent, allowing you to create custom messages for registration, login, or checkout.
Mandatory checkboxes block form submission until checked, while optional checkboxes allow users to submit without checking.
Yes, using the “+” button page picker inserts dynamic merge tags that link directly to your WordPress published pages.
Yes, every log explicitly records the touchpoint source, such as login, checkout, or registration.

Table of Contents
- Why Legal Compliance Matters for Online Course Creators
- What You Can Do With Legal Consents (Key Capabilities)
- How to Set Up Custom Legal Consent Forms in Tutor LMS (Step-by-Step)
- How Consent Forms Appear on the Front End
- How to Access, Audit, and Download Consent Logs in Tutor LMS
- Best Practices for Consent Forms
- The Bottom Line
- Frequently Asked Questions
Start Using Tutor LMS Today
Ready to take your online courses to new heights? Download Tutor LMS now and enjoy a journey of eLearning excellence.