Online courses rarely stay small. Over time, they collect PDFs, worksheets, slides, templates, checklists, and project files. Finding one important workbook can eventually feel like searching through the entire curriculum.
Not every file belongs in the same place. A worksheet may support one lesson, while a handbook or revision guide may remain useful throughout the course.
Tutor LMS addresses this challenge through its Resource Center. It gives course-wide materials a predictable home inside the learning interface. Learners can return to these files without checking every lesson individually.
TL;DR: The Tutor LMS Resource Center gives course-wide downloads a permanent, predictable home inside the learning interface, so learners stop digging through every lesson for one file: everything lives under More → Resources, with each file showing its name, description, and download button; Exercise Files handle lesson-specific materials like worksheets and code samples while Course Resources hold course-wide items like handbooks, templates, and study guides. You activate this by enabling the Course Attachments add-on in Tutor LMS Pro, then uploading files via Course Builder → Additional → Attachments.
What Is the Tutor LMS Resource Center?
The Tutor LMS Resource Center is the centralized Resources area within the Tutor LMS learning interface. Learners can find it under More → Resources at the bottom of the curriculum sidebar.
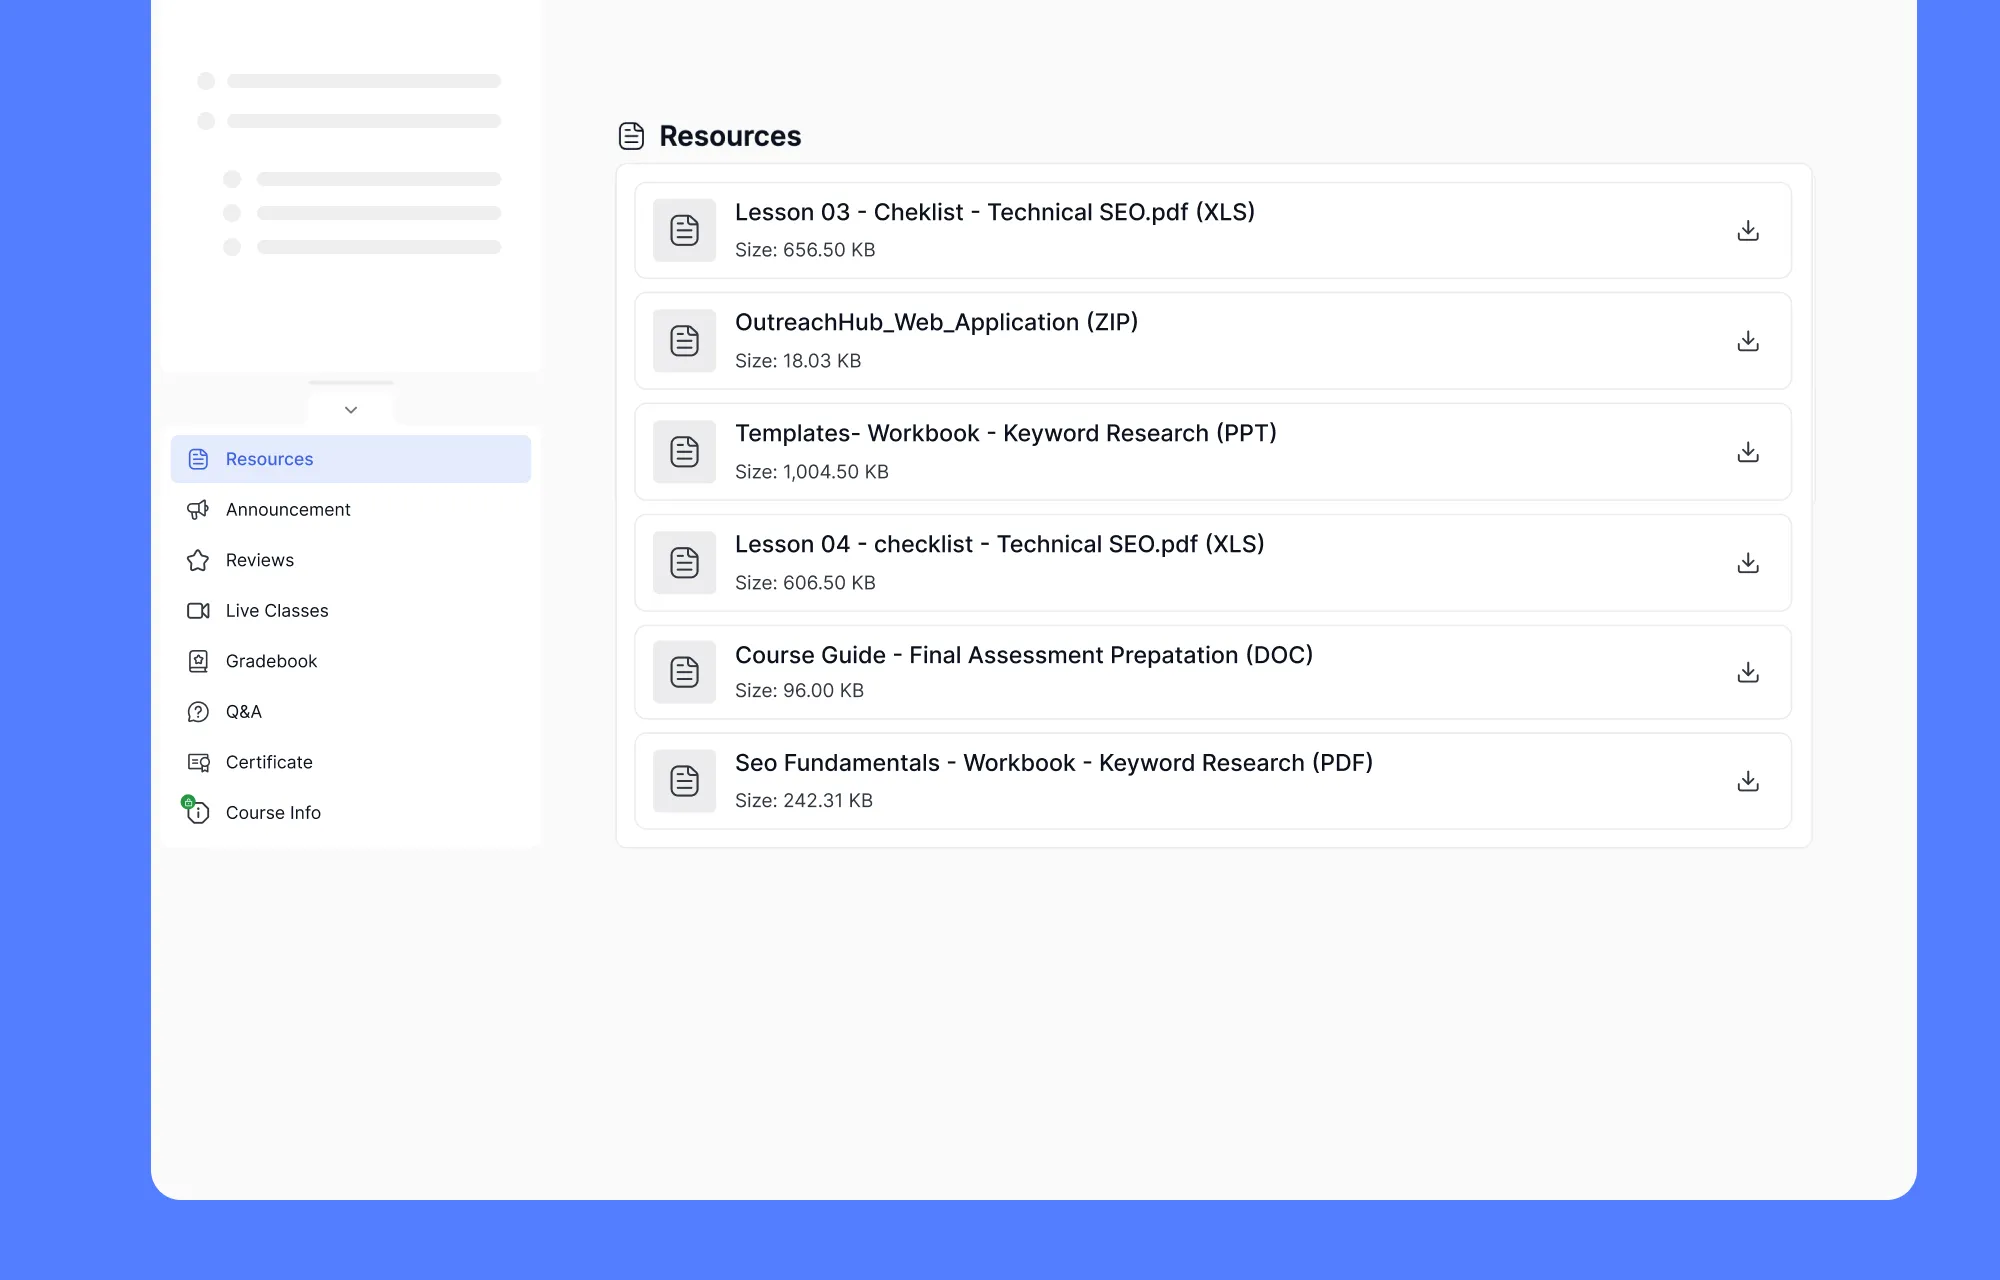
Each course resource can appear with its name, description, and download button. This makes important materials easier to revisit during lessons, revision, or assessment preparation.
Course Resources and Exercise Files can both contain downloadable materials. However, they serve different purposes.
| Consideration | Exercise Files | Course Resources |
|---|---|---|
| Scope | One lesson | The complete course |
| Location | Exercise Files tab beneath lesson content | More → Resources |
| Examples | Lesson worksheet, code sample, activity file | Syllabus, workbook, study guide |
| Best use | Material needed in a specific lesson | Material needed at several points |
The Exercise Files tab only appears when the instructor attaches any files to the lesson. This helps learners recognize when a lesson includes additional downloads.
How to Add Downloadable Resources in Tutor LMS
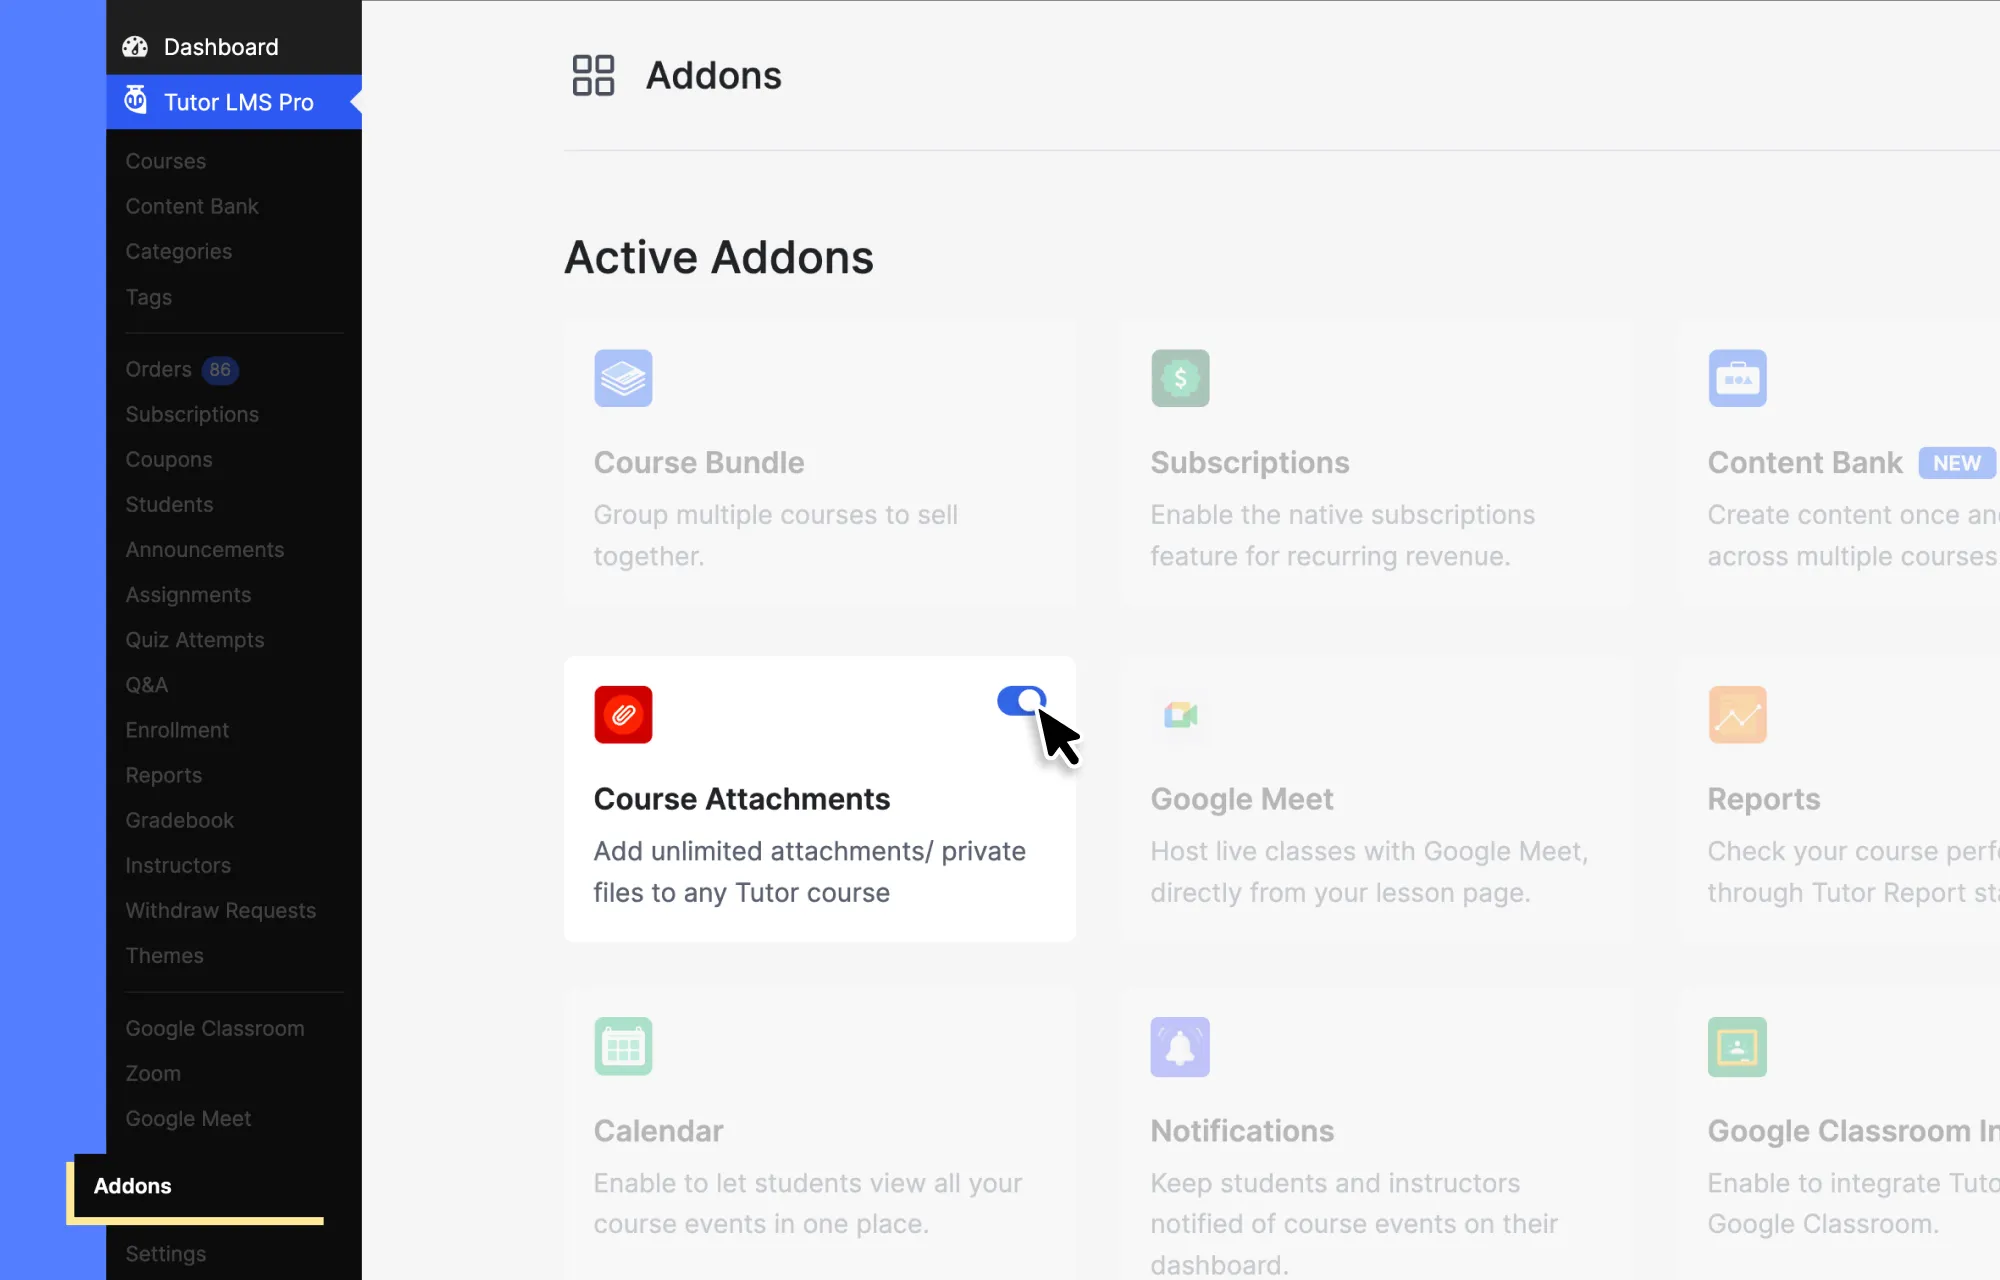
Before you can attach files to the course container, you must enable the feature. Go to Tutor LMS Pro > Addons and turn on Course Attachments. Without this active, the upload field does not appear in your builder.
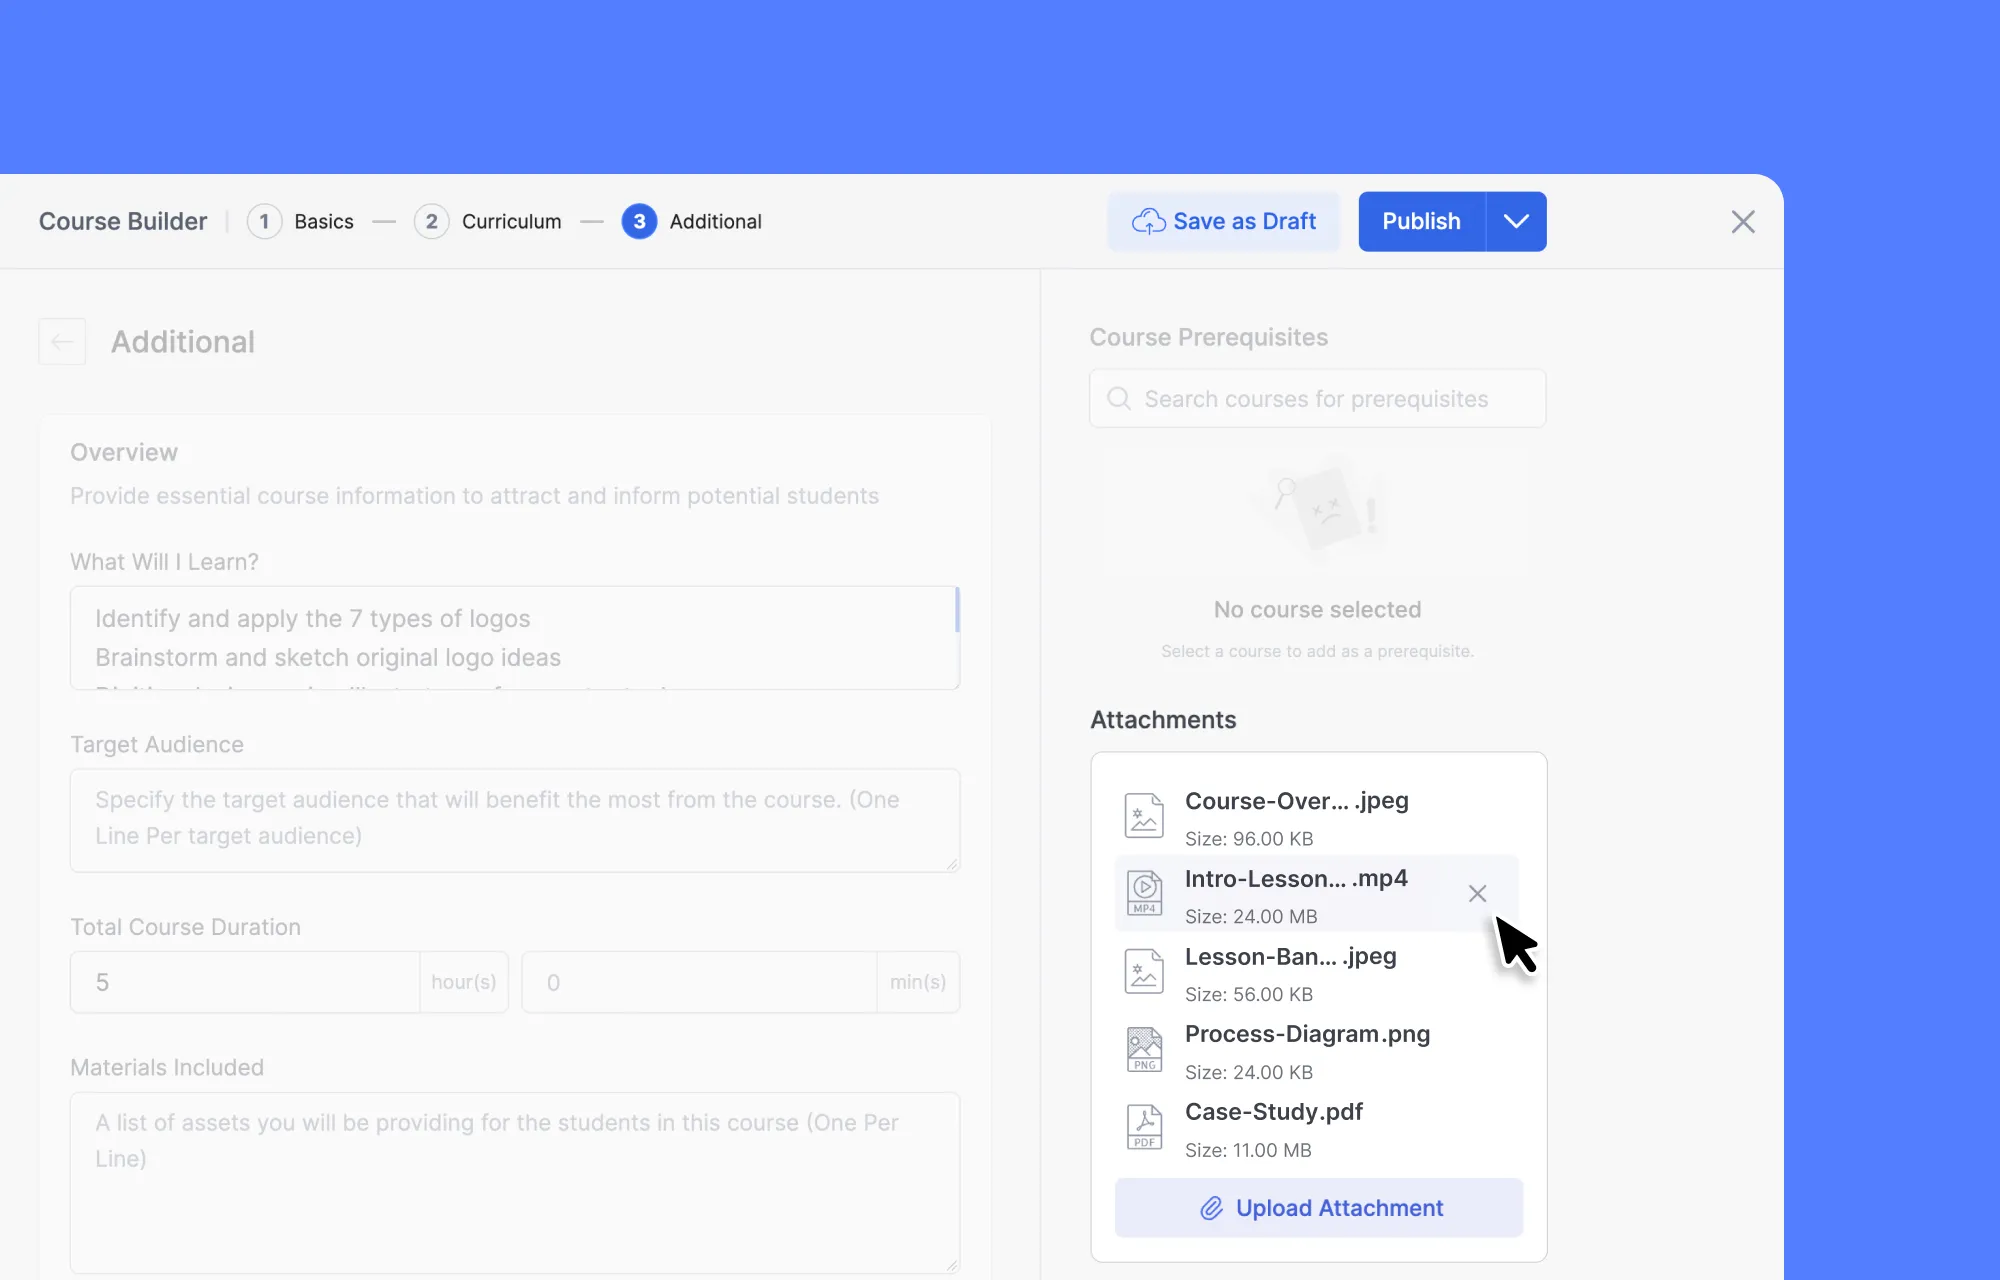
Open your course to edit. Bypass the lesson curriculum and scroll to the Additional section. Locate Attachments and upload your materials here. Because Tutor LMS uses native WordPress media handling, it accepts any file type your installation already allows. You can upload multiple documents, spreadsheets, or compressed archives at once. Click Update/Publish on the course to publish them.
What Should You Put in Your Course Resource Center?
Once your Tutor LMS Resource Center is ready, the next question is what to put in it.
A Resource Center becomes more useful when every file has a clear purpose. Instead of uploading every document related to a course, the resource list can focus on materials learners are likely to need during and after their lessons.
A practical course resource library can include four main types of materials:
- Required course materials
These are resources learners may need to follow the course properly, such as:
- Course syllabus or handbook
- Required reading materials
- Essential workbooks
- Setup or installation guides
- Supporting resources
These provide extra context without being essential to complete a lesson. Reference sheets, glossaries, cheat sheets, supplementary readings, and examples can fit well here.
- Practice resources
These help learners apply what they have learned. Common examples include worksheets, exercises, templates, project files, and checklists.
- Revision and assessment resources
Course-wide study guides, revision sheets, sample questions, assessment preparation guides, and formula or reference sheets can remain available throughout the learning journey.
Keep Lesson Resources and Course Resources Separate
Not every downloadable file needs to live in the same place. A simple separation between lesson-specific files and course-wide resources can make the learning experience much easier to navigate.
Exercise Files work best when a resource ties directly to a specific lesson. A dedicated “Marketing Research Worksheet” belongs right next to the video explaining how to fill it out.
Course Resources serve a different purpose entirely. You rely on this global hub when learners need a file repeatedly. These items require a permanent, predictable home. Typical examples include:
- A comprehensive course workbook
- A final exam study guide
- A core reference manual
Blurring this distinction creates a messy curriculum. Course creators frequently upload the exact same reference guide to five different modules. This inflates the course footprint and confuses students trying to locate the right file later.
You can avoid duplicate downloads across lessons by adopting a simple organizational rule. If a single file supports multiple lessons, place the master version in your Course Resources tab. Uploading identical copies to every individual lesson wastes storage and creates version control problems for your learners.
Create a Simple File Naming System
A disorganized Resource Center frustrates learners just as much as a scattered curriculum. A descriptive filename helps learners understand a resource before downloading it. Each name should answer three questions:
- What type of resource is it?
- Which course or module does it support?
- What topic or task does it cover?
A simple structure like [Course/Lesson] – [Resource Type] – [Topic] creates a predictable, readable list inside your learning environment.
- SEO Fundamentals – Workbook – Keyword Research.pdf
- Lesson 03 – Checklist – Technical SEO.pdf
- Course Guide – Final Assessment Preparation.pdf
Many creators rush the upload process and leave default names intact. A student looking at an attachment named final.pdf, worksheet2.pdf, or document-final-final.pdf has no context. They must download the file simply to check its contents.
Make Your Resource Library Easy to Use on Mobile Devices
Tutor LMS 4.0 includes a mobile-first learning interface with touch-friendly navigation. However, the quality of the mobile experience still depends on how your files are prepared.
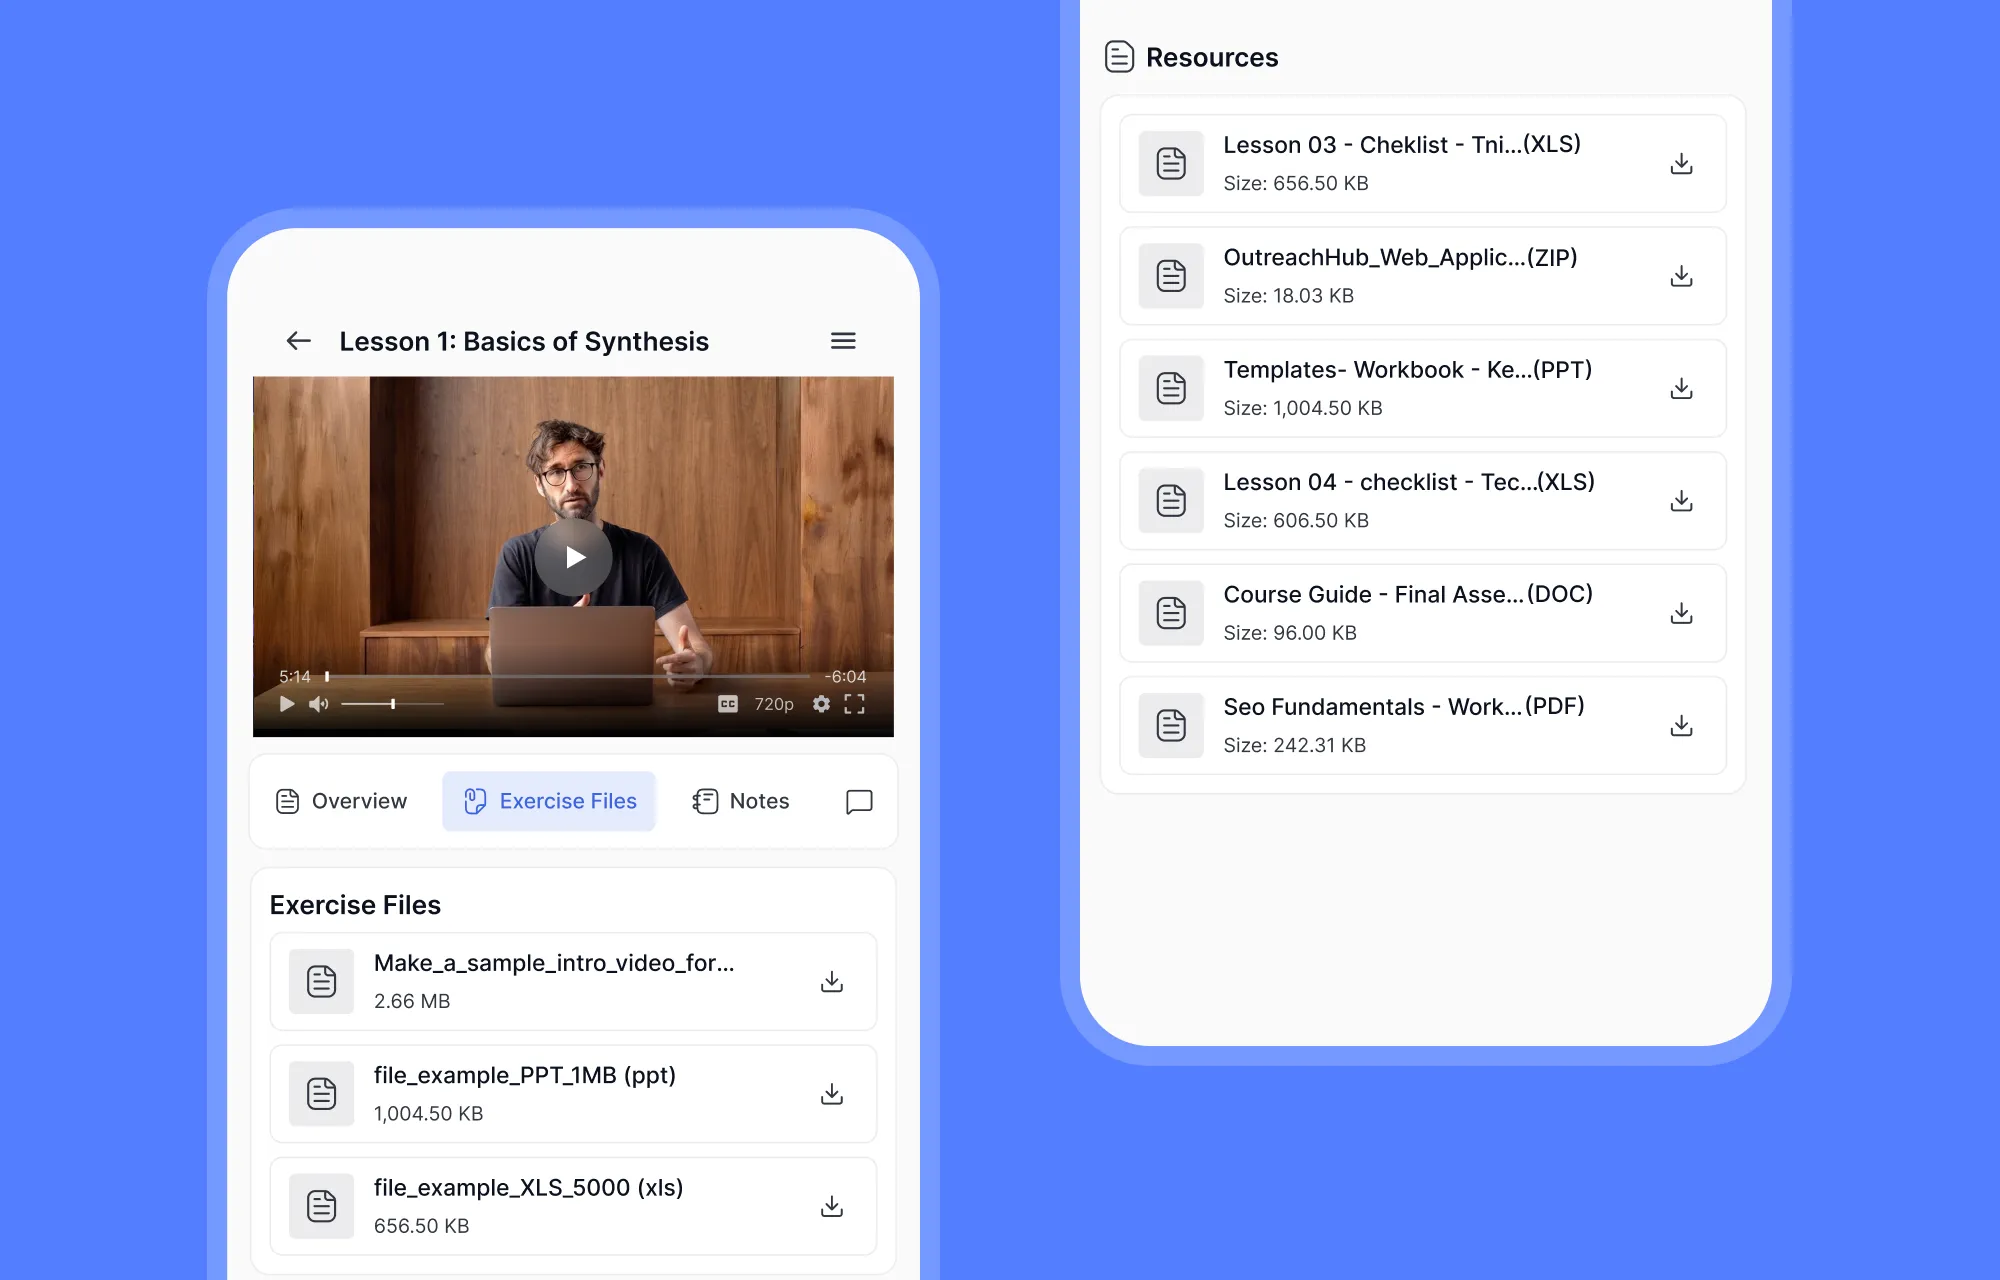
A few practical choices can reduce frustration:
- Short filenames are easier to scan on small screens.
- Important information works best near the beginning of the filename.
- Compressed files use less mobile data and open faster.
- Simple PDFs are usually easier to read than complex documents.
- One current version is clearer than several similar copies.
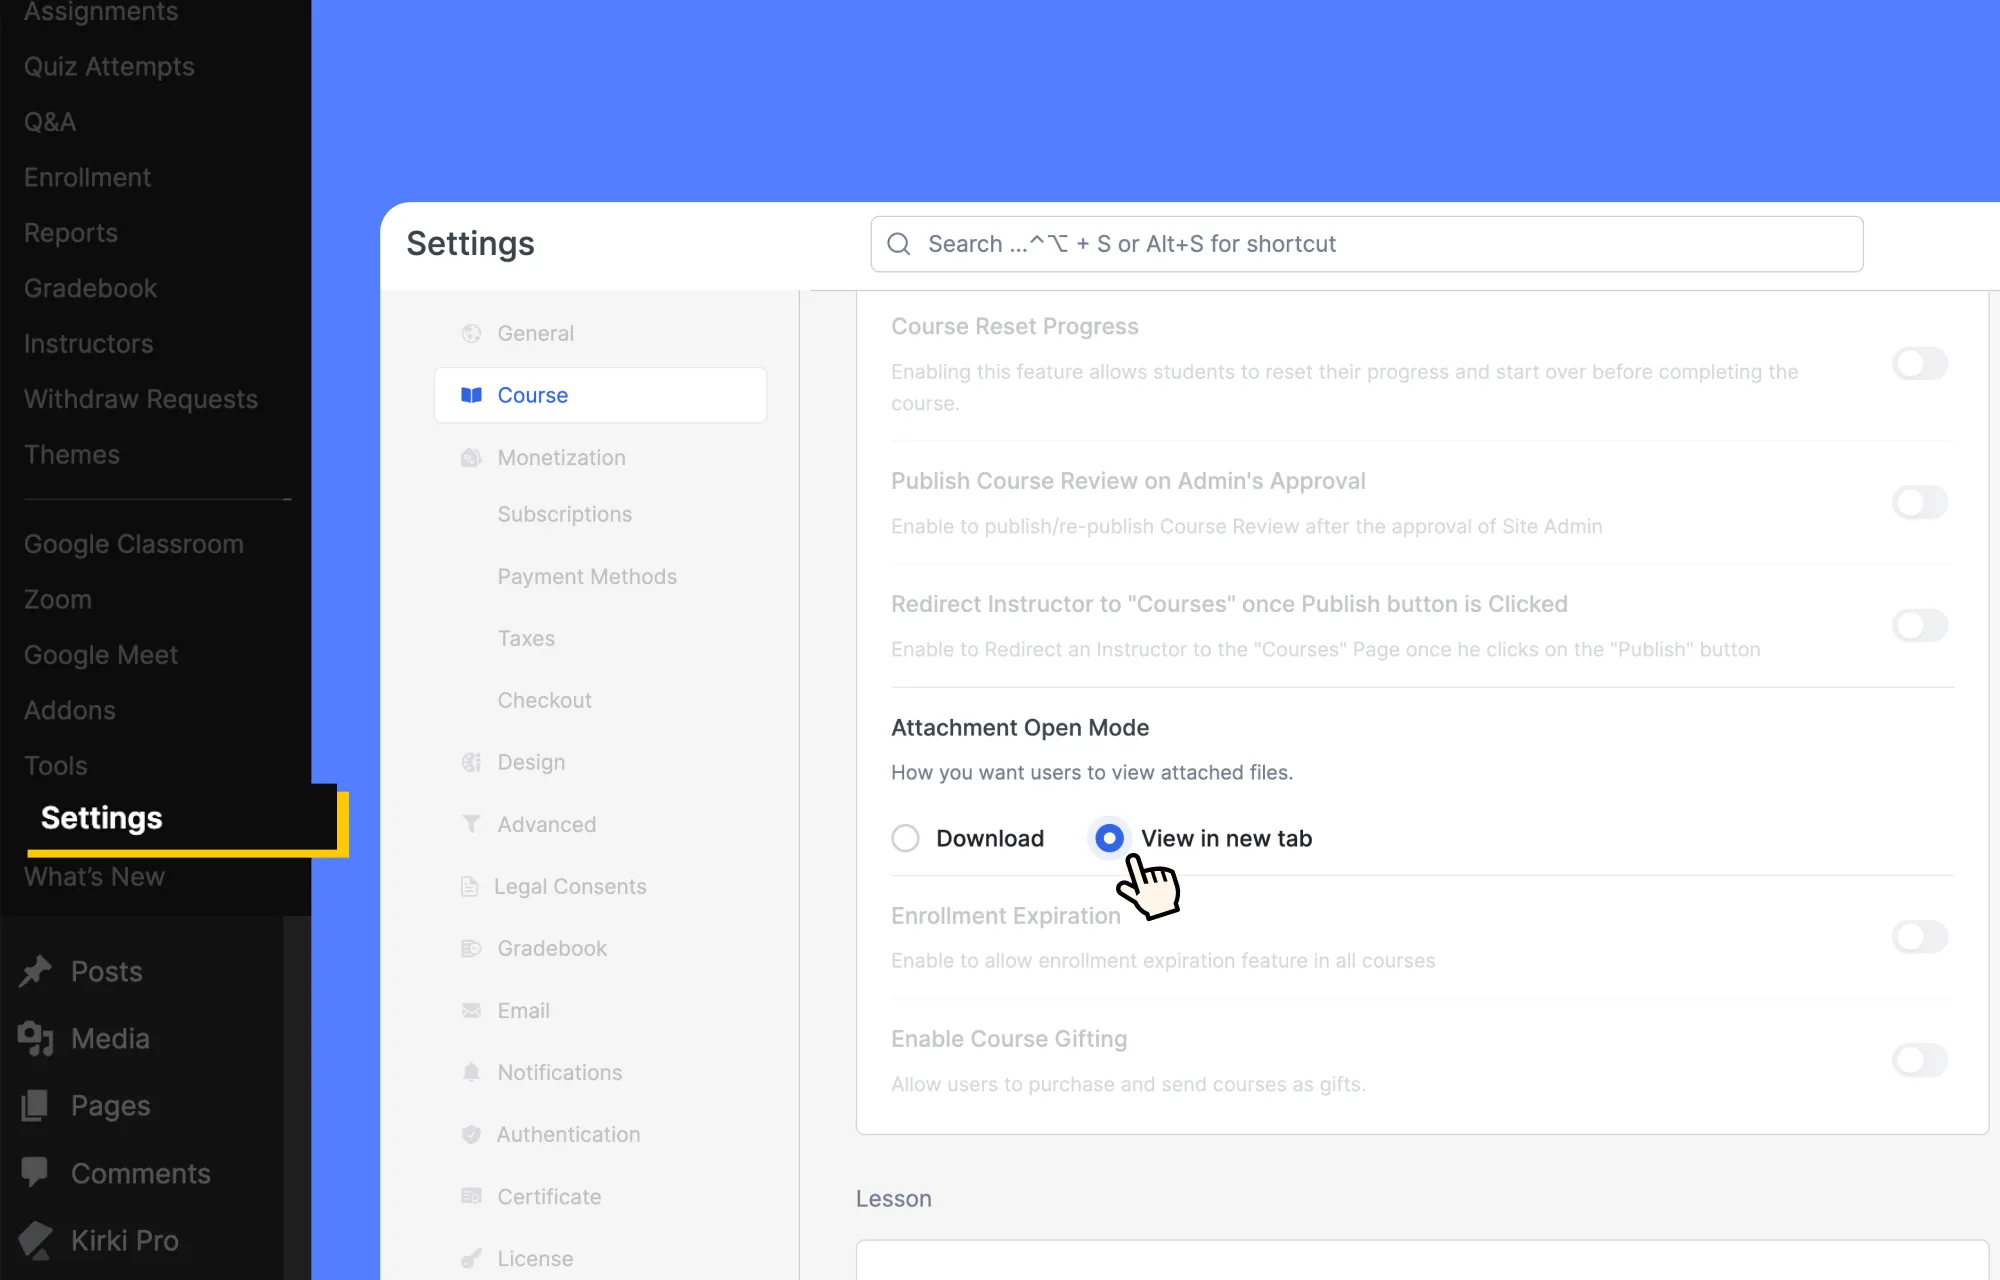
Tutor LMS also provides an Attachment Open Mode under WP Admin → Tutor LMS → Settings → Course. The View in New Tab option opens an attachment in another browser tab. Whether the file appears as a preview depends on its format and the learner’s browser.
Turn Your Resource Center into a Learning Hub
The Tutor LMS Resource Center gives course-wide materials a predictable home. Exercise Files can remain beside the lessons they support, while workbooks, guides, templates, and revision materials stay available from the Resources area.
That simple separation makes courses easier to navigate and maintain. Descriptive filenames help learners understand each download, while required or optional labels show what deserves attention first. Mobile-friendly files and one master copy of shared resources reduce unnecessary downloads and version confusion.
The Resource Center gives learners a central place to access course resources. It is part of the broader Tutor LMS 4.0 learning experience, helping learners find supporting materials without relying only on individual lessons.
Exercise Files are associated with specific lessons and provide supporting materials for that lesson. Course-level resources are intended for materials that learners may need throughout the course, such as guides, syllabi, or reference documents.
The Course Attachments addon needs to be enabled from WP Admin > Tutor LMS Pro > Addons. Resources can then be added through Course Builder > Additional > Attachments. Multiple files can be uploaded at once.
Tutor LMS supports file formats supported by WordPress through the Course Attachments feature. The documentation lists examples such as PDFs, Word documents, spreadsheets, presentations, images, audio, video, and archive files.
Yes. The Resource Center is part of the mobile-first Tutor LMS 4.0 learning experience. Short filenames, smaller downloads, and mobile-friendly PDFs can make those resources easier to scan and open on phones or tablets.
Yes. Tutor LMS includes an Attachment Open Mode setting under the course settings. You can choose Download or View in New Tab, depending on how you want attached files to open for learners.
Uploaded course attachments are available to enrolled learners through the course’s Resources area. This gives learners a consistent place to access supplementary course materials.

Start Using Tutor LMS Today
Ready to take your online courses to new heights? Download Tutor LMS now and enjoy a journey of eLearning excellence.