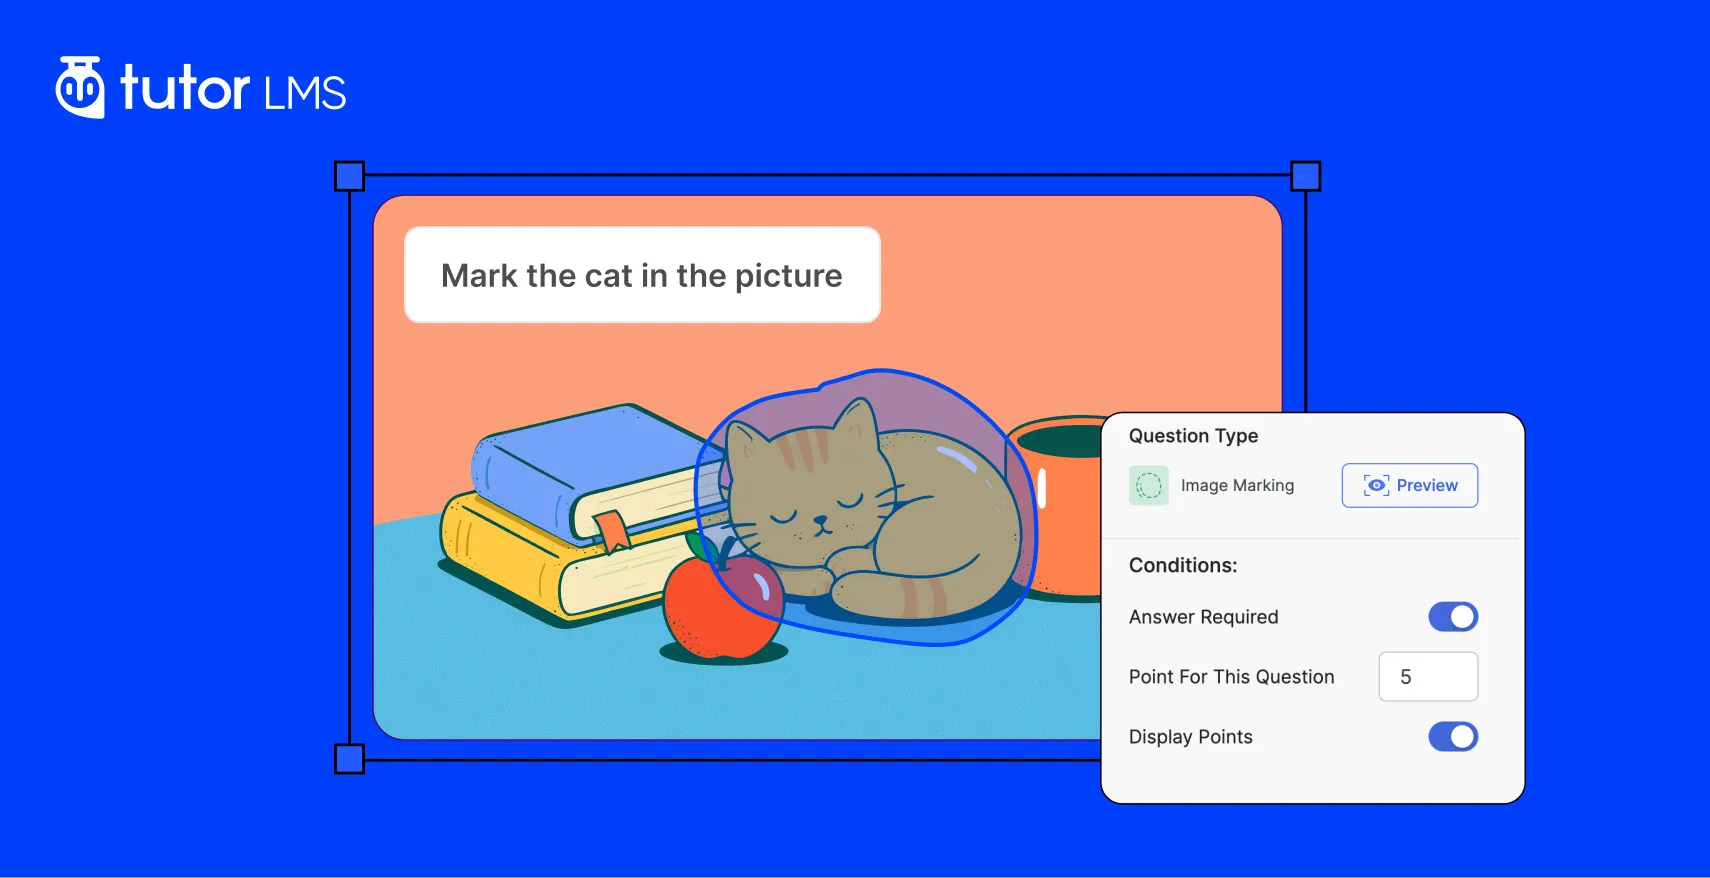
Creating interactive quizzes in WordPress transforms a standard online course into a deeply engaging experience. You spend hours building detailed lessons, but a boring multiple-choice test can quickly ruin that momentum. However, an interactive format requires students to apply their knowledge visually, spatially, and numerically instead of just clicking through text options. Tutor LMS provides five unique visual quiz formats designed specifically for this purpose. This step-by-step guide walks you through each interactive quiz option so you can build assessments that truly measure student understanding.
Getting Started: How to Add Your First Question
The Quiz Builder lives inside your Course Builder; there’s no separate menu to find. Once your course is open, go to the Curriculum tab, locate the topic where you want to add a quiz, and click +Quiz. That opens the Quiz Builder window, where you’ll enter a title and an optional description before you can start adding questions.
You’ll notice two main tabs at the top of this window. The Question Details tab handles your content, while the Settings tab controls your rules. The Settings tab is covered in detail later in the article.
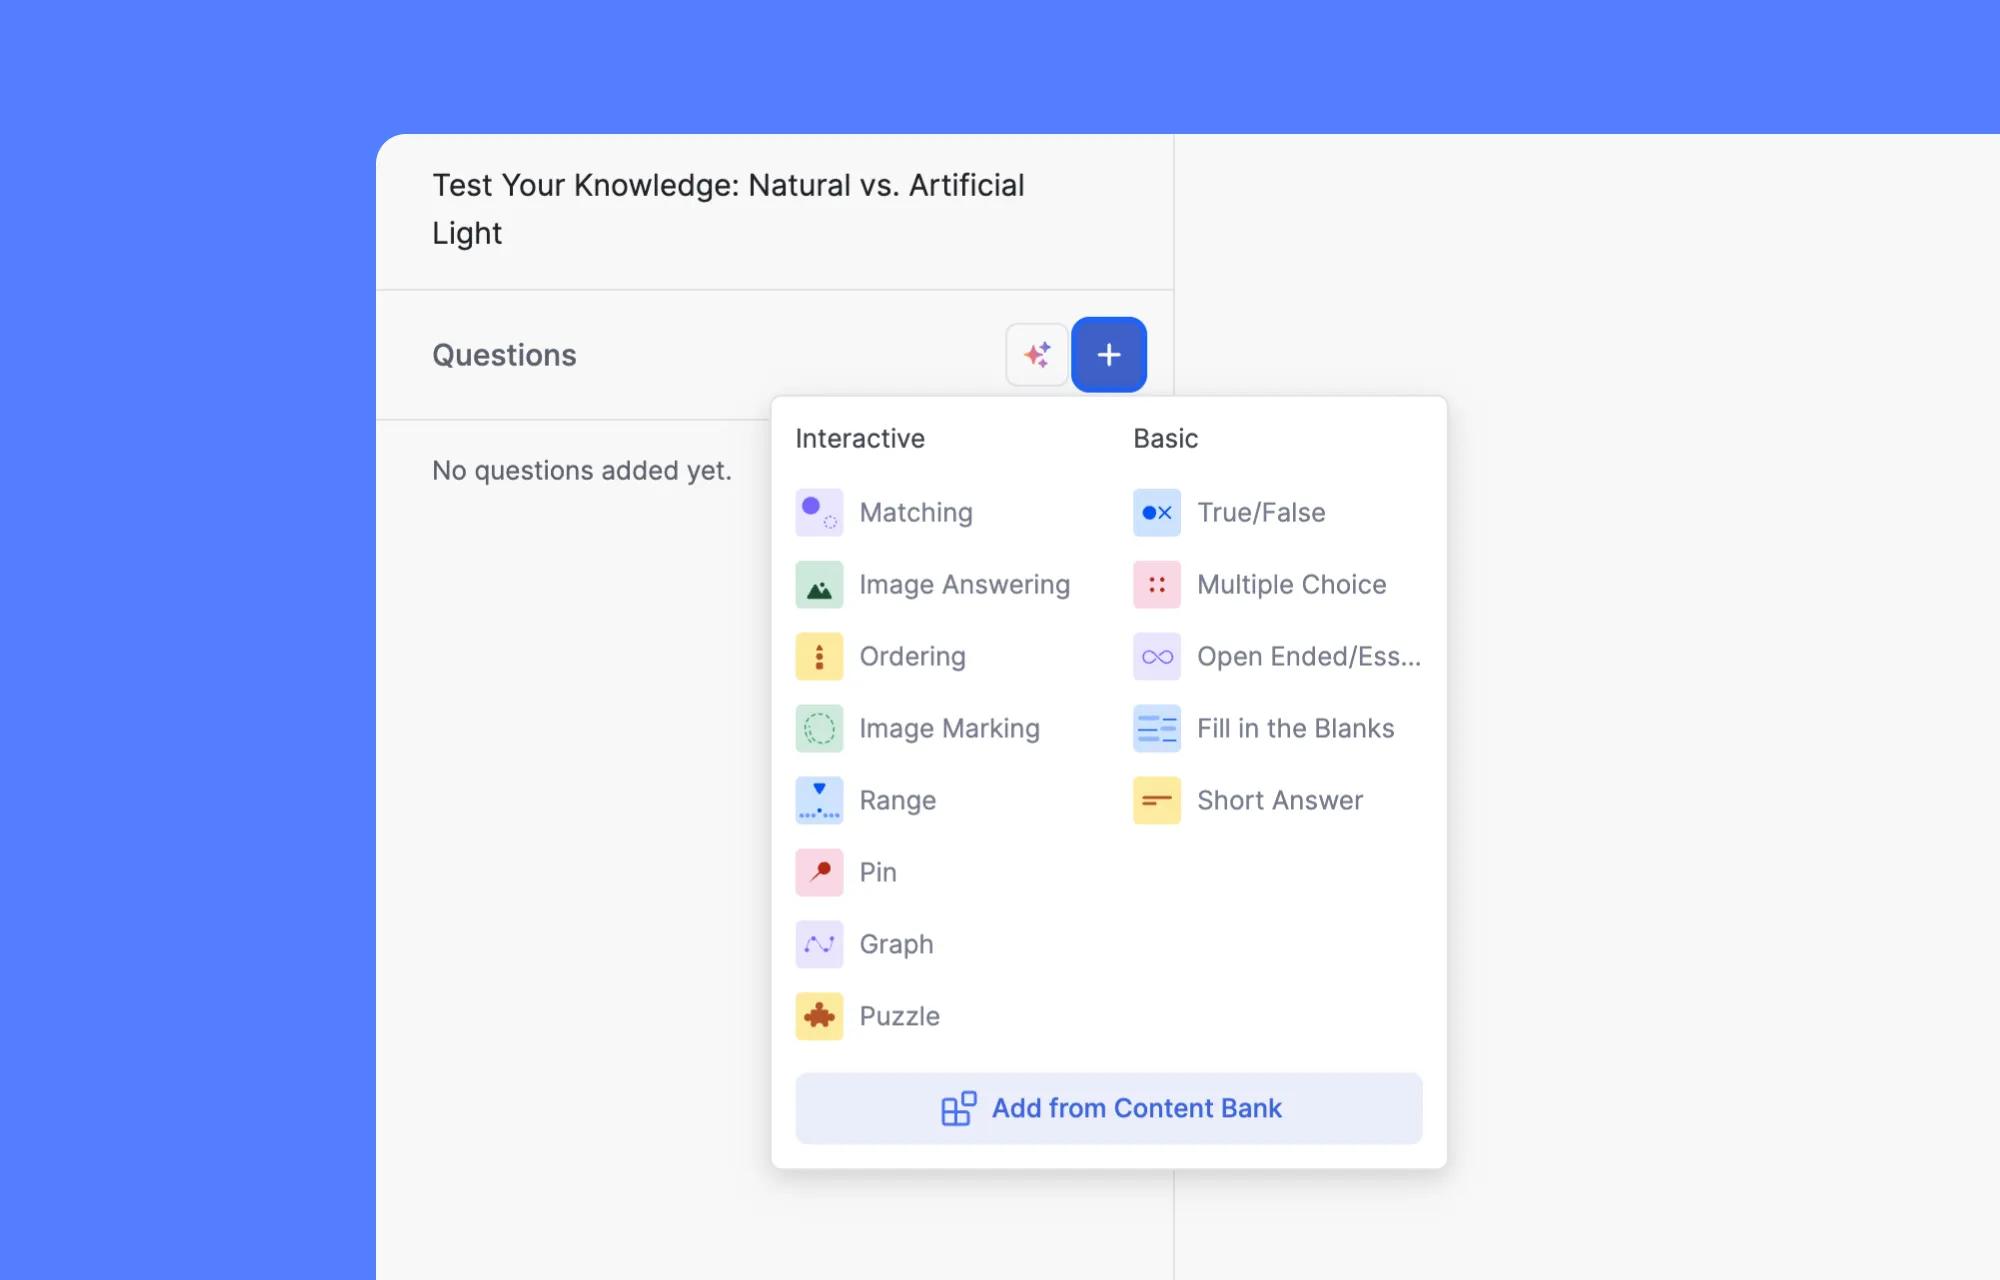
To add a question, click the large blue + button in the Questions section. A dropdown appears listing all 13 available question types. The five interactive quizzes are Image Marking, Range, Pin, Graph, and Puzzle sit at the left of that list.
Note: If you are new to the platform, reviewing this guide on the basics of quiz building provides a solid starting point before continuing.
The 5 Interactive Quiz Types in Tutor LMS
Each of the five formats below is designed for a specific kind of knowledge. Some test visual identification, others test spatial reasoning or numerical precision. The setup process differs for each one, but the logic is consistent: you define what correct looks like, and the system grades against it automatically.
1. Image Marking: The Visual Identification Format
The Image Marking format is excellent for visual identification. It requires your learners to draw a physical boundary directly on an uploaded picture. The system then compares their drawing against a hidden correct zone you established earlier. This approach shines in biology classes, technical diagnostics, or any subject where location matters.
Setting it up takes five steps:
- Select Mark in the Image from the question type dropdown
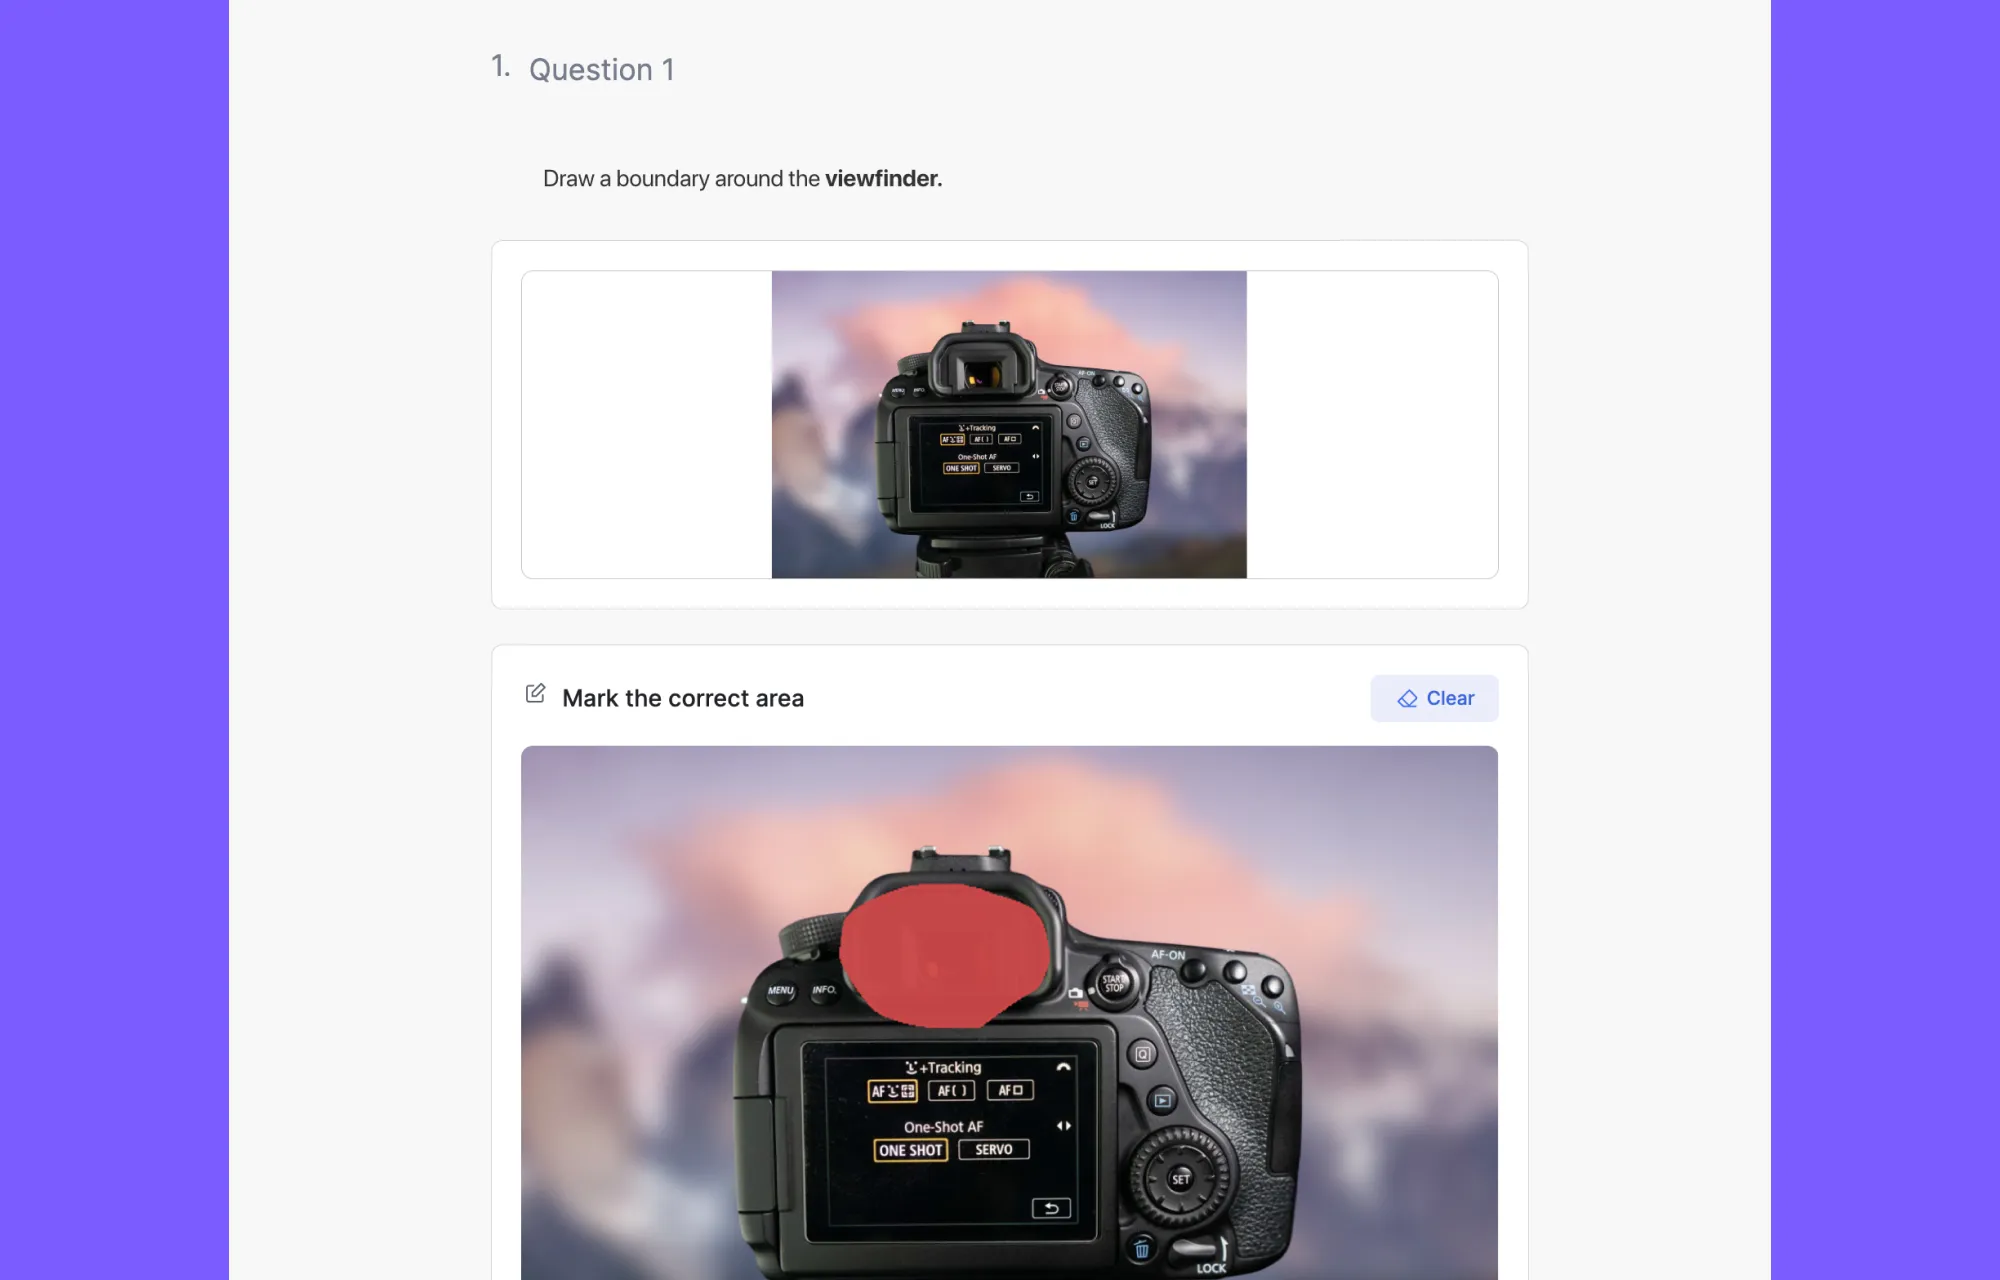
- Type your question text, for example: “Draw a boundary around the viewfinder”
- Click the image upload area below the question and choose your image
- Once uploaded, the Mark the correct area section appears. Click or draw directly on the image to define the correct region. Use Clear to reset and start again if needed.
- Open the Precision Level dropdown and set your percentage threshold
Tip: The Precision Level controls your grading difficulty. This percentage dictates how much of the student’s drawing must overlap your target to pass. A 70% precision level means their boundary marking must cover at least 70% of your defined zone.
Always adjust the precision setting based on the graphic. If the subject is large and obvious, a stricter percentage is fair. If you’re asking students to highlight a small or detailed area, a lower setting forgives the natural imprecision of drawing with a mouse.
After submission, students see their result as correct or incorrect based on the overlap calculation.
2. Pin Questions: When a Single Click Tells You Everything You Need to Know
Image Marking asks students to draw. Pin asks for something simpler, a single click. It’s a small but important distinction, and it changes both the setup process and the types of subjects it suits best.
With Pin questions, students click once on an image to drop a marker. The Tutor LMS then checks whether that point falls inside the acceptable region you’ve defined. No boundary drawing, no overlap calculation. Just a click and a pass or fail result based on location.
This makes it a natural fit for geography assessments, anatomy diagrams, historical maps, and any task that tests spatial reasoning through a single precise location.
Setting it up:
- Select Pin from the question type dropdown
- Type your question, for example: “Pin where the Rule of Thirds is used”
- Add an optional description if the student needs extra context
- Upload your image
- Scroll down to Mark the correct area and click and drag to draw your acceptable target zone
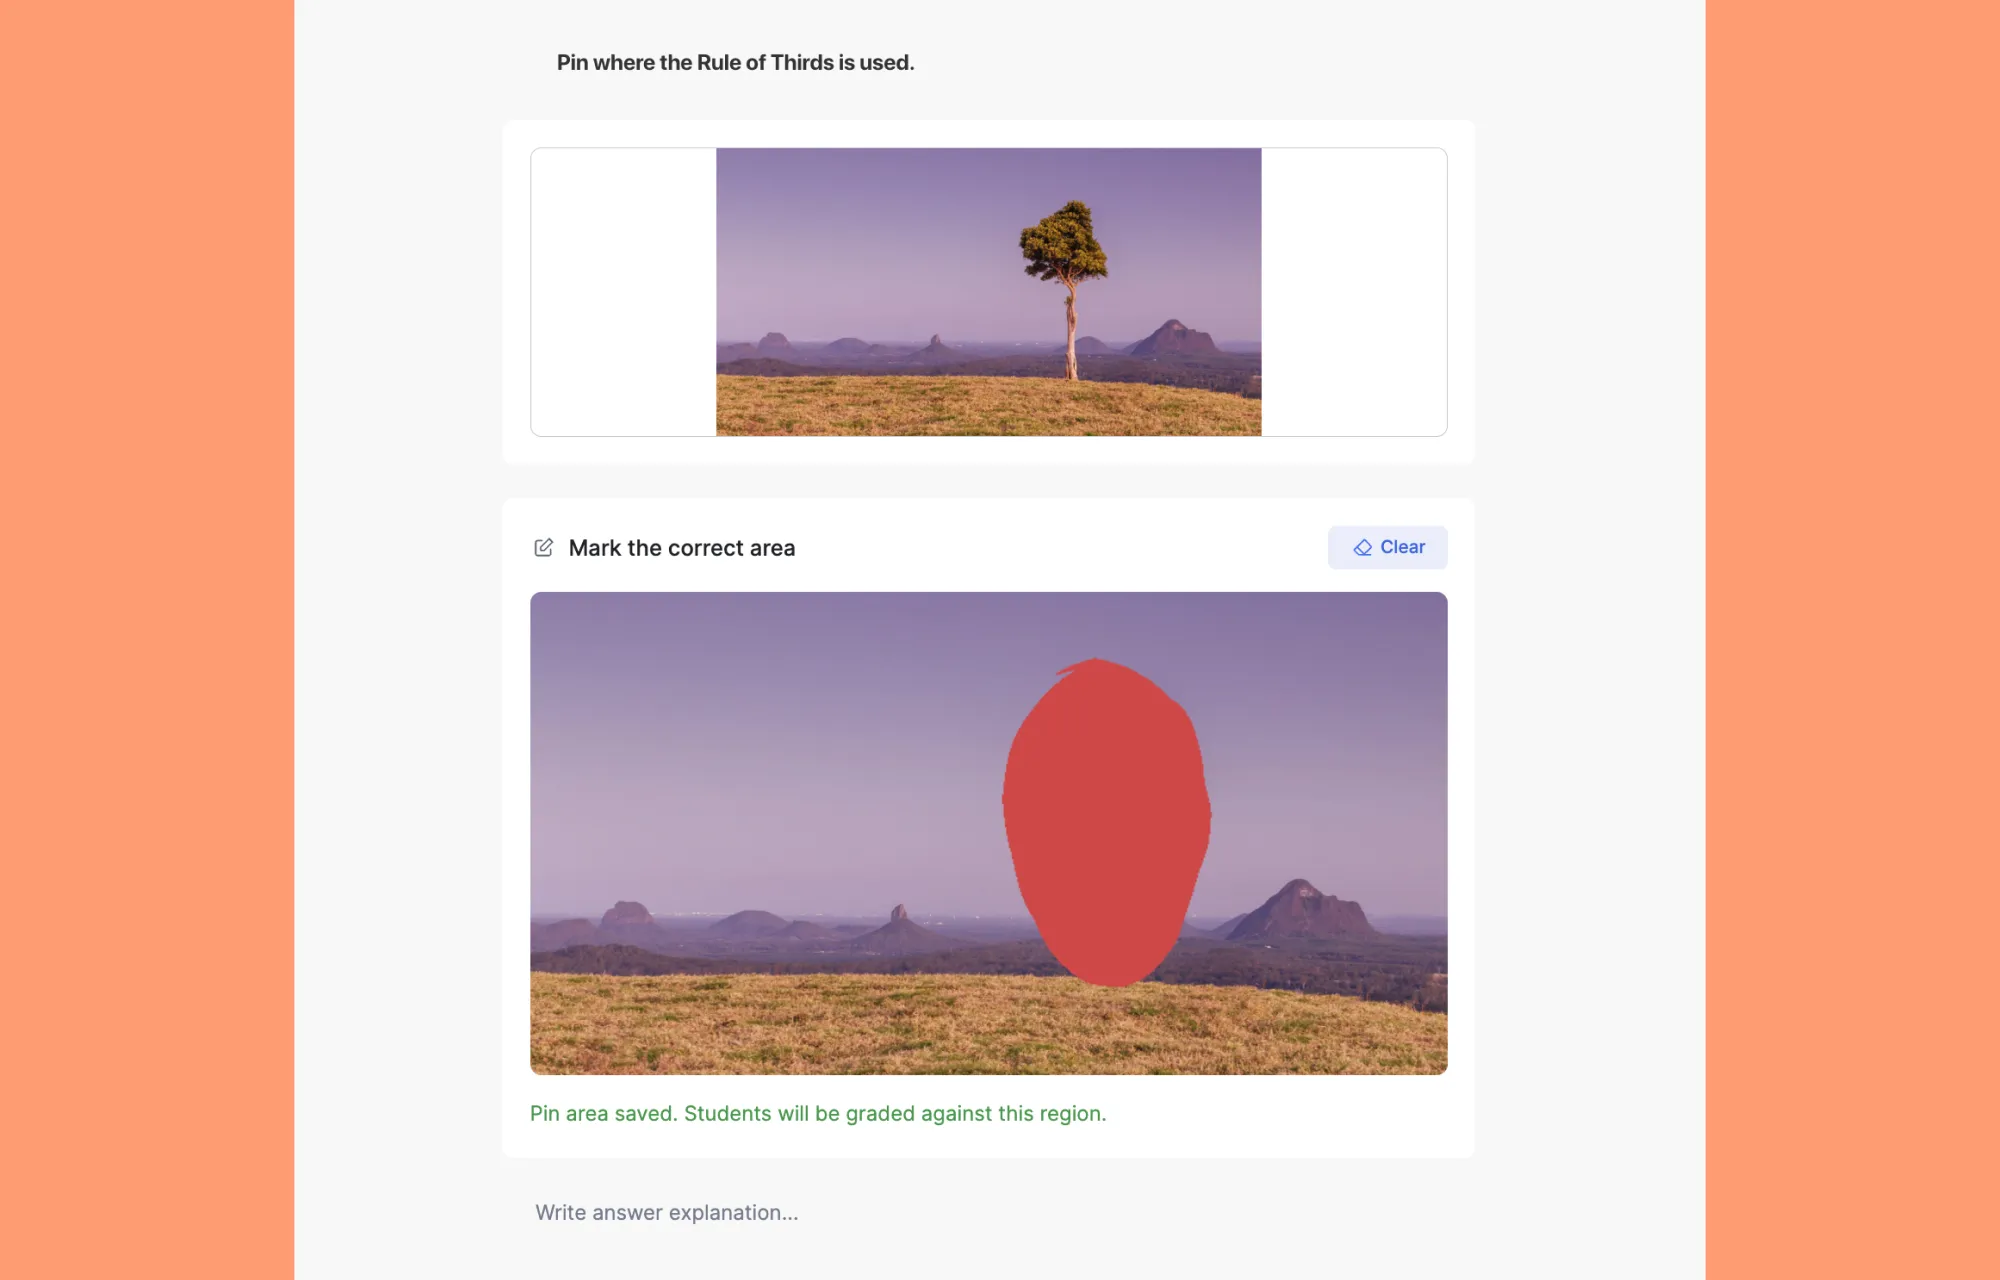
- A confirmation message will appear: “Pin area saved. Students will be graded against this region”
- Use Clear to redraw the zone if needed, and optionally add an Answer Explanation for post-submission feedback
Tip: One practical thing worth knowing is that your target zone should be slightly more generous than the exact boundary. A student who pins the edge of a country hasn’t really got it wrong. A zone that’s drawn too tightly creates fails that feel unfair and erodes trust in the assessment.
Students see the full image, drop their pin, and can reposition it before moving on. After submission, they’ll see whether their pin landed inside or outside the correct region.
3. Range Questions: The Slider Format That Eliminates Multiple-Choice Guessing
Not every subject calls for images. Sometimes the knowledge you need to test is purely numerical, and that’s where the Range question type earns its place in your online course quiz.
Students drag a handle along a horizontal scale until it lands on the correct value. No text box to fill in, no options to guess from. Just a direct interaction with a number line that requires actual knowledge to navigate accurately.
It works particularly well for chemistry (pH levels), physics (temperatures or voltages), history (dates), and medicine (dosage thresholds).
Setting it up:
- Select Range from the question type dropdown
- Type your question text, for example: “What is the approximate color temperature of daylight?”
- In the Scale range section, enter:
- Min value: the lowest number on the scale (e.g., 4500)
- Max value: the highest number (e.g., 5500) (must exceed the min value)
- Label entry: how frequently labels appear along the scale (e.g., entering 20 adds a label every 20 units)
- Enter the Correct Value, which must fall within your min and max range
- Optionally add an Answer Explanation for post-submission feedback
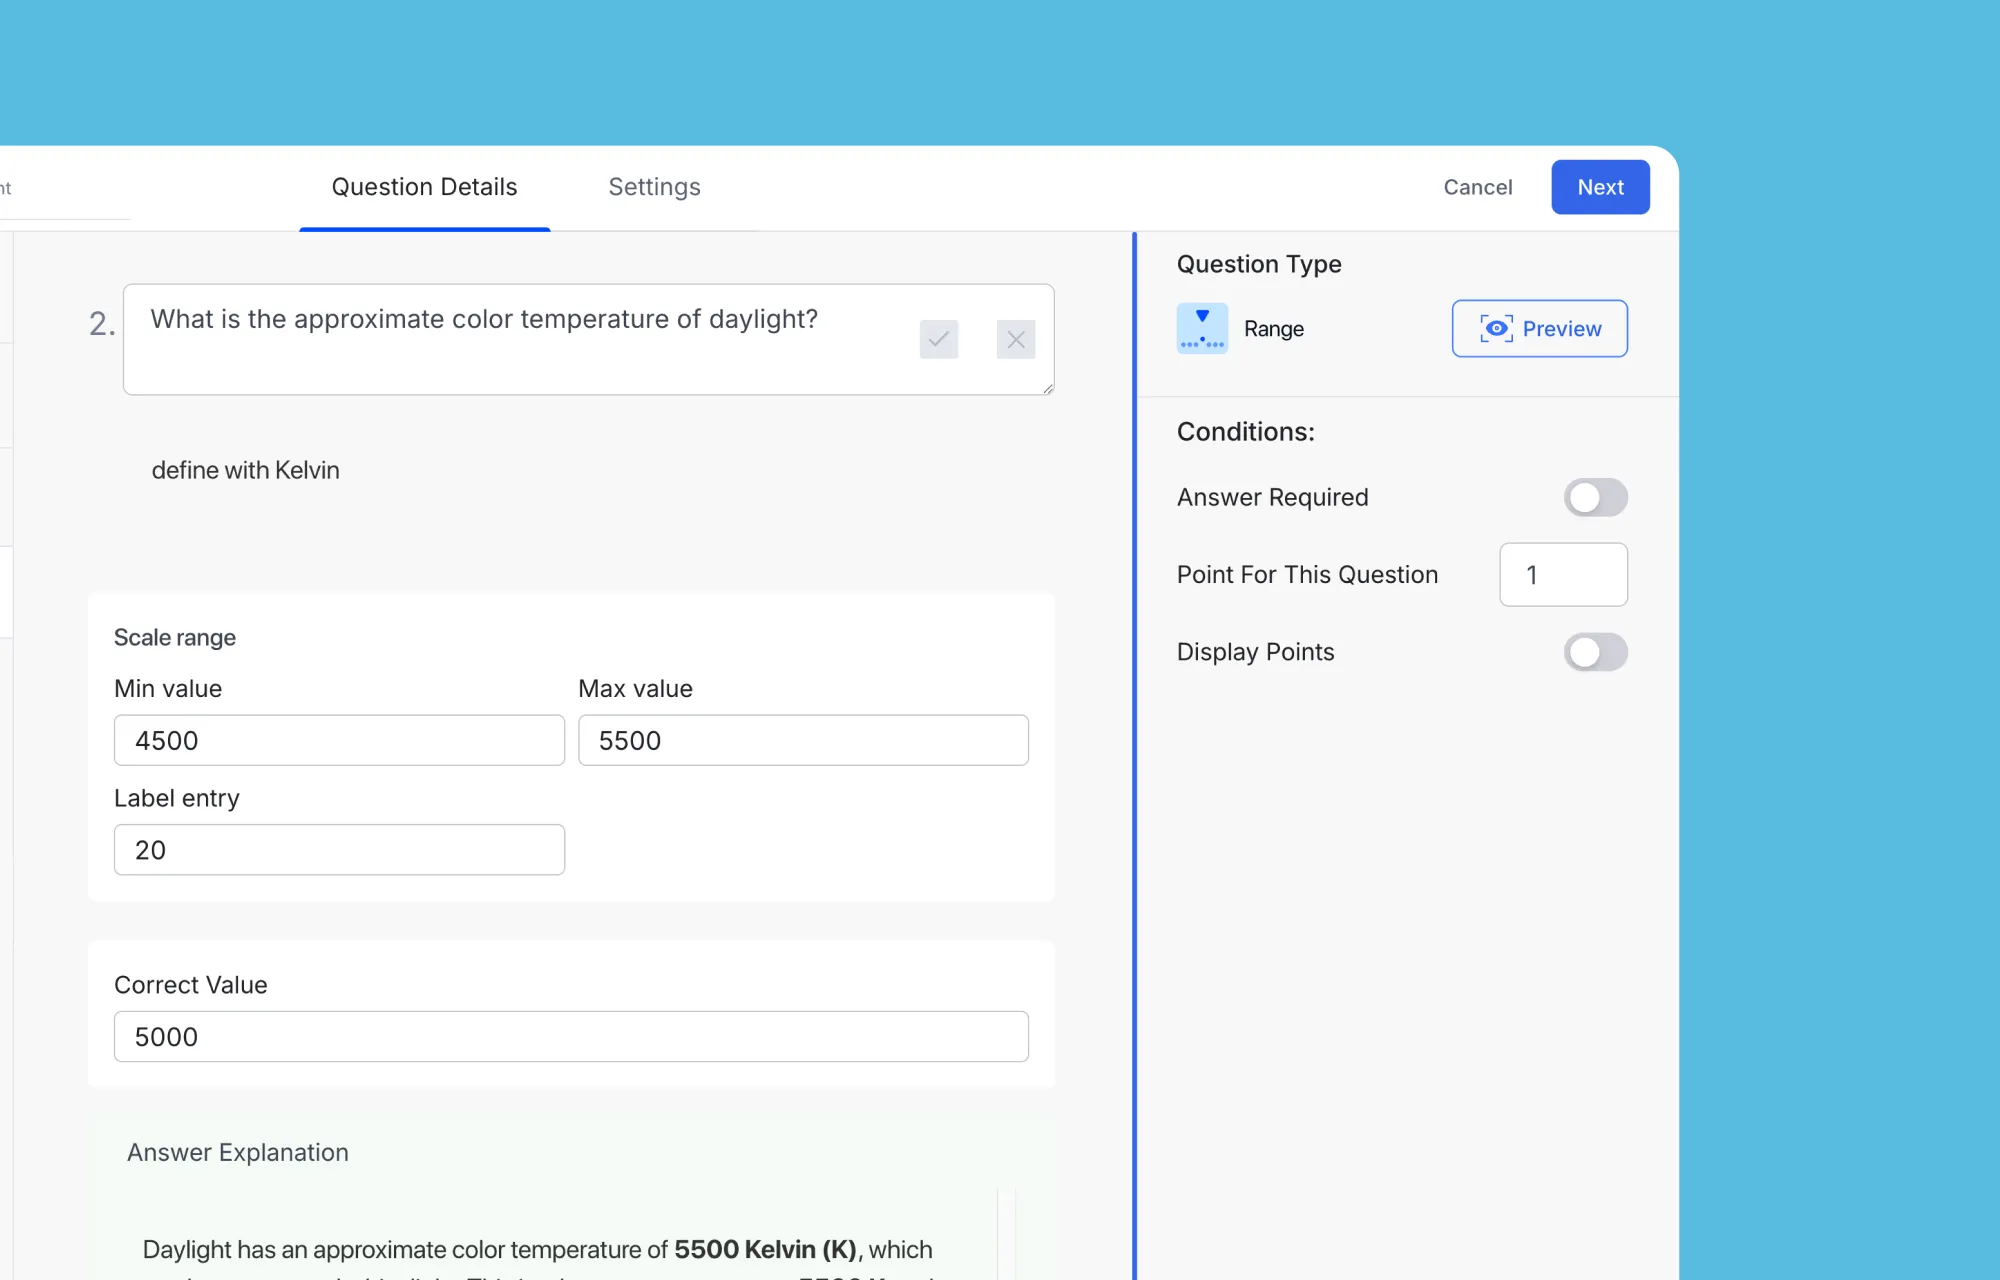
Tip: The label entry setting is easy to overlook, but it significantly affects usability. A pH scale labelled every 2 units is clean and readable. Label it every 0.1, and the slider becomes cluttered and difficult to use.
Students see a horizontal scale with tick marks and a tooltip above the drag handle showing their current value in real time.
4. Graph Questions: How to Ask Students to Plot Coordinates
Range questions handle numbers on a line. Graph questions move into two-dimensional coordinate plotting, making them the go-to format for maths and science subjects that require more than a single value to demonstrate understanding.
Students click directly on a Cartesian grid to place their answer dots. The grid runs from -10 to 10 on both axes by default, covering most standard algebra, geometry, data literacy, and physics use cases without any adjustments needed.
Setting it up:
- Select Graph from the question type dropdown
- Type your question, for example: “Which point represents the coordinates? 1. (-4, 5) 2. (3, -2) 3. (0, -9)”
- In the Coordinates section, enter the correct coordinates in x,y format, for example: -4,5
- The grid below updates in real time, placing a dot at your entered position (a useful live preview before you save)
- Click Add Coordination to include a second or third target point for multi-point questions; each entry gets its own row with duplicate and delete icons
- Optionally add an Answer Explanation for students to see after submission
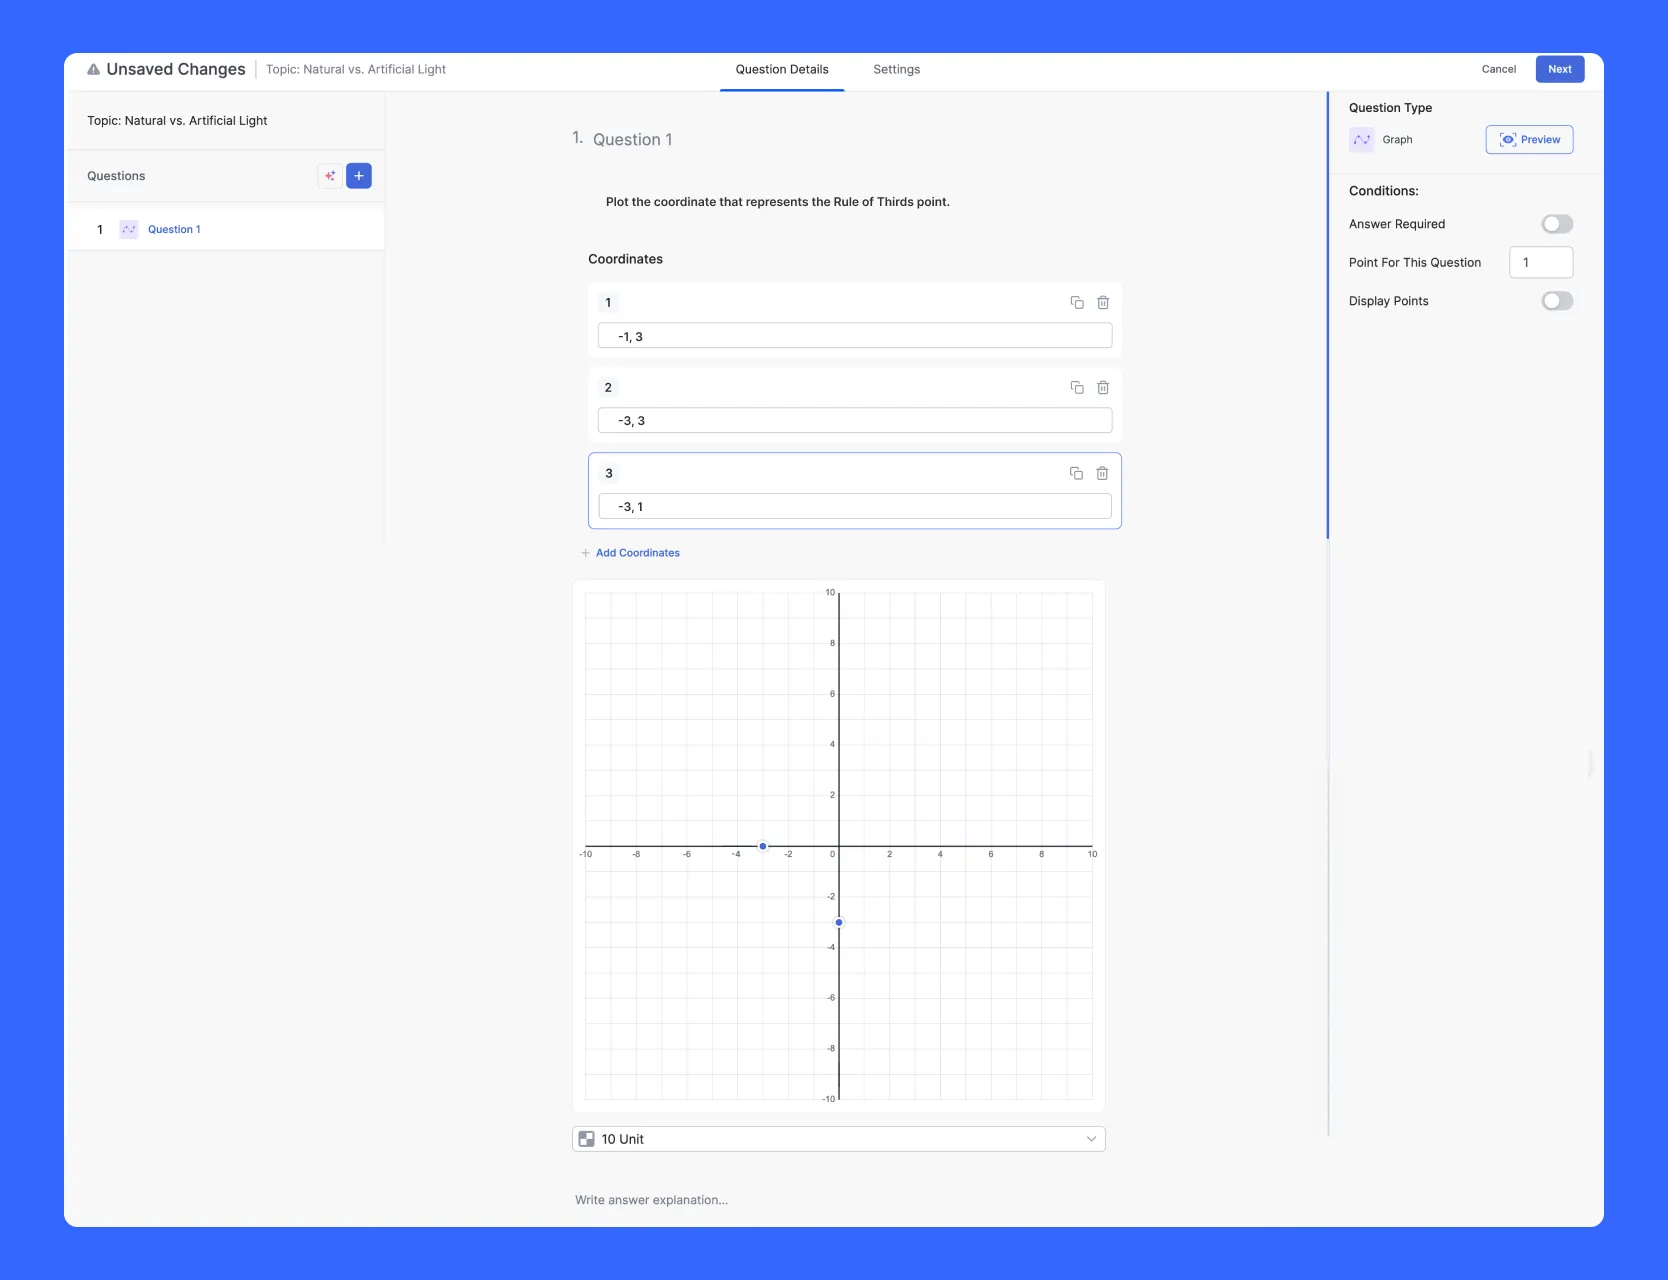
Multi-point questions open up richer assessments. A question like “Plot all three vertices of a right triangle at (0,0), (4,0), and (0,3)” requires three separate coordinate entries using Add Coordination, and students must place all three dots correctly.
After submission, the results are immediately clear: correctly placed dots turn green, incorrect ones turn red. It’s one of the more satisfying graph question type quiz formats because the visual feedback is instant and unambiguous.
5. Puzzle Questions: A Gamified Format That Tests Structural Visual Recall
The four question types covered so far test specific knowledge through precise interaction. Puzzle questions work differently. They test whether students can recognise the structural logic of a visual, and they do it through one of the more genuinely engaging formats in the online quiz builder.
An image is cut into scrambled square tiles. Students drag pieces from a tray at the bottom of the screen and drop them into position on the board above to reconstruct the original. It’s a gamified assessment format that works particularly well for geography, anatomy, engineering diagrams, and art history.
Setting it up:
- Select Puzzle from the question type dropdown
- Type your question, for example: “Solve the puzzle by aligning the photograph of Rome in the correct order”
- Upload a high-contrast image
- Open the Difficulty Level dropdown and choose your grid size:
- Easy: 2×2 grid, 4 pieces
- Medium: 4×4 grid, 16 pieces
- Hard: 7×7 grid, 49 pieces
- Optionally add an Answer Explanation
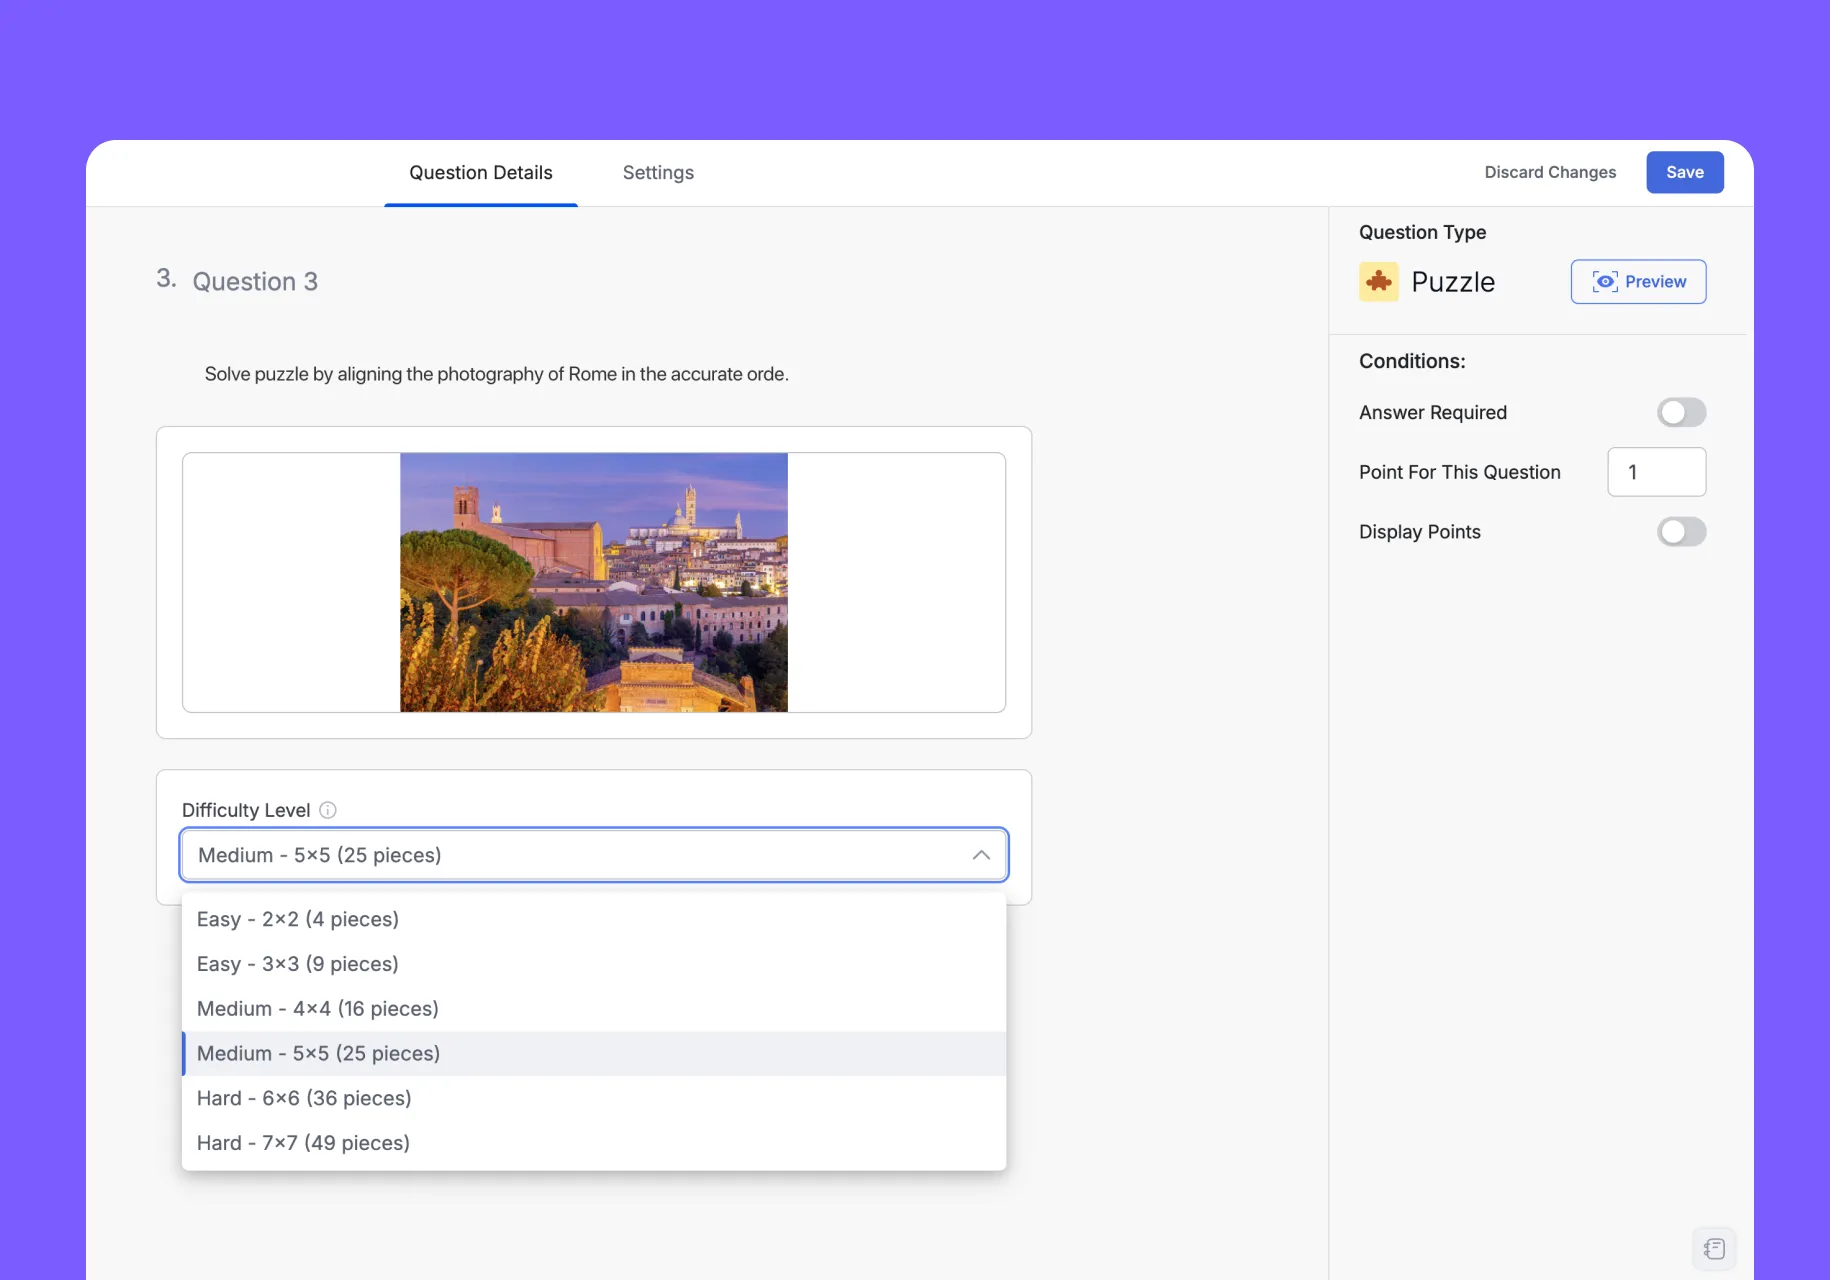
Two decisions determine whether this question type actually works: image choice and difficulty level. For instance, a labeled world map gives students structural clues like coastlines, country names, and color boundaries. A generic landscape photograph gives them nothing to work with, and the question becomes frustrating rather than educational.
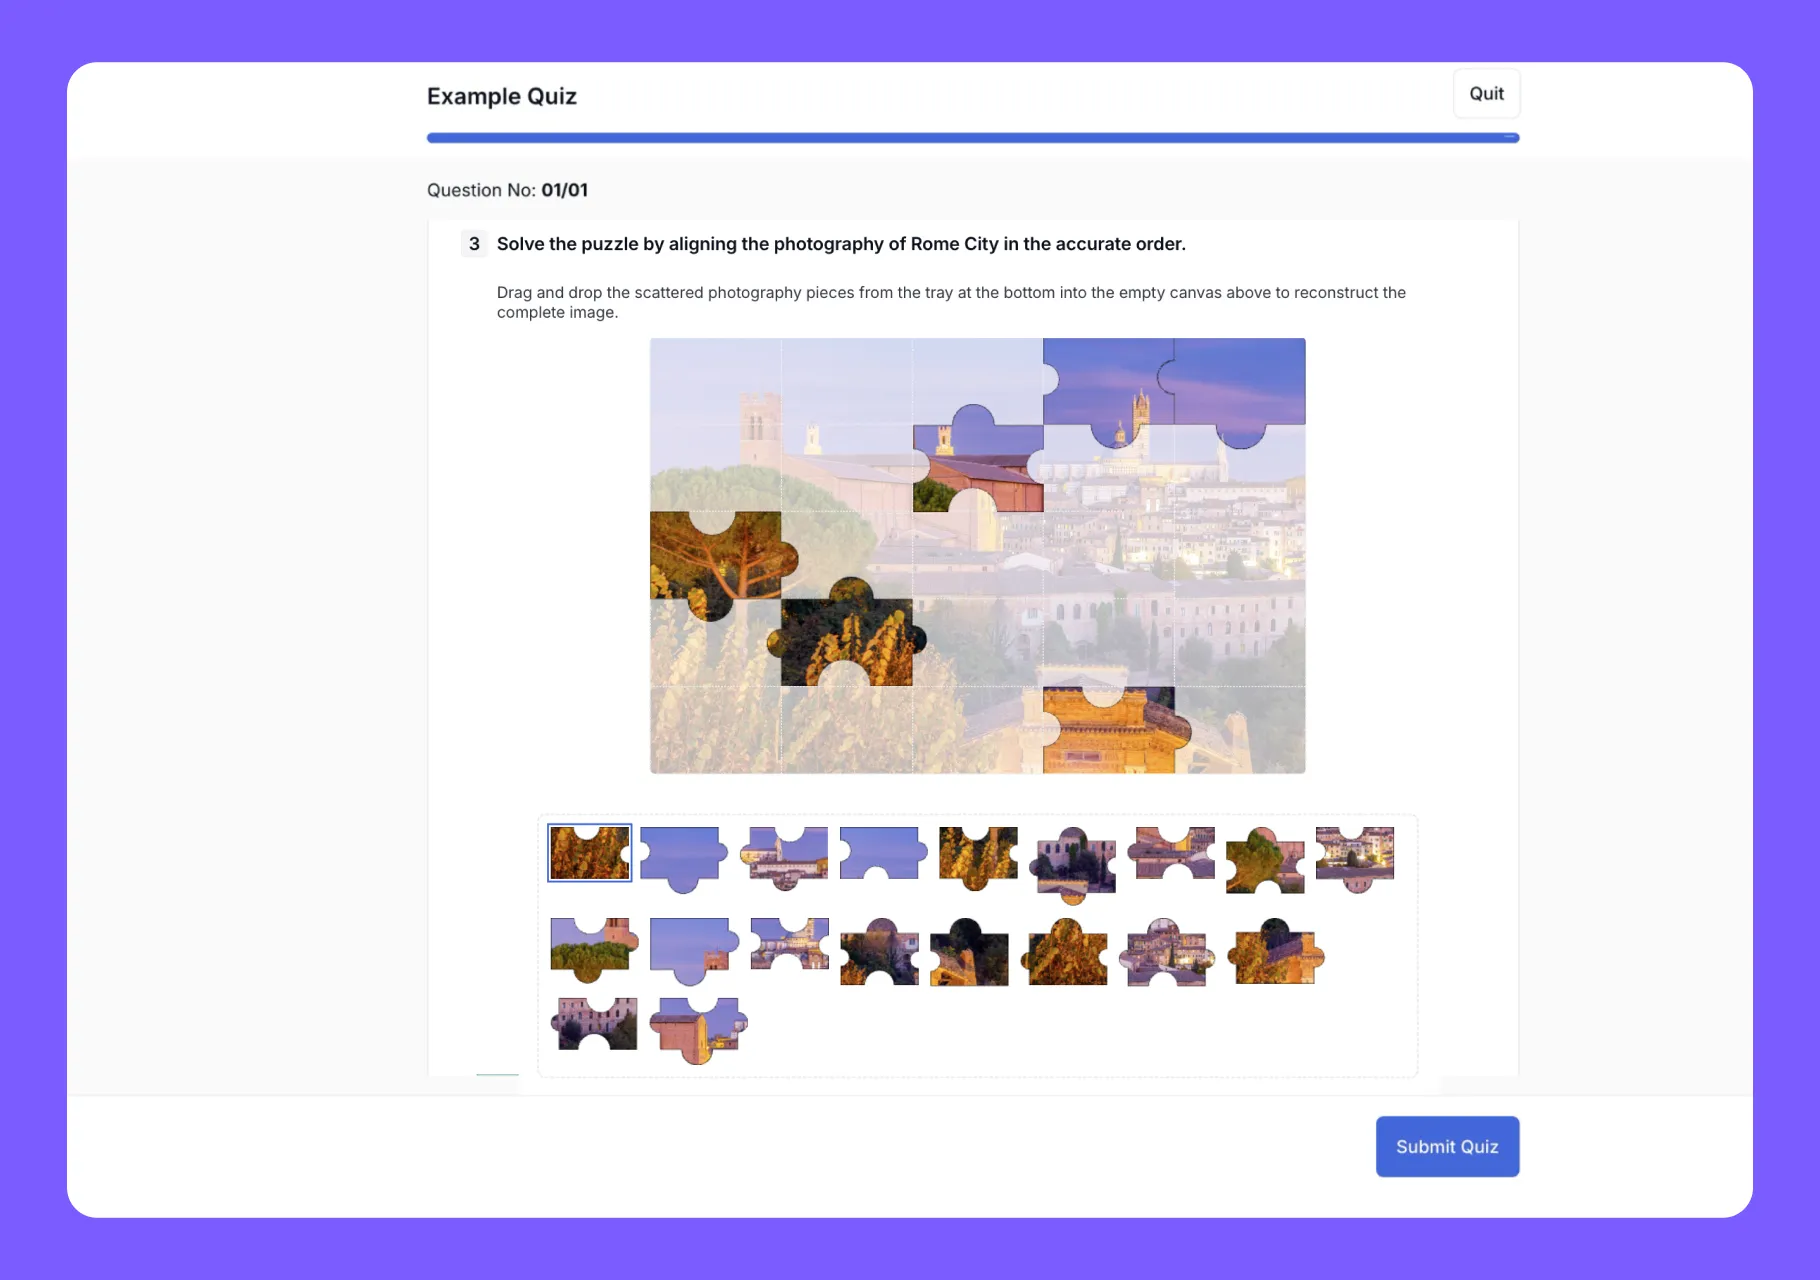
On difficulty, Easy and Medium suit introductory courses and younger learners well. Hard should be reserved for situations where spatial image reconstruction is genuinely the skill being assessed, not simply added for variety.
Three Settings That Apply to Every Question You Build
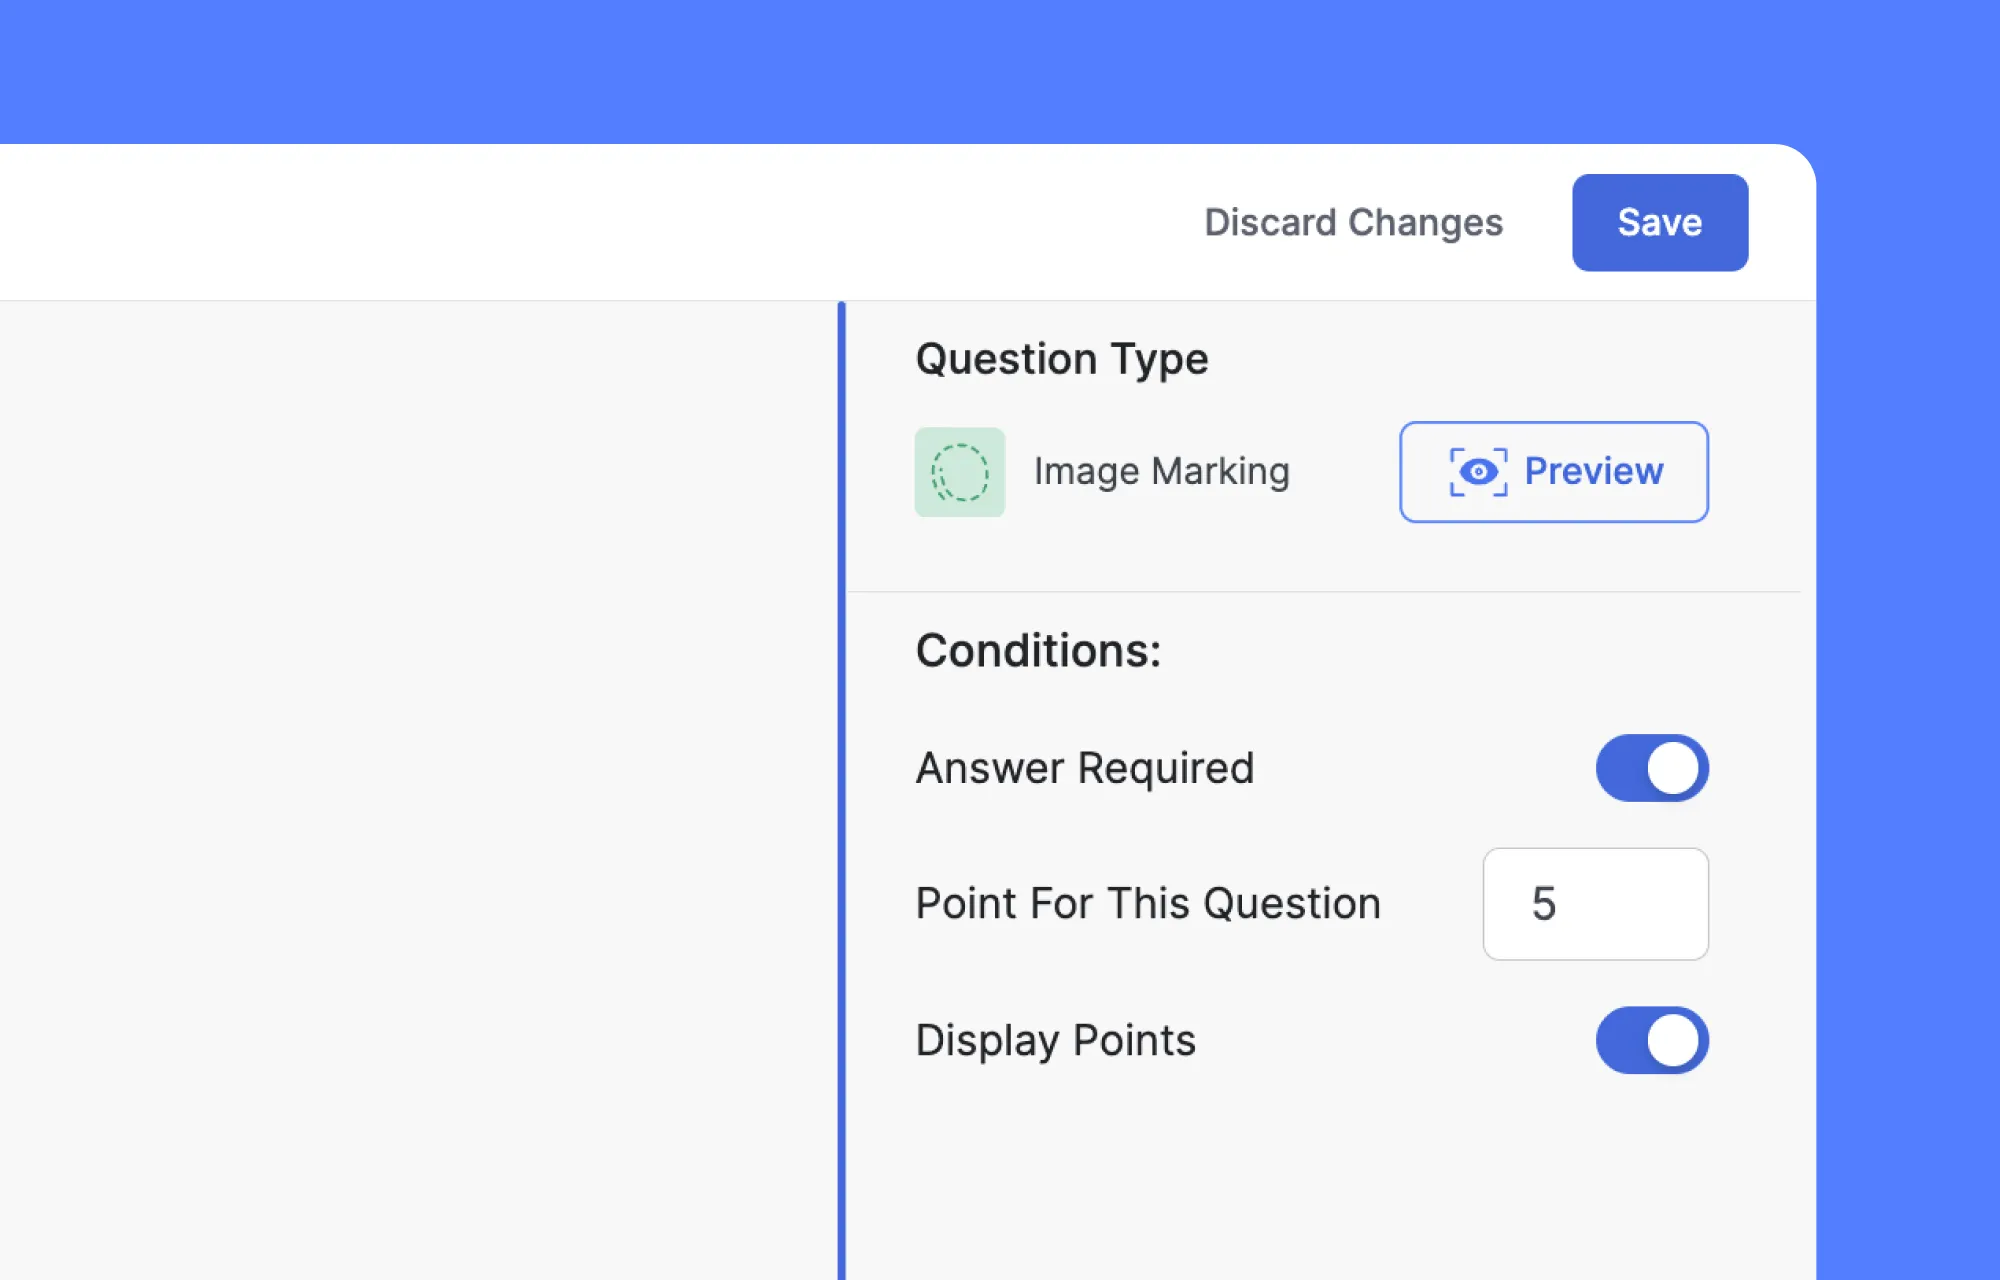
Before getting into the quiz-level settings, there are three controls in the right-hand panel that appear on every question you create, regardless of type. The panel activates the moment you select or create any question.
- Answer Required: Students can’t advance without submitting an answer. Useful when skipping a question would undermine the purpose of the quiz.
- Point For This Question: Defaults to 1 point, but you can raise it to reflect the difficulty of harder questions in your online quiz builder.
- Display Points: Shows the point value to students during the quiz, so they can manage their effort across the assessment.
These are per-question settings. The broader quiz-level controls are covered in the next sections.
Quiz Rules and Scope: Passing Grades, Shuffling, and Attempt Limits
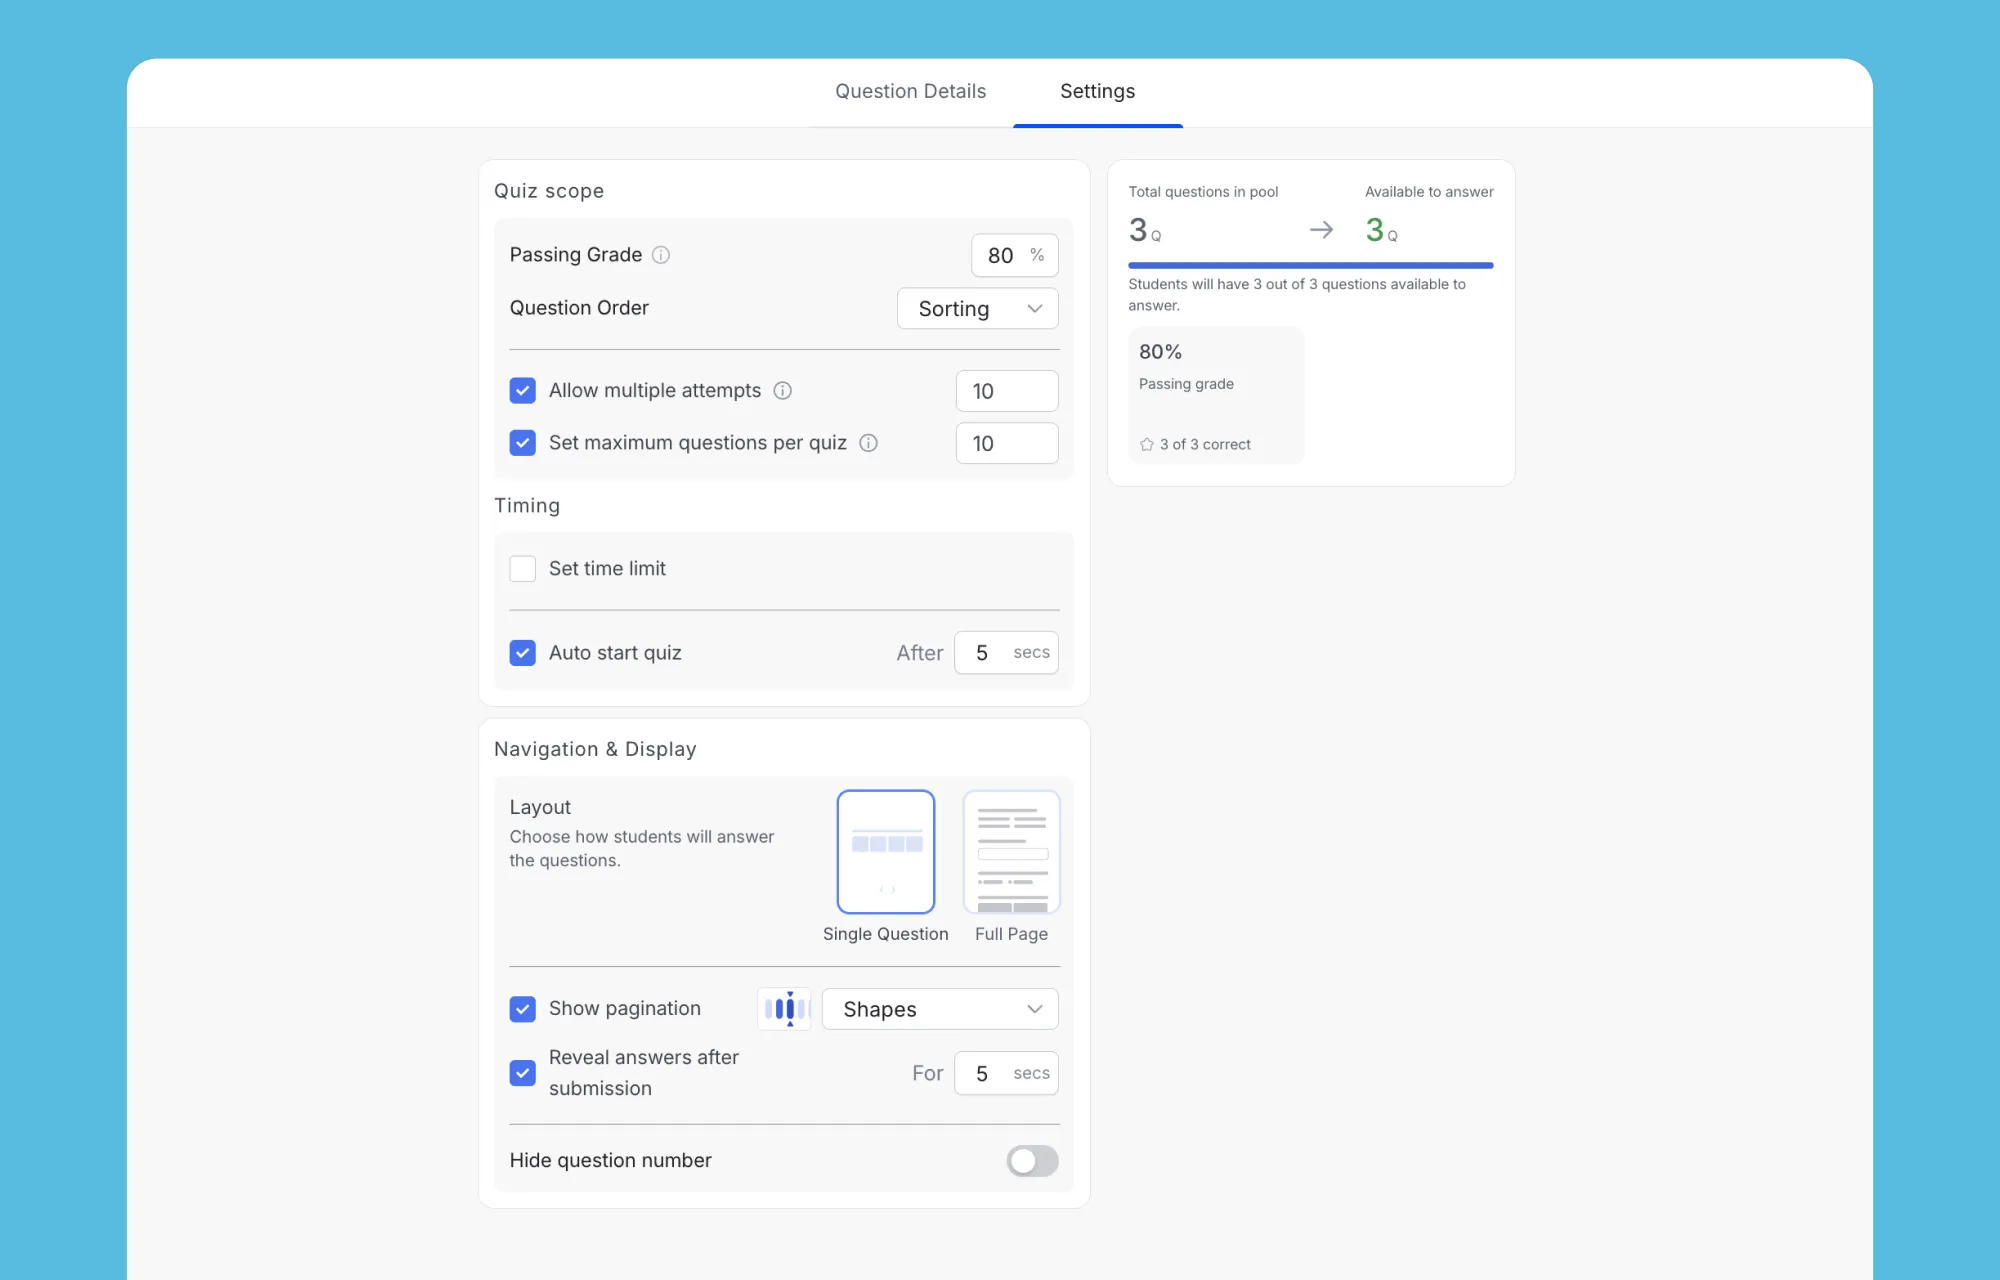
With your questions built, the Settings tab at the top of the Quiz Builder is where you define how the whole quiz runs. A live summary panel on the right updates in real time as you configure, so you always have a clear picture before publishing.
The key controls to know:
- Passing Grade: The minimum percentage a student needs to pass
- Question Order: Choose Random to prevent answer sharing, Sorting to follow a custom sequence, or Ascending/Descending for alphanumeric ordering
- Limit Attempts: Caps retry attempts so students can’t guess indefinitely
- Limit Questions to Answer: Shows a random subset from your full question bank each attempt, creating a unique experience every time
For the full breakdown of every setting, the Tutor LMS Quiz Settings documentation covers each option in detail.erience every time.
A Few Navigation and Display Features Worth Knowing
The Navigation and Display section gives you direct control over how students move through and experience your quiz. Three settings in particular are worth highlighting.
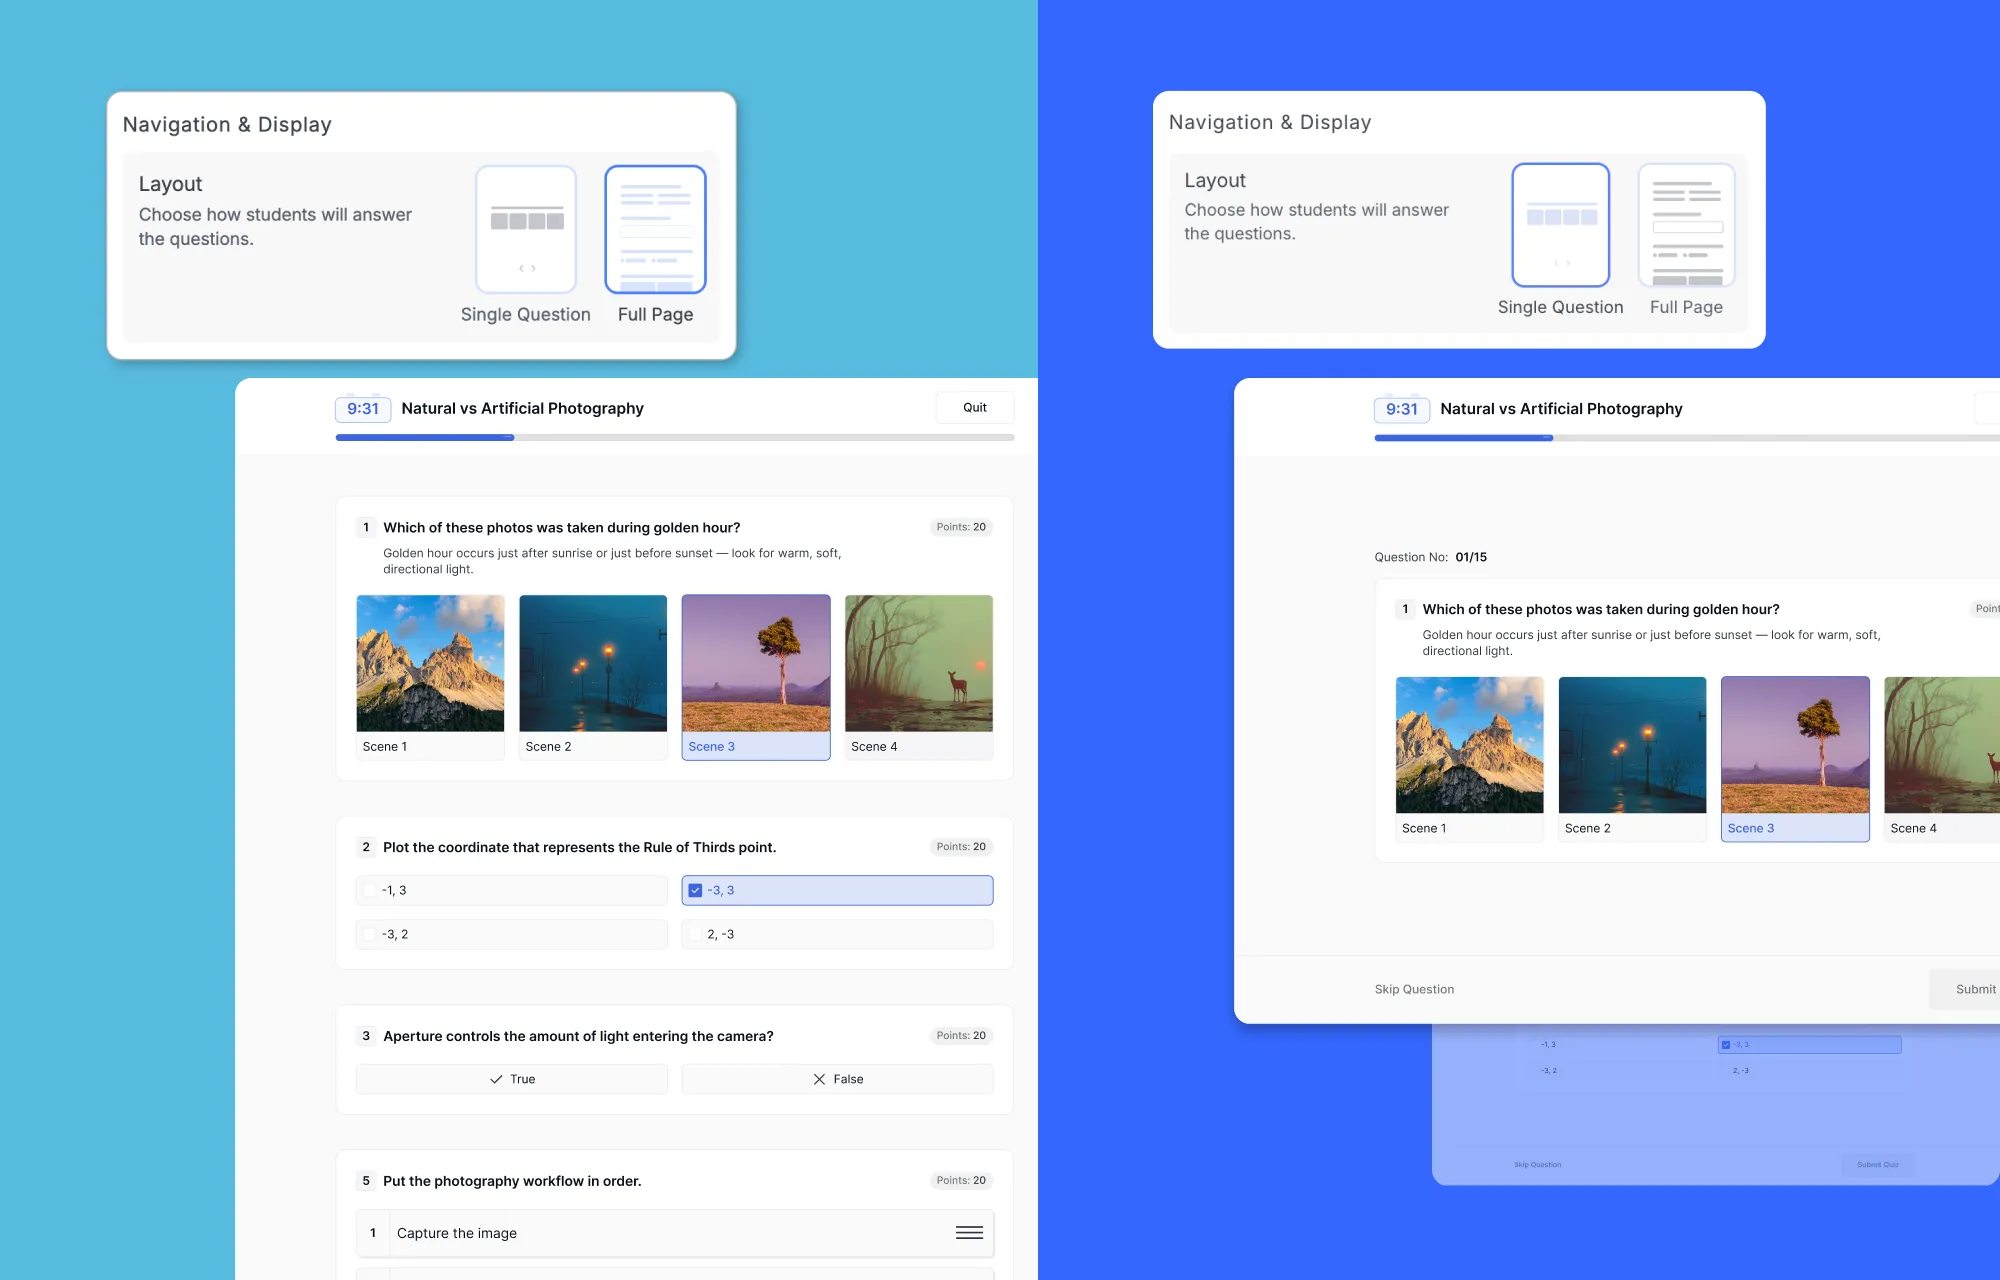
Layout: Single Question vs Full Page
This choice has a real impact on how students engage with your content. Full Page displays all questions on one scrollable screen, which works well for shorter text-based quizzes. Single Question focuses students on one task at a time and is the right choice for visual formats like Puzzle and Graph, which need the full screen to function properly.
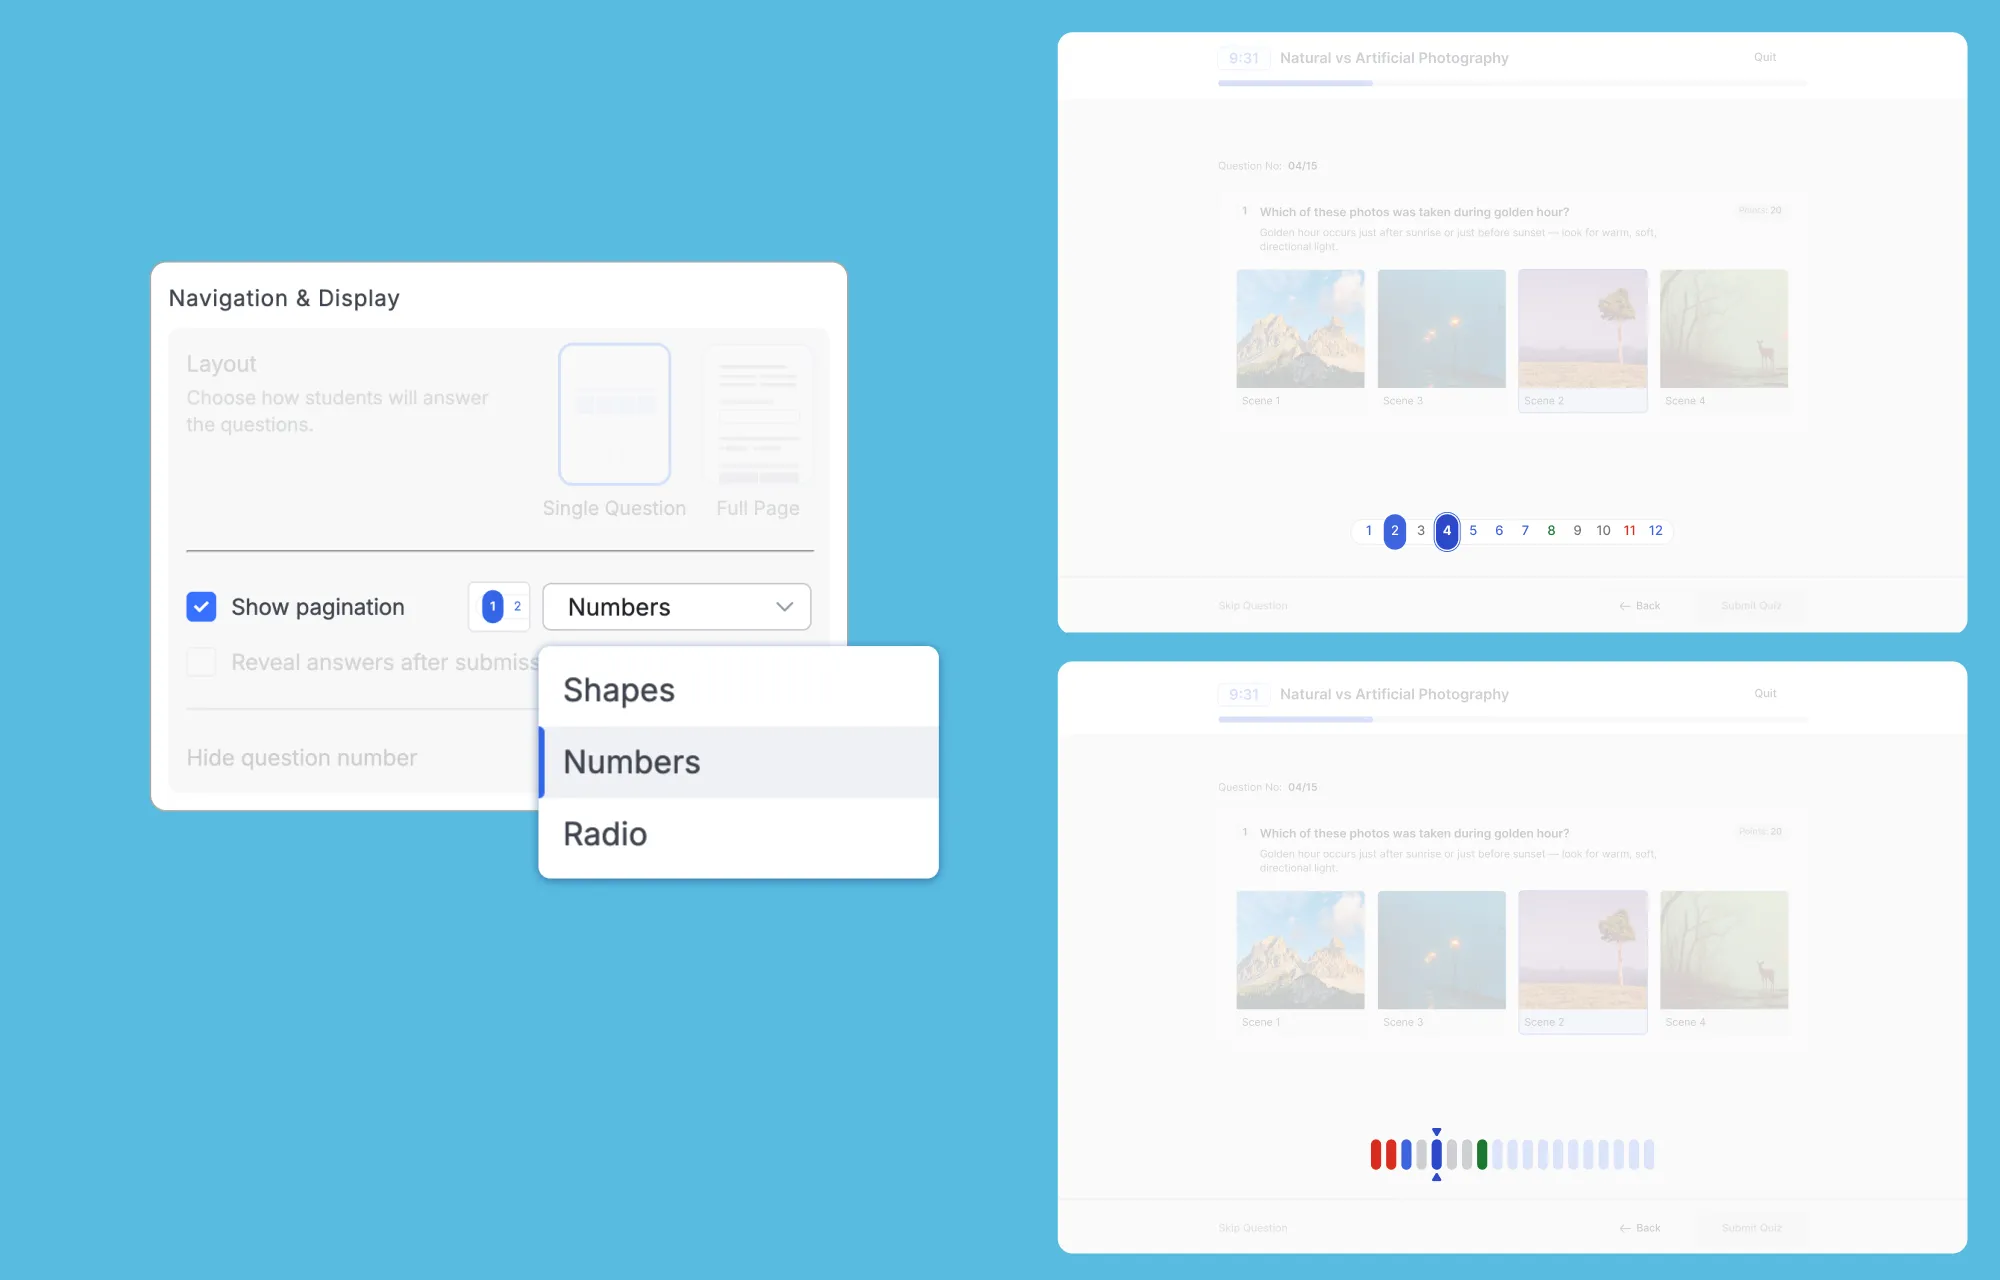
Pagination Style
When Show Pagination is enabled, students see their position in the question sequence. The style dropdown gives you three options: Numbers, Shapes, or Radio (dot-style indicators). The Numbers style is the most familiar for students who are used to standard quiz interfaces.
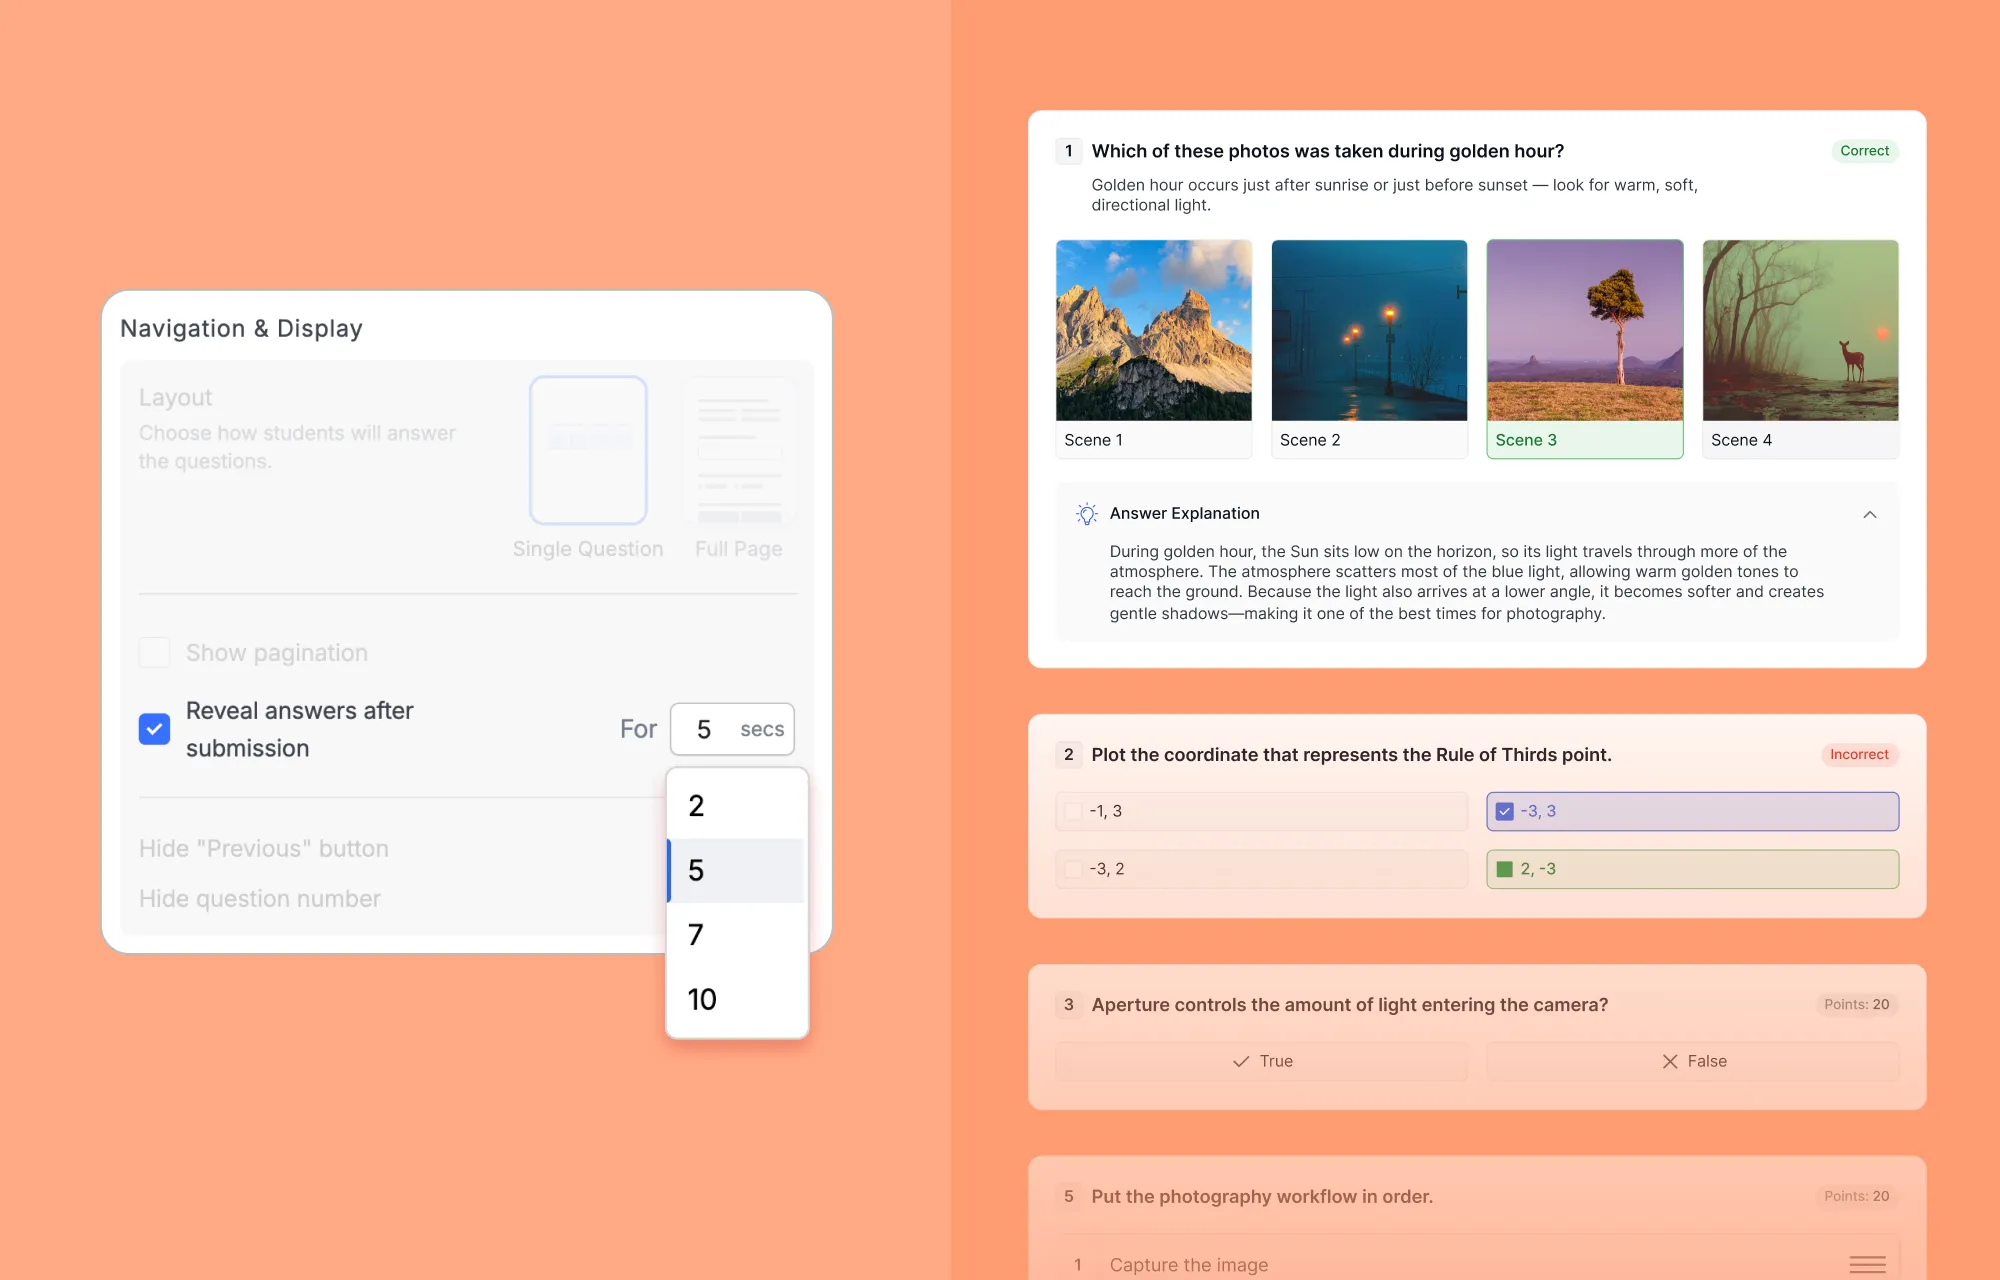
Reveal Answers After Submission
When this is enabled, students see which answers were correct and incorrect immediately after submitting. The optional timer field controls how long before the feedback is made visible to learners. If you leave it blank, answers remain visible indefinitely. Keeping answers hidden is the better choice when you plan to reuse the same quiz, since it protects your question bank.
Build Smarter Assessments, One Question at a Time
These five interactive quiz formats close a gap that standard multiple-choice questions never could. With spatial reasoning, numerical precision, coordinate placement, and visual identification, your LMS quiz can now assess the kinds of understanding that actually transfer to real-world performance.
You don’t need to rebuild every quiz from scratch. A more practical approach is to find one question you’ve always struggled to ask well and match it to the format that fits. That’s usually enough to see the difference in how students engage.
Frequently Asked Questions
Interactive quizzes in Tutor LMS go beyond traditional multiple-choice questions by requiring students to actively engage with content through formats like Image Marking, Pin, Range, Graph, and Puzzle. These formats test real understanding rather than passive recognition.
Tutor LMS currently offers 13 question types in total. Five are the newer visual interactive formats—Image Marking, Range, Pin, Graph, and Puzzle. The remaining eight are standard formats including Multiple Choice, True/False, Fill in the Blanks, Matching, and others.
The Quiz Builder is integrated directly into the Course Builder. Open your course, go to the Curriculum tab, find where you want to add a quiz, and click +Quiz. This opens the Quiz Builder window where you can add questions and configure settings.
No. Tutor LMS provides a visual, drag-and-drop interface for all quiz types. Absolutely no coding is required to set up Image Marking, Pin, Range, Graph, or Puzzle questions.
Yes, but some formats work better for specific subjects:
- Image Marking & Pin are ideal for geography, anatomy, and technical diagrams.
- Range works well for chemistry, physics, and numerical data.
- Graph is perfect for math, algebra, and coordinate-based subjects.
- Puzzle suits geography, engineering, and visual recognition tasks.
The Precision Level determines how much of the student’s drawn boundary must overlap with your defined correct zone to be marked as correct. For example, a 70% precision level means the student’s drawn boundary must successfully cover at least 70% of your target area.
Single Question displays one question at a time, which is ideal for visual formats like Puzzle and Graph that need full-screen space to work properly. Full Page shows all questions at once, making it a better choice for shorter, text-based quizzes where scanning is helpful.
In the Settings tab, simply enable Set Time Limit and enter your desired duration. You can also choose to toggle Hide Quiz Timer if you want to enforce the limit but remove the visible time pressure from the student’s screen.
By default, retries are unlimited. However, you can cap this. In the Quiz Scope section of Settings, enable Allow multiple attempts and enter the maximum number of retries you want to permit.
You can protect your assessment by going to the Settings tab and changing the Question Order to Random. This shuffles the sequence for every attempt so students cannot share answer orders. Additionally, limiting the total attempts and hiding the “Previous” button stops students from guessing repeatedly or going back to change past answers.
Every question type includes an optional Answer Explanation field during setup. Add your detailed feedback here, and students will be able to read it after submitting their final answers.
Yes, all interactive formats in Tutor LMS are designed for mobile devices. For example, students can easily tap and drag on touchscreens to draw

Table of Contents
Start Using Tutor LMS Today
Ready to take your online courses to new heights? Download Tutor LMS now and enjoy a journey of eLearning excellence.