Quiz Creation
The Quiz Builder includes an AI-powered question generator that creates quiz questions based on your selected course topics. Instead of writing every question manually, you can choose the topics, question types, difficulty level, and number of questions. AI Studio then generates a set of questions for you to review and edit.
The generator uses the AI provider connected through WordPress AI Connectors. Tutor LMS currently documents support for OpenAI, Google, and Anthropic, although available features may vary by provider. Before generating questions, you need to enable AI Studio, connect a provider, and authorize Tutor LMS to use that connection.
For setup instructions, see the AI Connector integration guide, which explains how to configure your provider and approve access.
Note: AI-generated questions use your connected provider’s API and may incur usage charges. Costs depend on the provider, model, number of questions, selected topics, and question complexity.
Prerequisites
Before using AI quiz generation, confirm the following:
- You have an active Tutor LMS Pro installation with AI Studio enabled.
- Your website runs WordPress 7.0 or later.
- You have an active API key for a supported provider and have configured it under WP Admin > Settings > Connectors.
- You have approved Tutor LMS access under WP Admin > Tools > Connector Approvals.
Once the provider is connected and Tutor LMS access is approved, you can use AI Studio to generate questions in the Quiz Builder.
How to Use the AI Quiz Builder in Tutor LMS
Step 1: Open the Quiz in the Quiz Builder
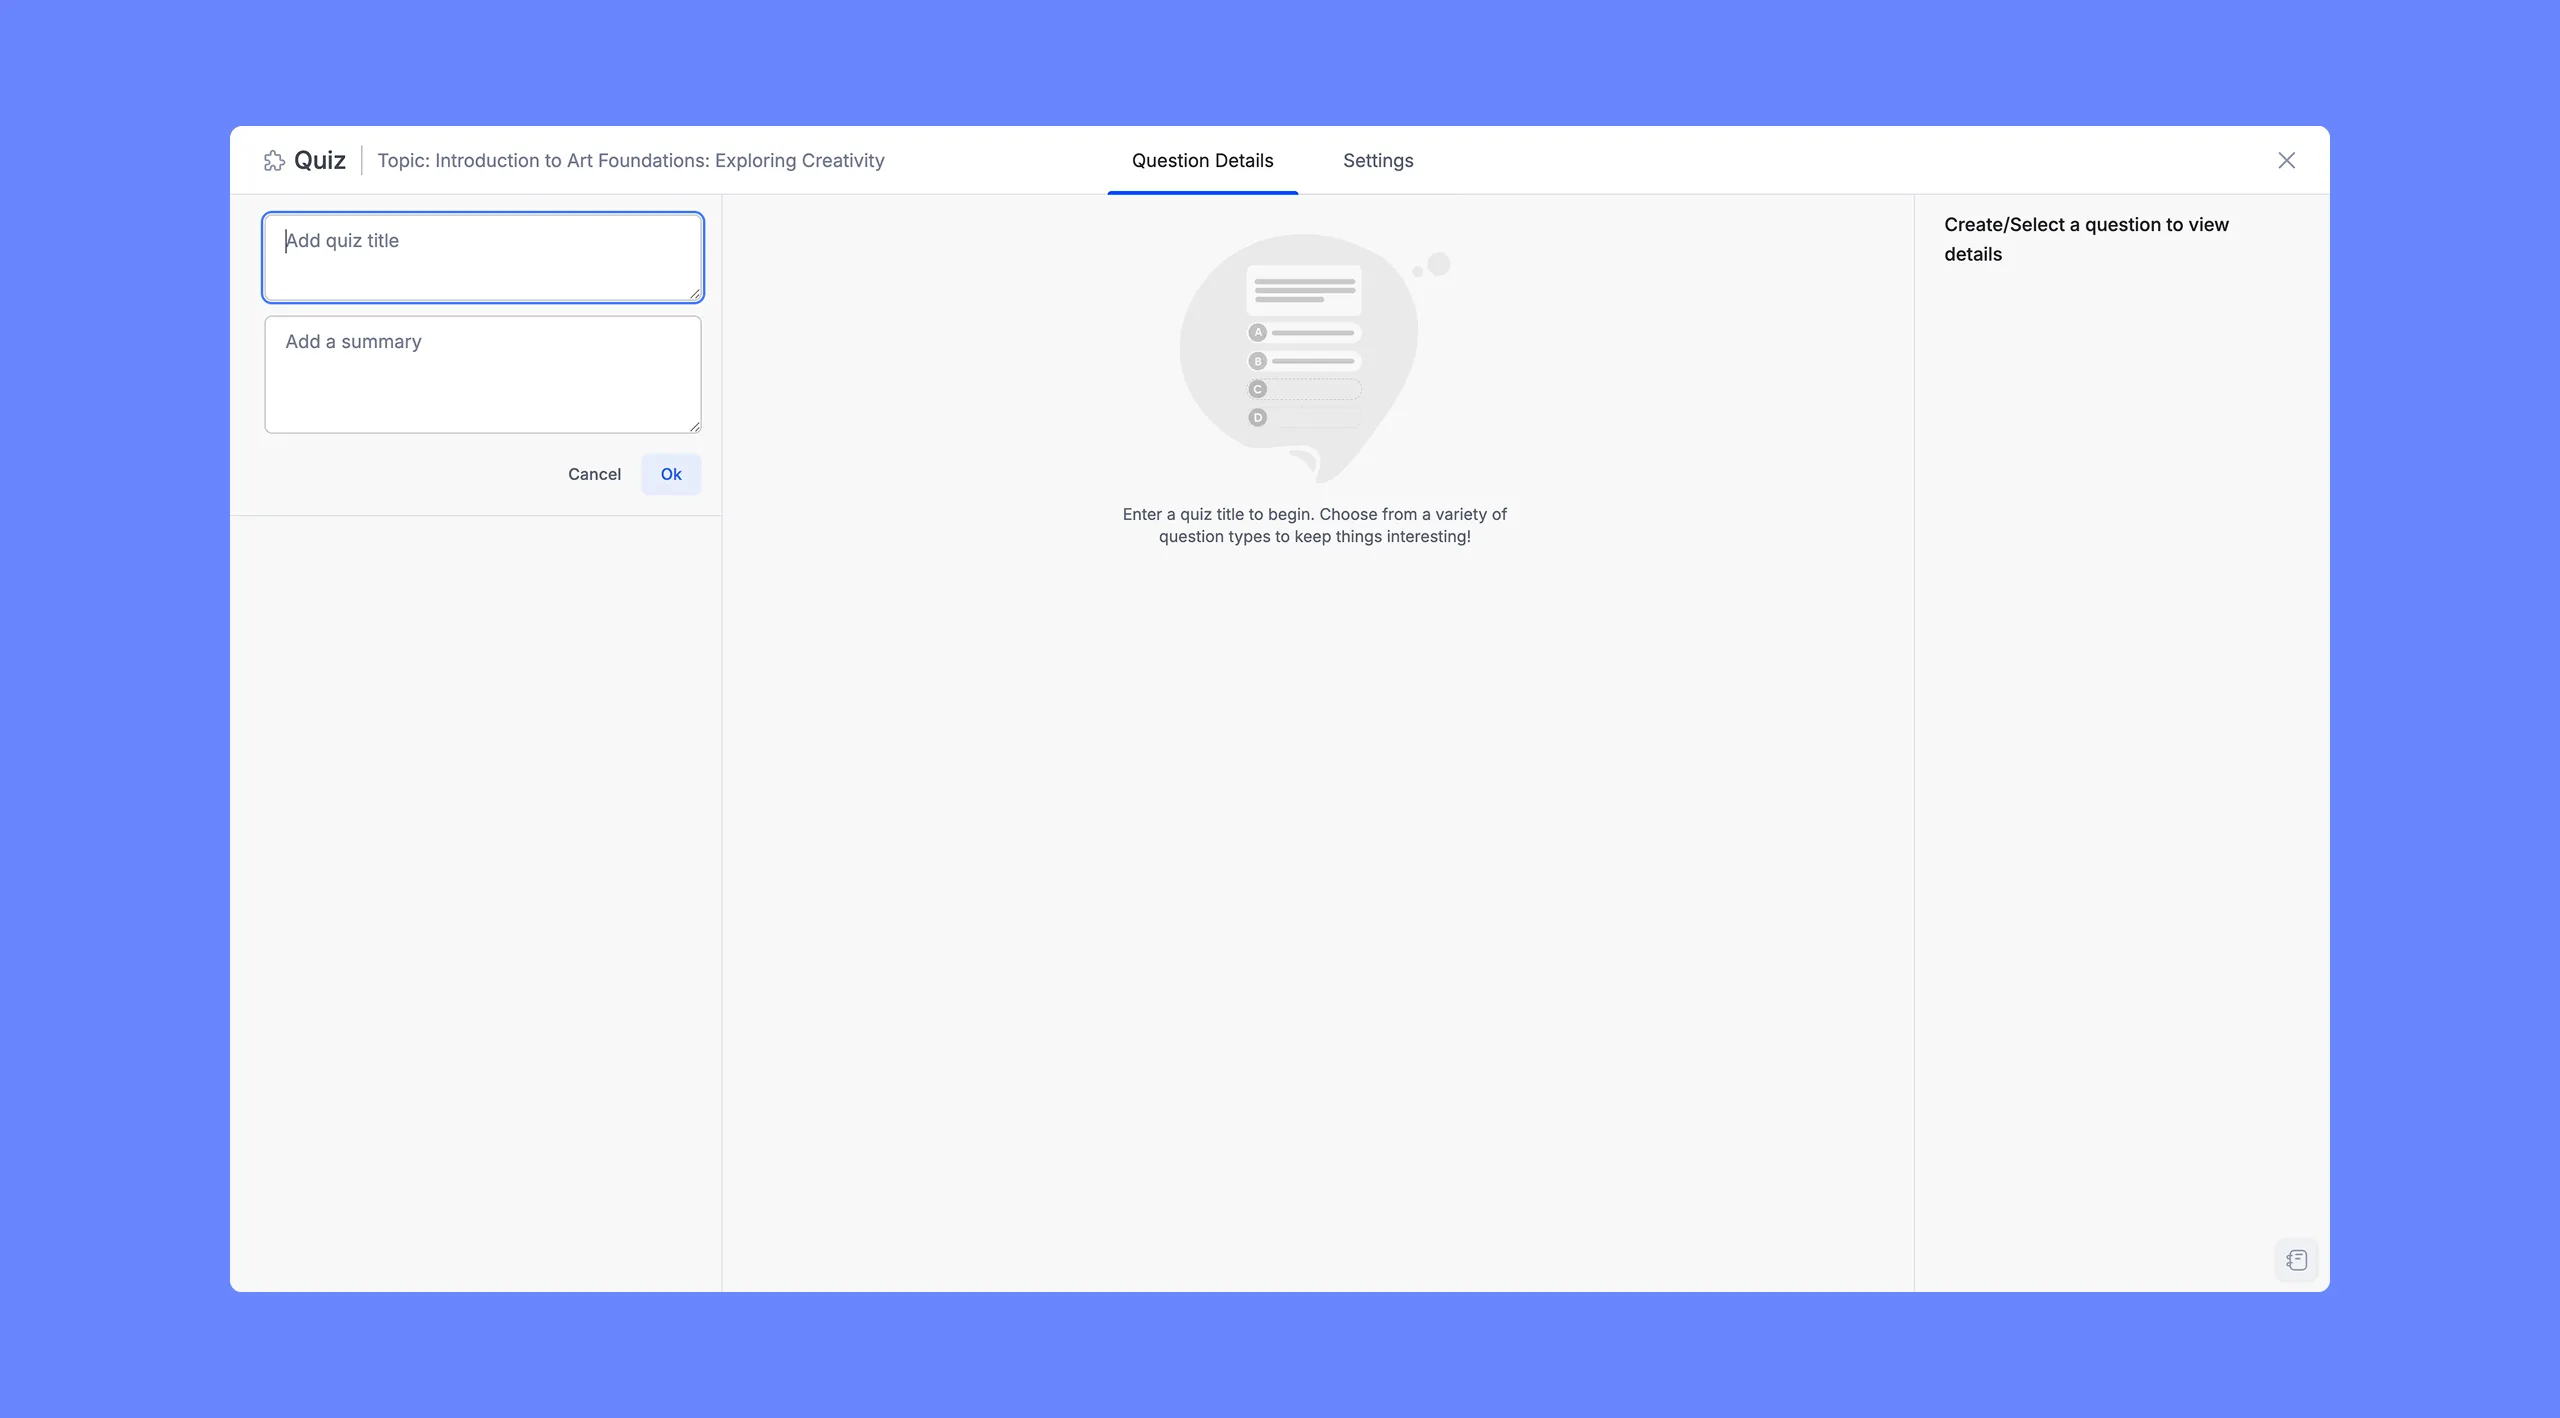
Navigate to the course that contains the quiz you want to work with and open it in the Course Builder. Locate the topic where the quiz lives and open the quiz. Click the +Quiz.
Step 2: Open the Generate Quiz Component Panel
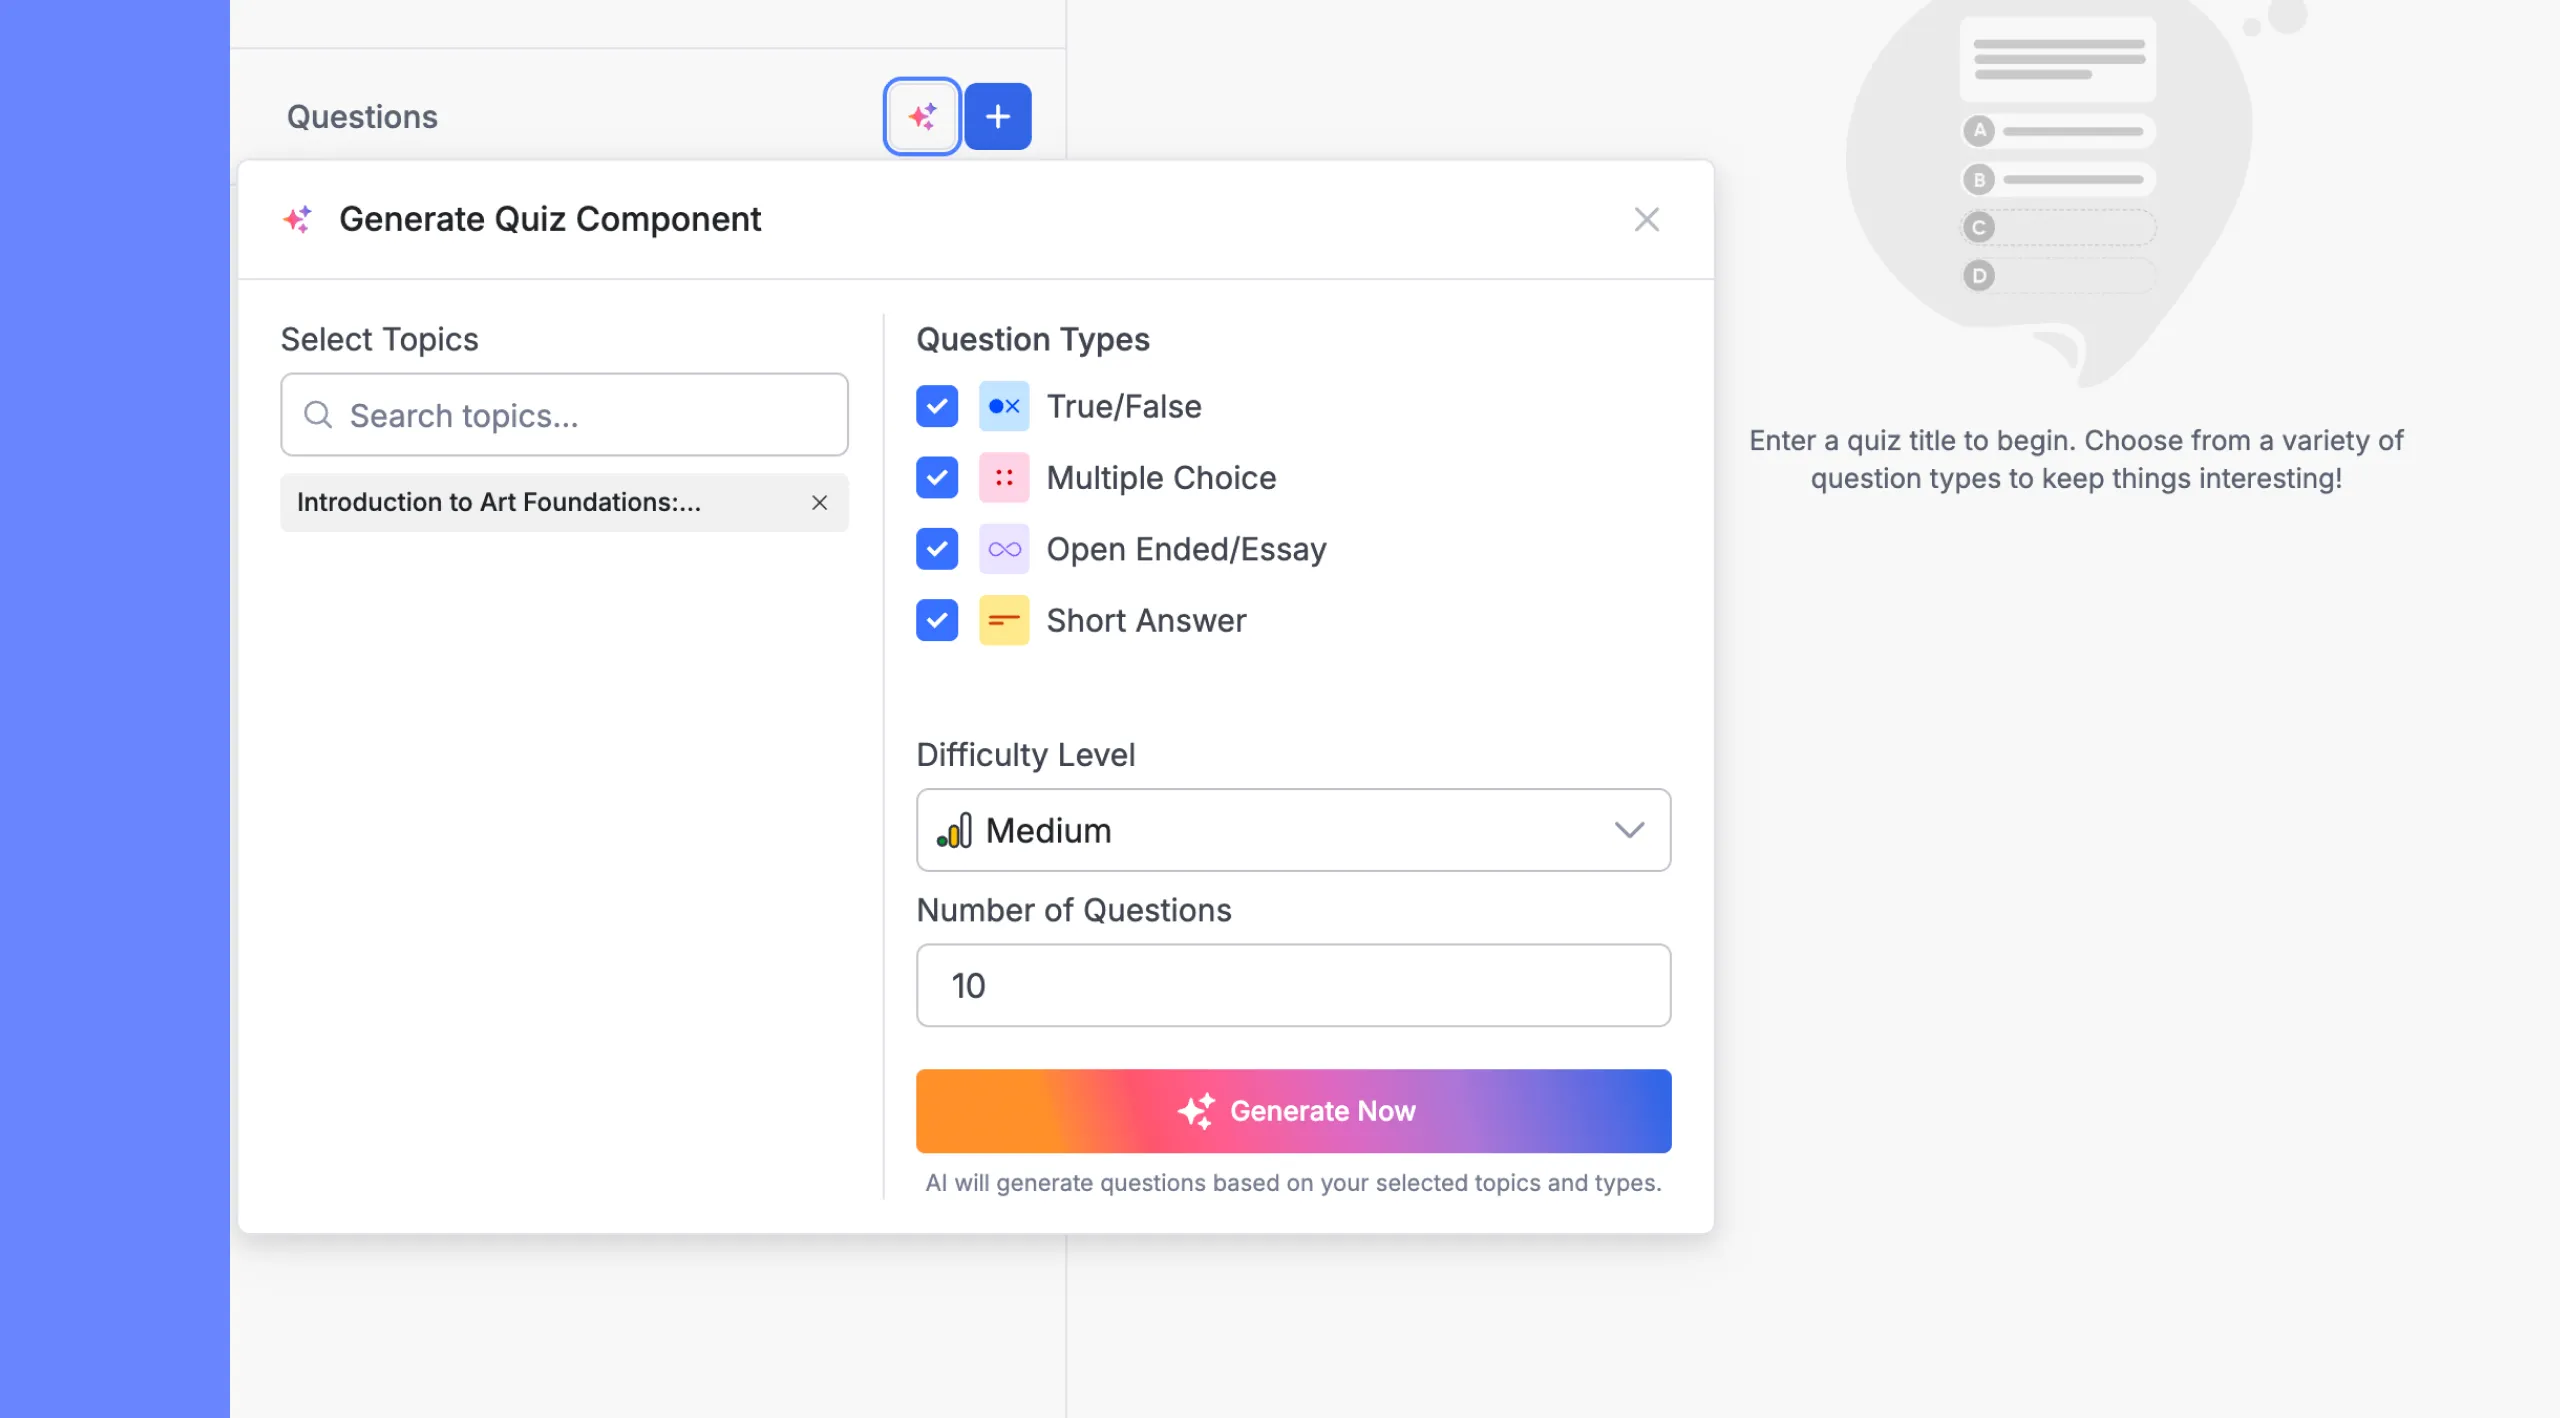
Click the AI Studio icon to open the Generate Quiz Component panel. This panel slides in over the left sidebar and contains all the controls for the AI generation.
Step 3: Select Topics
The Select Topics section on the left side of the panel determines what content the AI draws from when writing questions.
The topic that contains your quiz will appear here pre-selected by default. You can add more topics from the same course if you want the quiz to span multiple areas of content.
To add a topic:
- Click inside the Search topics… field and type part of the topic name.
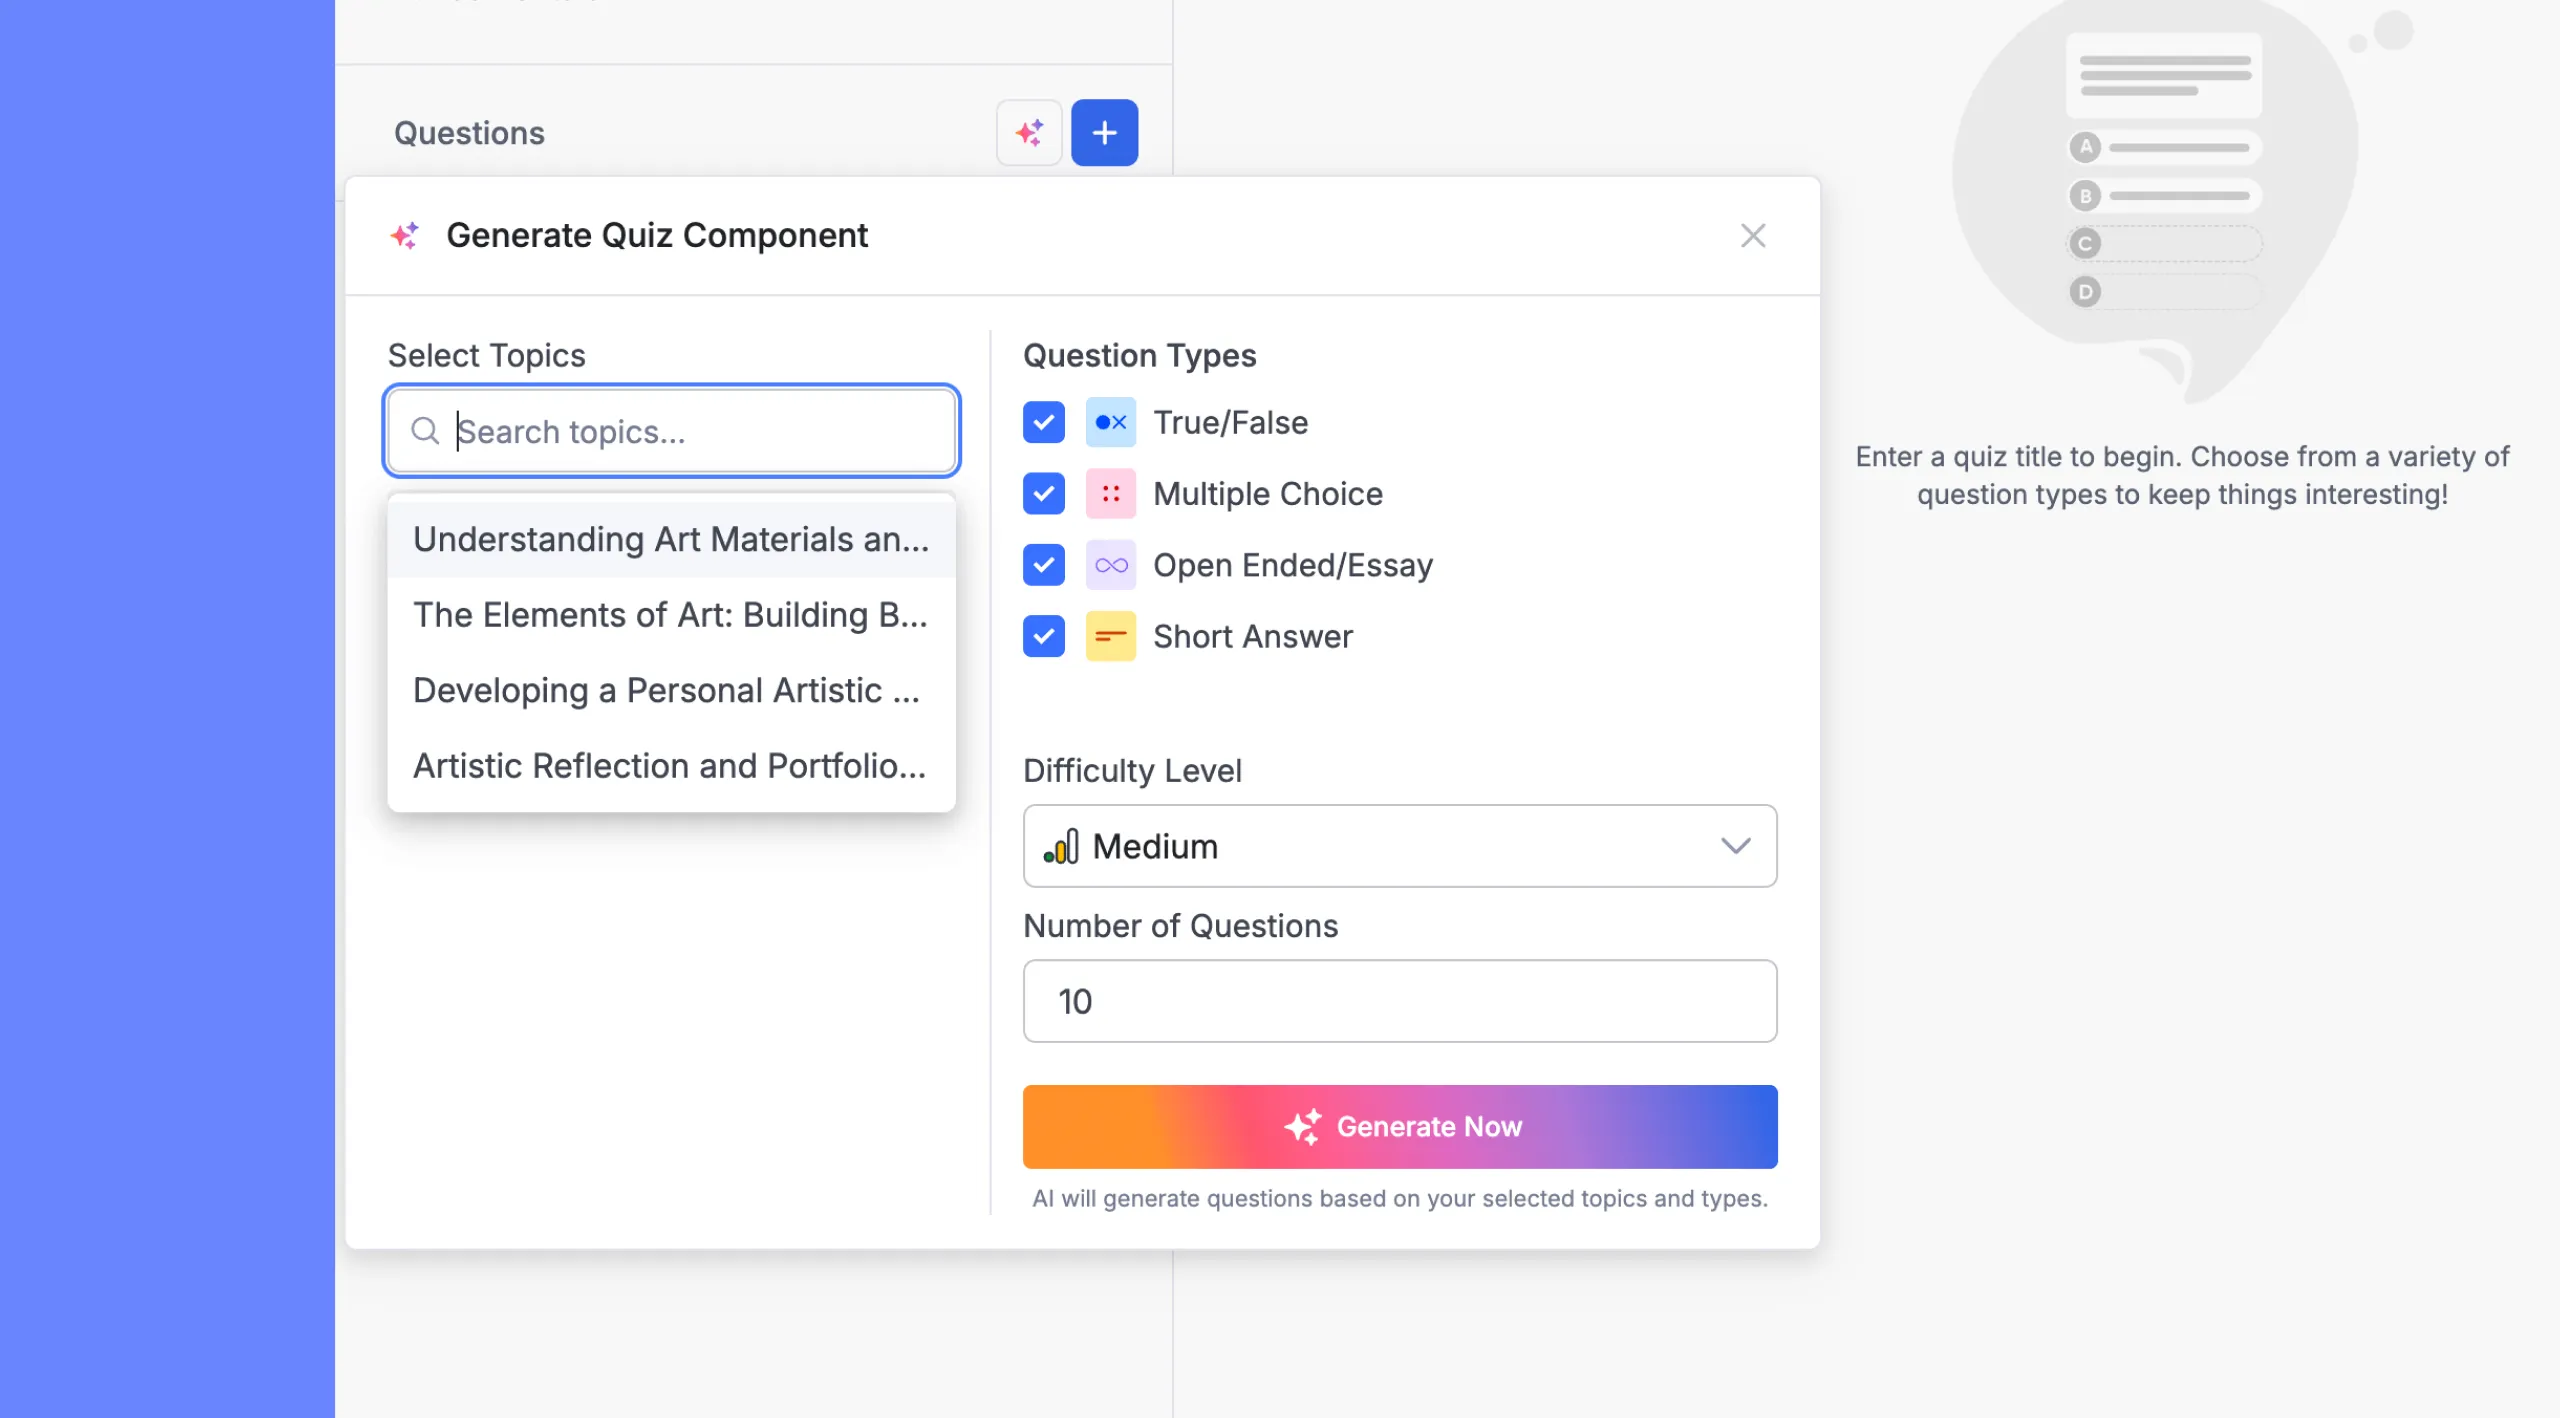
- Click the topic from the dropdown list to add it to your selection. It will appear as a tag below the search field with an × icon to remove it if needed.
You can select as many topics as you like. Keep in mind that selecting more topics gives the AI a broader range of subject matter to draw from, which generally produces a more varied question set — but it also means more tokens are consumed per generation.
Note: The AI uses your topic titles and content as context clues for generating relevant questions. Topic titles and content that are descriptive produce better results than vague or placeholder names.
Step 4: Choose Question Types
The Question Types section shows four checkboxes, all selected by default:
- True/False: a binary statement the student marks as true or false
- Multiple Choice: a question with four answer options, one correct
- Short Answer: a brief open-response question
- Open Ended/Essay: a longer-form response question
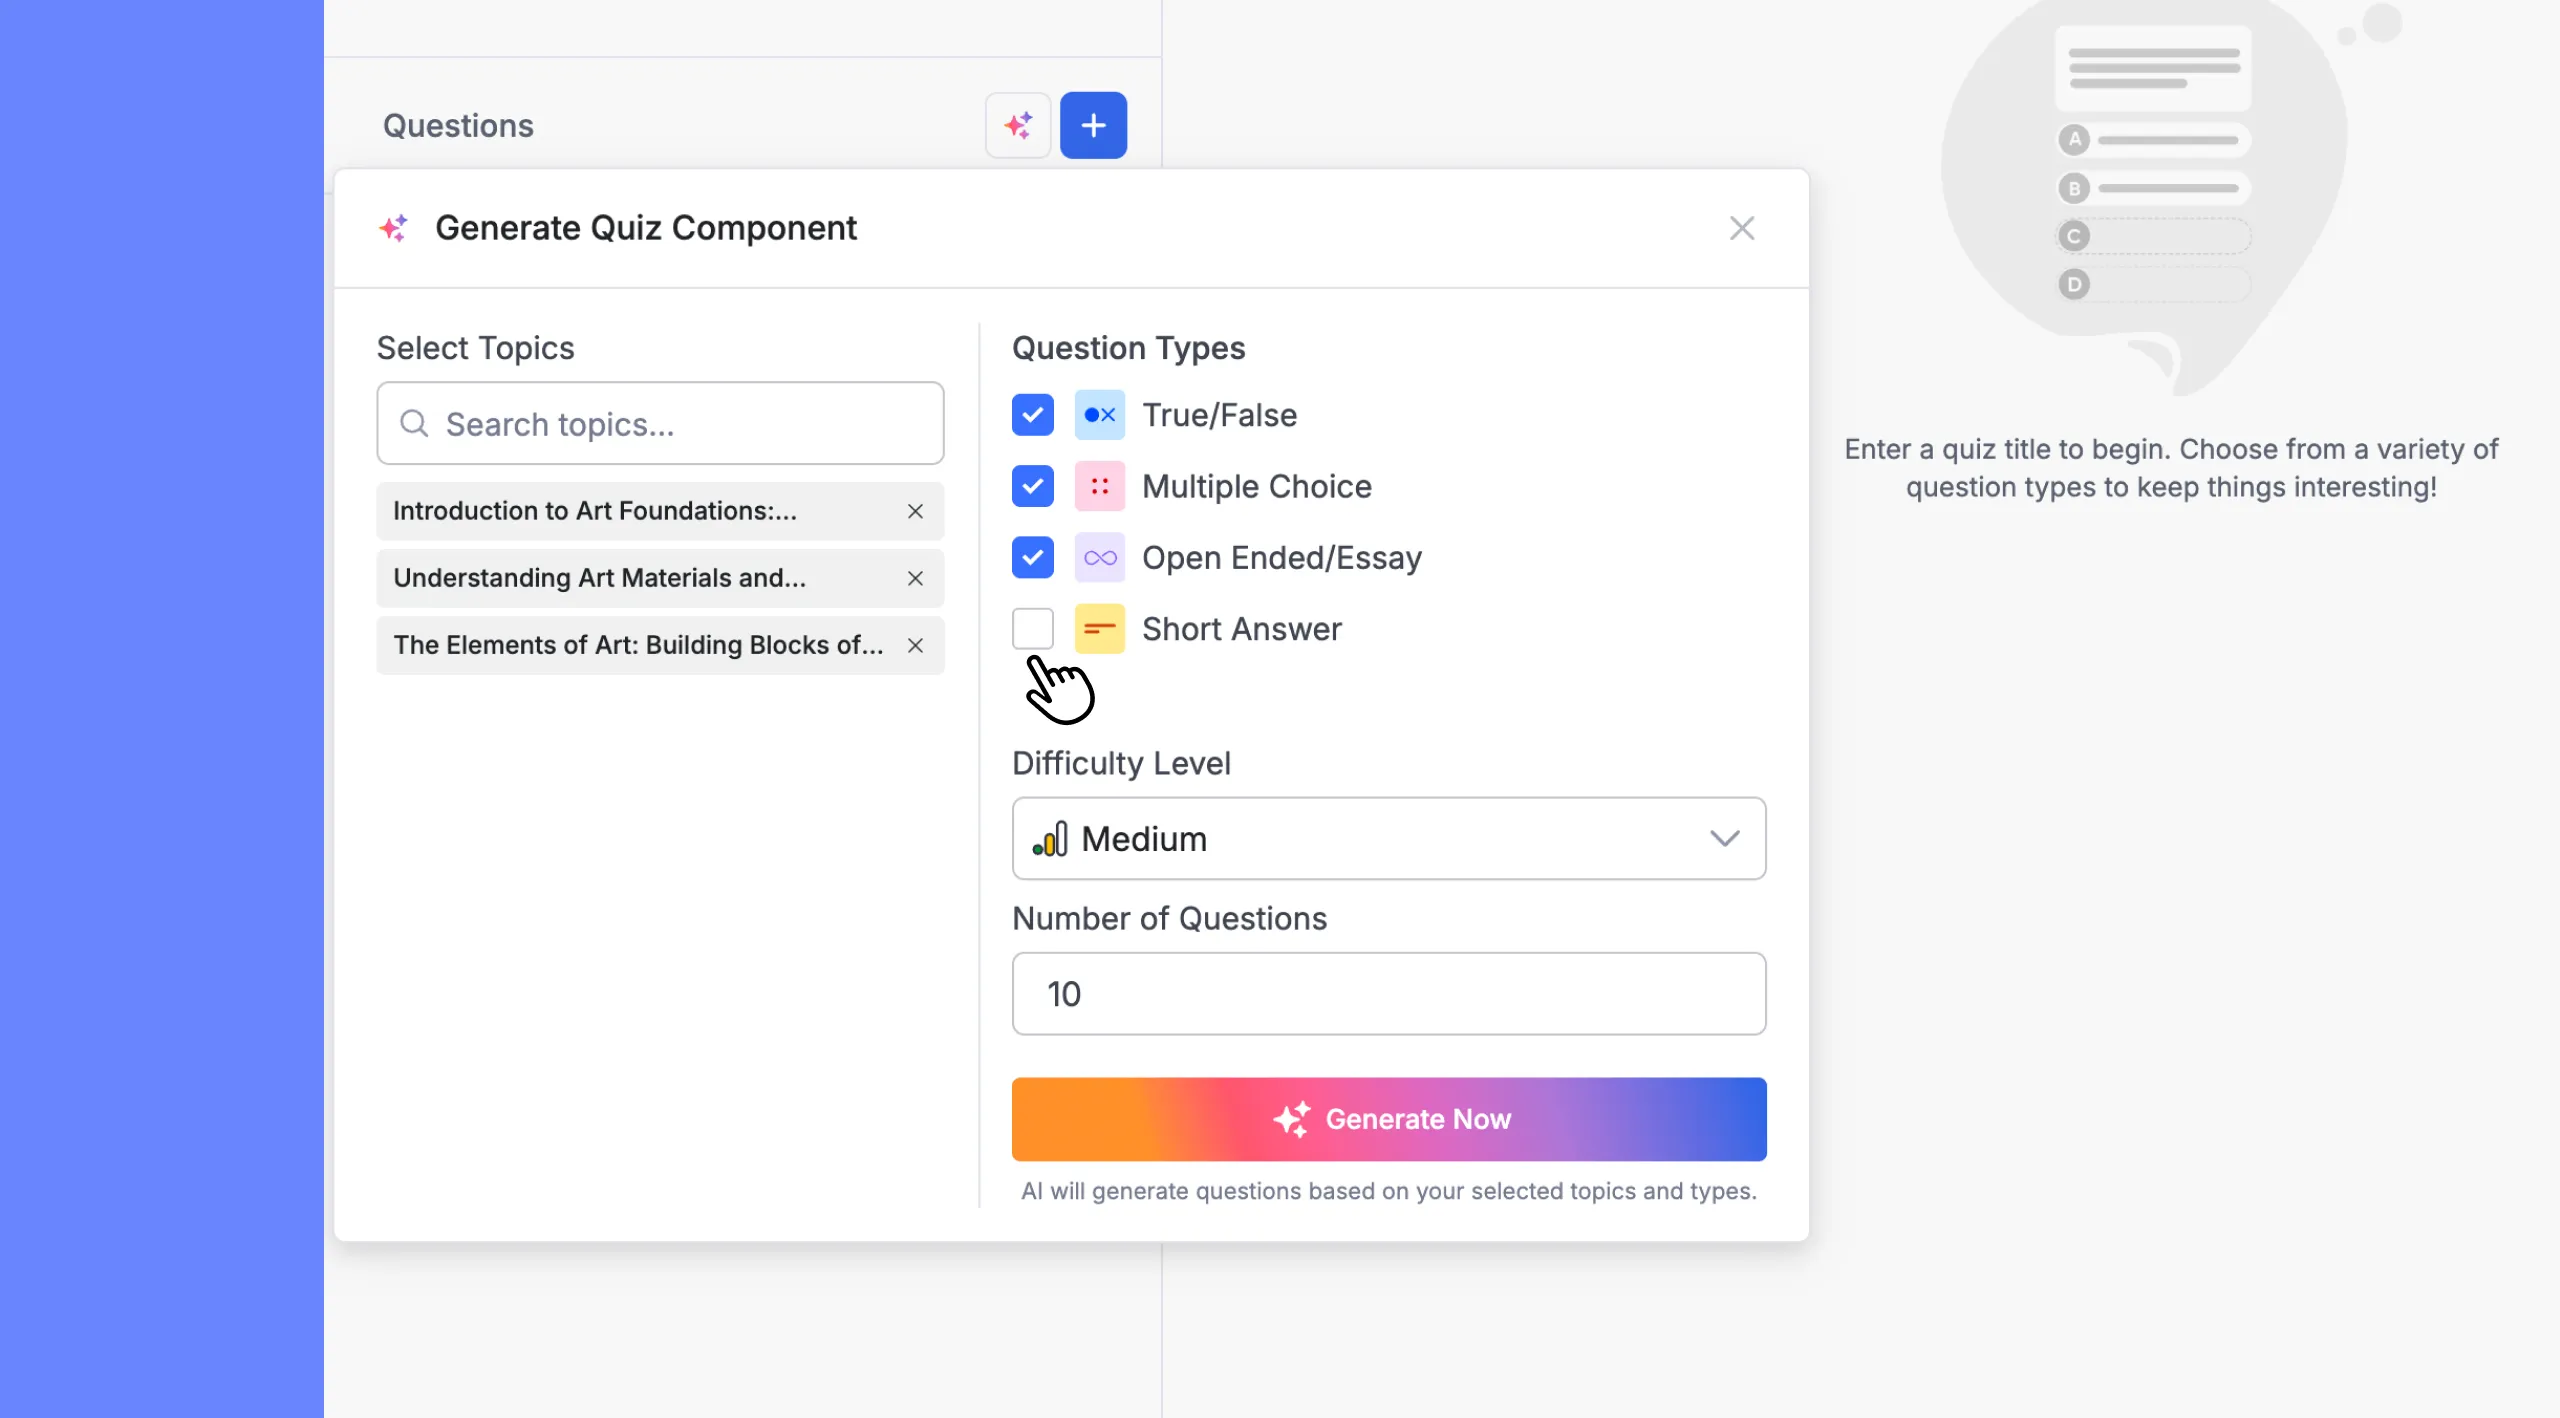
Check or uncheck each type to control which formats appear in the generated set. The AI will mix the selected types proportionally across the total number of questions you request. If you want a quiz that’s purely Multiple Choice, uncheck the other three. If you want a mix of True/False and Multiple Choice, uncheck Short Answer and Open Ended/Essay.
Step 5: Set the Difficulty Level
Use the Difficulty Level dropdown to set the overall challenge level for the generated questions. Three options are available:
- Easy: straightforward recall and basic comprehension questions
- Medium: questions that require understanding and some inference (the default)
- Hard: questions that test deeper analysis, application, or nuanced understanding
This setting affects how the AI frames questions and constructs answer choices, particularly for Multiple Choice where plausible wrong answers (distractors) become harder to distinguish at higher difficulty levels.
Step 6: Set the Number of Questions
Enter a number in the Number of Questions field to specify how many questions you want the AI to generate. The default is 10.
There is no hard cap displayed in the interface, but keep the following in mind:
- Larger question counts take longer to generate and consume more tokens.
- If you’re testing generation for the first time, starting with 5–10 questions is a practical approach. You can always run the generator again to add more.
- The AI distributes questions across your selected types and topics, so requesting 10 questions from 3 topics with 3 question types will produce a roughly balanced spread.
Step 7: Generate the Questions
Once your topics, question types, difficulty, and count are set, click the Generate Now button at the bottom of the panel.
The button label changes to Generating… and the AI begins processing your request. Generation typically completes within 10–30 seconds, depending on the number of questions and server response time. Do not close the Quiz Builder or navigate away while generation is in progress.
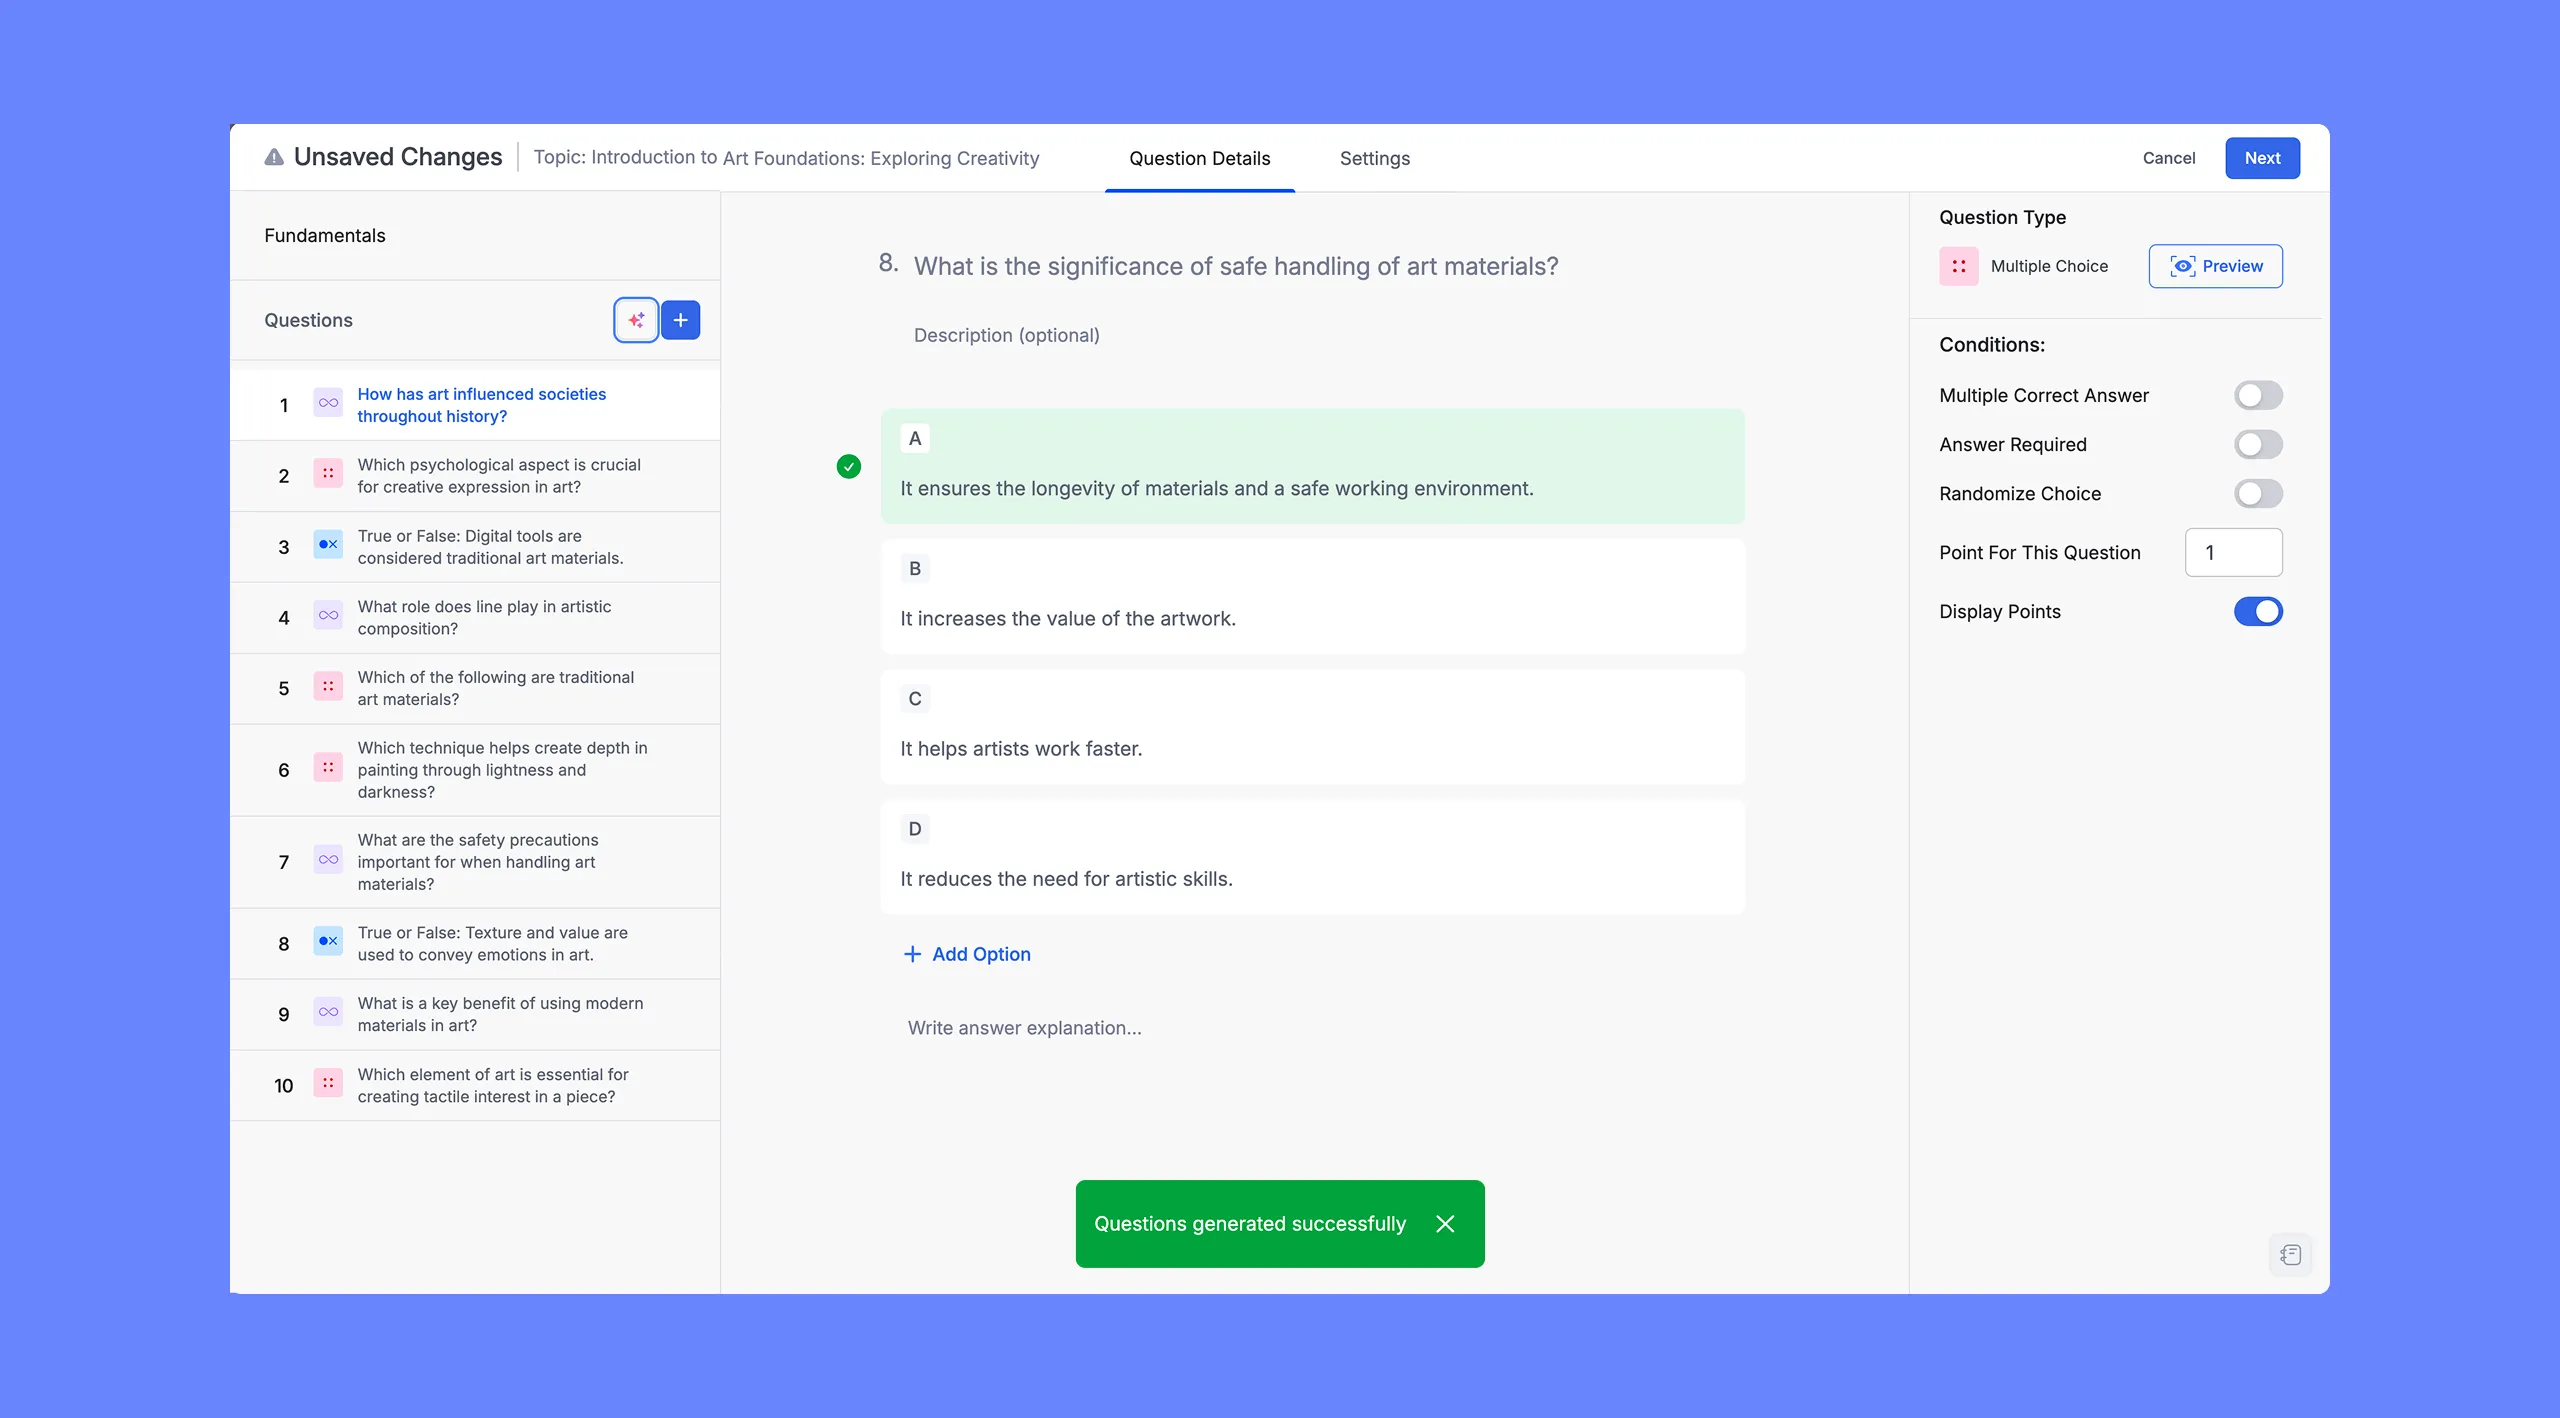
When the process completes, a “Questions generated successfully” notification appears briefly at the bottom of the screen, and the generated questions populate the Questions panel on the left.
Step 8: Review the Generated Questions
Once the generation completes, the left panel lists all generated questions. Each question entry shows:
- The question number
- A small colored icon indicating the question type (e.g., a True/False icon, a Multiple Choice grid icon, a Short Answer icon, or an Open Ended/Essay icon)
- The question text, truncated if it’s long
Click any question to load it in the main area. The Question Details view shows:
- The full question text
- An optional description field
- The answer options (for True/False and Multiple Choice) or a response area placeholder (for Short Answer and Open Ended)
- The correct answer already highlighted in green (for objective question types)
- The Question Type panel on the right showing the type and a Preview button
- The Conditions panel with per-question toggles: Multiple Correct Answer, Answer Required, Randomize Choice, Point For This Question, and Display Points
Review each question carefully. The AI generates content based on your topic titles and course context, but it doesn’t have access to the actual text of your lessons. Some questions may be broader or phrased differently than you’d prefer, and some answer options may need adjustment.
Step 9: Edit Questions as Needed
You can edit any generated question directly in the Question Details view:
- Click on the question text to modify the wording.
- Click on any answer option to change it.
- To mark a different answer as correct, click on the correct answer indicator.
- Use the Conditions panel on the right to adjust point values, toggle Answer Required, or enable Randomize Choice for that specific question.
- Click Add Option (for Multiple Choice) to add a fifth answer option if needed.
- If a question isn’t useful, select it in the left panel and delete it.
You can also click the AI Studio again at any time to run another generation. The new questions will be added to the existing list; they don’t replace what’s already there. This lets you build up a larger question pool incrementally or fill in gaps after reviewing the first batch.
Step 10: Save the Quiz
When you’re satisfied with the question set, click Next in the top-right corner to proceed to the Settings tab, where you can configure passing grade, timing, question order, and display options. Once settings are configured, click Save to finalize the quiz.
The Unsaved Changes indicator in the top-left header will clear once the quiz is saved successfully.
Tips for Better Results
- Be descriptive with topic title and content. The AI uses your topic titles and content as its primary reference for generating questions. A detailed topic with heavy course content will produce more precise questions than one named.
- Run multiple smaller generations. If you’re building a large question bank, generating in batches of 10 across different topic combinations often produces better variety than requesting 30+ questions in a single run.
- Use difficulty levels strategically. Consider generating a mix across difficulty levels if you want the quiz to serve different purposes — for example, starting with 5 Easy questions for a warm-up, then adding 5 Hard questions for a challenge section.
- Always review before publishing. AI-generated questions are a strong starting point but aren’t a substitute for instructor review. Check that the correct answer is actually correct, that distractors are plausible but clearly wrong, and that the question language matches the level and tone of your course.