Register Custom Fields in Tutor LMS Course Builder
The Tutor LMS Course Builder provides an extensible system that allows third-party plugins to inject custom fields and content into predefined slots within the course builder interface. This system is inspired by the WordPress hook mechanism and allows developers to extend the Tutor LMS native course builder by adding custom fields within it.
How It Works
- Developers can register fields dynamically in the course builder using the registerField function.
- Fields can be added to specific slots, ensuring they appear in the desired sections.
- Supports different field types, including text, password, textarea, select, radio, WPEditor, custom components, etc.
- Developers can inject arbitrary content, not just form fields.
1. Download the Demo Plugin
To begin, download the ‘Tutor LMS Custom Fields’ demo plugin. This plugin serves as a reference structure that you can update accordingly in order to add your customized settings.
Tutor LMS Custom Fields Directory Structure
Once you’ve downloaded the plugin, you’ll notice the following file structure:
tutor-lms-custom-fields/
│
├── custom-fields.js
└── tutor-lms-custom-fields.phpcustom-fields.js: This file contains JavaScript code to register custom fields in the course builder interface.tutor-lms-custom-fields.php: It contains PHP functions to enqueue scripts, save field data, and display field values.
2. Creating and Registering Custom Fields
Custom fields are registered using JavaScript through the Tutor LMS course builder API. Create a custom-fields.js file with the following structure:
document.addEventListener("DOMContentLoaded", function () {
   if (typeof Tutor !== "undefined" && Tutor.CourseBuilder) {

       // Register a textarea field
       Tutor.CourseBuilder.Basic.registerField("after_description", {
           name: "seo_content",
           type: "textarea",
           label: "SEO Content",
           placeholder: "Write here...",
           priority: 20,
       });
       // Register a number field
       Tutor.CourseBuilder.Curriculum.Lesson.registerField("bottom_of_sidebar", {
           name: "lesson_duration",
           type: "number",
           label: "Lesson Duration (minutes)",
           priority: 5,
       });
   }
});
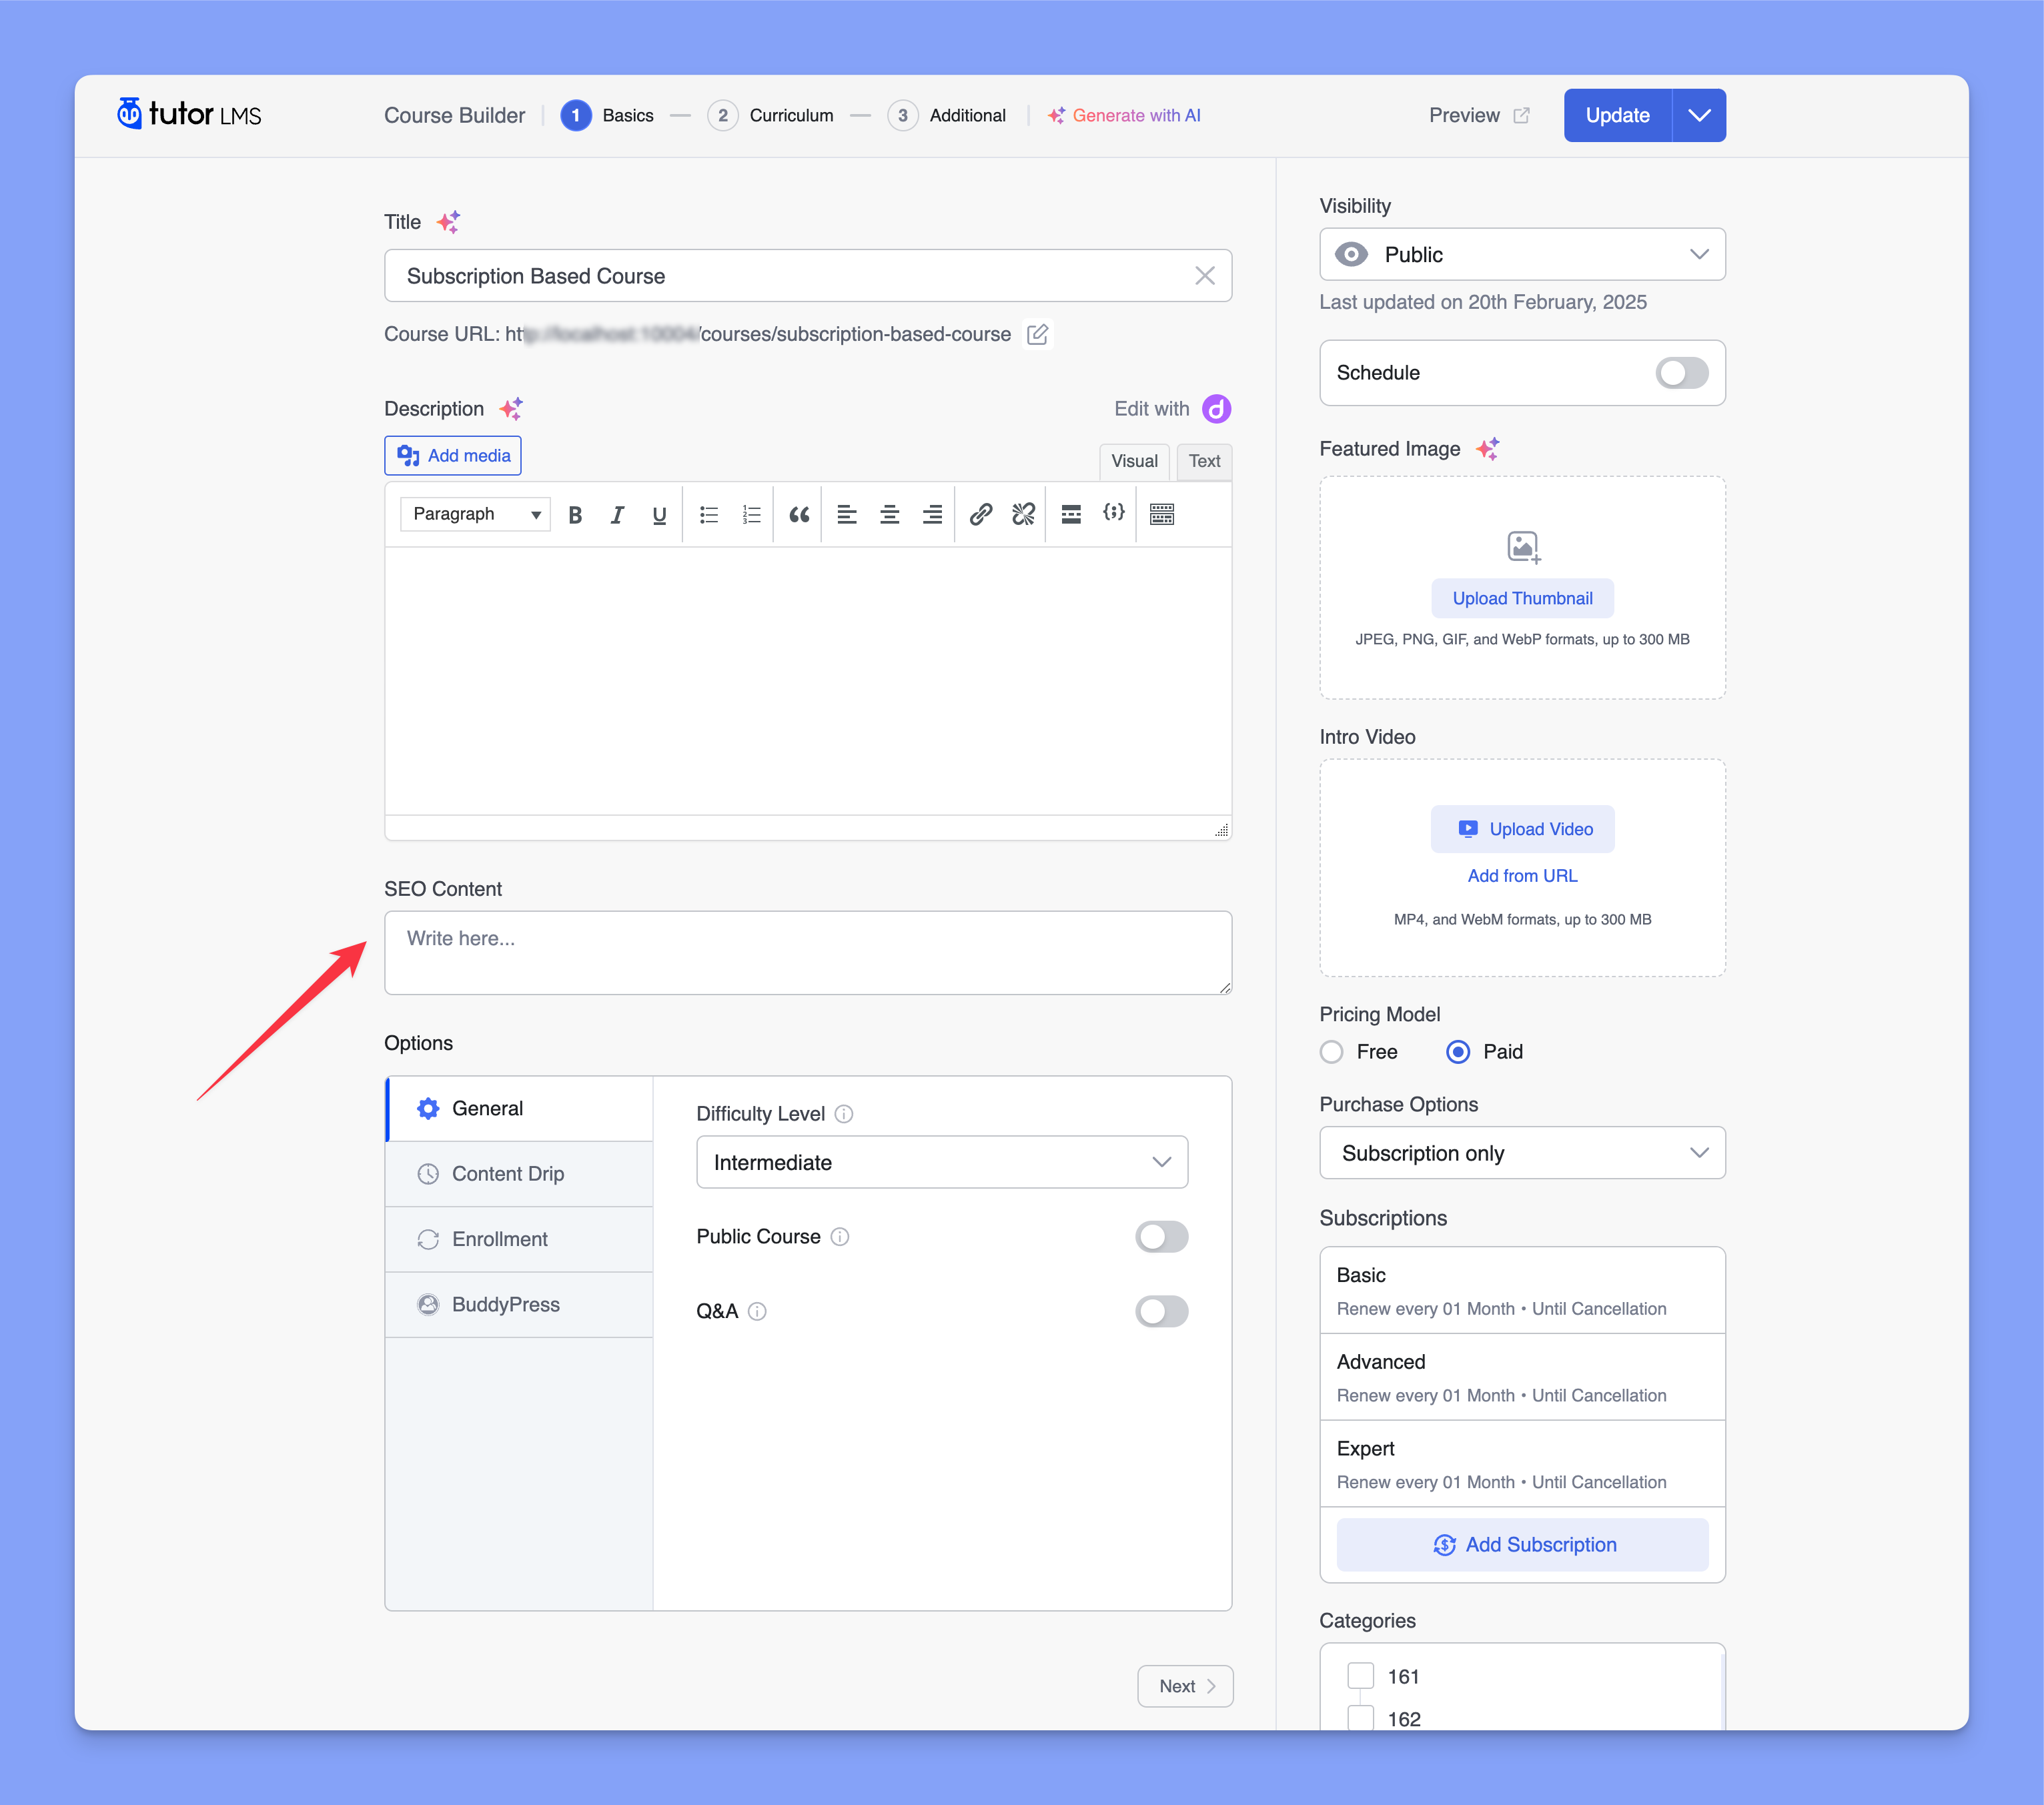
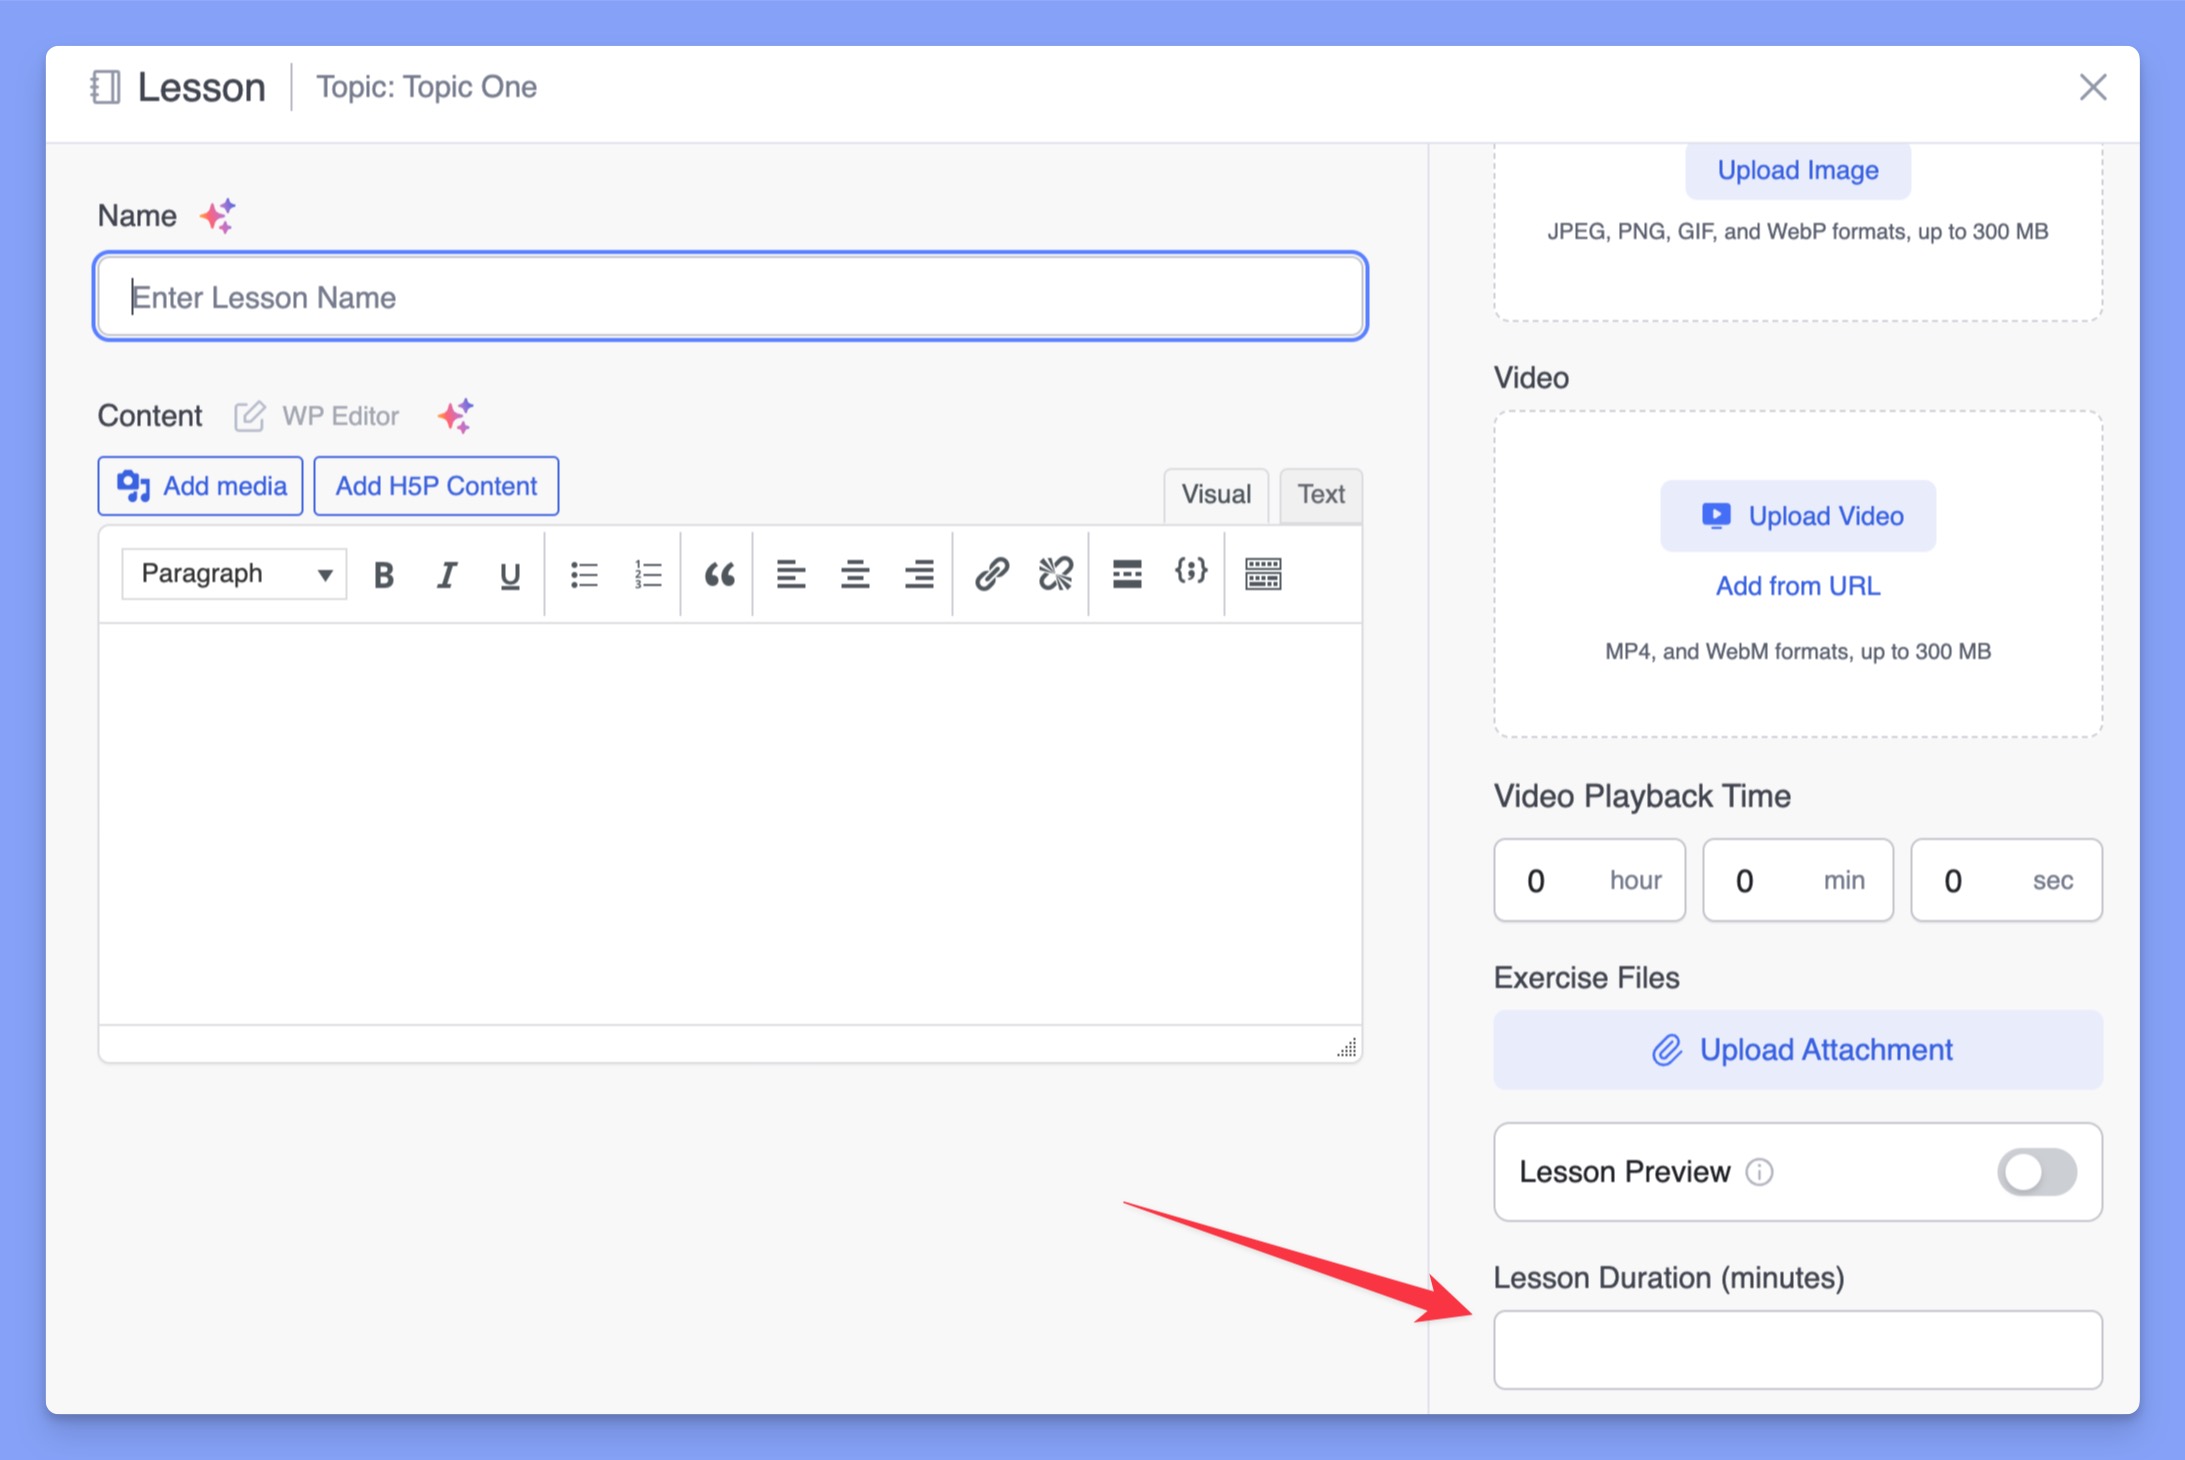
We’ve added two custom fields here. The first is a textarea field called SEO Content, located in the Basics tab. The second is a number field called Lesson Duration (minutes), placed at the bottom of the Lesson sidebar.
Here’s the SEO Content field in the Basics section:
Here’s the Lesson Duration field at the bottom of the Lesson sidebar:
3. Enqueuing Scripts to Show Custom Fields
You must enqueue your JavaScript file to display your custom fields in the course builder. To do this, create the tutor-lms-custom-fields.php file and add the following code:
This function hooks into tutor_after_course_builder_load to ensure the script is loaded only when the course builder is active, and it depends on the tutor-course-builder script.
4. Storing Custom Field Values
When a course is saved, you need to capture and store the custom field values:
add_action('save_post_courses', 'tlcf_save_course_meta');
/**
* Save custom field data when course is saved
*
* @param int $post_id Course post ID.
*
* @return void
*/
function tlcf_save_course_meta( int $post_id ) {
   $seo_content = sanitize_text_field( wp_unslash( $_POST['seo_content'] ) ?? '' );
   if ( $seo_content ) {
       update_post_meta( $post_id, 'tlcf_seo_content', $seo_content );
   }
}
You can specify the following things here:
add_action('save_post_courses', 'tlcf_save_course_meta'): This hooks into the course saving process.$_POST['seo_content']: Retrieves the value of the seo_content field.sanitize_textarea_field(): Sanitizes the input to prevent security vulnerabilities.update_post_meta(): Stores the sanitized value in the WordPress post meta table.
5. Displaying Custom Field Data
To make custom field data available to the frontend or REST API, use the tutor_course_details_response filter:
add_filter('tutor_course_details_response', 'tlcf_display_custom_field_data');
/**
* Display custom field data in course details
*
* @param array $data Course data array.
*
* @return array Modified course data array with custom field
*/
function tlcf_display_custom_field_data( array $data ) {
   $course_id   = $data['ID'];
   $seo_content = get_post_meta( $course_id, 'tlcf_seo_content', true );
   if ( $seo_content ) {
       $data['seo_content'] = $seo_content;
   }
   return $data;
}
Here’s the explanation of this:
add_filter('tutor_course_details_response', 'tlcf_display_custom_field_data'):This filters the course details response, allowing you to add custom data.get_post_meta(): Retrieves the stored custom field values.$data['seo_content'] = $seo_content;: Adds the custom field value to the course details response.
Hooking into the System
You can extend Tutor LMS Course Builder by using the following filter and action hooks.
Filter Hooks
apply_filters( 'tutor_course_details_response', array $course_data );
apply_filters( 'tutor_quiz_details_response', WP_Post $data, int $quiz_id );
apply_filters( 'tutor_assignment_details_response', array $post, int $assignment_id );
apply_filters( 'tutor_lesson_details_response', array $post, int $lesson_id );
Action Hooks
do_action( "save_post_courses", int $post_id, WP_Post $post, bool $update );
do_action( "save_post_lesson", int $post_id, WP_Post $post bool $update );
do_action( "save_post_tutor_assignments", int $post_id, WP_Post $post bool $update );
do_action( "save_post_tutor_quiz", int $post_id, WP_Post $post bool $update );
Available Field Registration Options
When registering a field, you can specify:
| Property | Type | Description |
|---|---|---|
name | string | Unique name for the field (this field is required). |
type | text | text, number, password, textarea, select, radio, checkbox, switch, date, time, image, video, uploader, WPEditor |
label | string | Label for the field. |
placeholder | string | Placeholder text (optional). |
options | array | Required for select and radio fields.Example: [{ value: '1', label: 'Option 1' }]. |
priority | number | Determines order within the slot (lower values appear first). |
rules | object | Validation rules for React Hook Form. |
Available Slots
Here are the available slots where you can insert custom fields:
Basics Section
- after_description
- after_settings
Curriculum Section
- Lesson
- after_description
- bottom_of_sidebar
- Quiz
- after_question_description
- bottom_of_question_sidebar
- bottom_of_settings
- Assignment
- after_description
- bottom_of_sidebar
Additional Section
- after_certificates
- bottom_of_sidebar
FAQ
Q: How do I validate fields?
Use the rules property when registering a field:
Example 1: Required field validation
const requiredRule = () => ({
    required: { value: true, message: 'This field is required' },
});
Example 2: Max limit validation
const maxLimitRule = (maxLimit) => ({
    validate: (value) => {
        if (value && maxLimit < value.length) {
            return `Maximum ${maxLimit} character supported`;
        }
        return undefined;
    },
});
By following this documentation, you can extend Tutor LMS with custom fields tailored to your specific needs.