Custom Payment Gateways
This guide walks you through the steps to integrate a custom payment gateway into Tutor LMS. It includes understanding the requirements, creating the necessary file structure, and implementing the code. Follow the step-by-step process below to create a custom payment gateway for Tutor LMS.
Getting Started
This guide walks you through the steps to integrate a custom payment gateway into Tutor LMS. It includes understanding the requirements, creating the necessary file structure, and implementing the code.
Understand Your Payment Gateway
Before starting, familiarize yourself with the API and documentation of the payment gateway you want to integrate. Key aspects to focus on include:
- Required Fields: Identify the fields such as secret_key, public_key, client_id, and any additional fields specific to the gateway.
- Supported Features:
- Does it support recurring payments?
- Is there a sandbox mode for testing?
- Does it provide webhook functionality?
- API Endpoints:
- Creating payments
- Handling callbacks/webhooks
- Verifying transactions
- Authentication: Identify the type of authentication required (e.g., API keys, tokens, OAuth).
Step 1: Download the Demo Plugin
Note: Throughout this documentation, we will refer to the payment gateway we are implementing as CustomPayment. This is simply a placeholder name. When integrating a specific payment gateway, replace CustomPayment with the name of the gateway you are working with.
To begin, download the demo plugin CustomPayment. This plugin serves as a reference structure that you can update with your own payment gateway’s configuration.
File Structure of the Demo Plugin
Once you’ve downloaded the plugin, you’ll notice the following file structure:
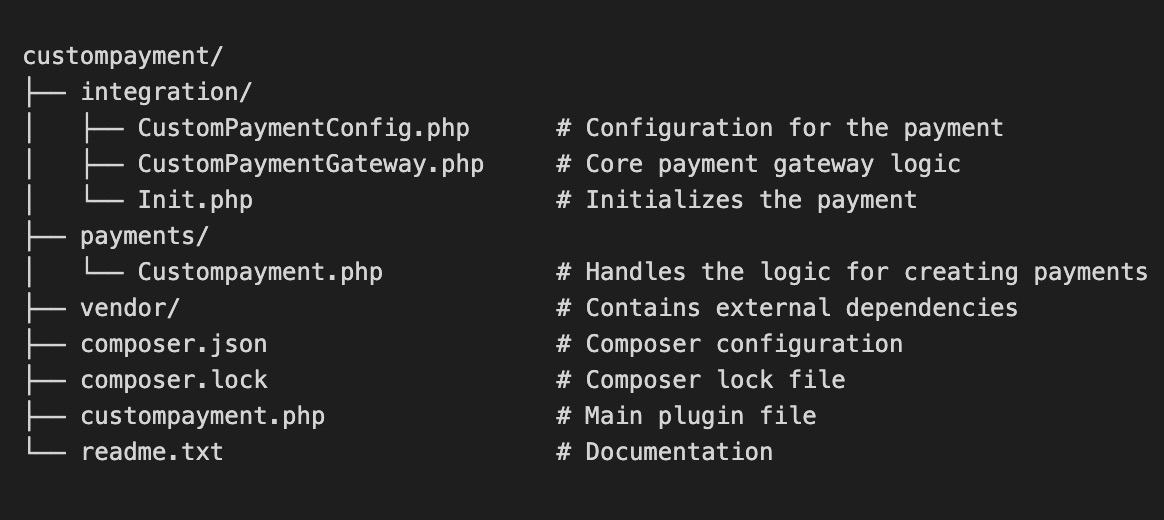
You’ll modify the files within the custompayment directory to suit the specific gateway you’re integrating.
Step 2: Update CustomPaymentConfig.php
The CustomPaymentConfig.php file handles the configuration settings for your payment gateway. Here’s a breakdown of the parts of the code and what they do:
Class Declaration and Namespaces
The class is located under the CustomPayment namespace, and it extends from BaseConfig and implements the ConfigContract.
namespace CustomPayment;
use Tutor\Ecommerce\Settings;
use Ollyo\PaymentHub\Core\Payment\BaseConfig;
use Tutor\PaymentGateways\Configs\PaymentUrlsTrait;
use Ollyo\PaymentHub\Contracts\Payment\ConfigContract;- BaseConfig is the core architecture class that handles basic configuration functionalities.
- ConfigContract is an interface, ensuring that the class implements necessary contract methods for configuration.
Class Properties
The configuration properties such as public_key, secret_key, environment, etc., are defined as private properties in the class. Define the required fields of your payment gateway here.
private $environment;
private $public_key;
private $secret_key;
private $client_id;
protected $name = 'custompayment';
These fields are provided by the payment gateway and can be filled in by the user via the WordPress admin panel (through the Payment settings in Tutor LMS).
What to Update in CustomPaymentConfig.php
Step 1: Update the Class Name and Namespace
- If you’re integrating a new payment gateway, you will need to update the class name and namespace to reflect that gateway.
Step 2: Update Configuration Fields
- If the new gateway requires different fields (e.g., merchant ID, currency type, etc.), you need to define them in the class. Add the new fields as private properties.
Example:
private $merchant_id;
private $currency_type;
Then, update the method get_custompayment_config_keys() to reflect the new fields added.
private function get_custompayment_config_keys() {
       return array(
           'environment' => 'environment',
           'secret_key'  => 'secret_key',
           'public_key'  => 'secret_key',
           'client_id'   => 'secret_key',
           'merchant_id'   => 'secret_key',   // New field
       );
}
Add Getter Methods
- To allow access to these fields, add getter methods for each configuration setting.
Example for the merchant ID:
private function getMerchantID(): string {
       return $this->merchant_id;
}
Verify the Configuration
The is_configured() method is used to check if all required fields are present. If you add new fields, ensure they are included in this check.
Before checking is_configured, you need to ensure that the merchant_id (and any other new fields) are properly initialized in createConfig.
Here’s how you can update the code:
- Define the
merchant_idincreateConfig().
public function createConfig(): void {
       parent::createConfig();
       $config = array( 'merchant_id' => $this->getMerchantID() );
       $this->updateConfig( $config );
}- Update the
is_configured()method to includemerchant_id.
public function is_configured() {
       return $this->secret_key && $this->public_key && $this->merchant_id;
}
Summary of Changes for CustomPaymentConfig.php:
- Class Name and Namespace: Update the class name and namespace to reflect the new gateway.
- Configuration Fields: Add new fields as needed (e.g.,
merchant_id,currency_type). - Constructor: Ensure the constructor correctly loads the settings for the new fields.
- Getter Methods: Add getter methods for new fields.
- is_configured Method: Include the new fields in the configuration validation.
Step 3: Update CustomPaymentGateway.php
Overview
The CustomPaymentGateway.php file is responsible for processing payments via the configured gateway. It interacts with the payment processor, handles payment requests, and manages responses.
The CustomPaymentGateway class extends the GatewayBase class, which contains the general functionality for payment gateways. By extending this class, you inherit reusable methods, allowing you to focus only on the specifics of your payment gateway.
Key Properties
The CustomPaymentGateway.php file contains the following properties that help manage the configuration, directory structure, and payment handling for your custom payment gateway.
$dir_name: Specifies the core payment class name for your payment gateway. This will be the folder where all your payment gateway files reside.$config_class: References the configuration class for the custom payment gateway. This is the class that manages the payment gateway settings (such as secret keys, public keys, etc.). In this case, it referencesCustomPaymentConfig::class.$payment_class: References the payment core class that processes transactions. Here, it points toCustompayment::class, which contains the logic for handling the payment transactions.
Methods Overview
The class includes several methods to retrieve directory names, configuration settings, and payment processing logic.
get_root_dir_name(): Returns the root directory name where the payment gateway files are stored.
get_payment_class(): Returns the class that handles the actual payment processing.
get_config_class(): Returns the configuration class, which contains the necessary settings (such as API keys and environment settings).
get_autoload_file(): Returns the path to the autoload file for the payment gateway, which is used to load all the dependencies required for your gateway.
What to Update in CustomPaymentGateway.php
- Gateway Class Reference:
The $payment_class and $config_class properties are set to reference Custompayment and CustomPaymentConfig classes by default. These properties should be updated to reflect the specific classes that handle the payment transactions and configurations for your gateway.
- Gateway Directory Name:
The $dir_name property is set to 'Custompayment'. This corresponds to the root directory where your payment gateway files are stored. If you choose to rename your folder, make sure to update this property accordingly.
3. Autoload File:
The get_autoload_file() method is used to return the path to the autoload file, typically required if you’re using Composer to manage dependencies. If your gateway requires this autoloader, specify the correct path to it, like so:
public static function get_autoload_file() {
       return '/path/to/vendor/autoload.php';
}
If no autoload file is required, you can leave the method as is (returning an empty string).
Summary of Changes for CustomPaymentConfig.php:
Properties: Update $dir_name, $payment_class, and $config_class to match your gateway’s structure.
Autoload File: Update the path if using Composer for dependency management.
Step 4: Update Initialization Class (Init.php)
The Init.php file is responsible for initializing the custom payment gateway within the Tutor LMS ecosystem. It registers the necessary hooks to connect the gateway with Tutor LMS, allowing the system to recognize the custom payment method and its configuration.
What to Update
Payment Gateway Name:
In the code, the payment gateway name is set as 'custompayment'. You should update this to match the name of your payment gateway.
Payment Gateway Classes:
The CustomPaymentGateway::class and CustomPaymentConfig::class in the payment_gateways_with_ref and filter_payment_gateways functions need to be updated to reflect the new gateway class names.
Gateway Label:
The label 'Custom Payment' in the $custom_payment_method array should be updated to the display name of your payment gateway.
Gateway Fields:
The fields array holds the settings and configuration fields for the payment gateway. These are the fields shown to the user in the admin settings. You can add new fields or modify the existing ones as needed for your gateway. For example:
If your payment gateway requires additional fields (e.g. merchant ID), you can add them to the fields array in the same format.
array(
                   'name'  => 'merchant_id',
                   'type'  => 'secret_key',
                   'label' => 'Merchant ID',
                   'value' => '',
),Icon:
If you want to add an icon for your payment gateway, specify the URL in the 'icon' field. This could be a link to an image hosted on your server.
Subscription Support:
The 'support_subscription' => false value indicates that the gateway does not support subscriptions. If your payment gateway supports subscriptions, change this value to true.
Adding More Fields:
If your gateway requires additional settings, simply add more fields to the fields array in the $custom_payment_method configuration.
By updating these sections, you can integrate your custom payment gateway into Tutor LMS while customizing it to meet your specific gateway requirements.
Step 5: Update Custompayment.php (Payment Logic)
The Custompayment.php file contains the core logic for processing payments via the custom payment gateway. This file extends the BasePayment class and overrides certain methods to handle payment operations specific to your gateway.
Namespace
Ensure the namespace at the top of the file matches your plugin name. Replace Payments\Custom with your preferred namespace to align with your project structure.
check() Method:
In the check() method, you will define the configuration keys for your payment gateway. These include values like secret_key, public_key, and mode. Update these keys to match the settings required by your payment gateway. If your gateway requires other configuration values (like API credentials or environment settings), add them to the $configKeys array.
setup() Method:
The setup() method is used to configure the necessary settings for making API calls to the payment gateway.
Purpose:
- This method sets up the necessary API headers, which will be used in subsequent requests to the payment gateway.
Creating Payments (createPayment() Method):
Overview:
createPayment(): Sends the payment data from Tutor LMS to your payment gateway.- The method generates a payment request by redirecting the user to a specific URL or using an iframe depending on your payment gateway’s integration method.
In the current implementation, createPayment() redirects the user to https://tutorlms.com/. This URL should be replaced with the actual URL where your payment gateway handles transactions.
- Important: Replace the redirect URL with the payment gateway’s URL, and update the logic to integrate payment creation with your gateway API (e.g., sending payment data and handling responses).
How to Implement:
Retrieve the required values from the settings interface using $this->config->get('property_name'). You can get values like the secret_key, public_key, and mode that were defined in the plugin’s settings page.
Webhook and Order Data Verification (verifyAndCreateOrderData() Method):
Overview:
- The
verifyAndCreateOrderData()method receives data from the payment gateway to Tutor LMS. - This method verifies the webhook signature and processes the order data. Ensure that
$get_data,$post_data,$server_variables, and$streamare correctly handled based on how your payment gateway sends the webhook data.
The order data should be updated to return the correct fields such as payment_status, transaction_id, and fees based on the response from your gateway.
How to Implement:
Retrieve the necessary values from the configuration interface (e.g., secret keys) and verify the webhook data accordingly. Use $returnData to return the order information.
Retrieving Data from Tutor LMS (via setData() and getData()):
The payment data sent by Tutor LMS can be accessed via the getData() method, which retrieves the details provided by the LMS when calling setData().
setData($data)
This method is used to set the payment data for the current payment object.
Parameters:
object $data: An object containing the payment data to be set.
Throws:
Throwable: If any error occurs while setting the data (i.e. if the parentsetDatamethod throws an error).
Additional Methods:
If your gateway requires extra methods for handling payments, such as refunds, cancellations, or payment status checks, add them to this class. Follow the pattern established by the existing methods to ensure consistency and reusability.
Step 6: Update custompayment.php
This file serves as the main entry point for your custom payment gateway plugin, and it is responsible for registering the plugin, loading necessary files, and initializing the integration with Tutor LMS.
What to Update
Plugin Metadata:
Update the plugin name, URI, description, author, and version information to reflect the details of your custom payment gateway and your company.
Paths and Directories:
The following constants define the paths and URLs for the plugin. Ensure these paths are correct based on your plugin structure:
// Define plugin meta info.
define( 'CUSTOM_PAYMENT_VERSION', '1.0.0' );
define( 'CUSTOM_PAYMENT_URL', plugin_dir_url( __FILE__ ) );
define( 'CUSTOM_PAYMENT_PATH', plugin_dir_path( __FILE__ ) );
define( 'CUSTOM_PAYMENT_PAYMENTS_DIR', trailingslashit( CUSTOM_PAYMENT_PATH . 'src/Payments' ) );
These paths are crucial for locating resources such as payment classes, assets, and other files. If your structure differs, adjust these constants accordingly.
Autoloader:
This line ensures the Composer autoloader is included, allowing any dependencies installed via Composer to be automatically loaded. Make sure the vendor directory exists and contains the required dependencies for your plugin.
Initialization:
The CustomPayment\Init class is instantiated if the necessary conditions are met. This will initialize the gateway integration by registering the necessary hooks and filters.
Make sure the initialization process matches your intended workflow. If there are any additional setup or configurations to be done, you can modify the code here to reflect those changes.
Step 7: Update Composer.json
Update Plugin Name and Description
name: This is the package name for your plugin. It should follow the formatthemeum/package-name.description: Provide a brief description of your plugin and what it does (e.g., integrates a custom payment gateway into Tutor LMS).
Update Autoload Section
This defines the mapping between namespaces and the directory structure for your PHP classes.
"autoload": {
        "psr-4": {
            "Ollyo\\PaymentHub\\": "../tutor/ecommerce/PaymentGateways/Paypal/src",  // This namespace 'Ollyo\\PaymentHub\\' is fixed and will remain unchanged
            "Payments\\Custom\\": "payments", // You can modify the namespace according to your project needs
            "CustomPayment\\": "integration" // You can adjust this namespace as per your directory structure
        }
}