Instructor Profile Menu & Account Settings
The instructor’s profile avatar is located in the top-right corner of the header, immediately next to the notifications bell. Clicking this avatar opens a dropdown menu that provides direct access to personal account configurations and specialized dashboard modules.
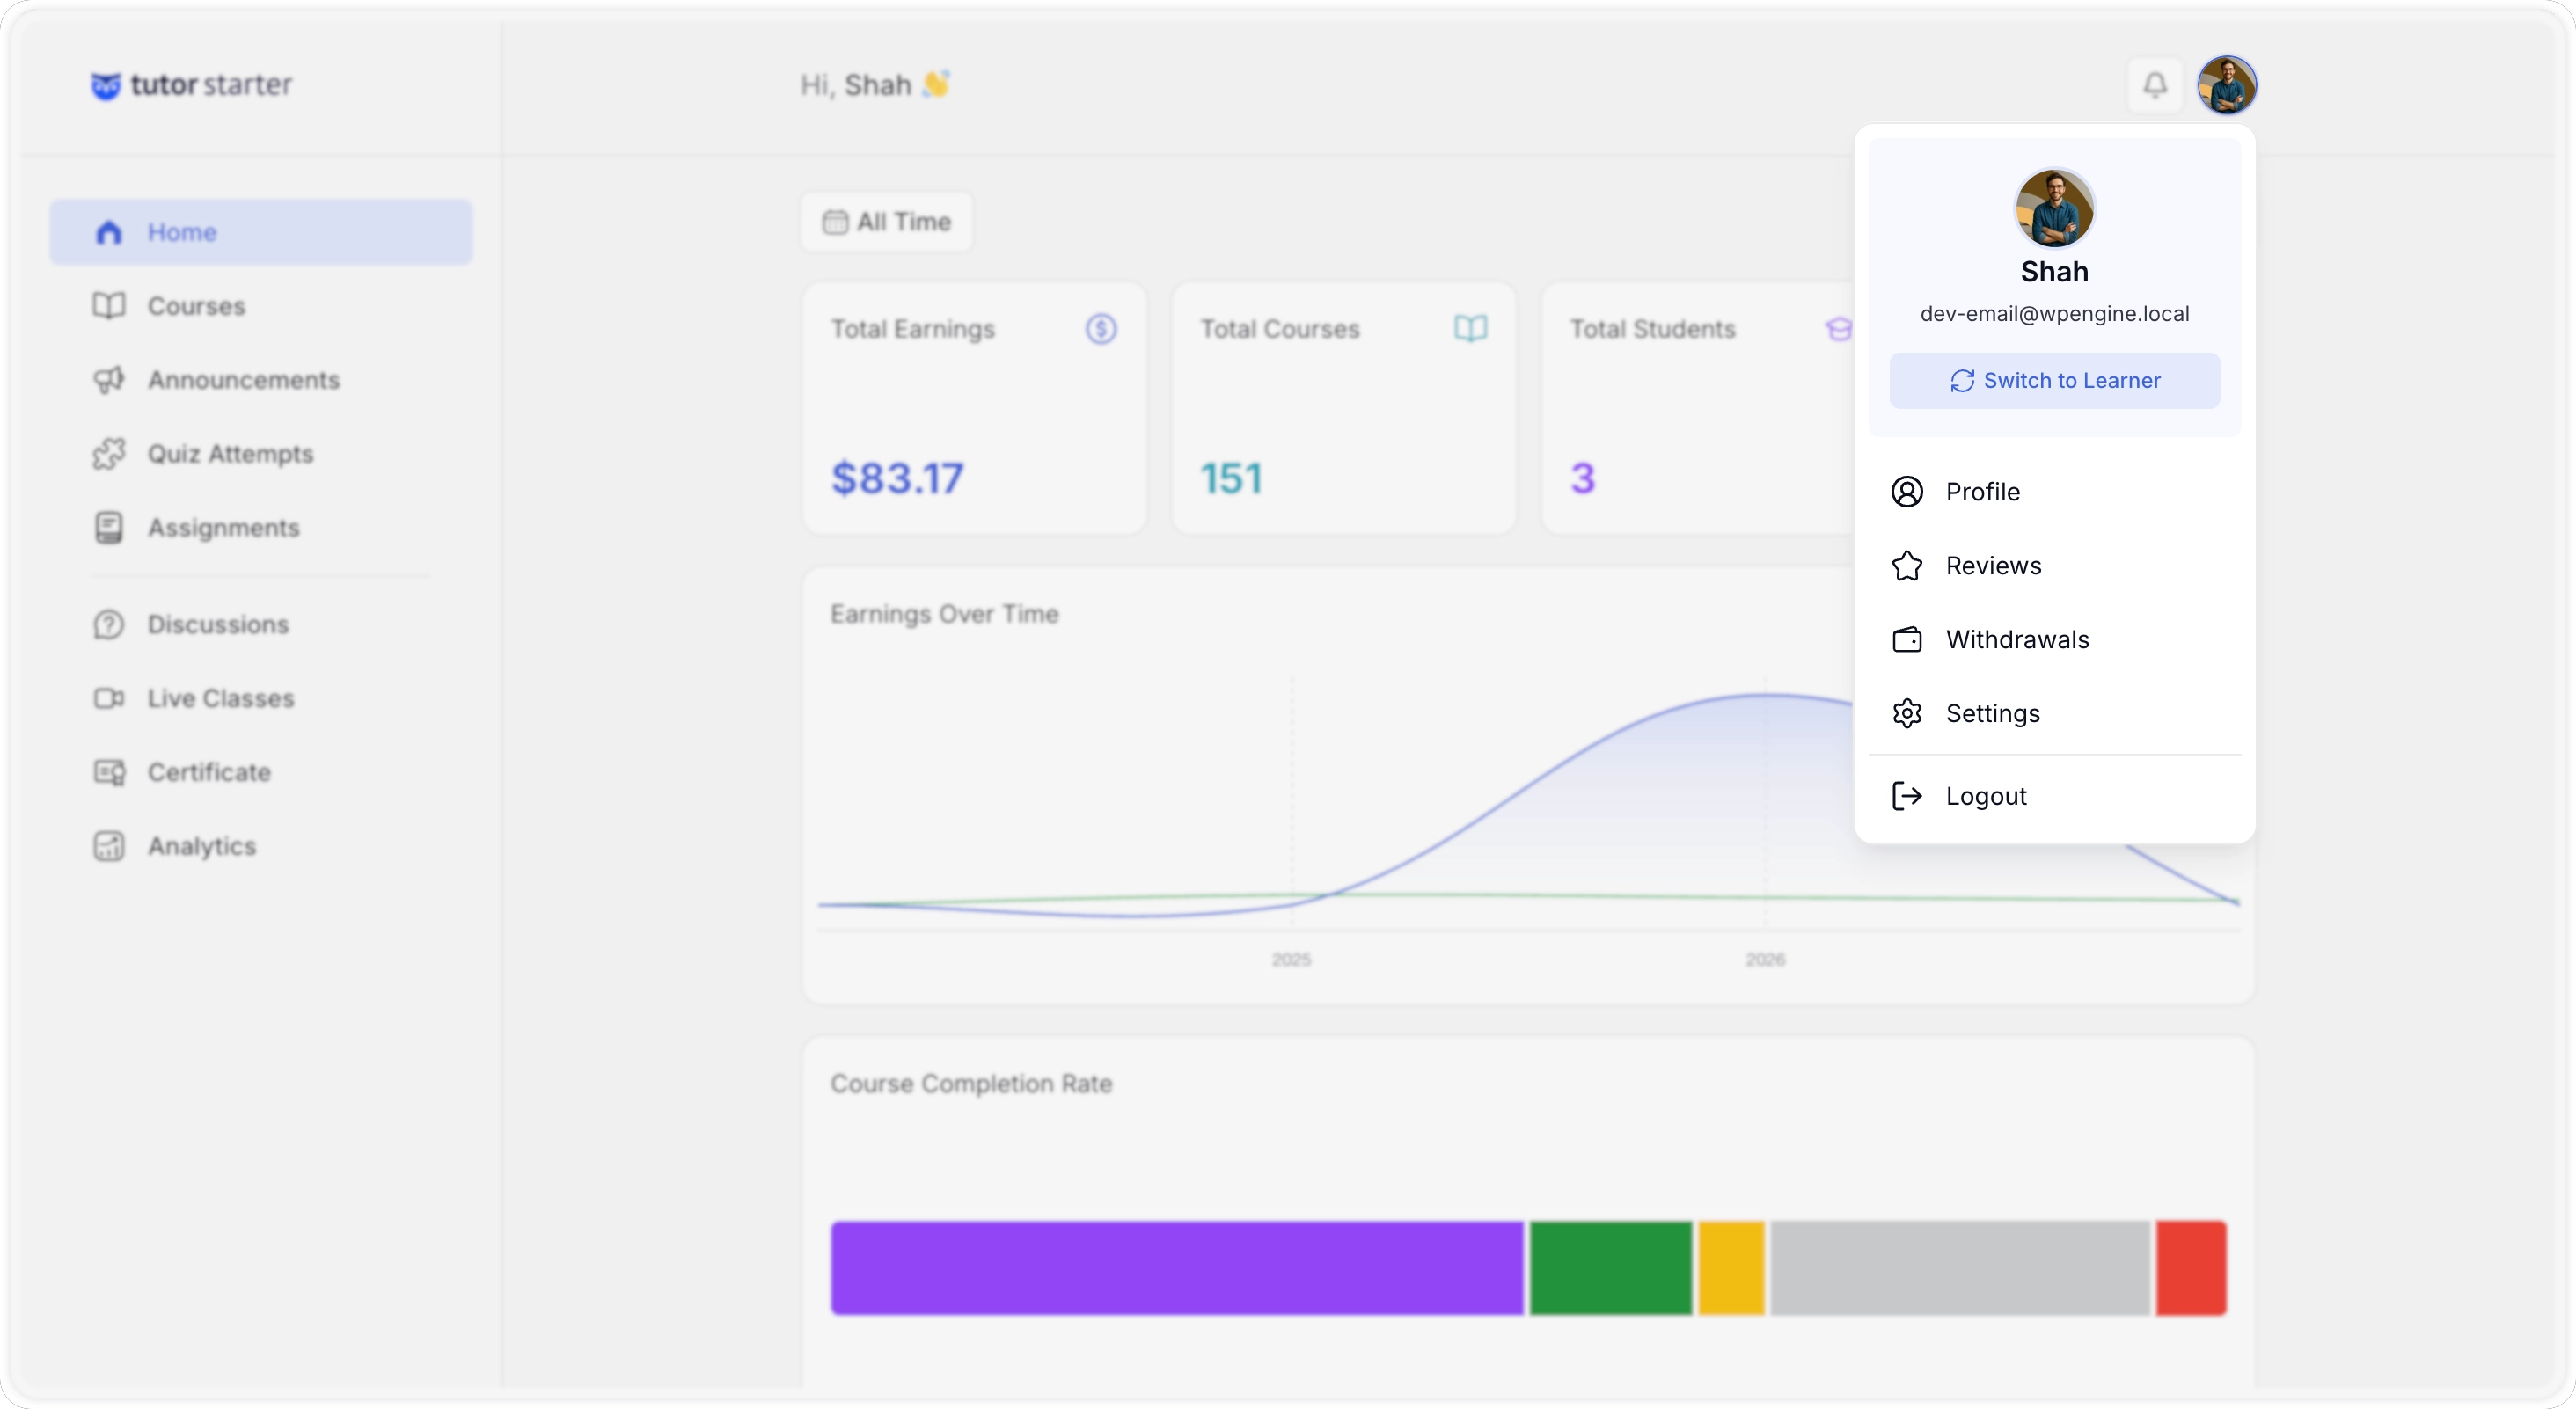
The primary function available at the top of this menu is the “Switch to Learner” button. Selecting this option changes your dashboard view from Instructor mode to Student mode. This allows you to experience the platform from a student’s perspective without logging out or creating a separate account.
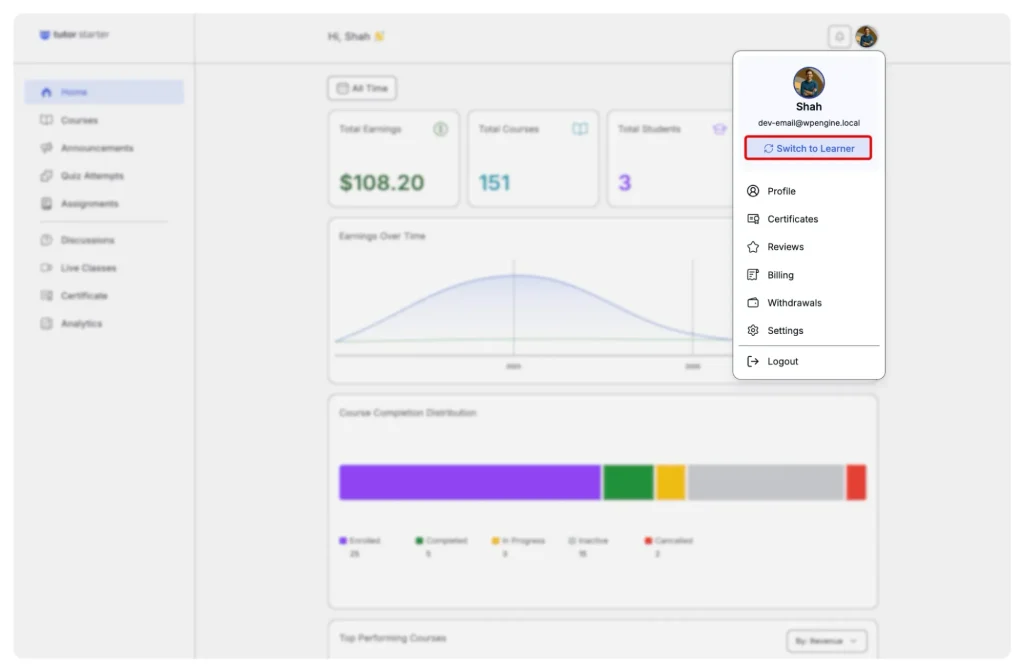
The dropdown menu contains the following navigation links to manage account specifics:
- Profile: Directs the user to the personal information page where they can update their display name, write a biography, and manage their social media links.
- Certificates: Provides access to the certificate management module for assigning templates to completed courses.
- Reviews: Opens the centralized review center where instructors can monitor all feedback and ratings submitted by their students across all active courses.
- Billing: Navigates to the billing history page, displaying a complete record of course purchases, subscriptions, and downloadable invoices.
- Withdrawals: Directs the user to the financial management area to track earnings, set up withdrawal methods, and request payouts from the platform.
- Settings: Opens the core account settings page to manage password security, notification preferences, and specific platform display options like dark mode or font size.
- Logout: Securely terminates the current active session on the platform.
Managing Your Profile
Selecting Profile from the dropdown menu opens the public-facing profile page. This page displays information that is visible to students and other users on the platform.
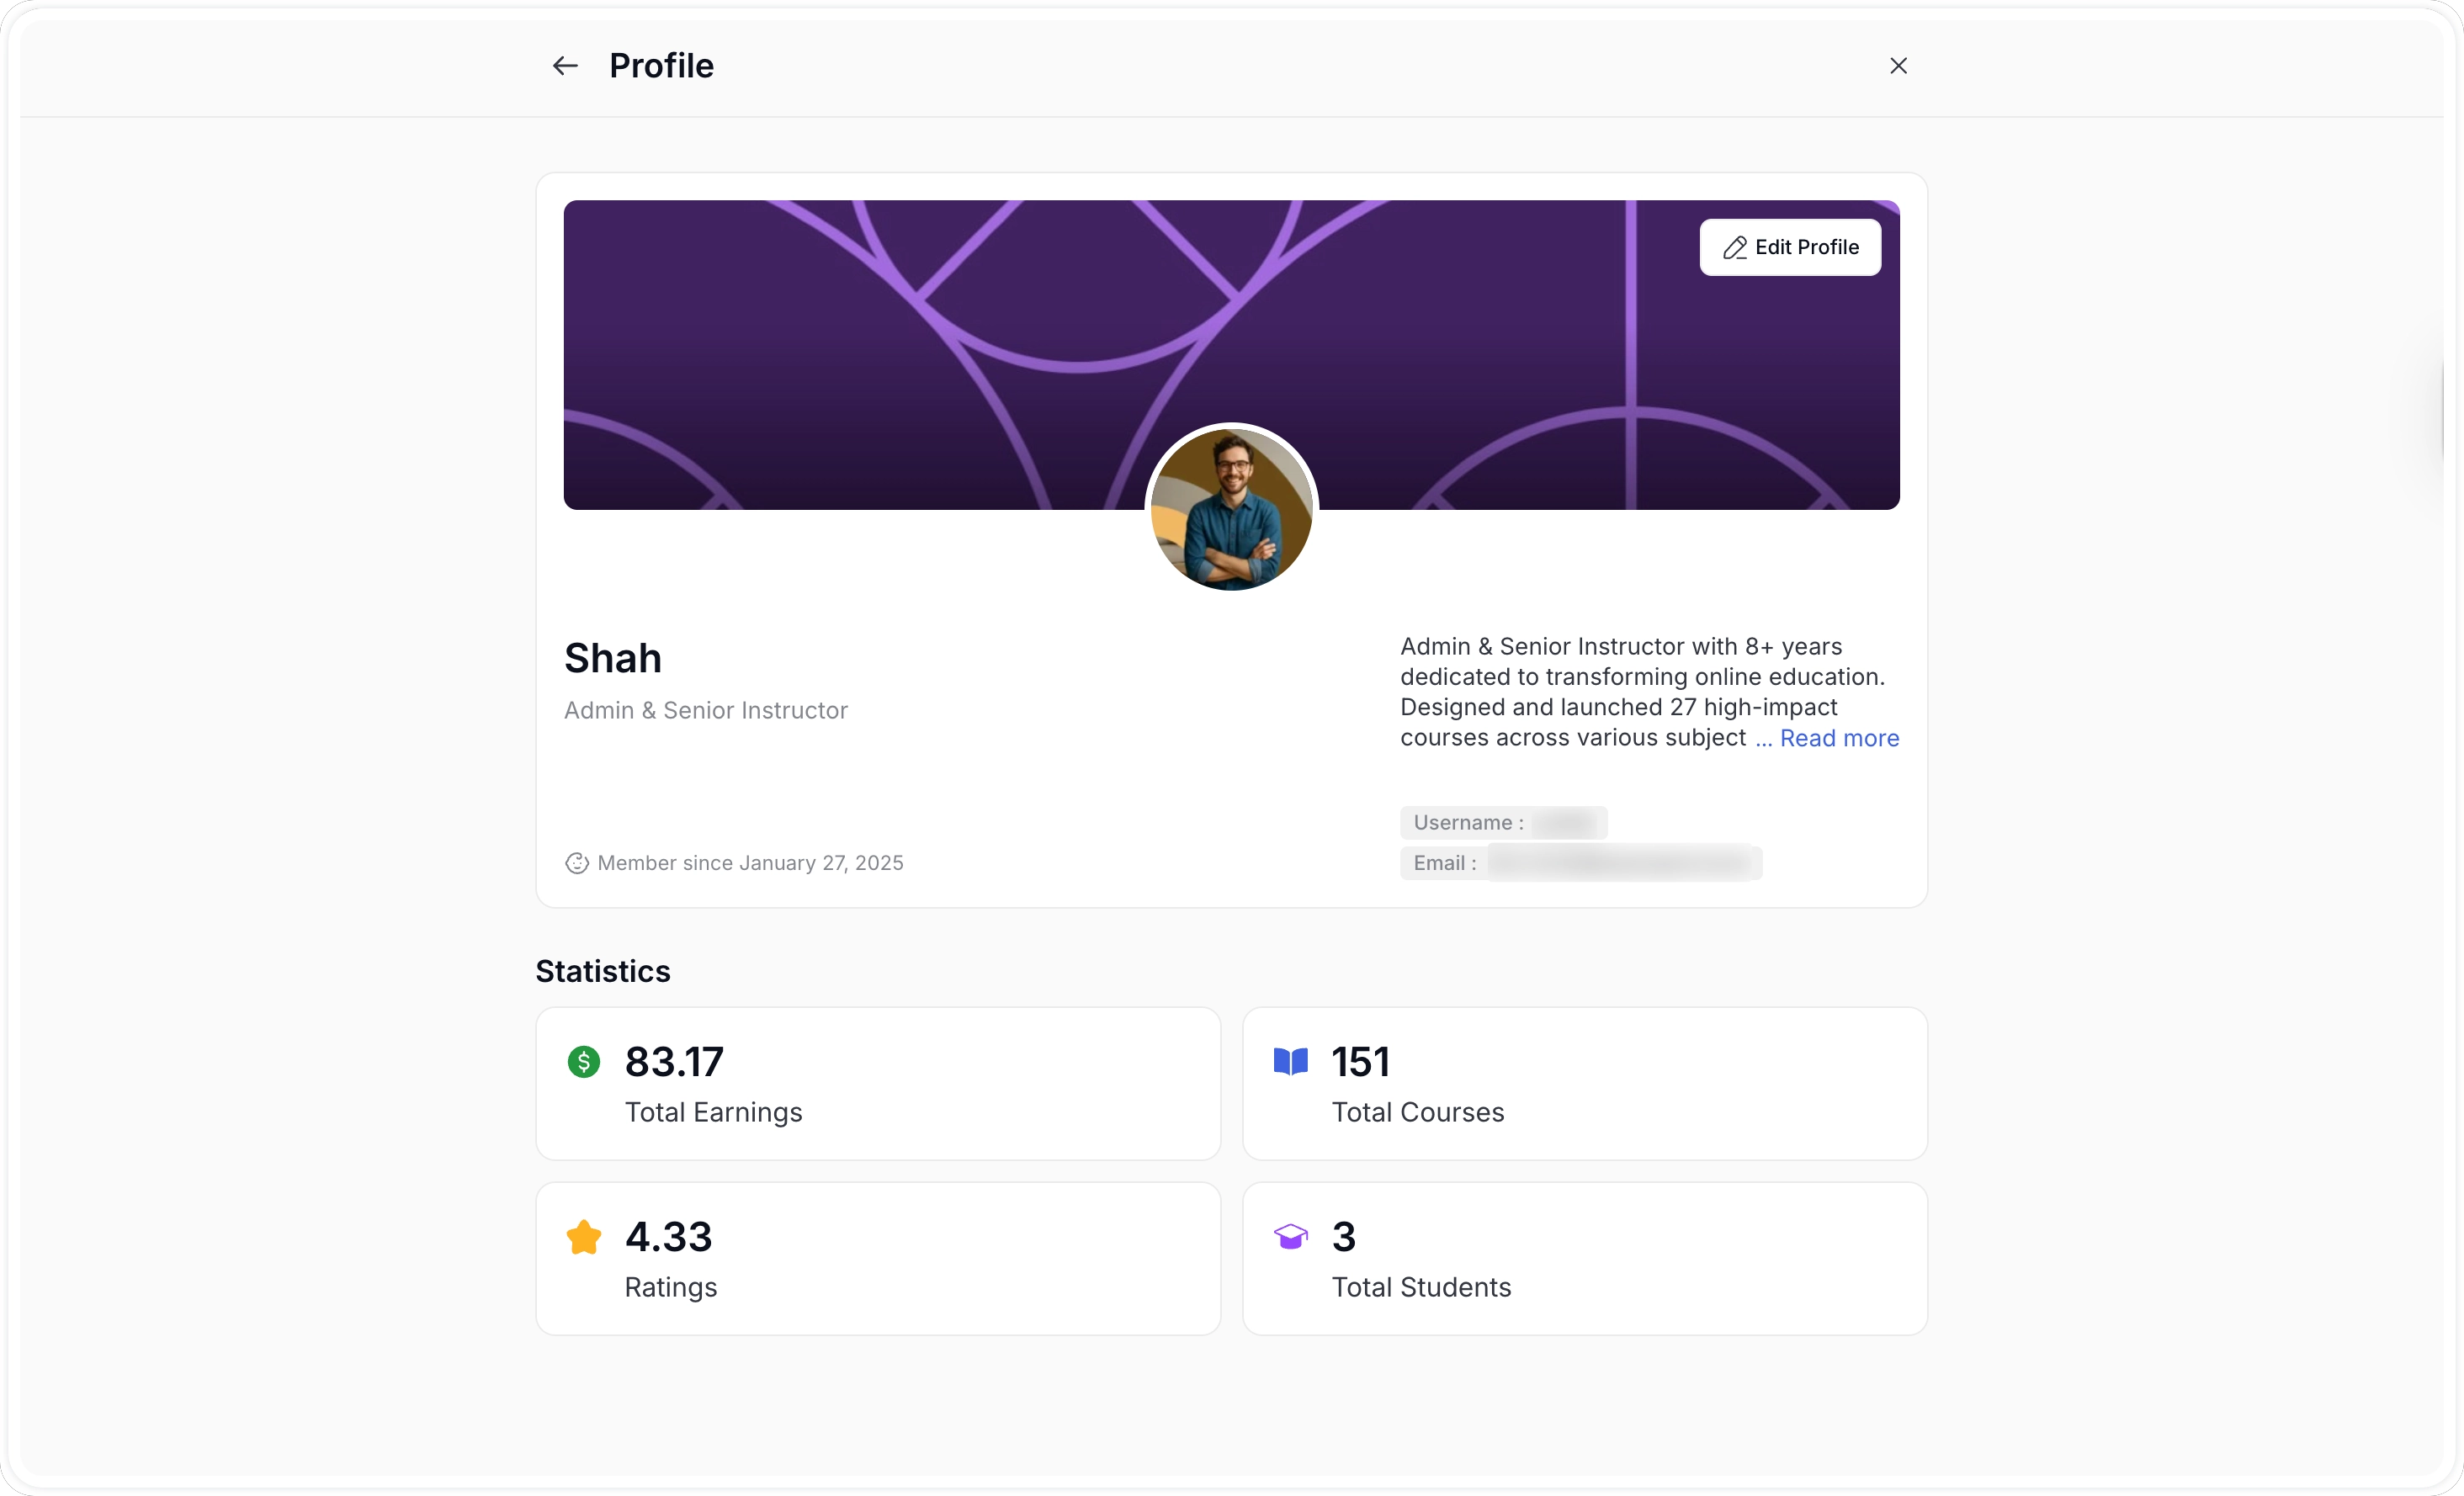
The profile page contains the following elements:
- Profile Image: The instructor’s current avatar is displayed on the profile page.
- Biography: A text description provided in the account settings is shown.
- Performance Statistics: The profile displays key metrics. These metrics include the total number of students enrolled, the total number of courses published, and the instructor’s average star rating.
Editing Profile Information
To update personal details, instructors must click the “Edit Profile” button located on the My Profile page. This action opens a sliding configuration panel on the right side of the screen. This panel allows users to modify their data without leaving the page.
The Edit Profile panel is organized into three specific tabs:
- Account: Includes text fields to update First Name, Last Name, Phone Number, Skill/Occupation, Email, and Birthdate.
- Public Profile: Includes a dropdown to select the preferred Display Name and a rich-text editor to write a public Bio.
- Certificate Signature: This section manages the specific signature applied to student certificates. It provides a drag-and-drop upload box. The interface indicates that the system accepts JPG, JPEG, GIF, SVG, and PNG file formats. The maximum allowed file size for the signature image is 3 MB.
To apply any modifications made within these tabs, the instructor must click the “Save” button located at the top right of the panel. Clicking the “Discard” button will cancel all current edits and close the side panel.
Reviews
Clicking Reviews opens the Reviews page, which consolidates all student reviews submitted across your courses in one place.
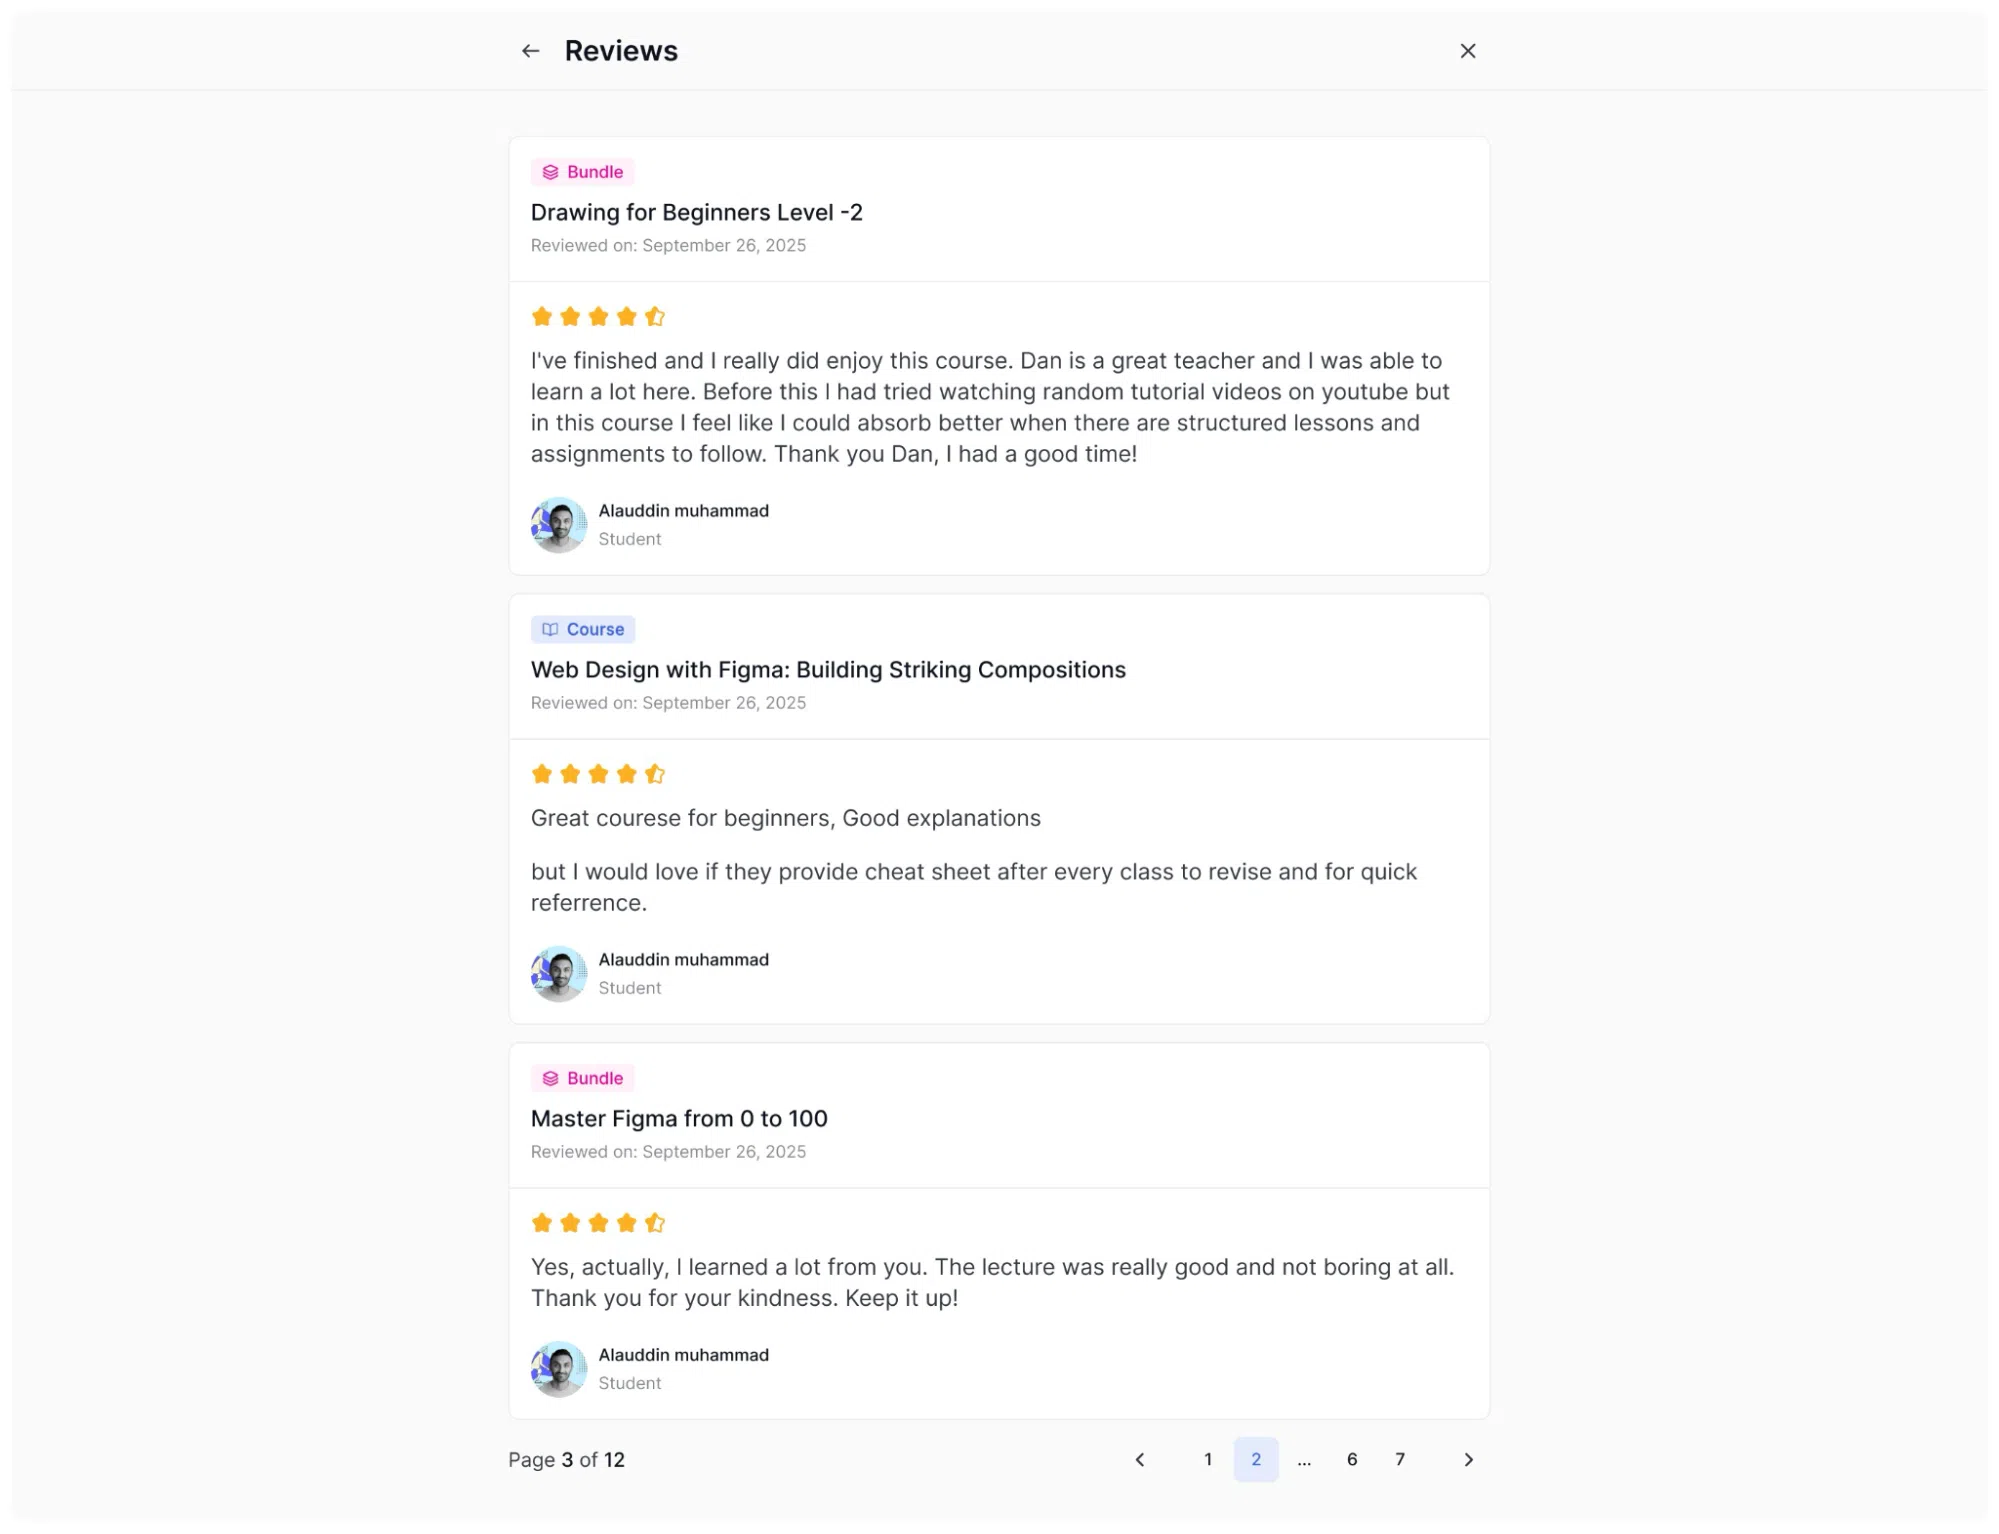
Each review is displayed as a card and contains the following:
- A Course/Bundle badge in the top-left corner, followed by the full course/bundle name.
- A “Reviewed on:” timestamp showing the date the review was submitted.
- A star rating displayed in gold, out of five stars.
- The written review text left by the student.
- The student’s profile photo, name, and role are shown below the review text.
Withdrawals
Selecting Withdrawals from the profile dropdown menu opens the financial payout module. This page is where instructors view their current earnings balance, submit payout requests, and review a full record of their past transactions.
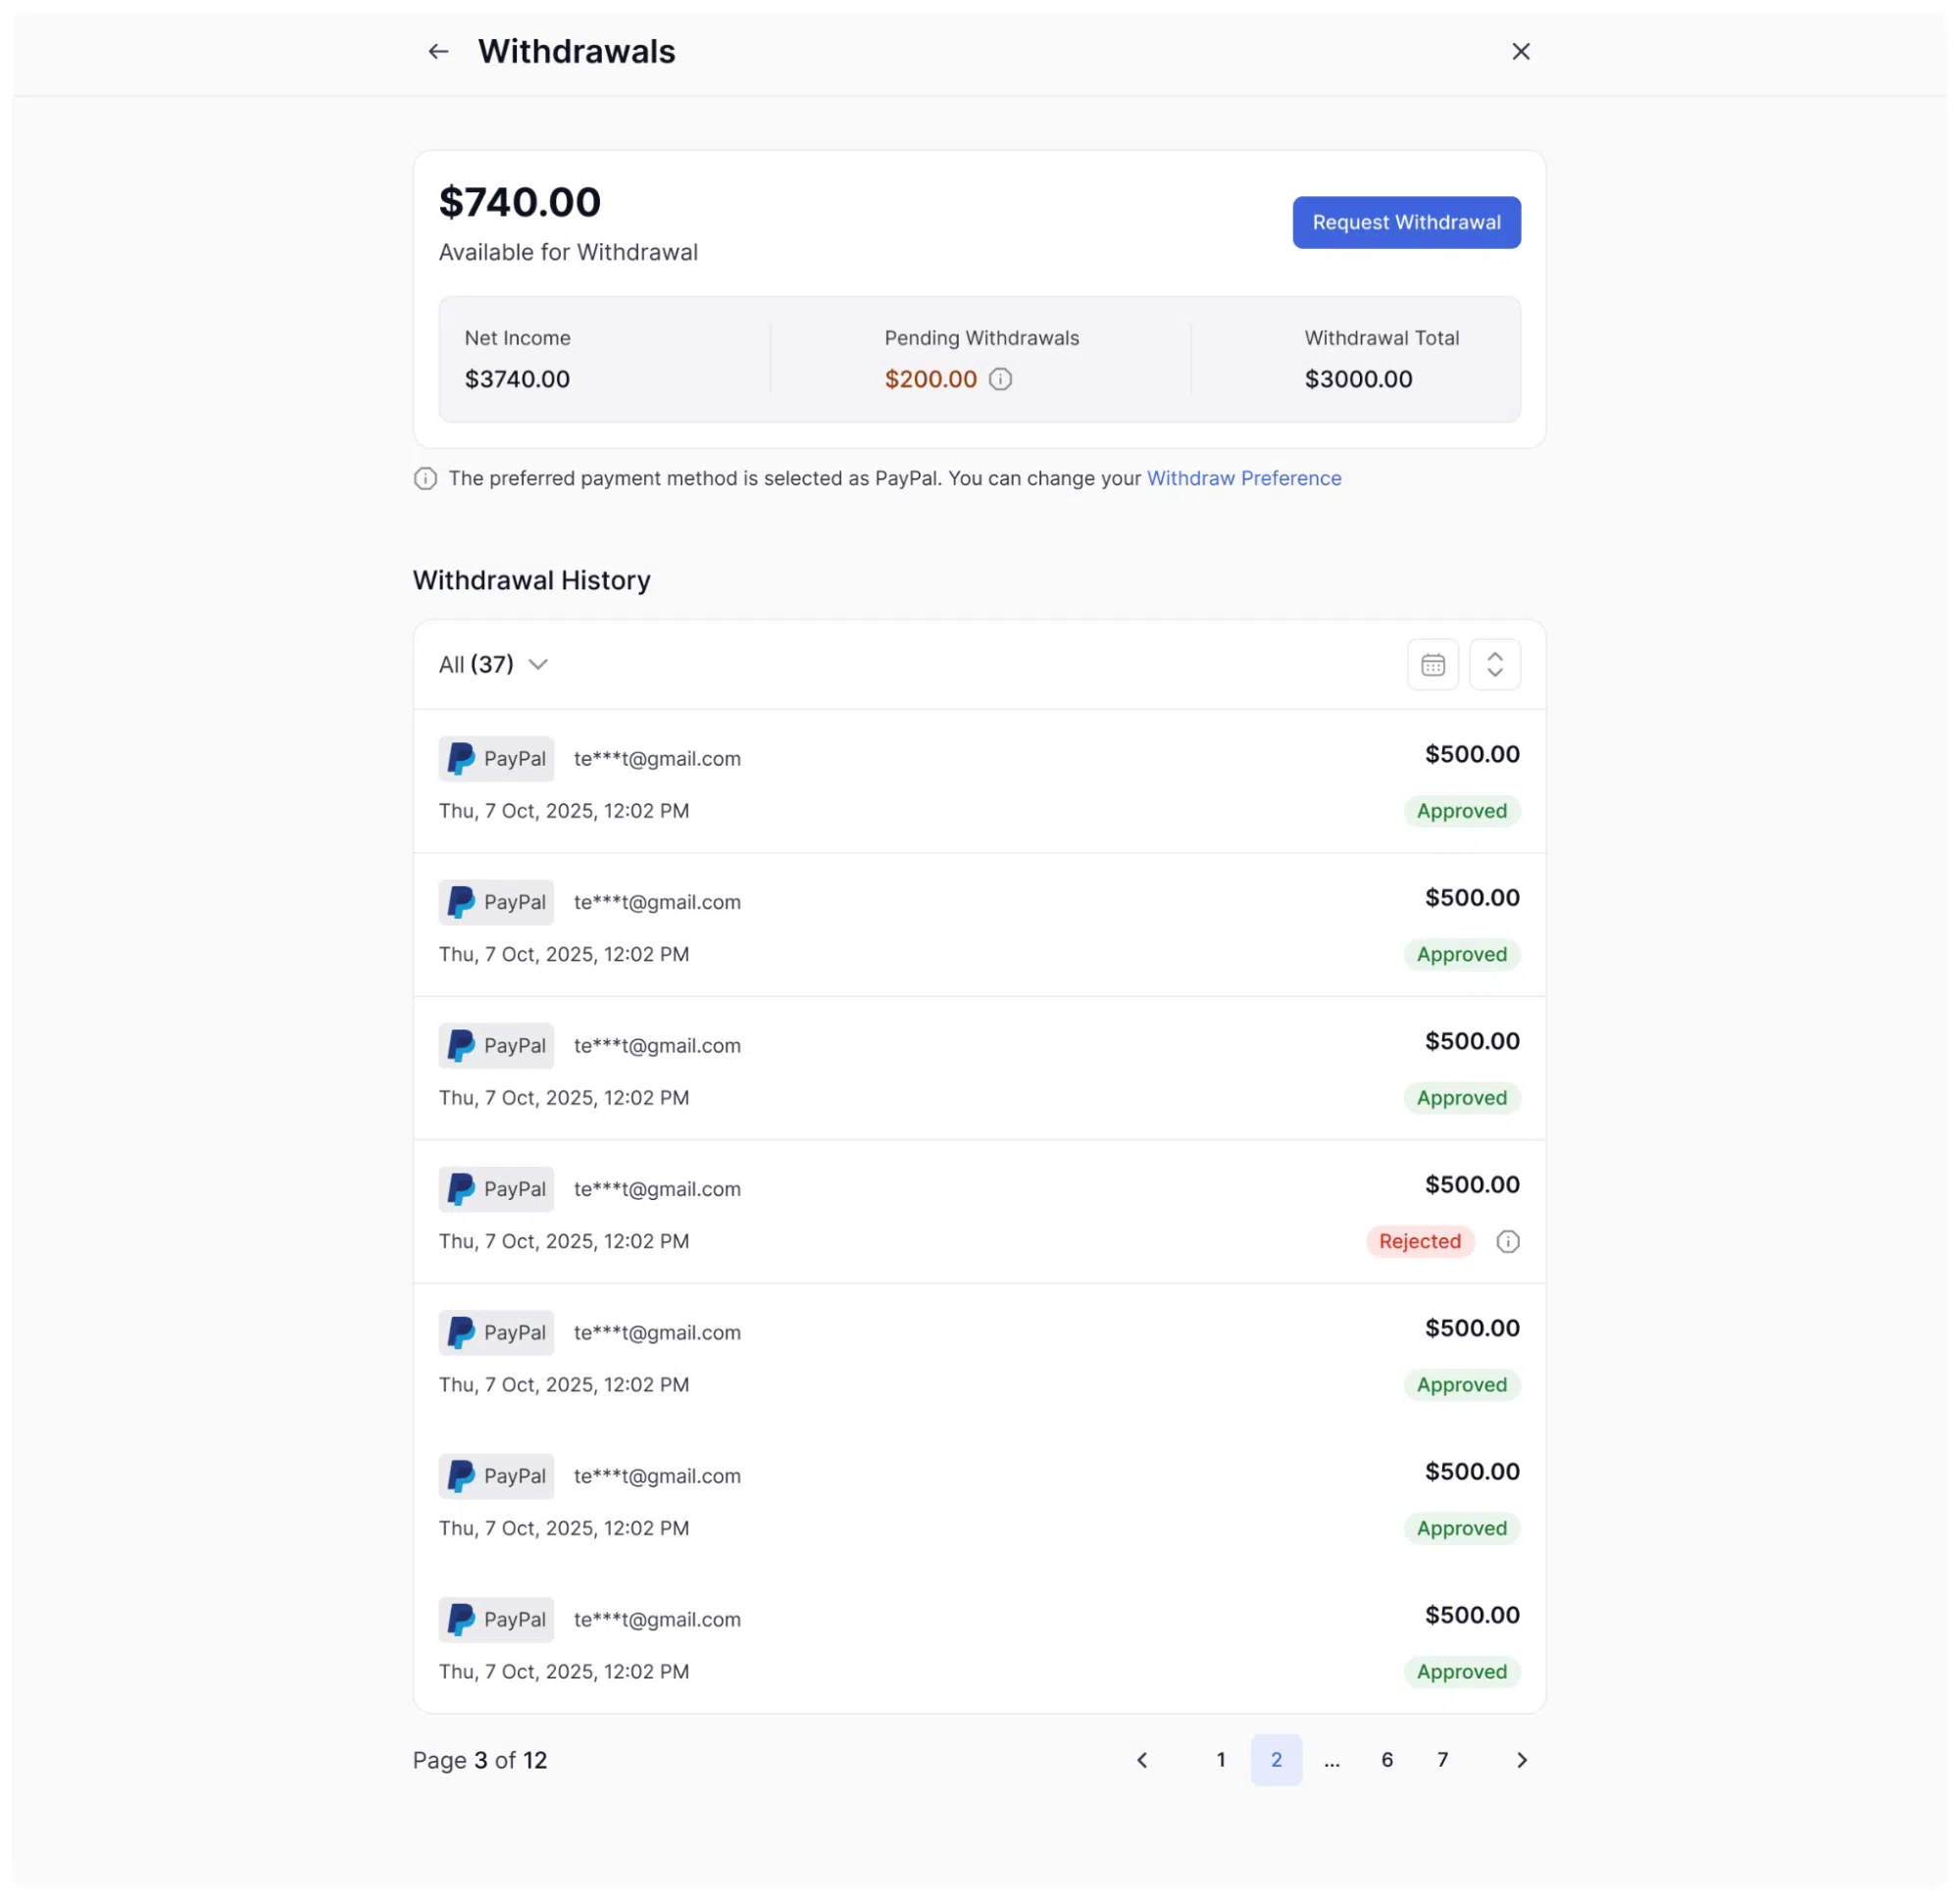
Note: The Withdrawal feature must be configured by the platform administrator before instructors can successfully use it. Administrators are required to enable withdrawal methods and set minimum payout amounts within the core platform settings. For detailed configuration instructions, please refer to the Tutor LMS Monetization Settings documentation.
Earnings Summary (Withdrawals)
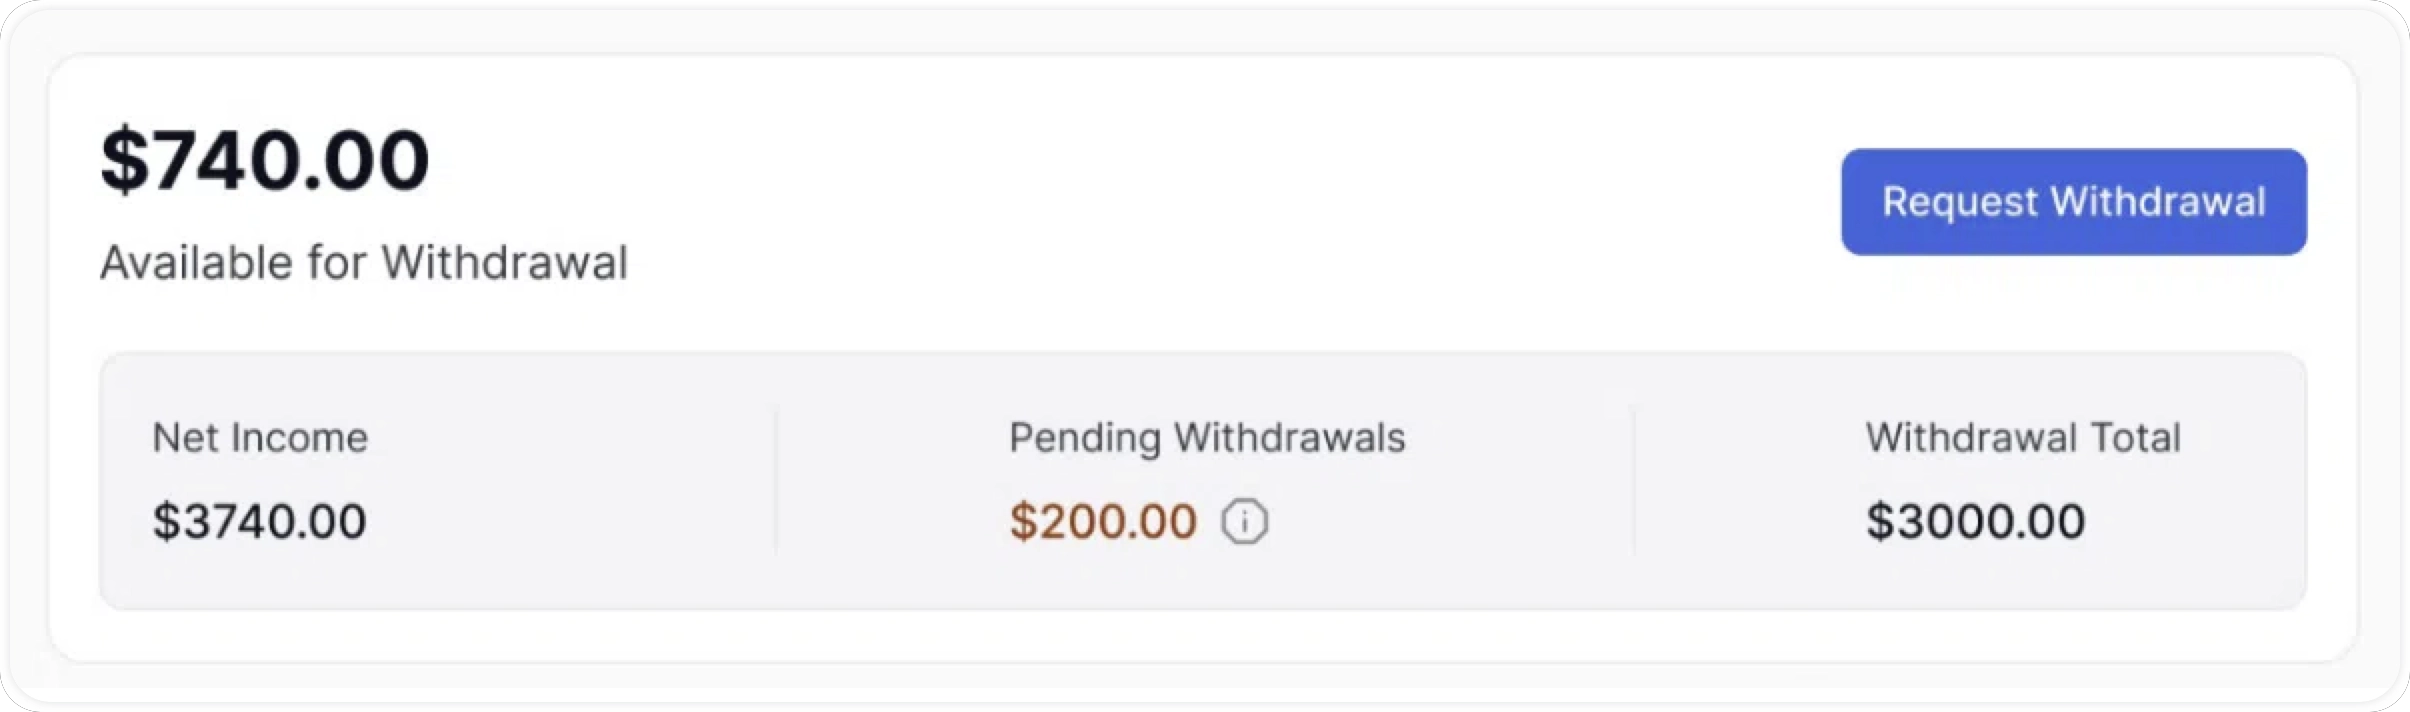
The upper section of the page presents a breakdown of your financial standing across four figures:
- Available for Withdrawal: The current balance of cleared funds that are eligible for a payout request. This figure is displayed prominently at the top of the summary.
- Net Income: The total lifetime net earnings that have been credited to your instructor account.
- Pending Withdrawals: The total value of withdrawal requests that have been submitted but not yet processed by the administrator.
- Withdrawal Total: The cumulative sum of all payouts that have been successfully completed to date.
Below these figures, a system notice identifies your currently active payment method. This notice includes a Withdraw Preference link. Clicking this link takes you directly to the Withdraw tab within your Account Settings, where your payout method and routing details can be configured or updated.
Withdrawal History
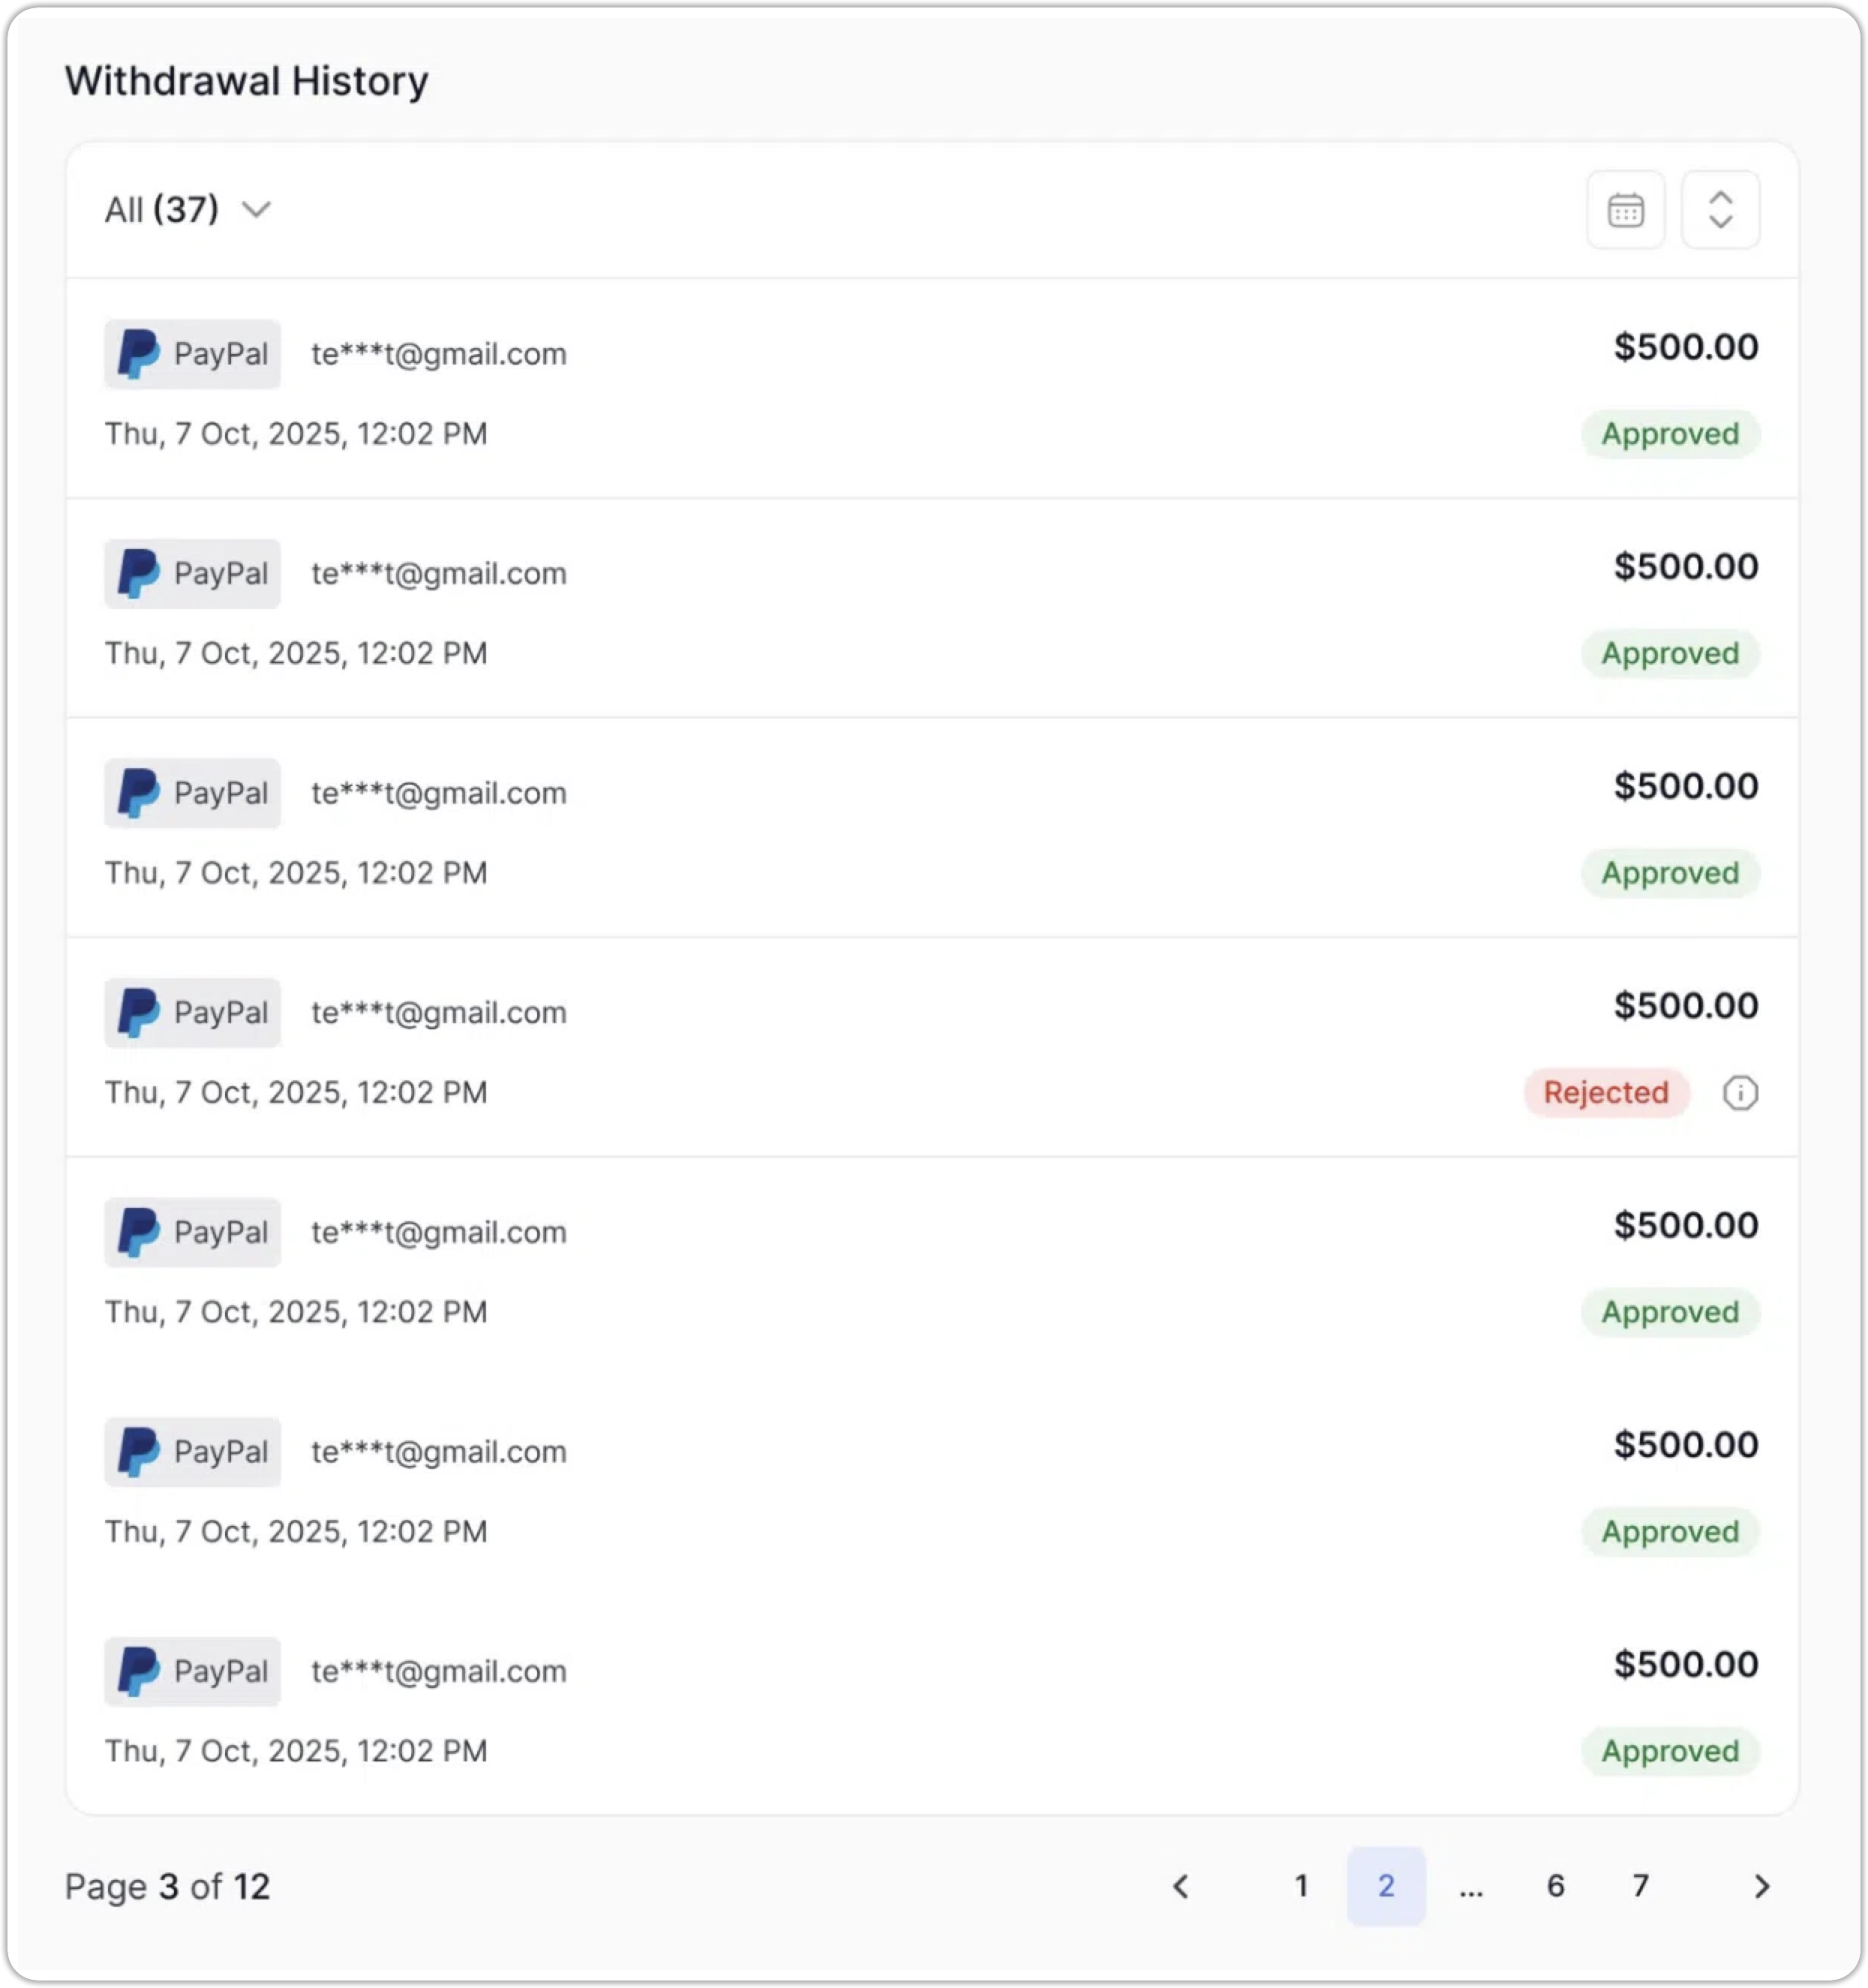
The lower half of the page contains the Withdrawal History section. This section displays a complete chronological log of all withdrawal requests made from your account, both past and current.
Each entry in the list shows the following:
- The date the request was submitted.
- The amount requested.
- The current status of the request (Pending, Approved, or Rejected).
A filter dropdown and a date range selector are available at the top of the list. These controls allow you to narrow the displayed records to a specific time period.
Requesting a Withdrawal
A blue Request Withdrawal button is located on the top right side of the page. Clicking this button opens a pop-up window used to initiate a fund transfer.
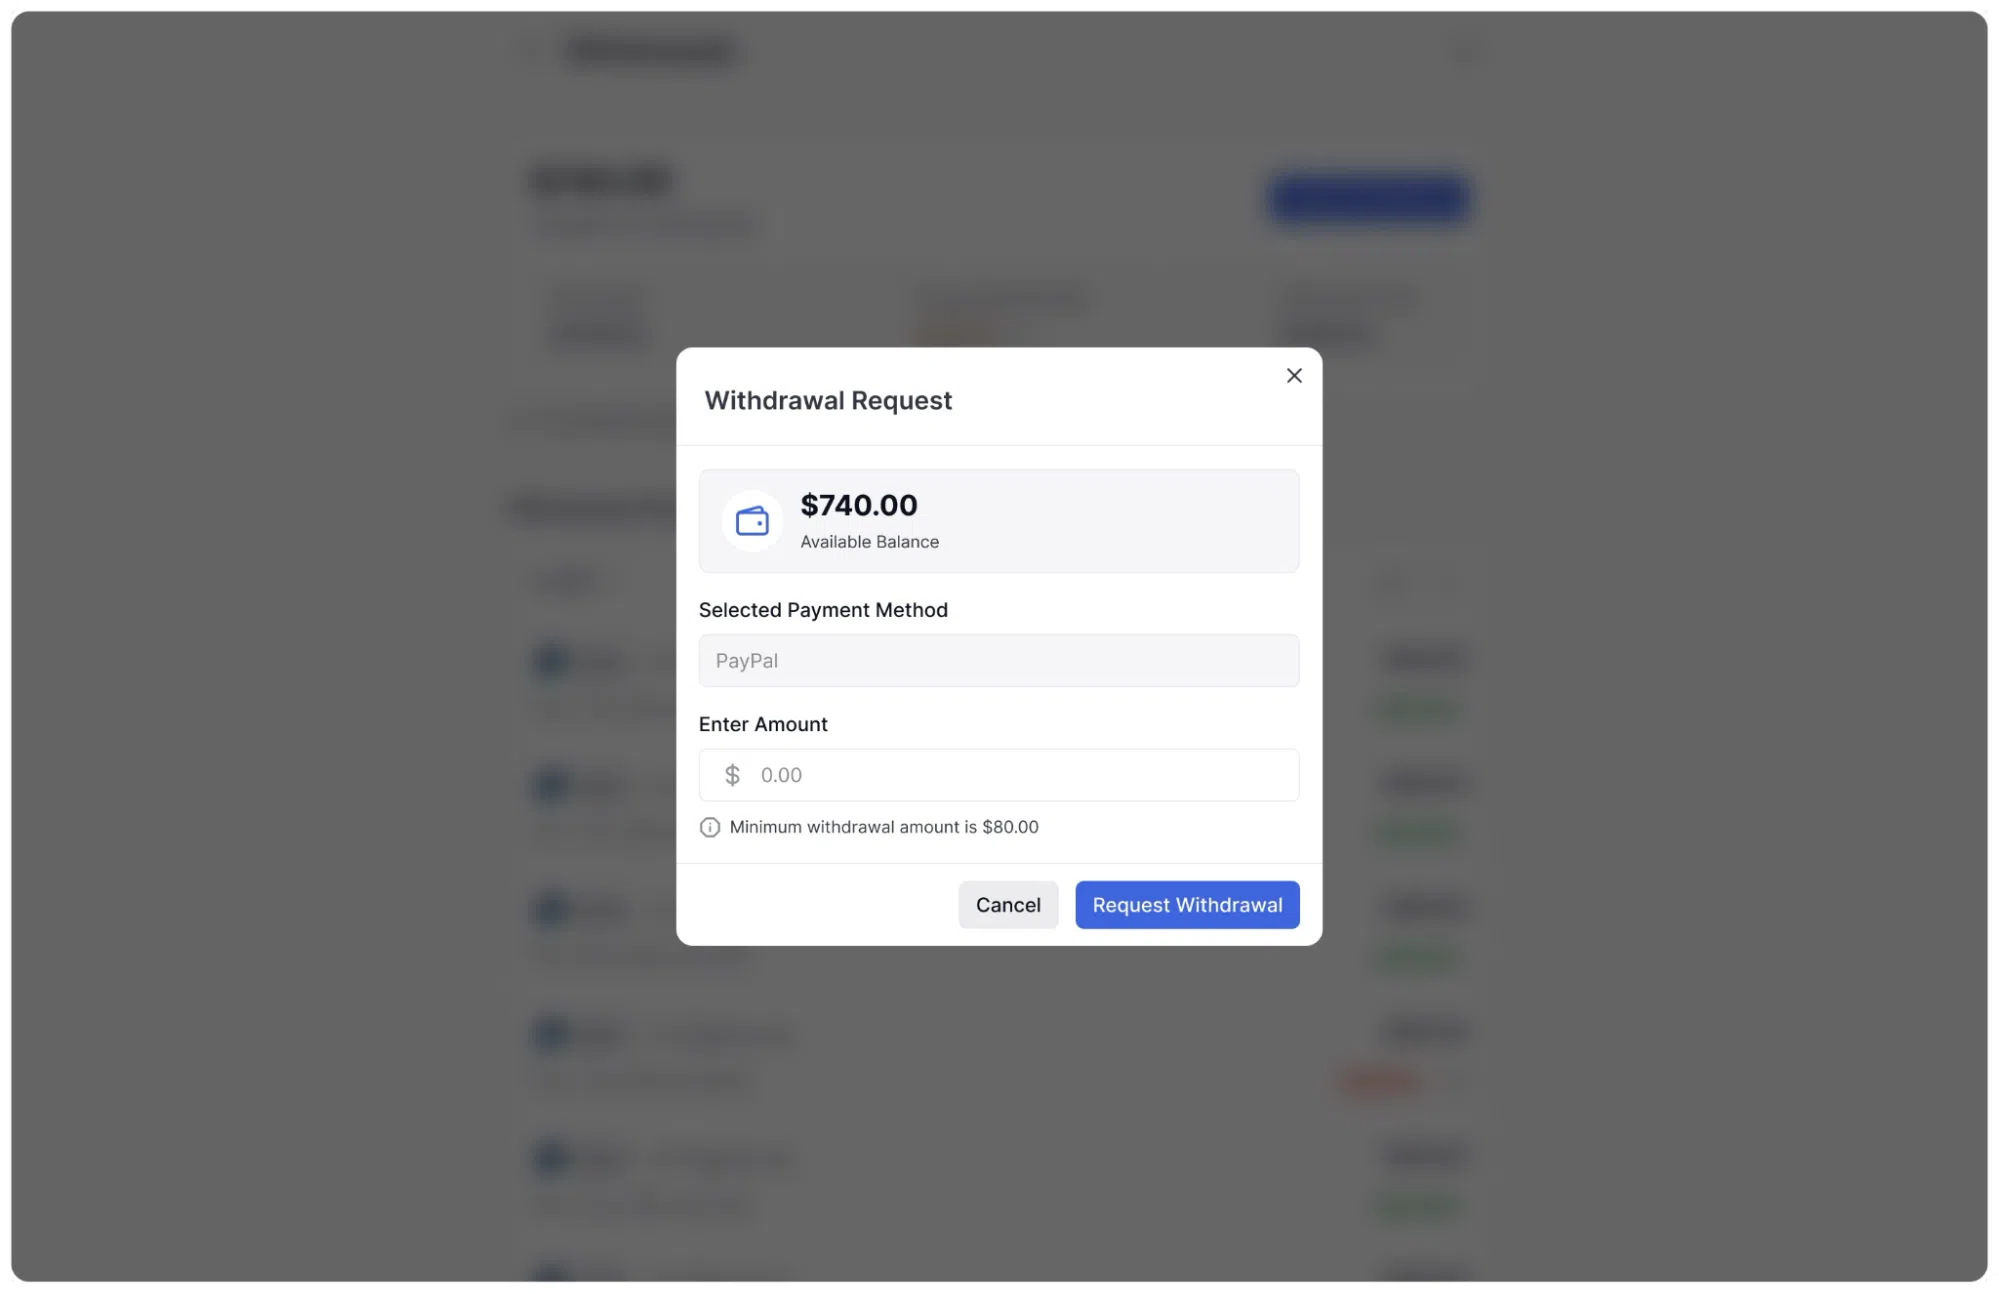
The pop-up window contains the following:
- The maximum amount (Available Balance) currently available for withdrawal, displayed at the top of the window.
- A Select Payment Method dropdown menu, used to confirm the payout gateway, such as Stripe, PayPal, or Bank Transfer.
- An Amount field, where the exact figure you wish to withdraw is entered.
- A platform notes section, which outlines any applicable withdrawal fees and the minimum balance required to submit a request.
After entering the desired amount, click Request Withdrawal to send the request to the administrator. Clicking Cancel closes the pop-up window without saving any input.
Administrator Withdrawal Request Processing (Backend View)
When an instructor submits a withdrawal request through the frontend dashboard, the request is sent to the platform administration team for manual review.
Submitted requests are accessible in the WordPress admin panel under Tutor LMS > Withdraw Requests. The administrator view presents a table that includes the requesting instructor’s name, the amount requested, the selected payment method, the submission date, and the current status. Administrators use the action buttons within this table to approve or reject each request.
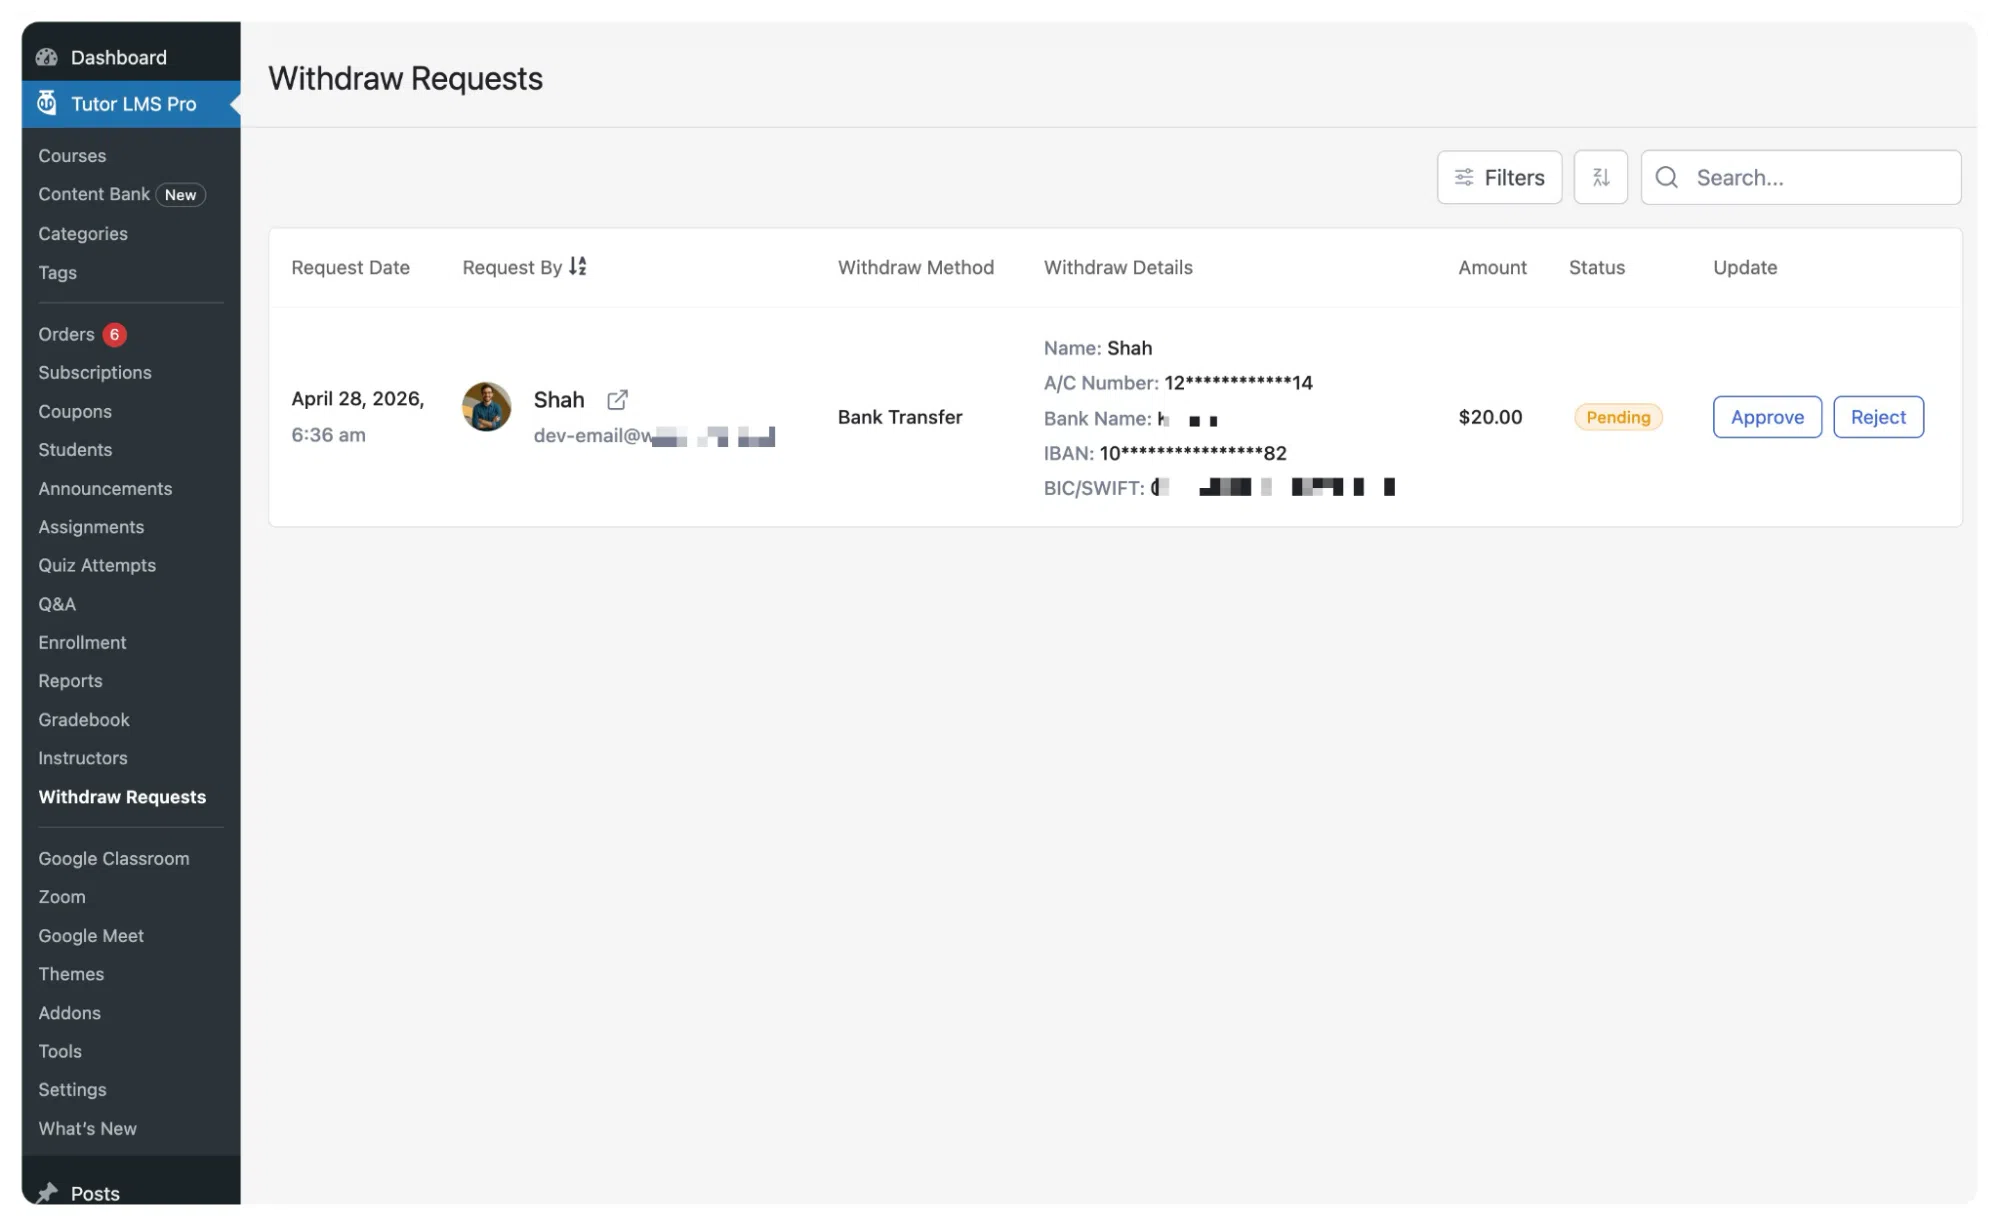
Once a request is processed from the backend, the status updates automatically and is reflected in the instructor’s Withdrawal History list on the frontend dashboard.
Settings
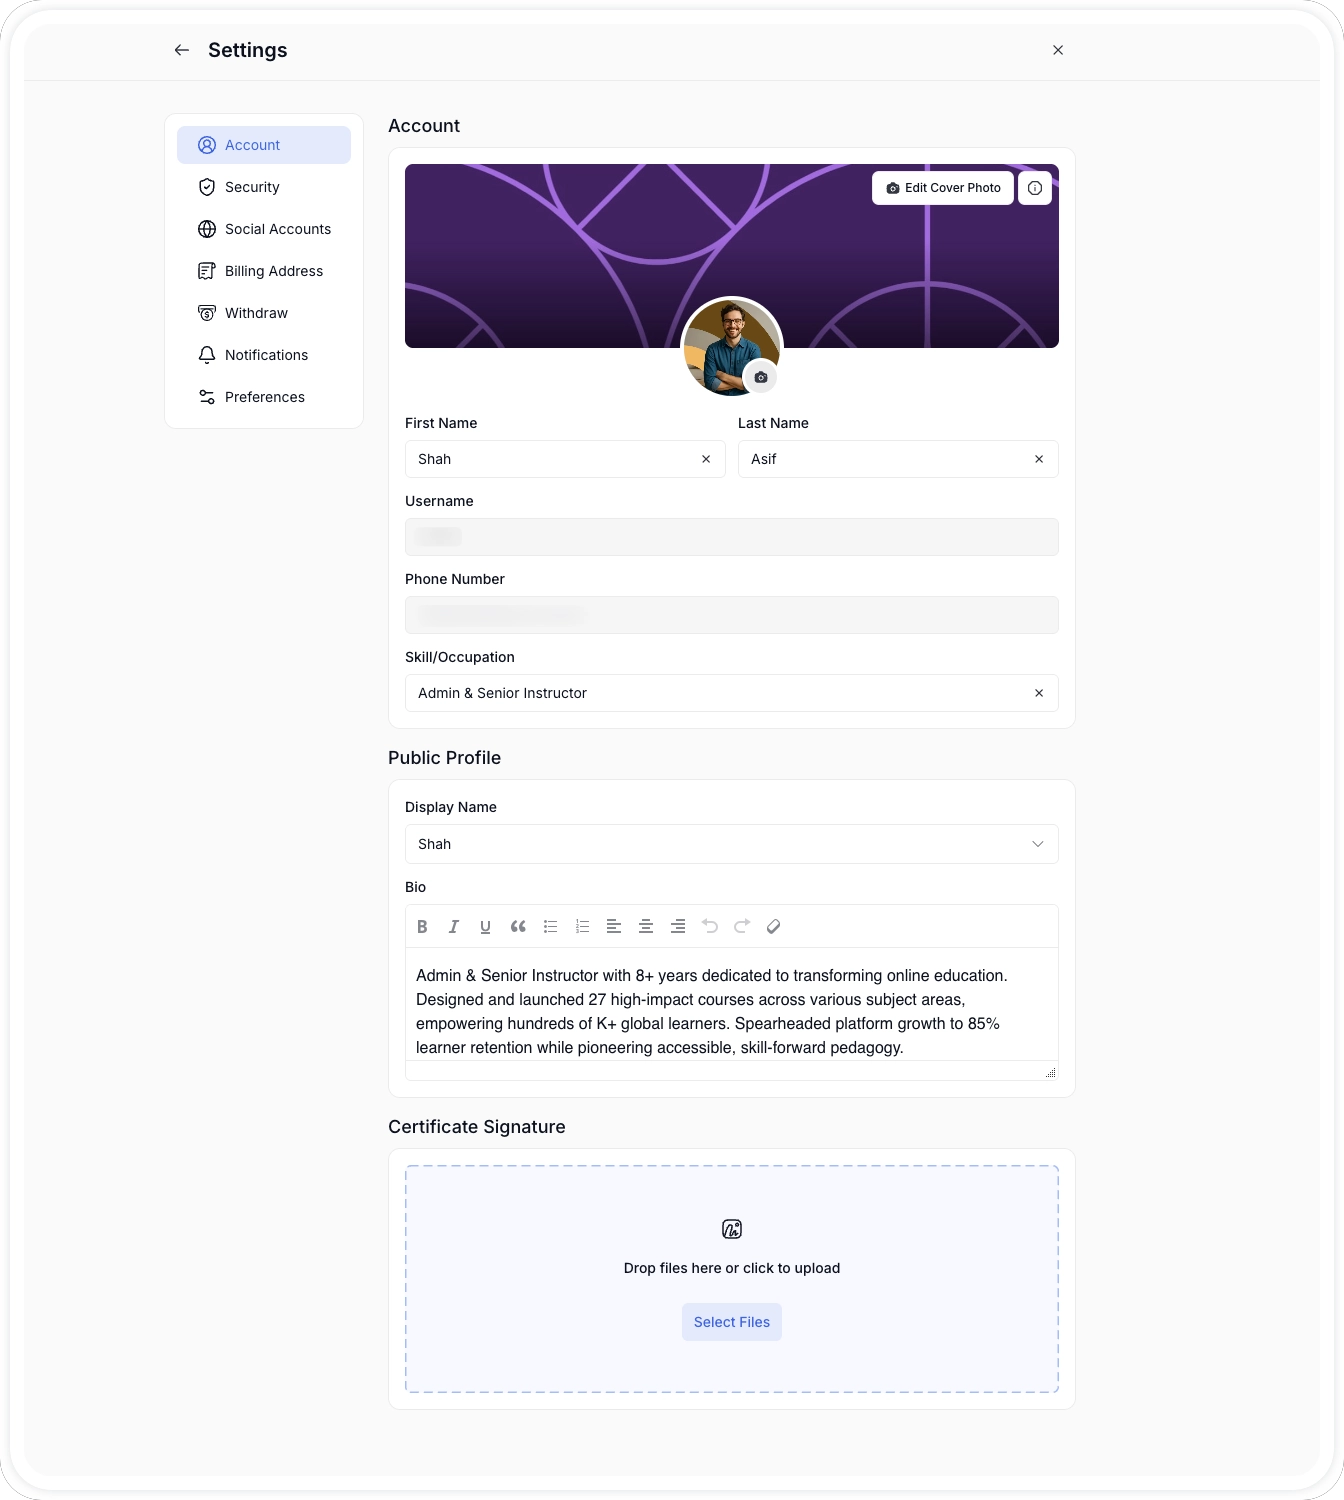
Clicking Settings from the instructor’s profile menu opens the Settings panel, which is a modal overlay containing seven sub-sections listed in a vertical sidebar on the left. Each sub-section controls a different area of your account.
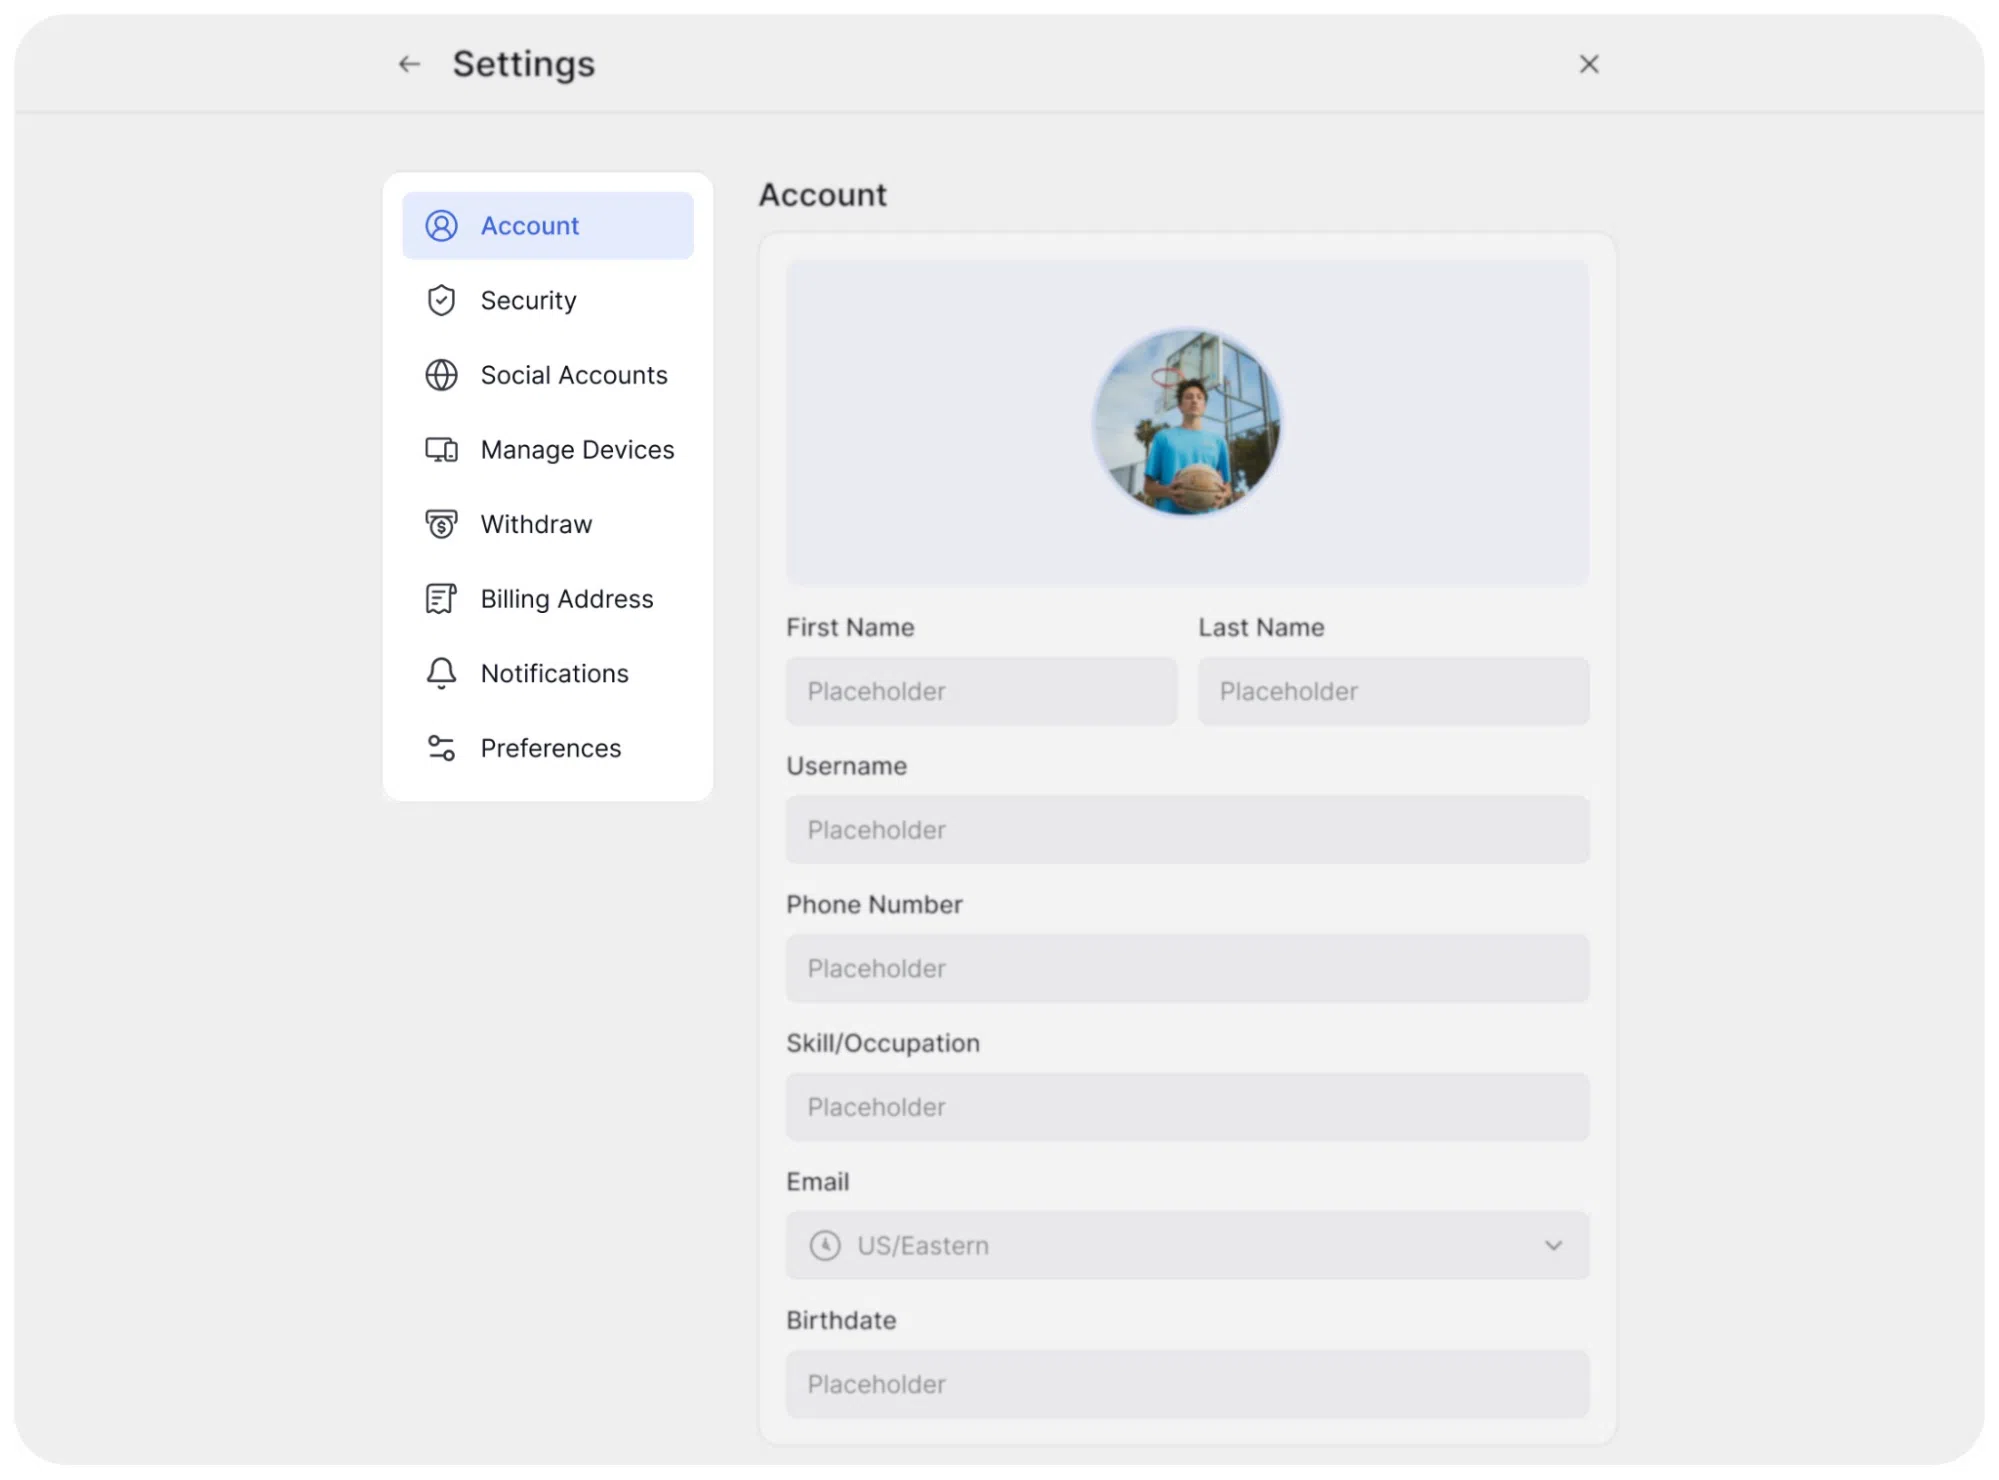
Account
The Account sub-section is the default view when Settings opens. It contains two areas: personal information and public profile.
Personal Information fields:
- Profile Photo: A circular photo upload area at the top. Click it to upload a new photo.
- First Name and Last Name: Your legal or preferred name.
- Username: Your platform username. This field is read-only once set.
- Phone Number: An optional contact number.
- Skill/Occupation: A short descriptor of your role, shown on your profile
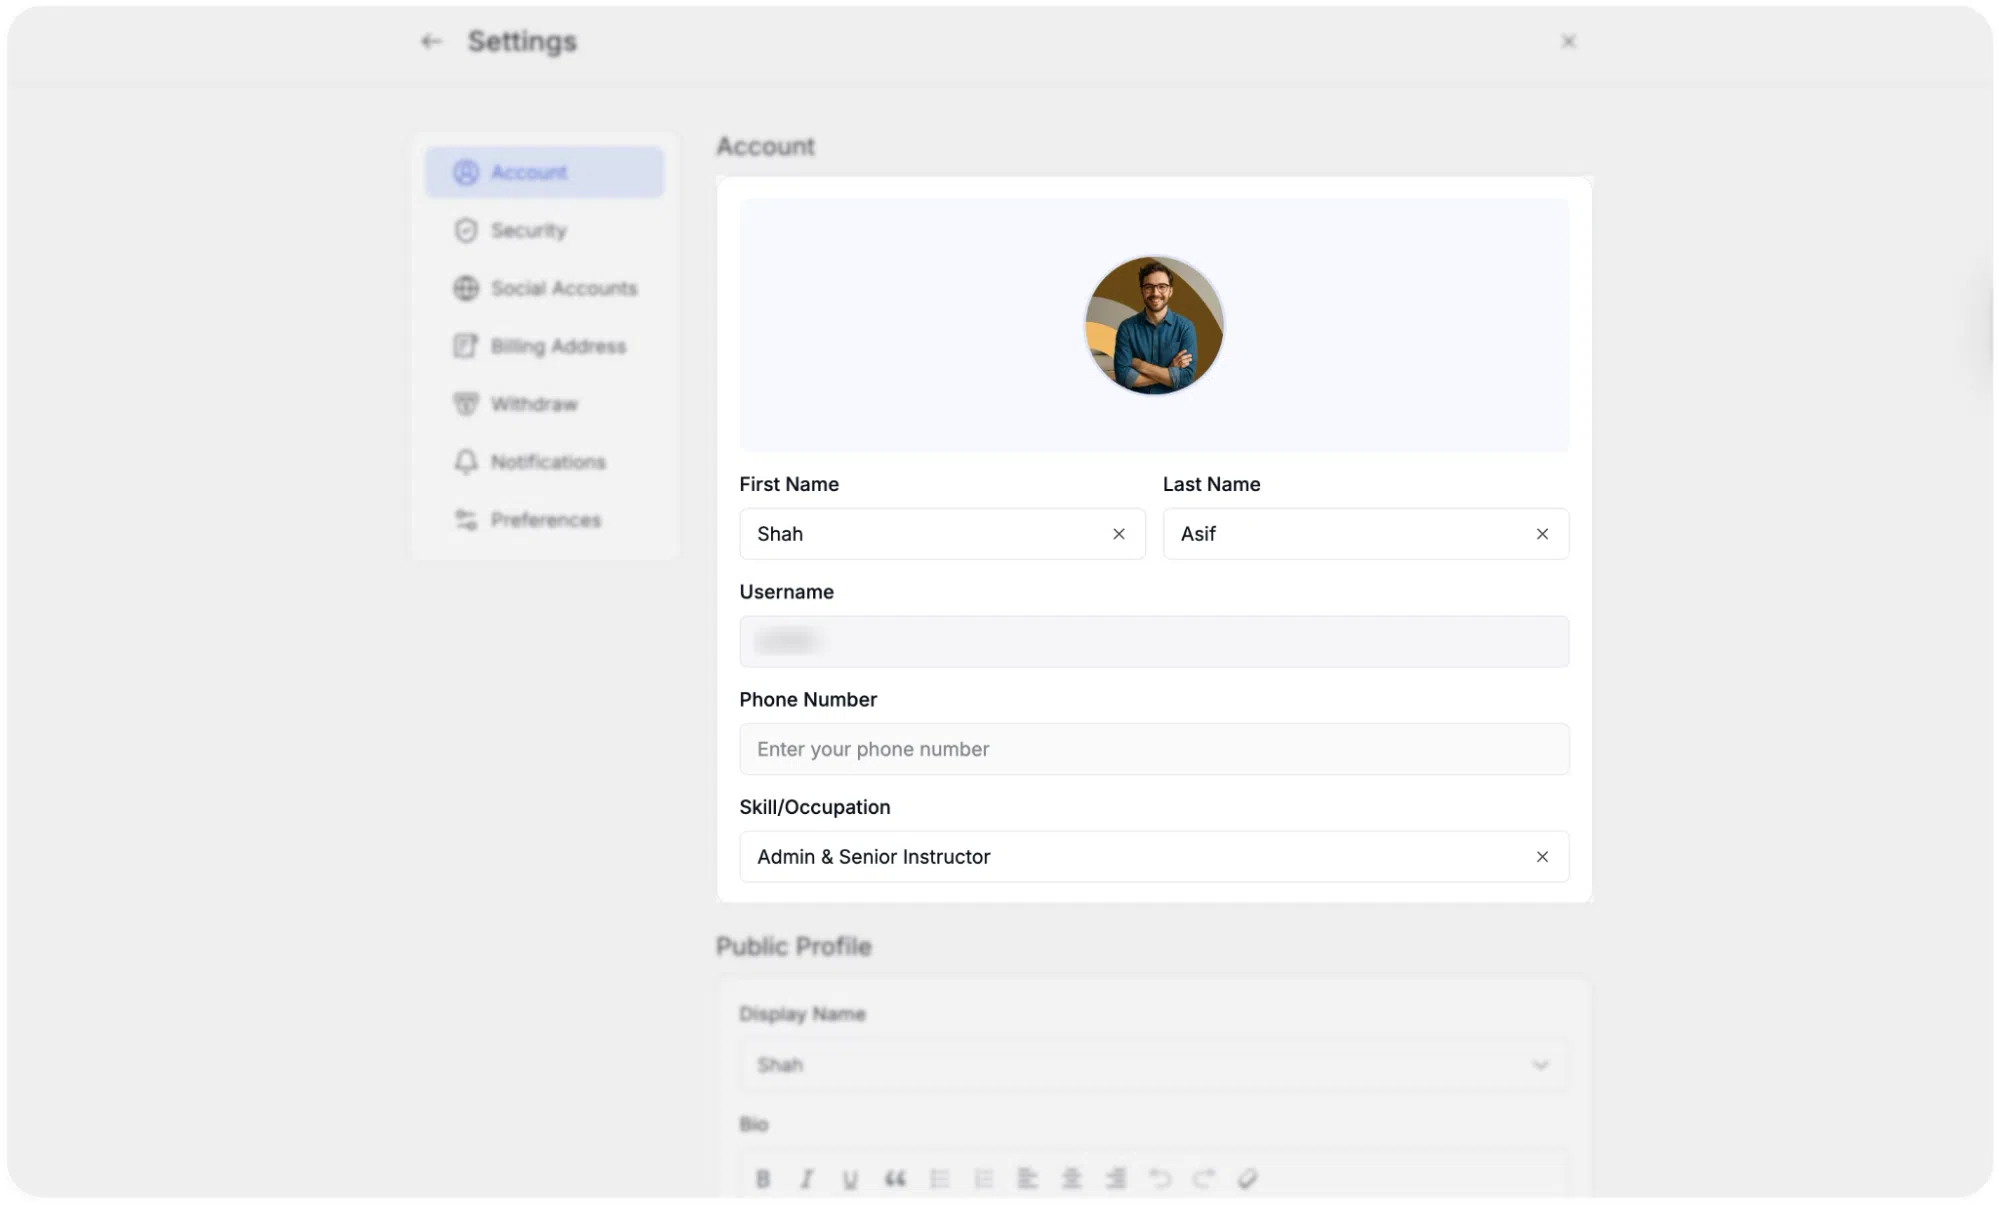
Public Profile fields:
- Display Name: A dropdown that lets you choose which name is shown publicly on your profile and courses.
- Bio: A rich text editor for writing your instructor biography. The toolbar includes formatting options for bold, italic, underline, blockquote, bullet lists, numbered lists, text alignment, undo/redo, and link insertion.
- Certificate Signature: A file upload area for adding your signature image, which will appear on certificates issued to students who complete your courses. Accepts drag-and-drop or file selection.
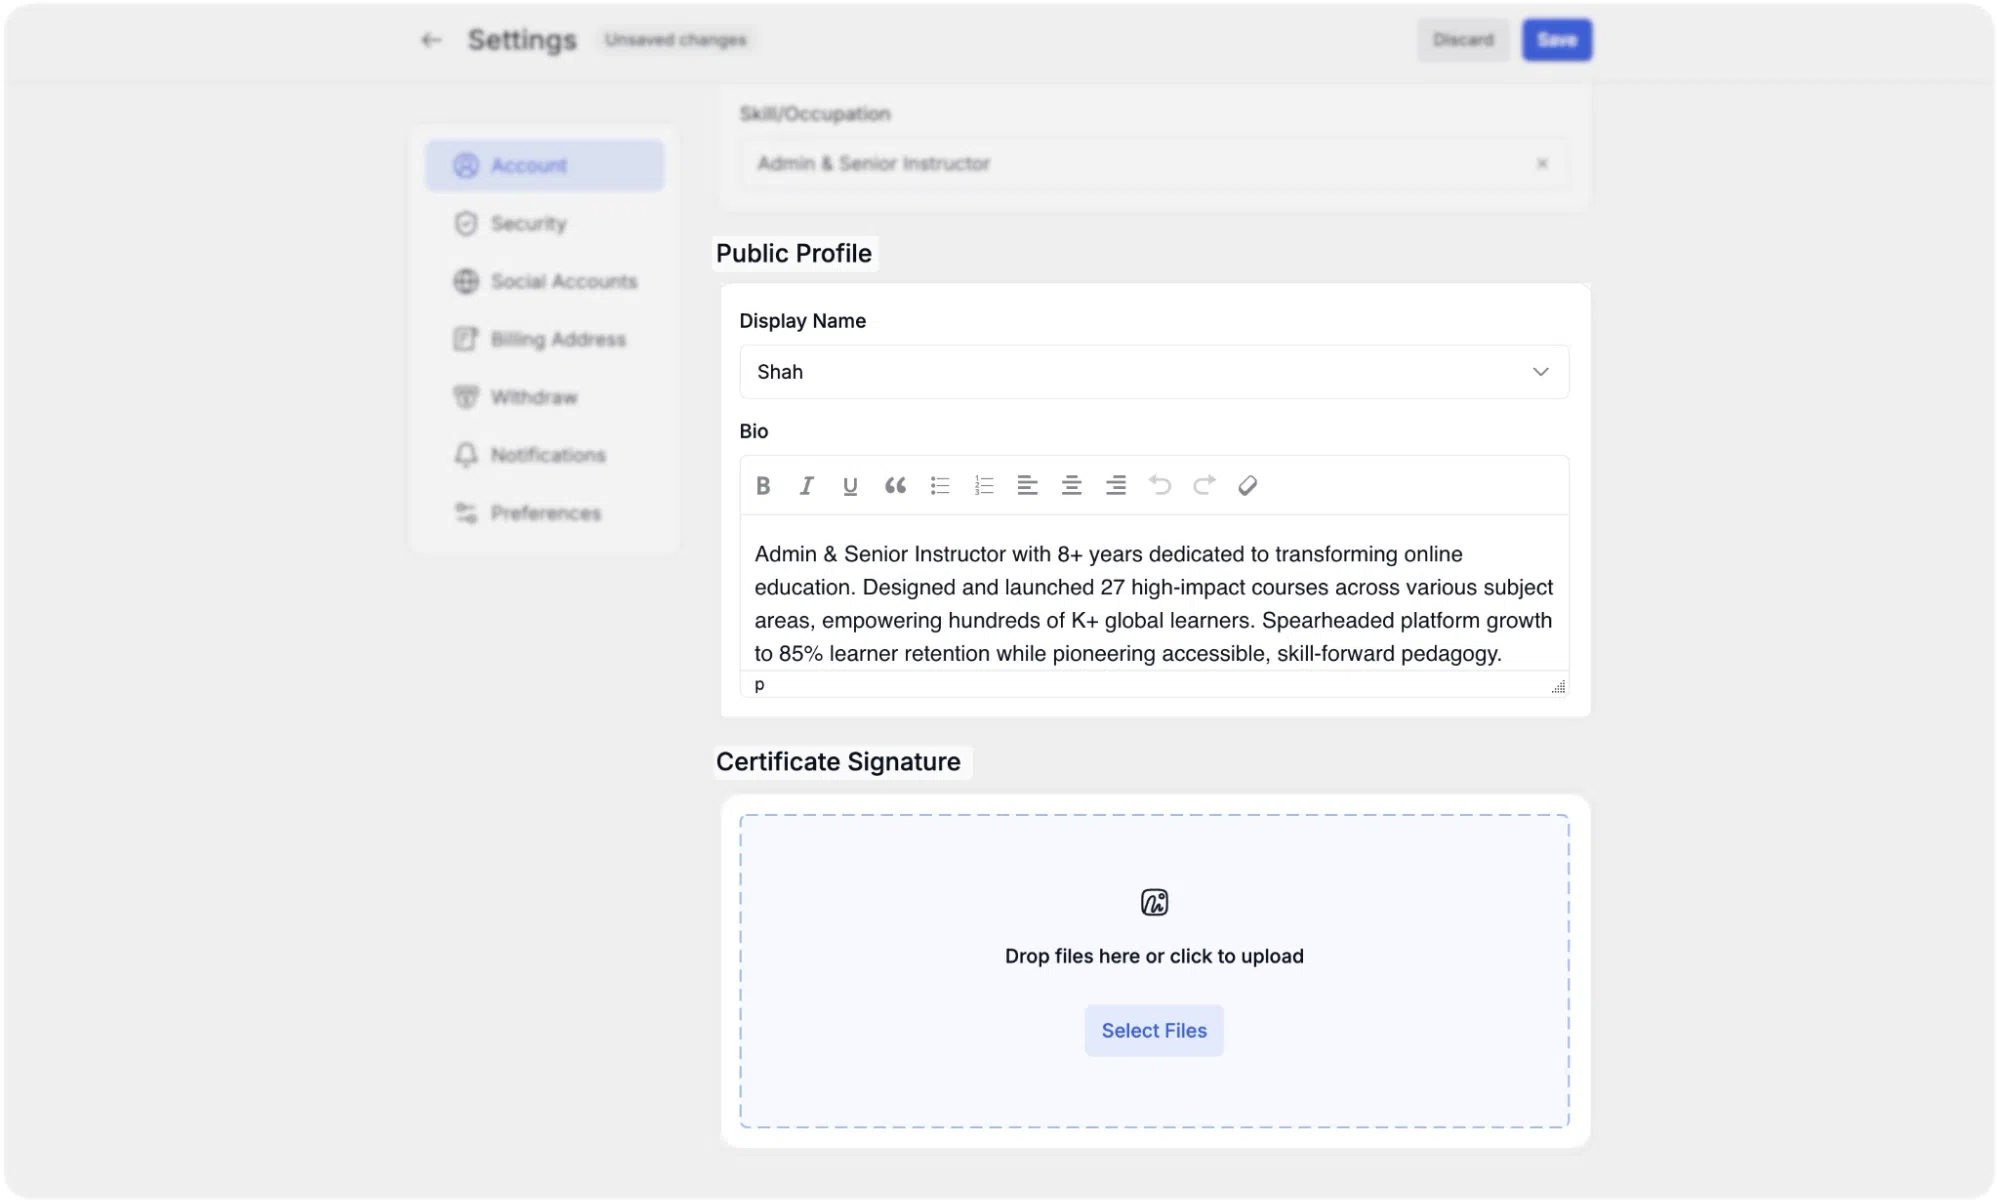
Use the Save and Discard buttons in the top-right corner of the window to save the changes made or disregard the changes.
Security
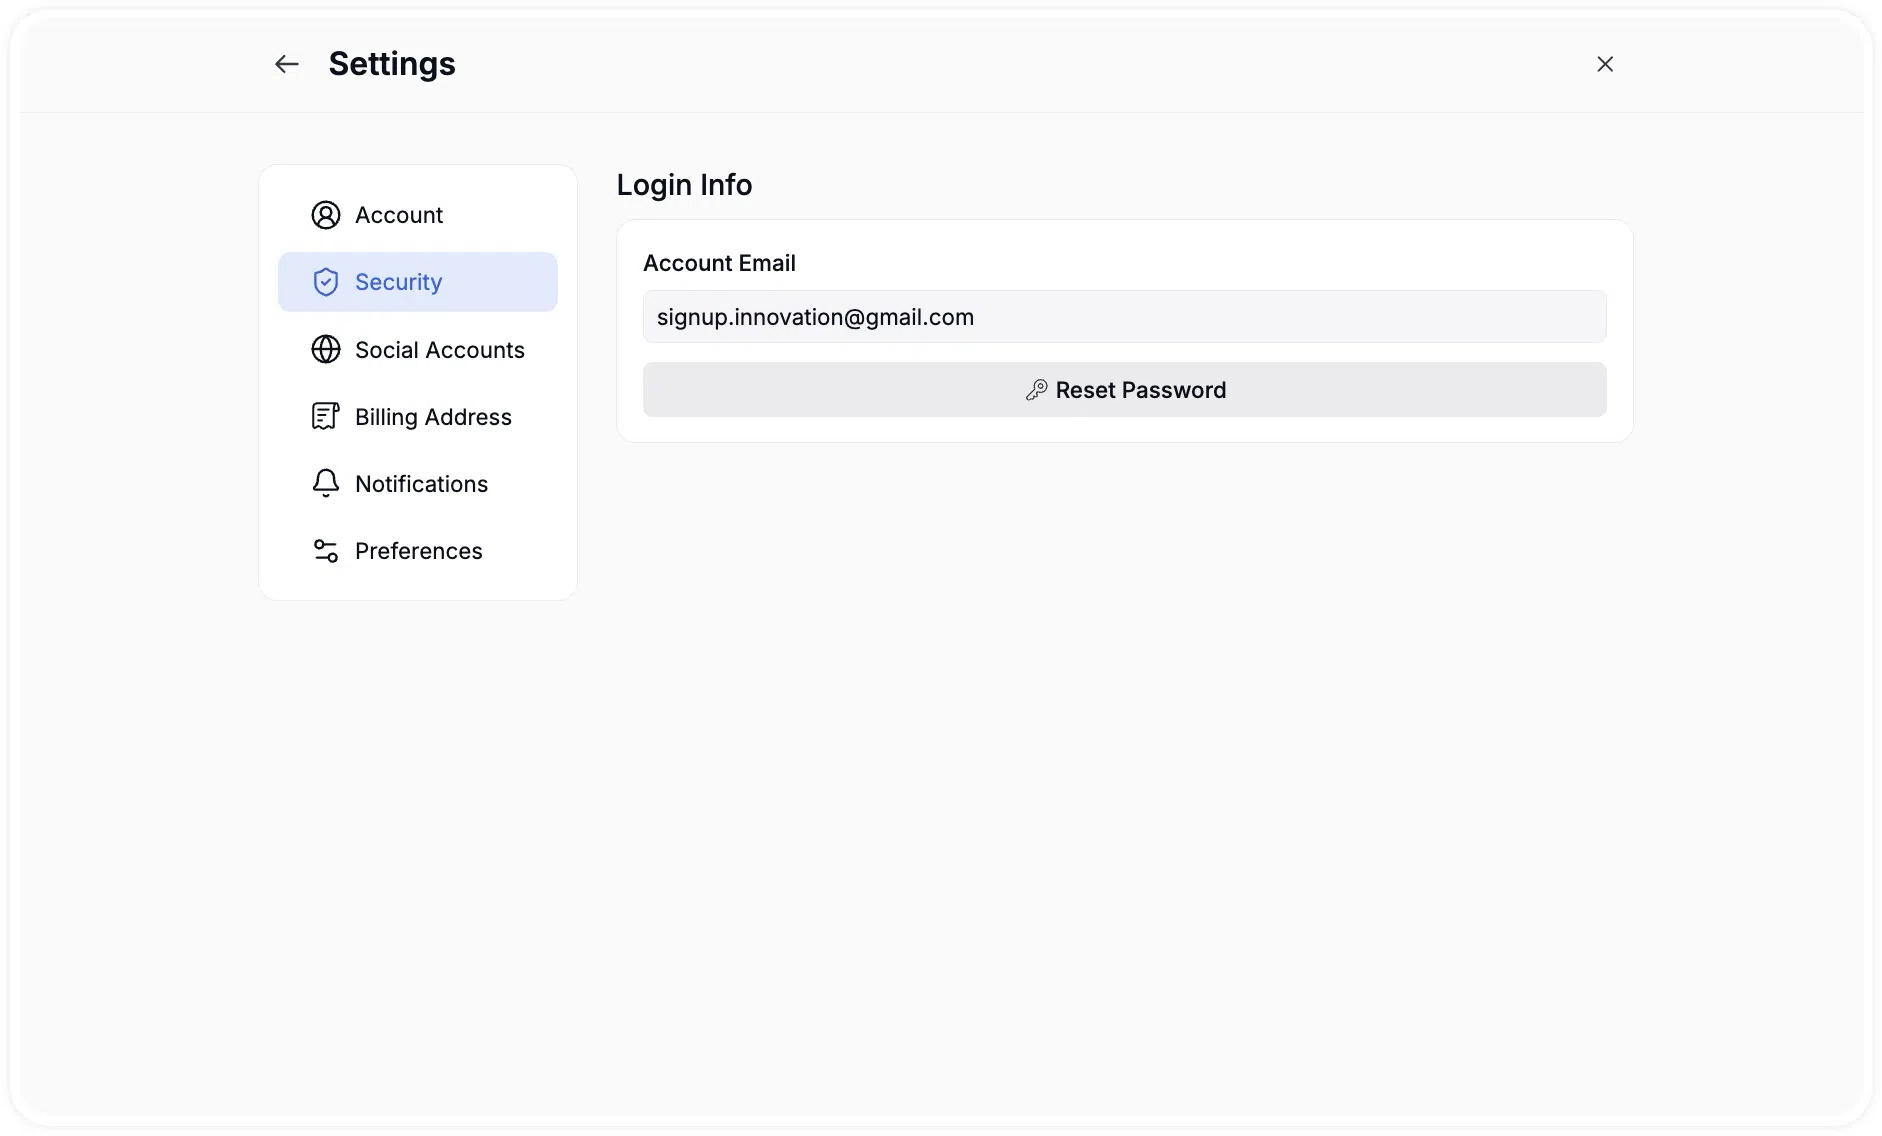
The Security sub-section is where you can alter your account credentials. It includes:
- Account Email: Your registered email address, shown as a read-only field.
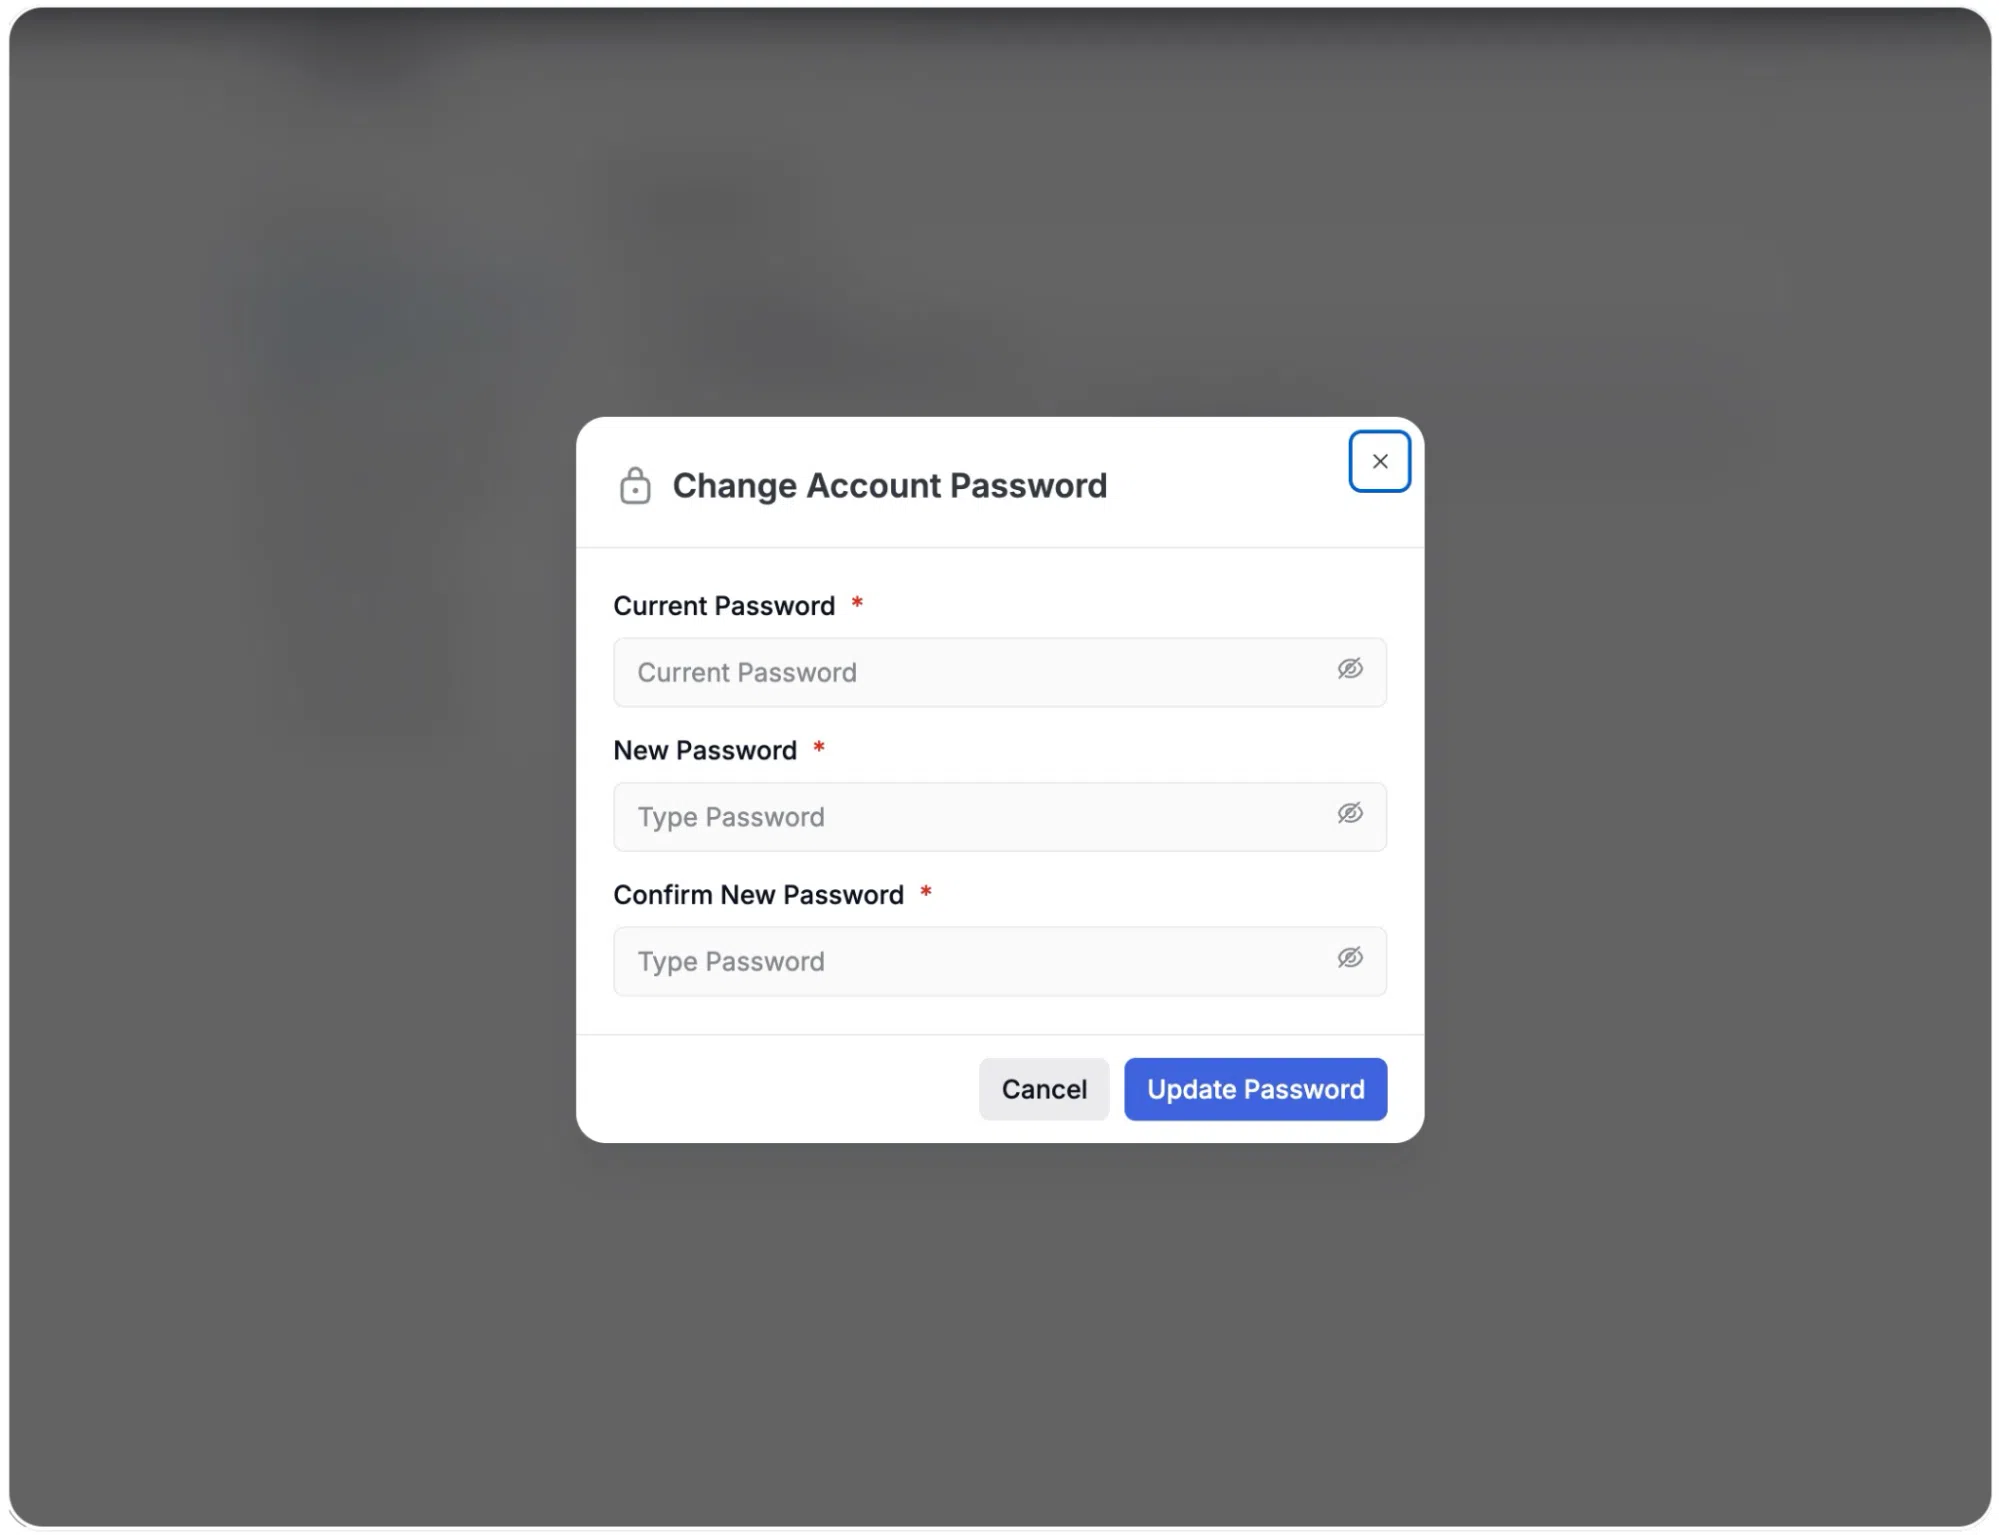
- Reset Password: A button that initiates the password reset process.
Social Accounts
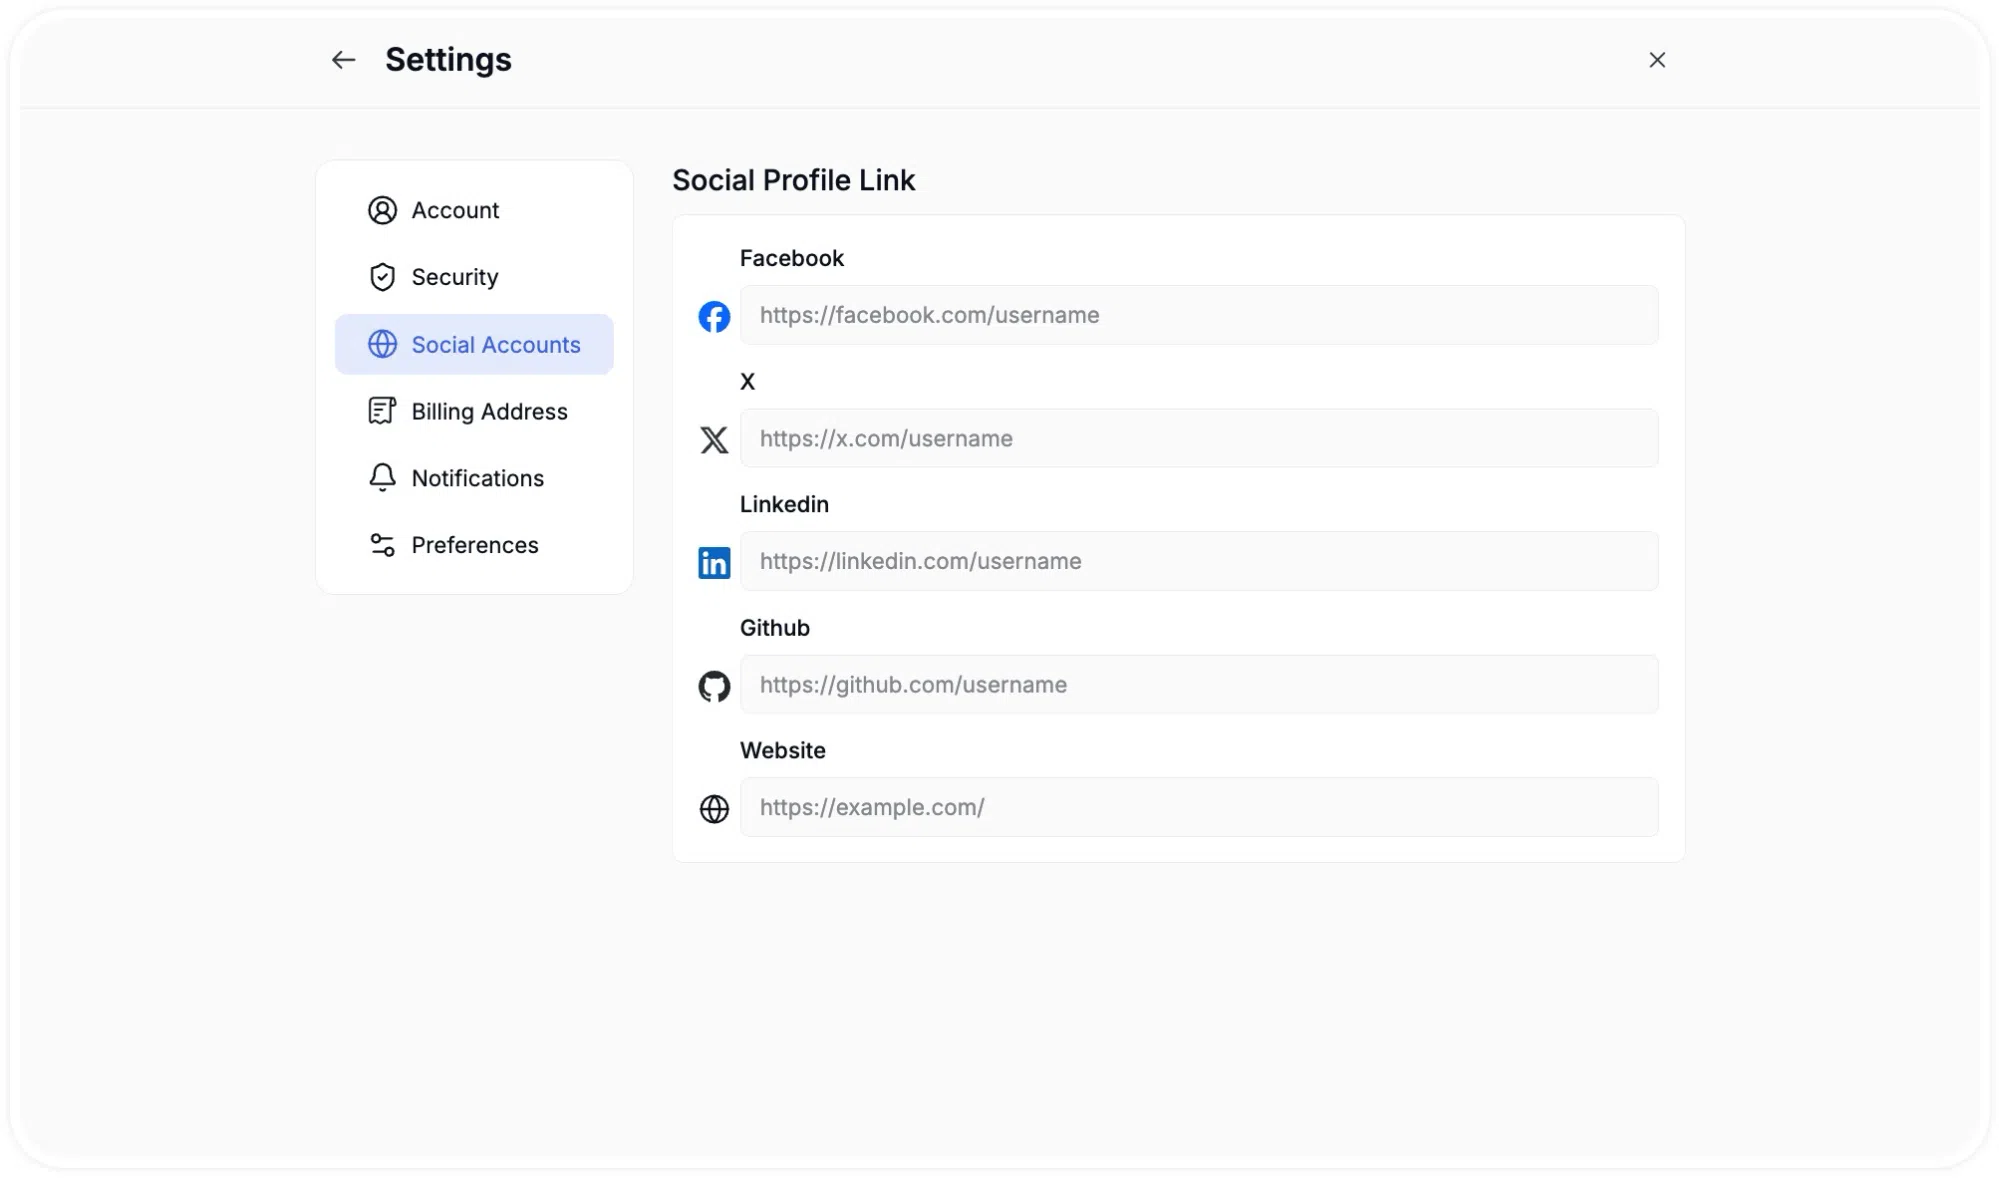
The Social Accounts section is where you connect your social media profiles. The links entered here appear as icons on your public instructor profile page, allowing students to find you on external platforms.
Billing Address
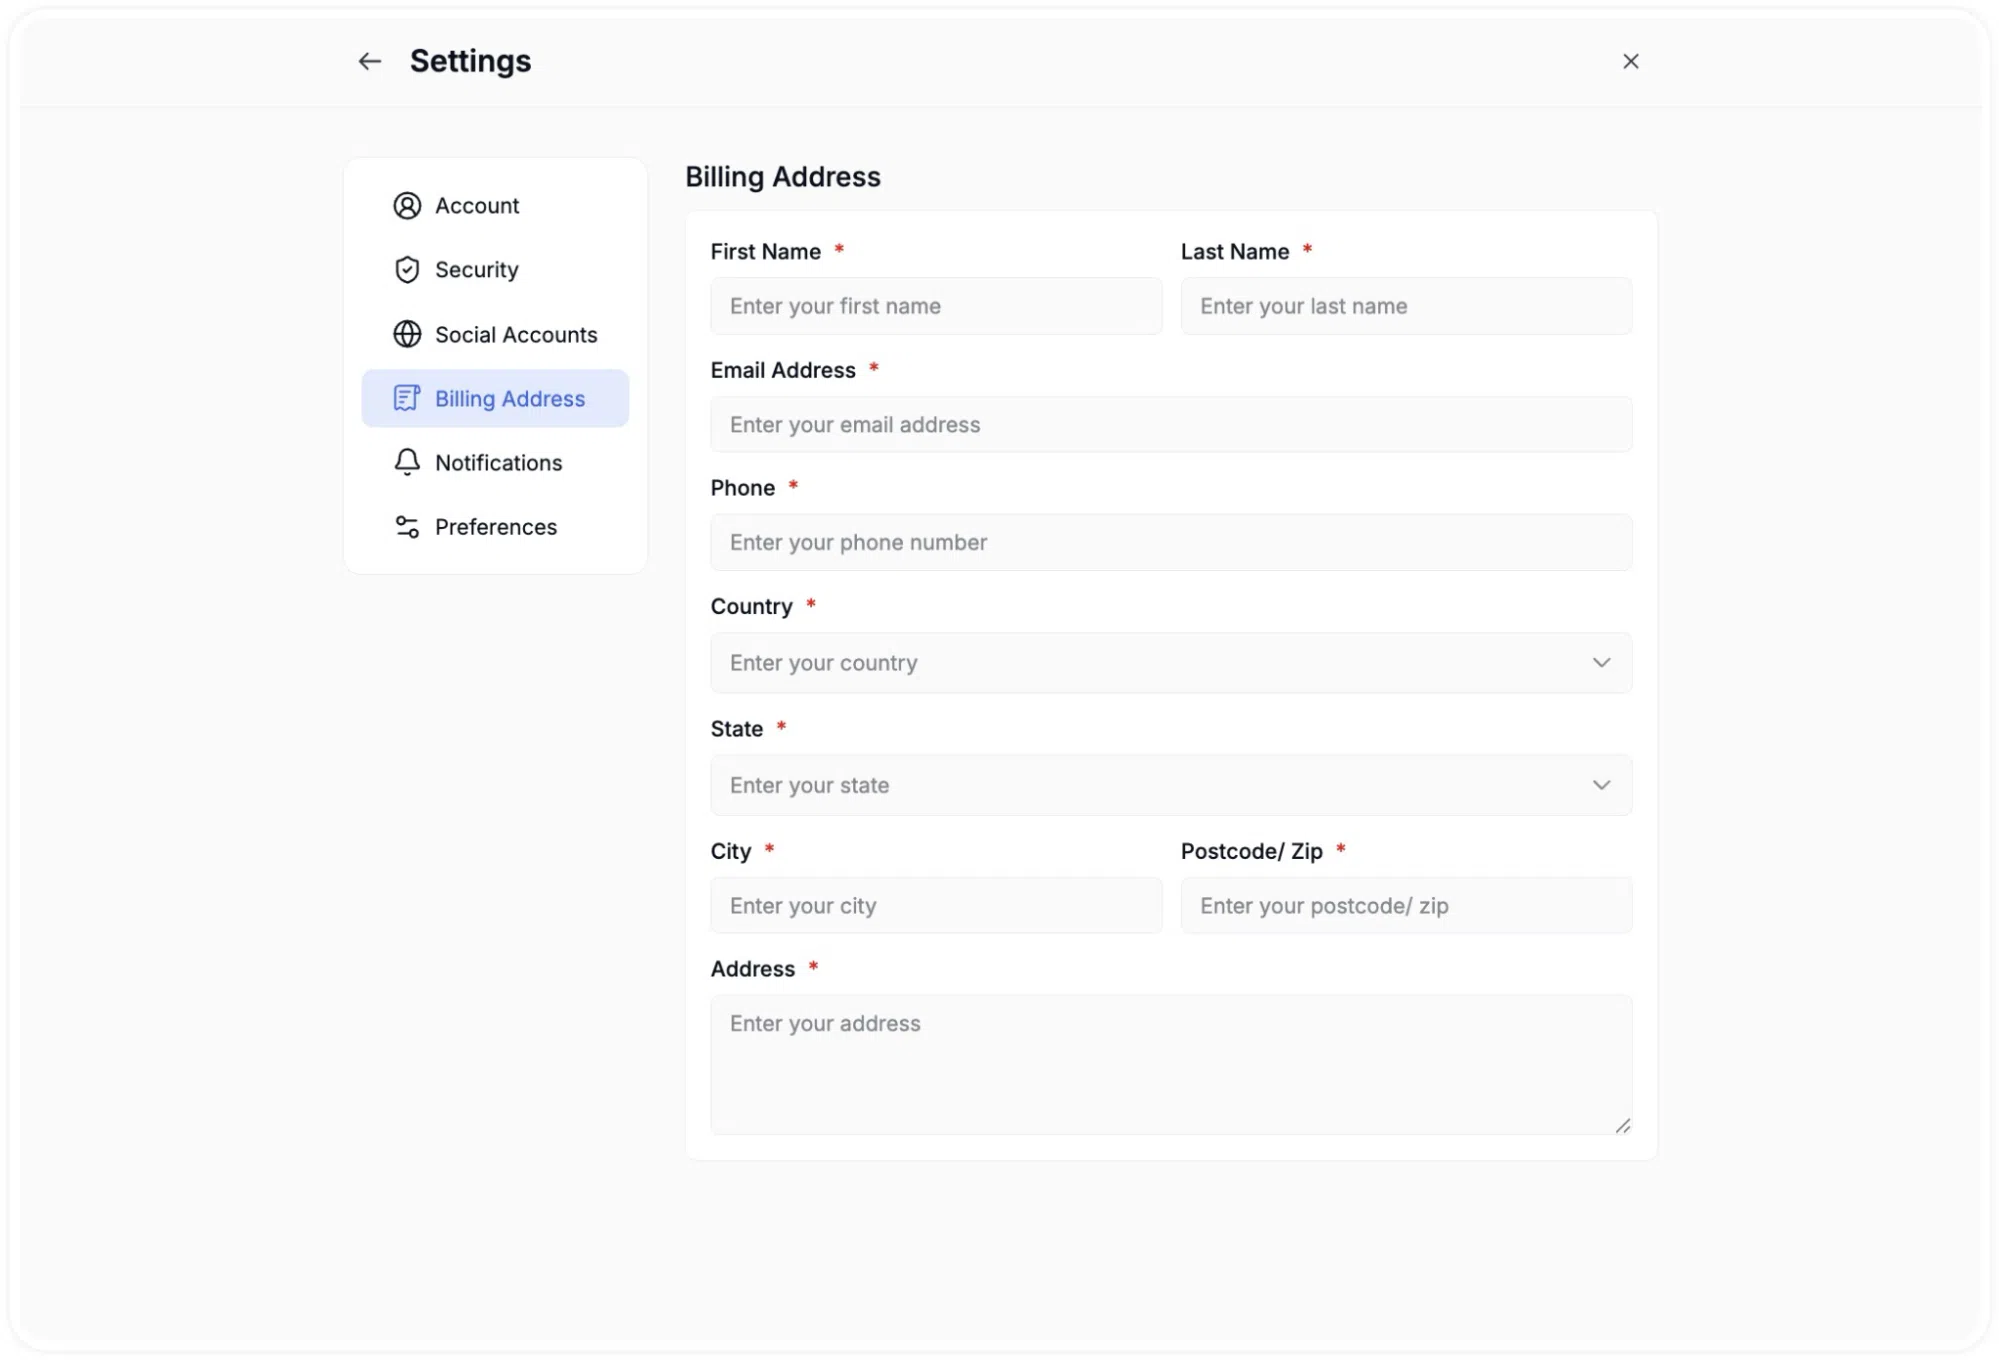
The Billing Address sub-section contains a form for storing your billing information. This address is used for payment and invoicing purposes. All fields marked with a red asterisk are required:
- First Name and Last Name
- Email Address
- Phone
- Country (a searchable dropdown)
- State (a dropdown that updates based on the selected country)
- City and Postcode / Zip
- Address (a text area for the full street address)
Withdraw
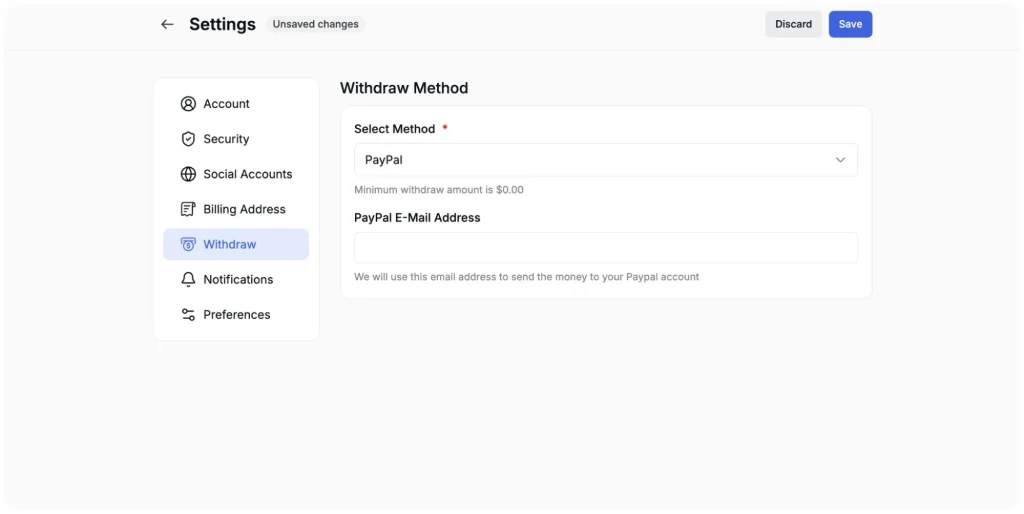
The Withdraw sub-section is where you configure the payment method that will receive your earnings when you request a payout.
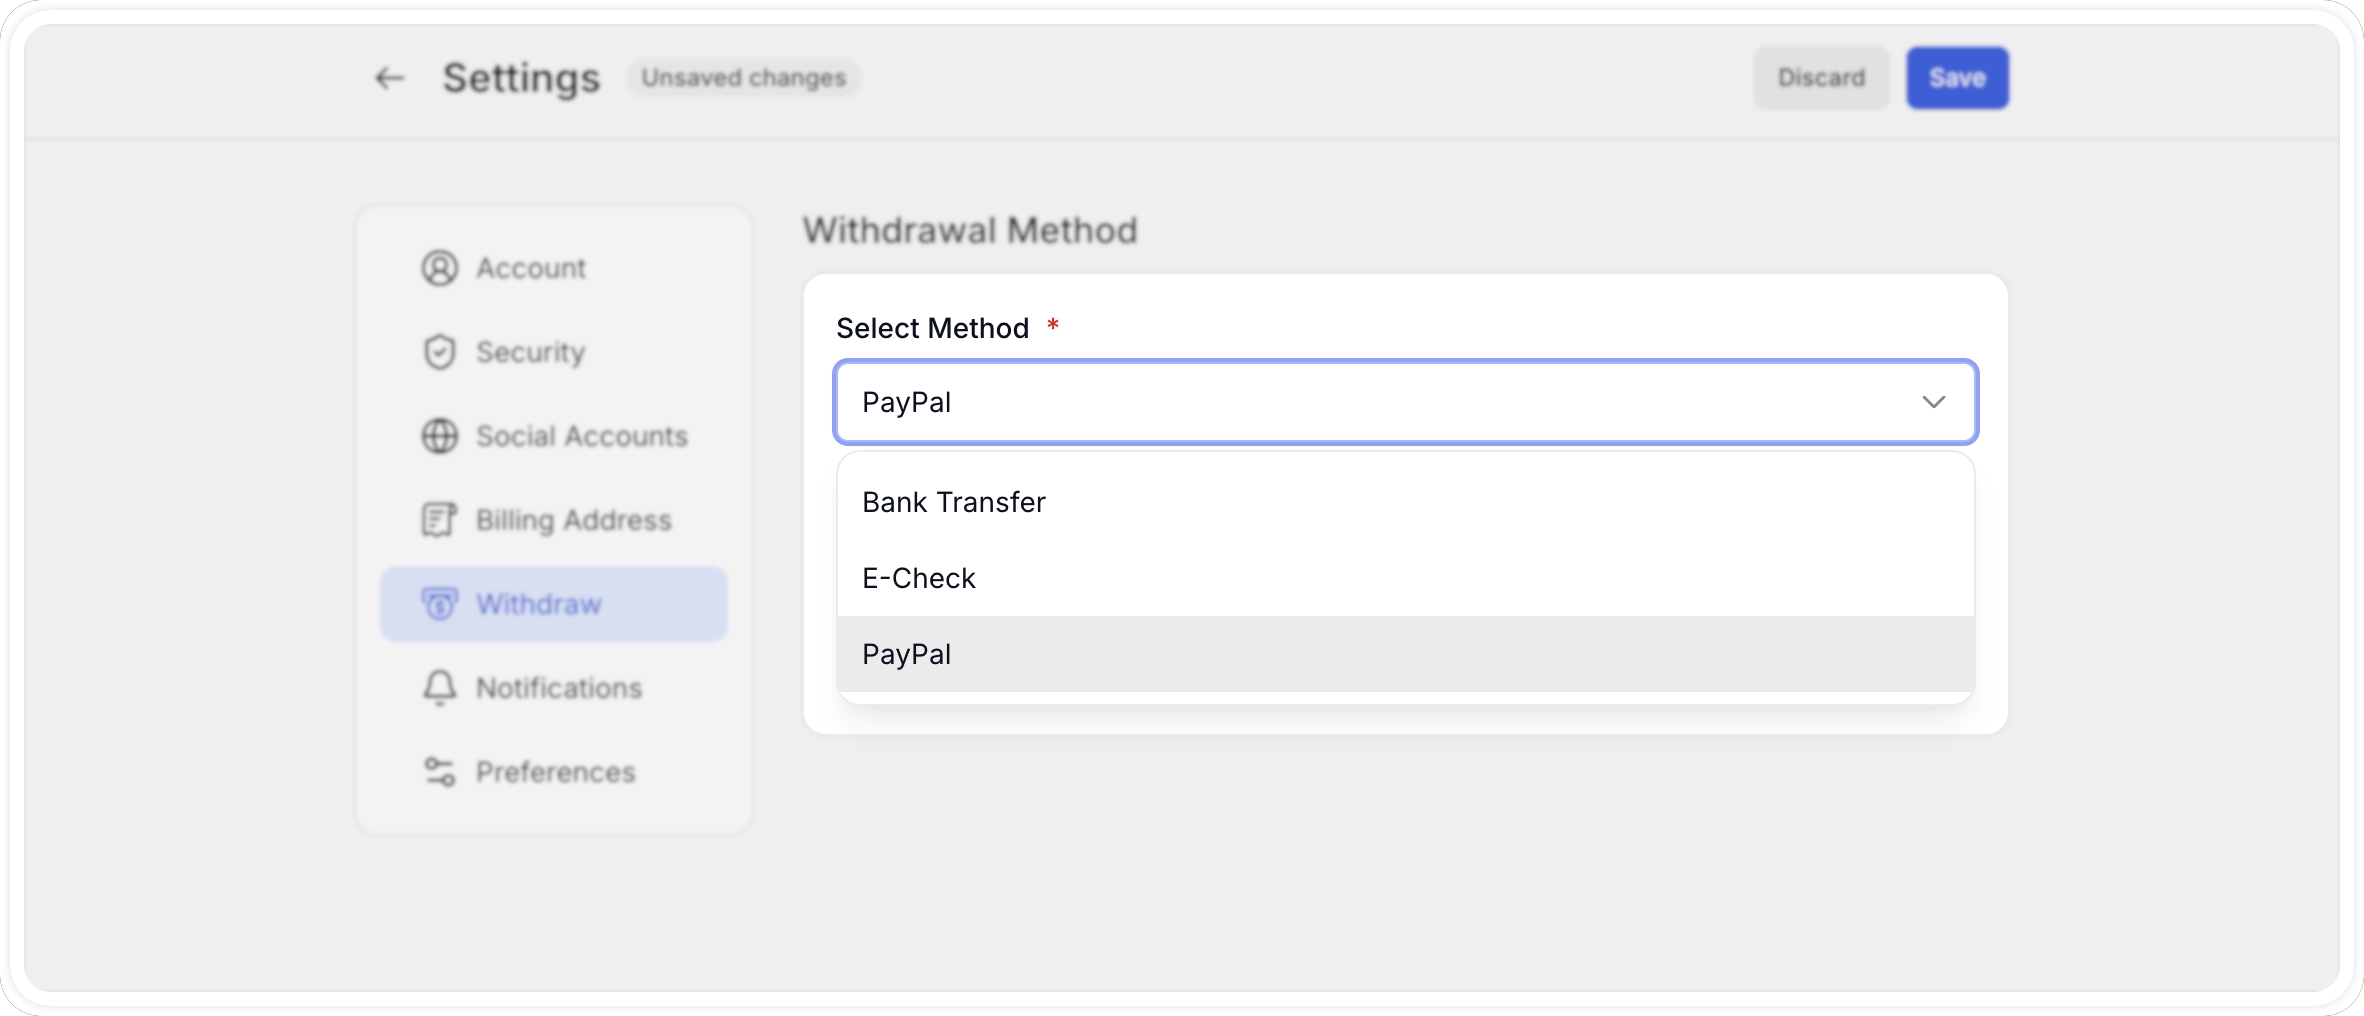
A Select Method dropdown list shows all available options:
- Bank Transfer
- E-Check
- PayPal
A note right below the Select Method dropdown shows the “Minimum withdrawal amount” as set by the admin. This is the minimum balance required before a withdrawal request can be submitted from the Withdrawals page.
When a method is selected and details are filled in, the Discard and Save buttons appear in the top-right corner. Saving here does not request a withdrawal, it only saves your preferred payout method. Actual withdrawal requests are initiated from the Withdrawals page in the main menu.
Notifications (Instructor Settings)
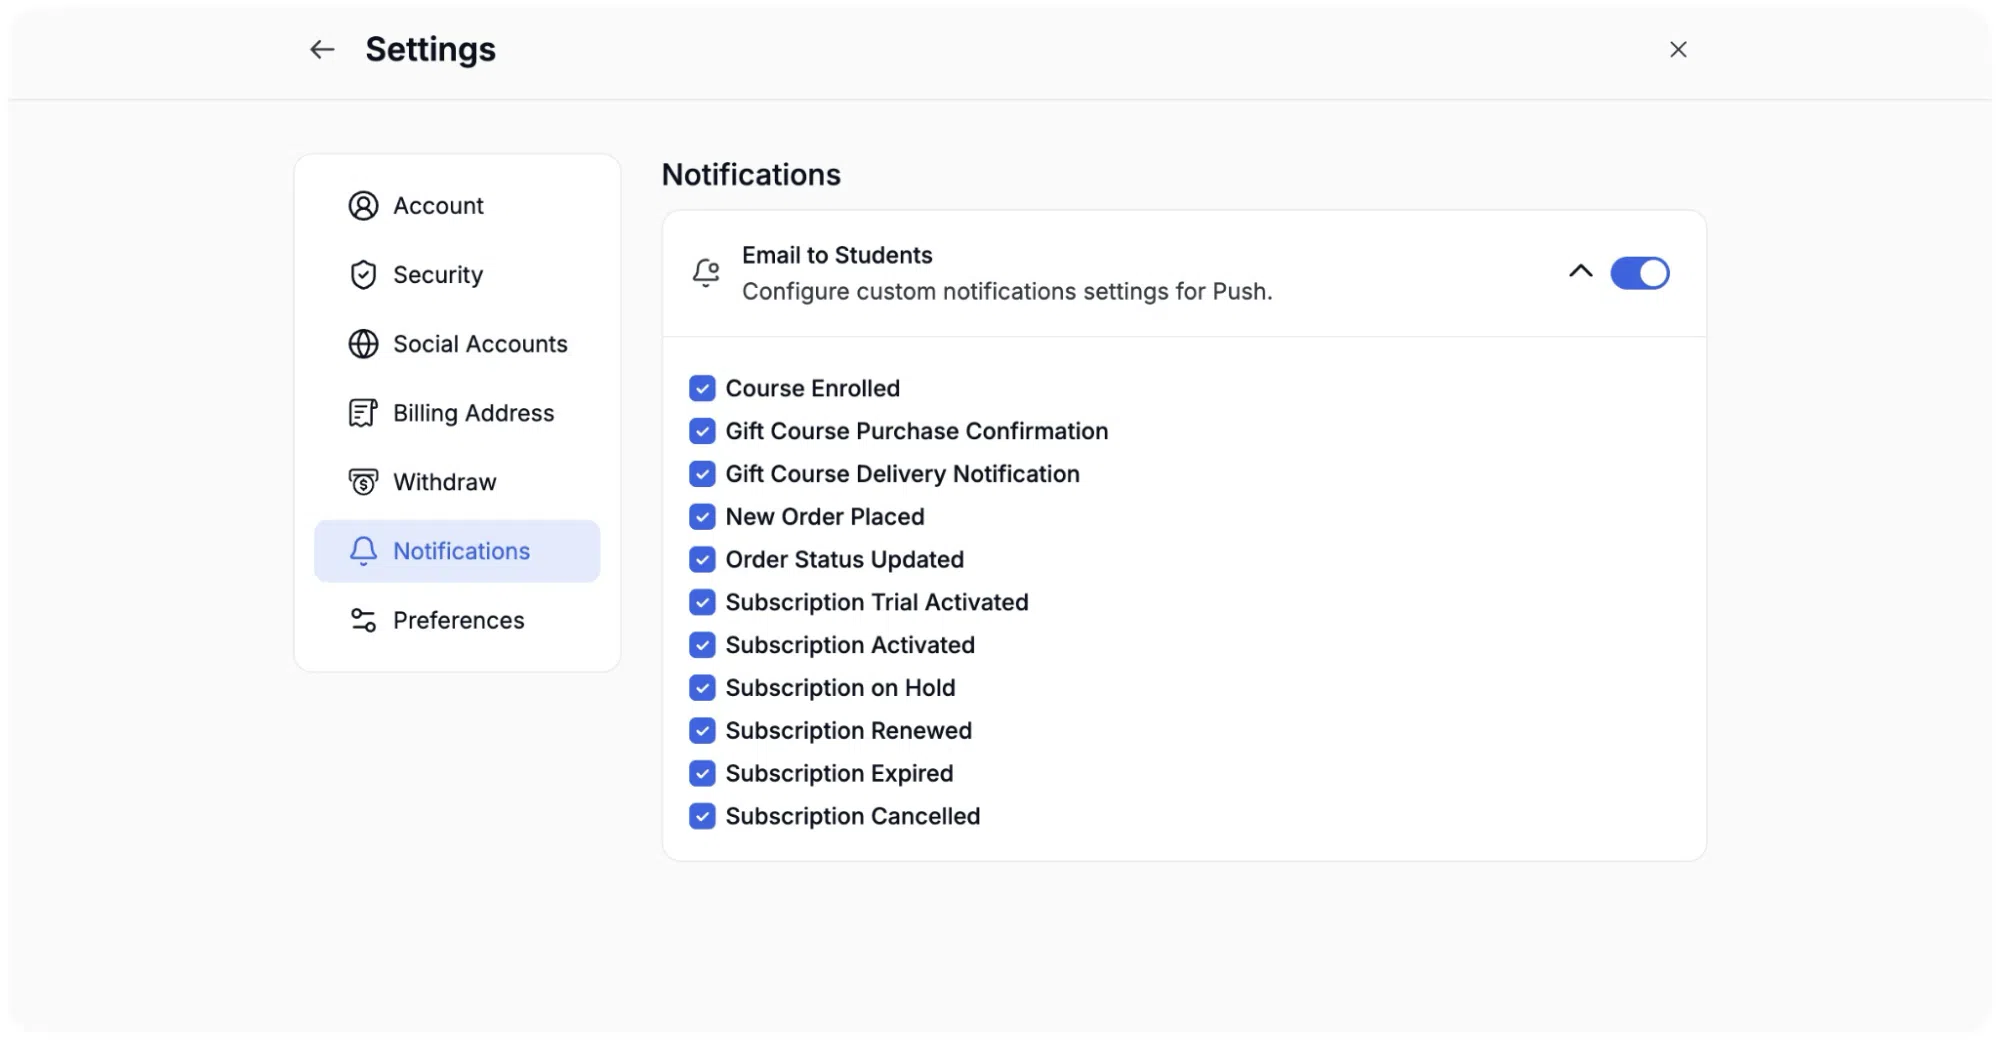
The Notifications sub-section allows you to control which platform events trigger email or in-dashboard notifications. Toggle each notification type on or off according to your preferences.
Preferences
The Preferences tab allows you to customize your learning experience by adjusting interface settings for better usability. The options are divided into four main categories.
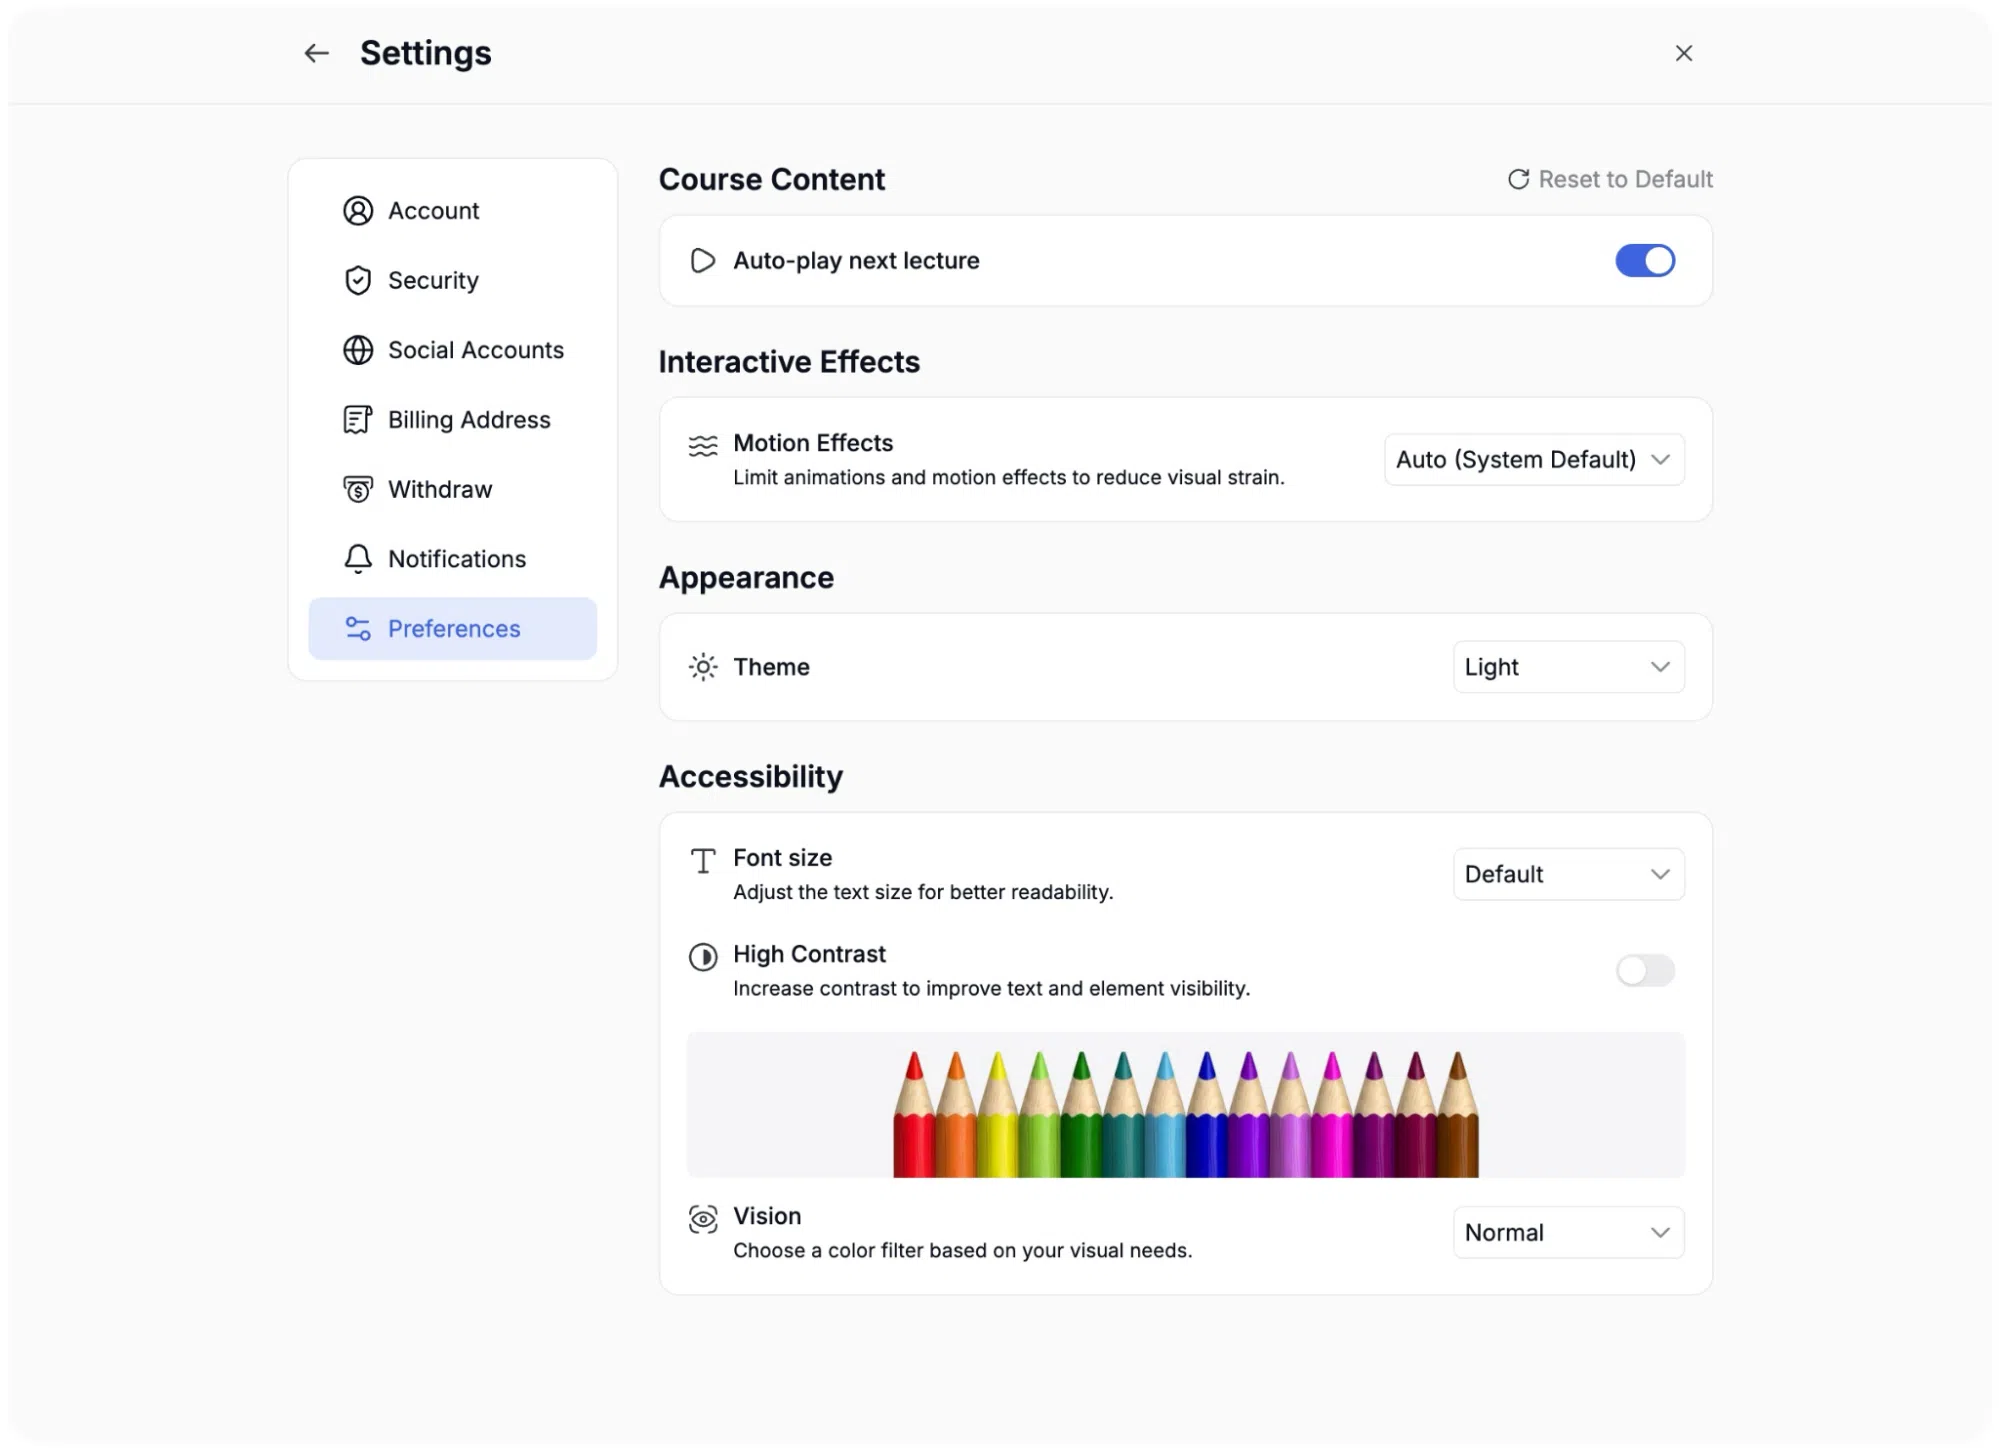
Course Content
- Auto-play next lecture: Use the toggle switch to enable or disable auto-play. When enabled, the next video lecture will start automatically upon finishing the current one.
Interactive Effects
- Motion Effects: A drop-down menu allows you to limit animations and motion effects, which can help reduce visual strain. You can choose between:
- Auto (System Default): Uses your device’s system settings.
- Reduced Motion: Minimizes animations across the dashboard.
- Standard Motion: Uses the default platform animations.
Appearance
- Theme: A drop-down menu to set the visual mode of your dashboard.
- Light: Forces a light interface.
- Dark: Forces a dark interface.
- System Default: Follows your device’s system theme settings.
Accessibility
- Font size: Use the drop-down menu to scale the interface text size based on percentage values, ranging from 60% to 200%, or set it to Default to improve overall readability.
- High Contrast: A toggle switch to increase contrast across the dashboard to improve text and element visibility.
- Vision: This option provides color filters based on visual needs. The drop-down menu allows you to select from various color profiles to assist with color blindness or other visual impairments. Options include: Normal, Protanopia, Deuteranopia, Tritanopia, and Achromatopsia.
A Reset to Default button in the top-right of this sub-section restores all three preferences to their original values in a single click.
Logout
Clicking Logout at the bottom of the Instructor Menu ends your current session immediately and redirects you to the platform login screen. No confirmation prompt is shown before logging out, so ensure any unsaved changes in Settings or other areas are saved before selecting this option.